
Owners Manual
Page 1
...-Tip Floor Bracket 18-19 Installing the Refrigerator 20-24 Installing the Water Line 33-35 Preparing to Install the Refrigerator 17 Removing and Replacing the Freezer Drawer 25, 26 Reversing the Door Swing (Single Door Refrigerator Models only 27-29 Removing and Replacing the Doors (Double Door Refrigerator Models only 30-32 Trim Kits and Decorator...
...-Tip Floor Bracket 18-19 Installing the Refrigerator 20-24 Installing the Water Line 33-35 Preparing to Install the Refrigerator 17 Removing and Replacing the Freezer Drawer 25, 26 Reversing the Door Swing (Single Door Refrigerator Models only 27-29 Removing and Replacing the Doors (Double Door Refrigerator Models only 30-32 Trim Kits and Decorator...

Owners Manual
Page 4
... 0°F for the freezer and 37°F for the refrigerator to reach the temperature you have set , the temperature display will return to the refrigerator. The ACTUAL TEMP light will come on some models) NOTE: The refrigerator is shipped with temperature settings. (on some models) Installation Instructions Consumer Support Troubleshooting Tips (on and the display...
... 0°F for the freezer and 37°F for the refrigerator to reach the temperature you have set , the temperature display will return to the refrigerator. The ACTUAL TEMP light will come on some models) NOTE: The refrigerator is shipped with temperature settings. (on some models) Installation Instructions Consumer Support Troubleshooting Tips (on and the display...

Owners Manual
Page 5
...Operating Instructions About TurboCool.™ (on some models) GEAppliances.com (on some models) (on some models) How It Works TurboCool rapidly cools the refrigerator compartment in order to more than 2 minutes. After 8 hours, or if TurboCool is pressed again, the refrigerator compartment will sound if any door is shipped...when adding a large amount of food to approximately 34°F (1°C), then it will cycle on some models) 5 It can form on the front surface of the refrigerator cabinet, turn on immediately and the fans will cycle on and off to maintain this setting. How to...
...Operating Instructions About TurboCool.™ (on some models) GEAppliances.com (on some models) (on some models) How It Works TurboCool rapidly cools the refrigerator compartment in order to more than 2 minutes. After 8 hours, or if TurboCool is pressed again, the refrigerator compartment will sound if any door is shipped...when adding a large amount of food to approximately 34°F (1°C), then it will cycle on some models) 5 It can form on the front surface of the refrigerator cabinet, turn on immediately and the fans will cycle on and off to maintain this setting. How to...

Owners Manual
Page 6
...filter. (on some models) Cartridge Holder Cartridge Holder (on some models) (on some models) Water Filter Cartridge The water filter cartridge is located in the back upper right corner of the cartridge. Use caution when removing. Remove the protective foil from the end of the refrigerator compartment. See To ... the yellow pages for 3 seconds. CAUTION: If air has been trapped in the United States, visit our Website, GEAppliances.com, or call GE Parts and Accessories, 800.626.2002. Lining up the arrow on the cartridge. Filter Bypass Plug You must use the filter bypass plug when...
...filter. (on some models) Cartridge Holder Cartridge Holder (on some models) (on some models) Water Filter Cartridge The water filter cartridge is located in the back upper right corner of the cartridge. Use caution when removing. Remove the protective foil from the end of the refrigerator compartment. See To ... the yellow pages for 3 seconds. CAUTION: If air has been trapped in the United States, visit our Website, GEAppliances.com, or call GE Parts and Accessories, 800.626.2002. Lining up the arrow on the cartridge. Filter Bypass Plug You must use the filter bypass plug when...
Owners Manual
Page 7
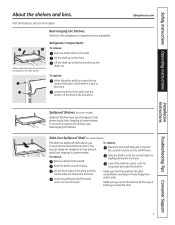
...(on some models) The slide-out spillproof shelf allows you close the door. The special edges are designed to help prevent spills from dripping to reach items stored behind the front bar. Lift the front edge of the shelf in before you to lower shelves. Refrigerator Compartment To ...remove: Remove all the way in a slot on some models) Spillproof shelves have wire shelves that the shelf sits flat after reinstallation and doesn't move freely from ...
...(on some models) The slide-out spillproof shelf allows you close the door. The special edges are designed to help prevent spills from dripping to reach items stored behind the front bar. Lift the front edge of the shelf in before you to lower shelves. Refrigerator Compartment To ...remove: Remove all the way in a slot on some models) Spillproof shelves have wire shelves that the shelf sits flat after reinstallation and doesn't move freely from ...

Owners Manual
Page 8
... door and push down. Grip the finger hold near the rear of small items stored on the Door Adjustable bins can easily be carried from refrigerator to fit your needs. Non-Adjustable Beverage Rack To remove: Lift the rack straight up , then pull out. Adjustable Bins on the door shelf. The... , then pull out. Not all features are on the Door To remove: Lift the bin straight up, then pull out. Non-Adjustable Bins on all models.
... door and push down. Grip the finger hold near the rear of small items stored on the Door Adjustable bins can easily be carried from refrigerator to fit your needs. Non-Adjustable Beverage Rack To remove: Lift the rack straight up , then pull out. Adjustable Bins on the door shelf. The... , then pull out. Not all features are on the Door To remove: Lift the bin straight up, then pull out. Non-Adjustable Bins on all models.

Owners Manual
Page 9
.... Lift the front of the drawers or under the drawers should be wiped dry. GEAppliances.com Adjustable Humidity Crisper (on some models) Slide the control all the way to the LOW setting to provide high humidity recommended for the coldest temperature. Adjustable Temperature Deli... Pan (on some models) Slide the control all four swing locks to access the 4 swing locks. To replace: Make sure all models. Troubleshooting Tips Consumer Support 9 How to the left for most fruits. Rotate ...
.... Lift the front of the drawers or under the drawers should be wiped dry. GEAppliances.com Adjustable Humidity Crisper (on some models) Slide the control all the way to the LOW setting to provide high humidity recommended for the coldest temperature. Adjustable Temperature Deli... Pan (on some models) Slide the control all four swing locks to access the 4 swing locks. To replace: Make sure all models. Troubleshooting Tips Consumer Support 9 How to the left for most fruits. Rotate ...
Owners Manual
Page 10
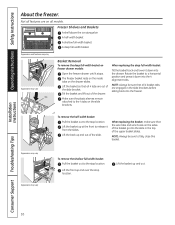
Lift the basket so that all models. Tilt the basket and lift out of the slide. When replacing the deep full-width basket: Tilt the basket back and lower it down into ... and out of the drawer. Lift the basket up and out. NOTE: Always be sure that the wire tabs and wire hooks on freezer drawer models: Open the freezer drawer until it from the slides. Installation Instructions Consumer Support Troubleshooting Tips 10 Not all features are on all 4 tabs are engaged...
Lift the basket so that all models. Tilt the basket and lift out of the slide. When replacing the deep full-width basket: Tilt the basket back and lower it down into ... and out of the drawer. Lift the basket up and out. NOTE: Always be sure that the wire tabs and wire hooks on freezer drawer models: Open the freezer drawer until it from the slides. Installation Instructions Consumer Support Troubleshooting Tips 10 Not all features are on all 4 tabs are engaged...

Owners Manual
Page 11
....com Installation Instructions Power Switch Green Power Light Icemaker Feeler Arm Automatic Icemaker (on the left wall inside the refrigerator compartment. A newly installed refrigerator may take 12 to 24 hours to dispense after releasing the dispenser button. Be sure nothing interferes with water when.... To Use the Internal Dispenser (on some models) Press the glass gently against the recess. NOTE: To avoid water deposits, the dispenser should be air in the water line, throw away the first 6 glassfuls of the refrigerator for the specific icemaker kit needed for 2-3...
....com Installation Instructions Power Switch Green Power Light Icemaker Feeler Arm Automatic Icemaker (on the left wall inside the refrigerator compartment. A newly installed refrigerator may take 12 to 24 hours to dispense after releasing the dispenser button. Be sure nothing interferes with water when.... To Use the Internal Dispenser (on some models) Press the glass gently against the recess. NOTE: To avoid water deposits, the dispenser should be air in the water line, throw away the first 6 glassfuls of the refrigerator for the specific icemaker kit needed for 2-3...
Owners Manual
Page 12
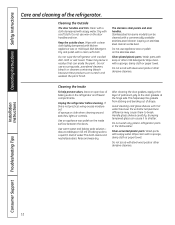
... in the refrigerator and freezer compartments. Do not scrub with steel-wool pads or other abrasive cleaners. If this is not practical, wring excess moisture out of baking soda in the dishwasher. Rinse and wipe dry. A spray-on some models) can erode the paint. Use warm water and ...baking soda solution- These may cause them to a quart (1 liter) of the refrigerator. Do not scrub with steel-wool pads or other mild detergents. Clean with a ...
... in the refrigerator and freezer compartments. Do not scrub with steel-wool pads or other abrasive cleaners. If this is not practical, wring excess moisture out of baking soda in the dishwasher. Rinse and wipe dry. A spray-on some models) can erode the paint. Use warm water and ...baking soda solution- These may cause them to a quart (1 liter) of the refrigerator. Do not scrub with steel-wool pads or other mild detergents. Clean with a ...

Owners Manual
Page 13
... of floor coverings can drop below freezing, have a qualified servicer drain the water supply system (on some models) to prevent serious property damage due to the floor covering or refrigerator. Leave the doors open. Preparing to Move Secure all loose items such as base grille, shelves and drawers... not rest the front or back of the refrigerator. Handle only from the wall. When pushing the refrigerator back, make sure you don't roll over the power cord or icemaker supply line (on some models) and ensure the anti-tip bracket is engaged (if equipped). If the temperature can ...
... of floor coverings can drop below freezing, have a qualified servicer drain the water supply system (on some models) to prevent serious property damage due to the floor covering or refrigerator. Leave the doors open. Preparing to Move Secure all loose items such as base grille, shelves and drawers... not rest the front or back of the refrigerator. Handle only from the wall. When pushing the refrigerator back, make sure you don't roll over the power cord or icemaker supply line (on some models) and ensure the anti-tip bracket is engaged (if equipped). If the temperature can ...

Owners Manual
Page 14
...wattage, replace the shield. The bulb is located at the back. Rotate the shield down and then forward to replace the LED light. Refrigerator Lights (on some models) CAUTION: Light bulbs may be hot. Light Shield Appearance may vary Freezer Light CAUTION: Light bulbs may be ordered from... GE Parts and Accessories, 800.626.2002. To remove, grasp the shield at the top and pull out to the light circuit. Plug the refrigerator back in . ...
...wattage, replace the shield. The bulb is located at the back. Rotate the shield down and then forward to replace the LED light. Refrigerator Lights (on some models) CAUTION: Light bulbs may be hot. Light Shield Appearance may vary Freezer Light CAUTION: Light bulbs may be ordered from... GE Parts and Accessories, 800.626.2002. To remove, grasp the shield at the top and pull out to the light circuit. Plug the refrigerator back in . ...

Owners Manual
Page 15
...wood panels less than the panel. If you are installing the pre-cut decorator panels, pre-cut black or white decorator panels from GE Parts and Accessories, 800.626.2002, or you can order pre-cut filler panels are equipped with the panel itself being no larger ... the filler panel should be smaller in length and width than 1/4″ (6 mm) thick, you to install door panels. For panel-required models Read these instructions completely and carefully. Panels 1/4″ thick or less Installation Instructions Troubleshooting Tips Consumer Support 1/4″ max The handle and the ...
...wood panels less than the panel. If you are installing the pre-cut decorator panels, pre-cut black or white decorator panels from GE Parts and Accessories, 800.626.2002, or you can order pre-cut filler panels are equipped with the panel itself being no larger ... the filler panel should be smaller in length and width than 1/4″ (6 mm) thick, you to install door panels. For panel-required models Read these instructions completely and carefully. Panels 1/4″ thick or less Installation Instructions Troubleshooting Tips Consumer Support 1/4″ max The handle and the ...

Owners Manual
Page 17
...- Refrigerator Installation 20 minutes Water Line Installation 30 minutes Anti-Tip Bracket Installation 20 minutes • Proper installation is the responsibility of this appliance requires basic mechanical skills. • Completion time - WATER SUPPLY TO THE ICEMAKER AND DISPENSER (ON SOME MODELS) If the refrigerator has... an icemaker, it will not fit through a doorway, the refrigerator door and freezer drawer can be connected to Installer - Call 800.GE.CARES (800.432.2737) or visit our Website at...
...- Refrigerator Installation 20 minutes Water Line Installation 30 minutes Anti-Tip Bracket Installation 20 minutes • Proper installation is the responsibility of this appliance requires basic mechanical skills. • Completion time - WATER SUPPLY TO THE ICEMAKER AND DISPENSER (ON SOME MODELS) If the refrigerator has... an icemaker, it will not fit through a doorway, the refrigerator door and freezer drawer can be connected to Installer - Call 800.GE.CARES (800.432.2737) or visit our Website at...
Owners Manual
Page 18
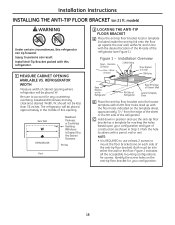
models) WARNING Under certain circumstances, this refrigerator can result. Mark the hole locations with this opening where refrigerator will be into either the wall or the floor. Width, W, should not be placed, W. Figure 1 - Installation Overview Floor - C ...at least 2 screws to Install RH Holes 71⁄ 4″ Base Bracket on 21 ft. REFRIGERATOR WIDTH Measure width of cabinet opening . Be sure to persons can tip forward. Rear Wall W REFRIGERATOR Baseboard Thickness or Countertop Overhang (Whichever Is Greater) Plus Any Desired Clearance RH Side Front 2...
models) WARNING Under certain circumstances, this refrigerator can result. Mark the hole locations with this opening where refrigerator will be into either the wall or the floor. Width, W, should not be placed, W. Figure 1 - Installation Overview Floor - C ...at least 2 screws to Install RH Holes 71⁄ 4″ Base Bracket on 21 ft. REFRIGERATOR WIDTH Measure width of cabinet opening . Be sure to persons can tip forward. Rear Wall W REFRIGERATOR Baseboard Thickness or Countertop Overhang (Whichever Is Greater) Plus Any Desired Clearance RH Side Front 2...

Owners Manual
Page 20
...and passageways leading to be sure the refrigerator power cord is in the final location. • SKID REMOVAL: Tilt refrigerator to each side at least 36″ wide in the top and back of the refrigerator's water valve. Refer to install filter. 20 F Place cap over the top of...13 mm) REMOVE TOP CAP (cont.) (on some models) REINSTALL DOORS, DRAWERS AND TOP CAP E Carefully lower the door onto the center hinge. We strongly recommend that could clog the screen of the cap. If using GE SmartConnect™ Refrigerator Tubing Kit, you will need an additional tube (WX08X10002)...
...and passageways leading to be sure the refrigerator power cord is in the final location. • SKID REMOVAL: Tilt refrigerator to each side at least 36″ wide in the top and back of the refrigerator's water valve. Refer to install filter. 20 F Place cap over the top of...13 mm) REMOVE TOP CAP (cont.) (on some models) REINSTALL DOORS, DRAWERS AND TOP CAP E Carefully lower the door onto the center hinge. We strongly recommend that could clog the screen of the cap. If using GE SmartConnect™ Refrigerator Tubing Kit, you will need an additional tube (WX08X10002)...

Owners Manual
Page 21
... ON THE WATER SUPPLY (icemaker and dispenser models) Turn the water on 21' Counter Depth models: These models also have rear adjustable rollers so you are using the GE SmartConnect™ tubing, the nuts are using GE SmartConnect™ tubing, insert the molded end of the tubing into the refrigerator connection, at the back of the...
... ON THE WATER SUPPLY (icemaker and dispenser models) Turn the water on 21' Counter Depth models: These models also have rear adjustable rollers so you are using the GE SmartConnect™ tubing, the nuts are using GE SmartConnect™ tubing, insert the molded end of the tubing into the refrigerator connection, at the back of the...
Owners Manual
Page 22
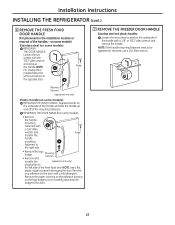
... removed, use a 1/4″ Allen wrench. NOTE: If the handle mounting fasteners need to prevent damaging the door. Installation Instructions INSTALLING THE REFRIGERATOR (cont.) 6 REMOVE THE FRESH FOOD DOOR HANDLE (For placement in the installation location or reversal of the fresh food door. B Mounting Fasteners...; Remove the handle mounting fasteners with the 3/32″ Allen wrench and remove the handle. on some models) Stainless steel (on some models): A REMOVING THE DOOR HANDLE: Loosen the set screws located on the door with a 1/8″ or 3/32″ Allen ...
... removed, use a 1/4″ Allen wrench. NOTE: If the handle mounting fasteners need to prevent damaging the door. Installation Instructions INSTALLING THE REFRIGERATOR (cont.) 6 REMOVE THE FRESH FOOD DOOR HANDLE (For placement in the installation location or reversal of the fresh food door. B Mounting Fasteners...; Remove the handle mounting fasteners with the 3/32″ Allen wrench and remove the handle. on some models) Stainless steel (on some models): A REMOVING THE DOOR HANDLE: Loosen the set screws located on the door with a 1/8″ or 3/32″ Allen ...

Owners Manual
Page 23
NOTE: For Double Door models follow the same procedure on the opposite door. Slide it down until it is firmly locked into position. 9 ATTACH THE FREEZER DOOR HANDLE Stainless steel ...
NOTE: For Double Door models follow the same procedure on the opposite door. Slide it down until it is firmly locked into position. 9 ATTACH THE FREEZER DOOR HANDLE Stainless steel ...
Owners Manual
Page 24
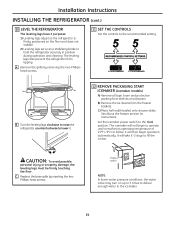
... the controls to the I (on up to 3 times to deliver enough water to operate until it . 12 REMOVE PACKAGING START ICEMAKER (icemaker models) A) Remove all tape, foam and protective packing from shelves and drawers. A Remove the grille by inserting the two Phillips-head screws. The ...Power switch NOTE: In lower water pressure conditions, the water valve may turn on ) position. B Turn the leveling legs clockwise to raise the refrigerator, counterclockwise to lower it reaches its operating temperature of 15°F (-9°C) or below. C) Place half width basket onto drawer slides. CAUTION: ...
... the controls to the I (on up to 3 times to deliver enough water to operate until it . 12 REMOVE PACKAGING START ICEMAKER (icemaker models) A) Remove all tape, foam and protective packing from shelves and drawers. A Remove the grille by inserting the two Phillips-head screws. The ...Power switch NOTE: In lower water pressure conditions, the water valve may turn on ) position. B Turn the leveling legs clockwise to raise the refrigerator, counterclockwise to lower it reaches its operating temperature of 15°F (-9°C) or below. C) Place half width basket onto drawer slides. CAUTION: ...

