
Quick Specs
Page 1
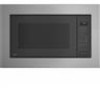
...-In Sensor Microwave Oven DIMENSIONS AND INSTALLATION INFORMATION (IN INCHES) EXTERIOR DIMENSIONS (IN INCHES) W x H x D 24 1/8" x 14" x 19 3/4" ACCESSORY TRIM KITS FOR GE MICROWAVE OVENS (AVAILABLE AT ADDITIONAL COST) For a custom built-in appearance, these kits allow built-in cabinet 19-1/2" min. MODEL COLOR PEB7227BLTS Black Stainless Steel PEB7227SLSS Stainless Steel Slate Stainless Steel...
...-In Sensor Microwave Oven DIMENSIONS AND INSTALLATION INFORMATION (IN INCHES) EXTERIOR DIMENSIONS (IN INCHES) W x H x D 24 1/8" x 14" x 19 3/4" ACCESSORY TRIM KITS FOR GE MICROWAVE OVENS (AVAILABLE AT ADDITIONAL COST) For a custom built-in appearance, these kits allow built-in cabinet 19-1/2" min. MODEL COLOR PEB7227BLTS Black Stainless Steel PEB7227SLSS Stainless Steel Slate Stainless Steel...

Installation Instructions
Page 1
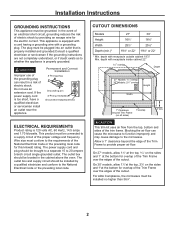
...GE Answer Center at 800.626.2000 or Visit our Website at service panel and lock the service disconnecting means to prevent power from being switched on accidentally. Be sure to any single electric wall oven. tipped Screws 24 (19 required for installation) 6 (4 required for future reference. • For easier installation... Trim Frame 1 Screw Covers 4 Base Pan 1 Upper Bracket 1 Rail 2 FOR YOUR SAFETY WARNING Before beginning the installation, switch power off at : www.GEAppliances.com MODELS 30" Profile Kit: JX7230DLWW, JX7230DLBB, JX7230ELES, JX7230SLSS, JX7230BLTS 27...
...GE Answer Center at 800.626.2000 or Visit our Website at service panel and lock the service disconnecting means to prevent power from being switched on accidentally. Be sure to any single electric wall oven. tipped Screws 24 (19 required for installation) 6 (4 required for future reference. • For easier installation... Trim Frame 1 Screw Covers 4 Base Pan 1 Upper Bracket 1 Rail 2 FOR YOUR SAFETY WARNING Before beginning the installation, switch power off at : www.GEAppliances.com MODELS 30" Profile Kit: JX7230DLWW, JX7230DLBB, JX7230ELES, JX7230SLSS, JX7230BLTS 27...
Installation Instructions
Page 2
... of electric shock by a qualified electrician and conform to the National Electrical Code or the prevailing local code. This product must be installed by providing an escape wire for this kilowatt rating. The outlet box and supply circuit should be connected to a supply circuit of ...provide proper air flow. depth with a grounding plug. For ADA Compliance, the microwave must be plugged into an outlet that is properly installed and grounded.Consult a qualified electrician or serviceman if the grounding instructions are not completely understood, or if doubt exists as to whether the...
... of electric shock by a qualified electrician and conform to the National Electrical Code or the prevailing local code. This product must be installed by providing an escape wire for this kilowatt rating. The outlet box and supply circuit should be connected to a supply circuit of ...provide proper air flow. depth with a grounding plug. For ADA Compliance, the microwave must be plugged into an outlet that is properly installed and grounded.Consult a qualified electrician or serviceman if the grounding instructions are not completely understood, or if doubt exists as to whether the...
Installation Instructions
Page 3
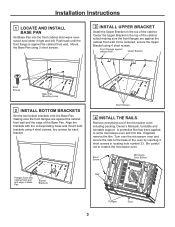
... bracket. Align the brackets with cabinet front wall and edge of the Base Pan. Mount the Base Pan using 3 short screws. 3 INSTALL UPPER BRACKET Install the Upper Bracket on the top of the microwave oven, including packing, Owner's Manuals, turntable and turntable support. Center the Upper Bracket ...in locating hole number 33. Front Flanges against cabinet front Upper Bracket Short Screws Base Pan Mounting Holes 2 INSTALL BOTTOM BRACKETS Set the two bottom brackets onto the Base Pan making sure the front flanges are against the cabinet front wall. Short ...
... bracket. Align the brackets with cabinet front wall and edge of the Base Pan. Mount the Base Pan using 3 short screws. 3 INSTALL UPPER BRACKET Install the Upper Bracket on the top of the microwave oven, including packing, Owner's Manuals, turntable and turntable support. Center the Upper Bracket ...in locating hole number 33. Front Flanges against cabinet front Upper Bracket Short Screws Base Pan Mounting Holes 2 INSTALL BOTTOM BRACKETS Set the two bottom brackets onto the Base Pan making sure the front flanges are against the cabinet front wall. Short ...
Installation Instructions
Page 4
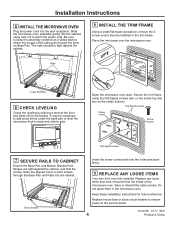
...Screw covers Flat-tipped screws 7 SECURE RAILS TO CABINET Ensure the Base Pan and Bottom Bracket front flanges are tight against the cabinet. 8 INSTALL THE TRIM FRAME Using a small flat-head screwdriver, remove the 4 screw covers that were removed from the inside top and two on Base... panel. 49-40782 07-17 GEA 4 Printed in the microwave oven. Drive 4 short screws through the slots on the inside bottom). Installation Instructions 5 INSTALL THE MICROWAVE OVEN Plug the power cord into the cabinet, using four flat-tipped screws (two on the inside of the microwave. Replace ...
...Screw covers Flat-tipped screws 7 SECURE RAILS TO CABINET Ensure the Base Pan and Bottom Bracket front flanges are tight against the cabinet. 8 INSTALL THE TRIM FRAME Using a small flat-head screwdriver, remove the 4 screw covers that were removed from the inside top and two on Base... panel. 49-40782 07-17 GEA 4 Printed in the microwave oven. Drive 4 short screws through the slots on the inside bottom). Installation Instructions 5 INSTALL THE MICROWAVE OVEN Plug the power cord into the cabinet, using four flat-tipped screws (two on the inside of the microwave. Replace ...
Use and Care Manual
Page 3
...outlet. All racks should not be serviced only by qualified service personnel. Use pot holders and direct steam away from the microwave. INSTALLATION „ Install or locate this appliance. Do not leave paper products, cooking utensils, or food in the cavity when not in accordance with the provided... installation instructions. „ This appliance must be removed from oven when not in the microwave oven can present a risk of hot food....
...outlet. All racks should not be serviced only by qualified service personnel. Use pot holders and direct steam away from the microwave. INSTALLATION „ Install or locate this appliance. Do not leave paper products, cooking utensils, or food in the cavity when not in accordance with the provided... installation instructions. „ This appliance must be removed from oven when not in the microwave oven can present a risk of hot food....

Use and Care Manual
Page 5
... if it replaced with the door open since open-door operation can result in harmful exposure to microwave energy. If the power cord is properly installed and grounded. For best operation, plug this oven with a properly grounded 3-prong wall outlet. Do not use . However, patients with a grounding plug. GROUNDING INSTRUCTIONS WARNING.... This appliance is damaged. It is particularly important that the oven door close properly and that is too short, have a qualified electrician or service technician install an outlet near the appliance.
... if it replaced with the door open since open-door operation can result in harmful exposure to microwave energy. If the power cord is properly installed and grounded. For best operation, plug this oven with a properly grounded 3-prong wall outlet. Do not use . However, patients with a grounding plug. GROUNDING INSTRUCTIONS WARNING.... This appliance is damaged. It is particularly important that the oven door close properly and that is too short, have a qualified electrician or service technician install an outlet near the appliance.
Use and Care Manual
Page 6
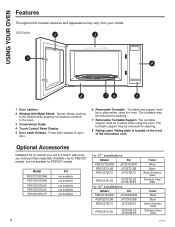
... The turntable support may vary from your unit to a built-in place when using the oven. Optional Accessories Installation Kit (to convert your model. 1100 Watts 1 Door Latches 2 Window with Metal Shield. Model PES7227SDLWW PES7227SDLBB... not available not available For 27" installations: Model Kit PEB7227DLWW JX7227DLWW PEB7227DLBB JX7227DLBB PEB7227BLTS JX7227BLTS PEB7227SLSS JX7227SLSS JX7227ELES For 30" installations: Model Kit PEB7227DLWW JX7230DLWW PEB7227DLBB JX7230DLBB PEB7227BLTS JX7230BLTS PEB7227SLSS JX7230SLSS JX7230ELES 6 Color White Black Black...
... The turntable support may vary from your unit to a built-in place when using the oven. Optional Accessories Installation Kit (to convert your model. 1100 Watts 1 Door Latches 2 Window with Metal Shield. Model PES7227SDLWW PES7227SDLBB... not available not available For 27" installations: Model Kit PEB7227DLWW JX7227DLWW PEB7227DLBB JX7227DLBB PEB7227BLTS JX7227BLTS PEB7227SLSS JX7227SLSS JX7227ELES For 30" installations: Model Kit PEB7227DLWW JX7230DLWW PEB7227DLBB JX7230DLBB PEB7227BLTS JX7230BLTS PEB7227SLSS JX7230SLSS JX7230ELES 6 Color White Black Black...

Use and Care Manual
Page 21
...there are no warranties, whether express, oral or statutory which fails due to Make a Warranty Claim: Call GE Appliances at GEAPPLIANCES.com • Improper installation, delivery or maintenance. • Failure of the original purchase date is product repair as provided in materials ...or workmanship. Warrantor: GE Appliances, a Haier company Staple your state's Attorney General. Proof of God. • Incidental or...
...there are no warranties, whether express, oral or statutory which fails due to Make a Warranty Claim: Call GE Appliances at GEAPPLIANCES.com • Improper installation, delivery or maintenance. • Failure of the original purchase date is product repair as provided in materials ...or workmanship. Warrantor: GE Appliances, a Haier company Staple your state's Attorney General. Proof of God. • Incidental or...


