Quick Specs
Page 1
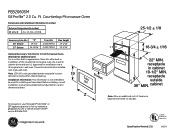
...; appliance questions, visit our website at additional cost) For a custom built-in appearance, these kits allow built-in installation of trim kit over a GE single electric wall oven. receptacle outside 36" MIN. Countertop Microwave Oven Dimensions and Installation Information (in inches) Exterior Dimensions (in cabinet 19-1/2" MIN. Note: 120V, 60-cycle, grounded power receptacle location 19 optional...
...; appliance questions, visit our website at additional cost) For a custom built-in appearance, these kits allow built-in installation of trim kit over a GE single electric wall oven. receptacle outside 36" MIN. Countertop Microwave Oven Dimensions and Installation Information (in inches) Exterior Dimensions (in cabinet 19-1/2" MIN. Note: 120V, 60-cycle, grounded power receptacle location 19 optional...

Use and Care Manual
Page 2
... place the front surface of the door three inches or more back from General Electric. When using a power cord available from the countertop edge to accumulate on top of the appliance in this appliance if it has a damaged power cord or plug, if it is .... IMPORTANT SAFETY INSTRUCTIONS. See the Grounding Instructions section on the appliance. s Install or locate this appliance over or near any openings on page 4. s Do not mount the microwave oven over a sink. s Do not operate this appliance. This microwave oven is no damage to the: (1) door (bent), (2) hinges and latches ...
... place the front surface of the door three inches or more back from General Electric. When using a power cord available from the countertop edge to accumulate on top of the appliance in this appliance if it has a damaged power cord or plug, if it is .... IMPORTANT SAFETY INSTRUCTIONS. See the Grounding Instructions section on the appliance. s Install or locate this appliance over or near any openings on page 4. s Do not mount the microwave oven over a sink. s Do not operate this appliance. This microwave oven is no damage to the: (1) door (bent), (2) hinges and latches ...
Use and Care Manual
Page 5
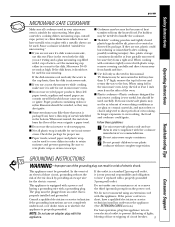
... or remove the third (ground) prong from the heated food. Safety Instructions Operating Instructions ge.com MICROWAVE-SAFE COOKWARE Make sure all plastic wrap is suitable for use this test: Place in the oven both the dish you are testing and a glass measuring cup filled with 1 cup of... supervision. Be sure to have a qualified electrician or service technician install an outlet near the appliance. (See EXTENSION CORDS section.) For best operation, plug this appliance. Pot holders may be used to cover dishes in the microwave oven, keep the foil at least 1 inch away from hands and ...
... or remove the third (ground) prong from the heated food. Safety Instructions Operating Instructions ge.com MICROWAVE-SAFE COOKWARE Make sure all plastic wrap is suitable for use this test: Place in the oven both the dish you are testing and a glass measuring cup filled with 1 cup of... supervision. Be sure to have a qualified electrician or service technician install an outlet near the appliance. (See EXTENSION CORDS section.) For best operation, plug this appliance. Pot holders may be used to cover dishes in the microwave oven, keep the foil at least 1 inch away from hands and ...

Use and Care Manual
Page 7
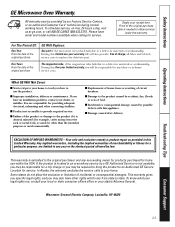
...; installations: Model PEB2060DMBB PEB2060DMCC PEB2060SMSS PEB2060DMWW Kit JX2030DMBB JX2030DMCC JX2030SMSS JX2030DMWW 7 Consumer Support Window with Metal Shield. Door Latch Release. The turntable support must be viewed while keeping microwaves confined in place when using the oven. Safety Instructions About the features of your model. 1200 Watts ge.com Operating Instructions Troubleshooting Tips Features of the microwave oven...
...; installations: Model PEB2060DMBB PEB2060DMCC PEB2060SMSS PEB2060DMWW Kit JX2030DMBB JX2030DMCC JX2030SMSS JX2030DMWW 7 Consumer Support Window with Metal Shield. Door Latch Release. The turntable support must be viewed while keeping microwaves confined in place when using the oven. Safety Instructions About the features of your model. 1200 Watts ge.com Operating Instructions Troubleshooting Tips Features of the microwave oven...
Use and Care Manual
Page 23
...local or state consumer affairs office or your legal rights are responsible for home use the product. I Improper installation, delivery or maintenance. Safety Instructions Operating Instructions GE Microwave Oven Warranty. All warranty service provided by accident, fire, floods or acts of circuit breakers. The magnetron tube...for a trip charge or you will also provide, free of the microwave oven which vary from wire rack or metal/foil), or used for other rights which fails due to an Authorized GE Service Location for example, cavity arcing from state to your receipt ...
...local or state consumer affairs office or your legal rights are responsible for home use the product. I Improper installation, delivery or maintenance. Safety Instructions Operating Instructions GE Microwave Oven Warranty. All warranty service provided by accident, fire, floods or acts of circuit breakers. The magnetron tube...for a trip charge or you will also provide, free of the microwave oven which vary from wire rack or metal/foil), or used for other rights which fails due to an Authorized GE Service Location for example, cavity arcing from state to your receipt ...
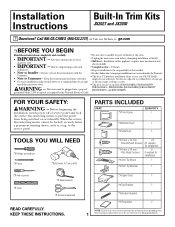
Installation Instructions
Page 1
...oven. install this microwave oven. • This kit is the responsibility of this appliance requires basic mechanical and electrical skills. • Completion time - 1-3 hours ordinances. • Note to (within 2 feet of this kit. • Skill level - Before beginning the installation, switch power off at : ge..., PEB2060SMSS, JEB1860DMBB, JEB1860DMWW, JEB1860DMCC and JEB1860SMSS. Call 800.GE.CARES (800.432.2737) or Visit our Website at service panel and lock the service disconnecting means to the service panel. Be sure to leave these instructions for installation) ...
...oven. install this microwave oven. • This kit is the responsibility of this appliance requires basic mechanical and electrical skills. • Completion time - 1-3 hours ordinances. • Note to (within 2 feet of this kit. • Skill level - Before beginning the installation, switch power off at : ge..., PEB2060SMSS, JEB1860DMBB, JEB1860DMWW, JEB1860DMCC and JEB1860SMSS. Call 800.GE.CARES (800.432.2737) or Visit our Website at service panel and lock the service disconnecting means to the service panel. Be sure to leave these instructions for installation) ...
Installation Instructions
Page 2
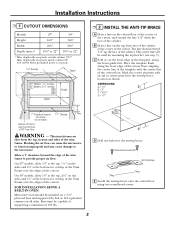
...of the cabinet at the center of the cutout floor. Blocking the air flow can cause the microwave to function improperly and may cause damage to provide proper air flow. Installation Instructions ❒ 1 CUTOUT DIMENSIONS Models 27″ 30″ Height 163⁄4″ 163... the cabinet. Place the template flush along the front guide line. FOR INSTALLATION ABOVE A BUILT-IN OVEN: Microwave oven should extend 1/2″ up the face of the trim frame. Round-head screws (2) Anti-Tip Brace E Install the anti-tip brace onto the cutout floor using two round-head screws....
...of the cabinet at the center of the cutout floor. Blocking the air flow can cause the microwave to function improperly and may cause damage to provide proper air flow. Installation Instructions ❒ 1 CUTOUT DIMENSIONS Models 27″ 30″ Height 163⁄4″ 163... the cabinet. Place the template flush along the front guide line. FOR INSTALLATION ABOVE A BUILT-IN OVEN: Microwave oven should extend 1/2″ up the face of the trim frame. Round-head screws (2) Anti-Tip Brace E Install the anti-tip brace onto the cutout floor using two round-head screws....
Installation Instructions
Page 3
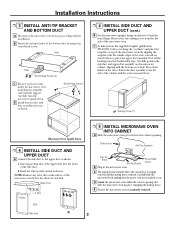
... DUCT AND UPPER DUCT A Connect the side duct to bend the front flange. Upper Duct 3 Holes 3 Tabs ❒ 5 INSTALL MICROWAVE OVEN INTO CABINET A Slide the microwave oven part way into the holes of the microwave oven. D Center the microwave oven within the cutout opening . E Ensure the microwave oven is not mashed or cut lines" and place the template on the ducts...
... DUCT AND UPPER DUCT A Connect the side duct to bend the front flange. Upper Duct 3 Holes 3 Tabs ❒ 5 INSTALL MICROWAVE OVEN INTO CABINET A Slide the microwave oven part way into the holes of the microwave oven. D Center the microwave oven within the cutout opening . E Ensure the microwave oven is not mashed or cut lines" and place the template on the ducts...
Installation Instructions
Page 4
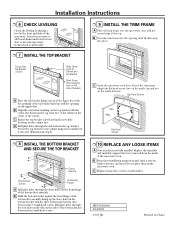
...pilot holes through the three holes on the cabinet face. Screw in the microwave oven. Do not place them in four round-head screws. ❒ 10 REPLACE ANY LOOSE ITEMS A Your trim kit is now fully installed. Installation Instructions ❒ 6 CHECK LEVELING Check the leveling by placing a level at... Replace house fuse or close circuit breaker. Secure the top bracket to -side. ❒ 7 INSTALL THE TOP BRACKET ❒ 9 INSTALL THE TRIM FRAME A Place the trim frame over the microwave oven with the opening on the upper duct. MFL38268401 49-40552 07-07 JR Printed in three round-...
...pilot holes through the three holes on the cabinet face. Screw in the microwave oven. Do not place them in four round-head screws. ❒ 10 REPLACE ANY LOOSE ITEMS A Your trim kit is now fully installed. Installation Instructions ❒ 6 CHECK LEVELING Check the leveling by placing a level at... Replace house fuse or close circuit breaker. Secure the top bracket to -side. ❒ 7 INSTALL THE TOP BRACKET ❒ 9 INSTALL THE TRIM FRAME A Place the trim frame over the microwave oven with the opening on the upper duct. MFL38268401 49-40552 07-07 JR Printed in three round-...


