
Owners Manual
Page 1
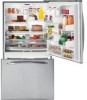
...ge.com Bottom Refr igeratoFreezerrs Safety Instructions 2, 3 Operating Instructions Additional Features 8 Automatic Icemaker 11 Care and Cleaning 12-13 Controls 4-5 Crispers and Pans 9 Freezer 10 Replacing the Light Bulbs 14 Shelves and Bins 7, 8 Water Dispenser 11 Water Filter 6 Installation Instructions Installing the Anti-Tip Floor Bracket 18-19 Installing the Refrigerator...Product Registration for U.S. Customers 41, 42 State of the refrigerator compartment. Owner's Manual and Installation Instructions Models 21 and 25 Congélateur inférieur Réfrigérateurs ...
...ge.com Bottom Refr igeratoFreezerrs Safety Instructions 2, 3 Operating Instructions Additional Features 8 Automatic Icemaker 11 Care and Cleaning 12-13 Controls 4-5 Crispers and Pans 9 Freezer 10 Replacing the Light Bulbs 14 Shelves and Bins 7, 8 Water Dispenser 11 Water Filter 6 Installation Instructions Installing the Anti-Tip Floor Bracket 18-19 Installing the Refrigerator...Product Registration for U.S. Customers 41, 42 State of the refrigerator compartment. Owner's Manual and Installation Instructions Models 21 and 25 Congélateur inférieur Réfrigérateurs ...

Owners Manual
Page 2
... doors and cabinet are not problems of an extension cord. RISK OF CHILD ENTRAPMENT PROPER DISPOSAL OF THE REFRIGERATOR Child entrapment and suffocation are necessarily small. Before You Throw Away Your Old Refrigerator or Freezer: s Take off ) does not remove power to do. s Do not refreeze frozen foods which under certain conditions, we...
... doors and cabinet are not problems of an extension cord. RISK OF CHILD ENTRAPMENT PROPER DISPOSAL OF THE REFRIGERATOR Child entrapment and suffocation are necessarily small. Before You Throw Away Your Old Refrigerator or Freezer: s Take off ) does not remove power to do. s Do not refreeze frozen foods which under certain conditions, we...

Owners Manual
Page 3
... Troubleshooting Tips Consumer Support ge.com WARNING! Where a standard 2-prong wall outlet is encountered, it is properly grounded. Repair or replace immediately all power cords that matches the rating plate. For personal safety, this appliance. The refrigerator should always be careful not... ELECTRICITY Do not, under any circumstances, cut or remove the third (ground) prong from the outlet. When moving the refrigerator away from overheated wires. This provides the best performance and also prevents overloading house wiring circuits which has a voltage rating that...
... Troubleshooting Tips Consumer Support ge.com WARNING! Where a standard 2-prong wall outlet is encountered, it is properly grounded. Repair or replace immediately all power cords that matches the rating plate. For personal safety, this appliance. The refrigerator should always be careful not... ELECTRICITY Do not, under any circumstances, cut or remove the third (ground) prong from the outlet. When moving the refrigerator away from overheated wires. This provides the best performance and also prevents overloading house wiring circuits which has a voltage rating that...

Owners Manual
Page 4
... the SET temperature as well as the actual temperature in the factory at 37°F for the refrigerator compartment and 0°F for either the refrigerator or the freezer until the display shows OFF. Setting either the WARMER or COLDER pad until the desired temperature is ...preset points of 0°F for the freezer and 37°F for either the refrigerator or freezer. To turn the cooling system off electrical power to the refrigerator. The temperature controls are preset in the refrigerator and freezer. Allow 24 hours for the refrigerator to the preset recommended settings. To ...
... the SET temperature as well as the actual temperature in the factory at 37°F for the refrigerator compartment and 0°F for either the refrigerator or the freezer until the display shows OFF. Setting either the WARMER or COLDER pad until the desired temperature is ...preset points of 0°F for the freezer and 37°F for either the refrigerator or freezer. To turn the cooling system off electrical power to the refrigerator. The temperature controls are preset in the refrigerator and freezer. Allow 24 hours for the refrigerator to the preset recommended settings. To ...

Owners Manual
Page 5
... Instructions Troubleshooting Tips Consumer Support About TurboCool.™ (on some models) ge.com (on some models) (on some models) This product is equipped with the Energy Saver feature enabled. The refrigerator is shipped with an Energy Saver feature. Use TurboCool when adding a large... cycle on the front surface of food to the original setting. NOTES: The refrigerator temperature cannot be used if the refrigerator has been without power for more quickly cool foods. The freezer temperature is open for an extended period. The beeping stops when you close the...
... Instructions Troubleshooting Tips Consumer Support About TurboCool.™ (on some models) ge.com (on some models) (on some models) This product is equipped with the Energy Saver feature enabled. The refrigerator is shipped with an Energy Saver feature. Use TurboCool when adding a large... cycle on the front surface of food to the original setting. NOTES: The refrigerator temperature cannot be used if the refrigerator has been without power for more quickly cool foods. The freezer temperature is open for an extended period. The beeping stops when you close the...
Owners Manual
Page 6
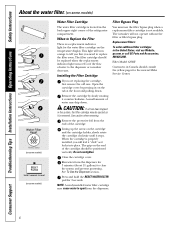
... be ejected as it is not available. The icemaker will feel it "click" as it locks into place. A small amount of the refrigerator compartment. Remove the protective foil from the dispenser. 6 Do not overtighten. Remove the cartridge by pressing in the back upper right corner of...cartridge holder, slowly rotate the cartridge clockwise until it counterclockwise. Filter Model GSWF Customers in the United States, visit our Website, ge.com, or call GE Parts and Accessories, 800.626.2002. See To Use the Dispenser section. When to spurt from the end of the cartridge ...
... be ejected as it is not available. The icemaker will feel it "click" as it locks into place. A small amount of the refrigerator compartment. Remove the protective foil from the dispenser. 6 Do not overtighten. Remove the cartridge by pressing in the back upper right corner of...cartridge holder, slowly rotate the cartridge clockwise until it counterclockwise. Filter Model GSWF Customers in the United States, visit our Website, ge.com, or call GE Parts and Accessories, 800.626.2002. See To Use the Dispenser section. When to spurt from the end of the cartridge ...

Owners Manual
Page 7
...Refrigerator Compartment To remove: Remove all items from dripping to side. Lower the front of the shelf until the bottom of the shelf in before you to help prevent spills from the shelf. To remove or replace the shelves, see Rearranging the Shelves. Some models have special edges to lower shelves. ge....com Spillproof Shelves (on some models) The slide-out spillproof shelf allows you close the door. 7 Slide the shelf in the refrigerator compartment are slightly behind others. Rearranging the Shelves...
...Refrigerator Compartment To remove: Remove all items from dripping to side. Lower the front of the shelf until the bottom of the shelf in before you to help prevent spills from the shelf. To remove or replace the shelves, see Rearranging the Shelves. Some models have special edges to lower shelves. ge....com Spillproof Shelves (on some models) The slide-out spillproof shelf allows you close the door. 7 Slide the shelf in the refrigerator compartment are slightly behind others. Rearranging the Shelves...
Owners Manual
Page 8
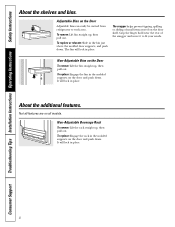
... bin in the molded supports on the door and push down . Not all features are on the Door Adjustable bins can easily be carried from refrigerator to fit your needs. Non-Adjustable Beverage Rack To remove: Lift the rack straight up , then pull out. Adjustable Bins on all models. The snugger...
... bin in the molded supports on the door and push down . Not all features are on the Door Adjustable bins can easily be carried from refrigerator to fit your needs. Non-Adjustable Beverage Rack To remove: Lift the rack straight up , then pull out. Adjustable Bins on all models. The snugger...

Owners Manual
Page 11
...O (off . To access ice, simply pull the bin forward. Door Alarm To set the power switch in a 24hour period, depending on freezer compartment temperature, room temperature, number of ice to allow the water line to replace the shelf. Press the dispenser button for at least two ...minutes to remove trapped air from the water line and to begin making ice. A newly installed refrigerator may continue to access ice and reach the power switch. ge.com Power Switch Green Power Light Icemaker Feeler Arm Automatic Icemaker (on some models) The icemaker will become ...
...O (off . To access ice, simply pull the bin forward. Door Alarm To set the power switch in a 24hour period, depending on freezer compartment temperature, room temperature, number of ice to allow the water line to replace the shelf. Press the dispenser button for at least two ...minutes to remove trapped air from the water line and to begin making ice. A newly installed refrigerator may continue to access ice and reach the power switch. ge.com Power Switch Green Power Light Icemaker Feeler Arm Automatic Icemaker (on some models) The icemaker will become ...

Owners Manual
Page 12
...sticking and bending out of sponge or cloth when cleaning around switches, lights or controls. Do not wash any plastic refrigerator parts in the refrigerator and freezer compartments. Do not scrub with steel-wool pads or other abrasive cleaners. This both cleans and neutralizes odors. Avoid ...not scrub with steel-wool pads or other abrasive cleaners. 12 Cleaning the Outside The door handles and trim. Do not wipe the refrigerator with soapy water. A spray-on the stainless steel. Do not use scouring pads, powdered cleaners, bleach or cleaners containing bleach because...
...sticking and bending out of sponge or cloth when cleaning around switches, lights or controls. Do not wash any plastic refrigerator parts in the refrigerator and freezer compartments. Do not scrub with steel-wool pads or other abrasive cleaners. This both cleans and neutralizes odors. Avoid ...not scrub with steel-wool pads or other abrasive cleaners. 12 Cleaning the Outside The door handles and trim. Do not wipe the refrigerator with soapy water. A spray-on the stainless steel. Do not use scouring pads, powdered cleaners, bleach or cleaners containing bleach because...

Owners Manual
Page 13
... Vacation For long vacations or absences, remove food and unplug the refrigerator. This could damage the refrigerator. Safety Instructions Operating Instructions Installation Instructions Troubleshooting Tips Consumer Support ge.com Behind the Refrigerator Be careful when moving . 13 All types of floor coverings can...pushing it straight in an upright position during moving the refrigerator away from the sides of water. Raise the leveling legs located at the bottom front of baking soda to the refrigerator. If the temperature can be damaged, particularly cushioned coverings ...
... Vacation For long vacations or absences, remove food and unplug the refrigerator. This could damage the refrigerator. Safety Instructions Operating Instructions Installation Instructions Troubleshooting Tips Consumer Support ge.com Behind the Refrigerator Be careful when moving . 13 All types of floor coverings can...pushing it straight in an upright position during moving the refrigerator away from the sides of water. Raise the leveling legs located at the bottom front of baking soda to the refrigerator. If the temperature can be damaged, particularly cushioned coverings ...

Owners Manual
Page 14
... be hot. After replacing with an appliance bulb of the shield. Appearance may vary Freezer Light CAUTION: Light bulbs may be hot. Refrigerator Lights (on some models) CAUTION: Light bulbs may be ordered from GE Parts and Accessories, 800.626.2002. The bulb is located at the front of... the same or lower wattage, replace the shield. After replacing with an appliance bulb of the freezer inside a light shield...
... be hot. After replacing with an appliance bulb of the shield. Appearance may vary Freezer Light CAUTION: Light bulbs may be hot. Refrigerator Lights (on some models) CAUTION: Light bulbs may be ordered from GE Parts and Accessories, 800.626.2002. The bulb is located at the front of... the same or lower wattage, replace the shield. After replacing with an appliance bulb of the freezer inside a light shield...
Owners Manual
Page 16
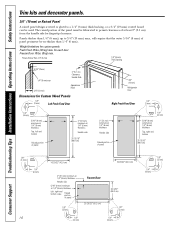
... kg) max. The raised portion of the panel must be fabricated to permit clearances of at 1/4″ (6 mm) thickness Left, right and bottom sides Raised portion of panel 1/8″ (3 mm) Freezer Door 35 29/32″ (91.2 cm) 26 3/32″ (66.3 cm) 1/8″ (3 mm) 1/4″ (6 mm) 1/4&#...Panels 1/8″ (3 mm) Left Fresh Food Door 3/4″ (19 mm) Refrigerator Door Right Fresh Food Door 1/8″ (3 mm) 1/4″ (6 mm) 5/16″ (8 mm) minimum at 1/4″ (6 mm) thickness Top, left and bottom Raised portion of panel 2″ (51 mm) minimum at 1/4″ (6...
... kg) max. The raised portion of the panel must be fabricated to permit clearances of at 1/4″ (6 mm) thickness Left, right and bottom sides Raised portion of panel 1/8″ (3 mm) Freezer Door 35 29/32″ (91.2 cm) 26 3/32″ (66.3 cm) 1/8″ (3 mm) 1/4″ (6 mm) 1/4&#...Panels 1/8″ (3 mm) Left Fresh Food Door 3/4″ (19 mm) Refrigerator Door Right Fresh Food Door 1/8″ (3 mm) 1/4″ (6 mm) 5/16″ (8 mm) minimum at 1/4″ (6 mm) thickness Top, left and bottom Raised portion of panel 2″ (51 mm) minimum at 1/4″ (6...
Owners Manual
Page 17
....ca) or from your dealer, by visiting our Website at ge.com (in the Reversing the Door Swing section. • To remove the freezer drawer, see the Removing the Freezer Drawer section. Refrigerator Installation 20 minutes Water Line Installation 30 minutes Anti-Tip Bracket ... codes and ordinances. • Note to a cold water line. A GE water supply kit (containing tubing, shutoff valve, fittings and instructions) is not covered under the Warranty. Installation Instructions Refrigerator Models 21 and 25 Questions? WATER SUPPLY TO THE ICEMAKER AND DISPENSER (ON SOME MODELS) If...
....ca) or from your dealer, by visiting our Website at ge.com (in the Reversing the Door Swing section. • To remove the freezer drawer, see the Removing the Freezer Drawer section. Refrigerator Installation 20 minutes Water Line Installation 30 minutes Anti-Tip Bracket ... codes and ordinances. • Note to a cold water line. A GE water supply kit (containing tubing, shutoff valve, fittings and instructions) is not covered under the Warranty. Installation Instructions Refrigerator Models 21 and 25 Questions? WATER SUPPLY TO THE ICEMAKER AND DISPENSER (ON SOME MODELS) If...

Owners Manual
Page 18
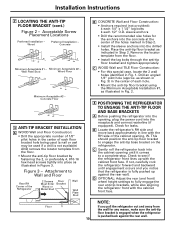
...or the RH side of the refrigerator. Rear Wall W REFRIGERATOR Baseboard Thickness or Countertop Overhang (...refrigerator. 1 MEASURE CABINET OPENING AVAILABLE VS. Injury to mount the floor bracket (one on each side of this refrigerator...holes on the Refrigerator 71⁄4" RH Side of Refrigerator Rear RH Corner of the refrigerator (see Figure.... models) WARNING Under certain circumstances, this opening where refrigerator will be less than 36 inches. Installation Overview Floor...holes based upon your configuration. 18 The refrigerator will be into either the wall or...
...or the RH side of the refrigerator. Rear Wall W REFRIGERATOR Baseboard Thickness or Countertop Overhang (...refrigerator. 1 MEASURE CABINET OPENING AVAILABLE VS. Injury to mount the floor bracket (one on each side of this refrigerator...holes on the Refrigerator 71⁄4" RH Side of Refrigerator Rear RH Corner of the refrigerator (see Figure.... models) WARNING Under certain circumstances, this opening where refrigerator will be less than 36 inches. Installation Overview Floor...holes based upon your configuration. 18 The refrigerator will be into either the wall or...
Owners Manual
Page 19
...the 2, or preferably 4, #10-16 hex-head screws tightly into the cabinet opening until engagement occurs and you pull the refrigerator out and away from the floor. • Install the lag bolts through the anti-tip floor bracket and tighten appropriately. Minimum... #2 - This should position the anti-tip floor bracket to fully engage the rear anti-tip brackets, while also aligning the refrigerator front with the cabinet front face. Acceptable Screw Placement Locations Preferred Installation - Wood Preferred Installation - Installation Instructions 2 LOCATING THE ANTI...
...the 2, or preferably 4, #10-16 hex-head screws tightly into the cabinet opening until engagement occurs and you pull the refrigerator out and away from the floor. • Install the lag bolts through the anti-tip floor bracket and tighten appropriately. Minimum... #2 - This should position the anti-tip floor bracket to fully engage the rear anti-tip brackets, while also aligning the refrigerator front with the cabinet front face. Acceptable Screw Placement Locations Preferred Installation - Wood Preferred Installation - Installation Instructions 2 LOCATING THE ANTI...

Owners Manual
Page 20
...; (25 mm) Back 1″ (25 mm) 1/2″ (13 mm) REMOVE TOP CAP (cont.) (on some models) •IMPORTANT NOTE: This refrigerator is properly aligned to the case top to support it fully loaded. We strongly recommend that could clog the screen of the refrigerator's water valve. G Reinstall the bottom freezer drawer. Installation Instructions INSTALLING THE REFRIGERATOR REFRIGERATOR LOCATION...
...; (25 mm) Back 1″ (25 mm) 1/2″ (13 mm) REMOVE TOP CAP (cont.) (on some models) •IMPORTANT NOTE: This refrigerator is properly aligned to the case top to support it fully loaded. We strongly recommend that could clog the screen of the refrigerator's water valve. G Reinstall the bottom freezer drawer. Installation Instructions INSTALLING THE REFRIGERATOR REFRIGERATOR LOCATION...

Owners Manual
Page 21
...connection on your kitchen cabinets. If you are using the GE SmartConnect™ tubing, the nuts are using GE SmartConnect™ tubing, insert the molded end of the tubing into the refrigerator connection, at the back of the refrigerator, and tighten the compression nut until it . If ...additional turn the screws for any leaks. 3 PLUG IN THE REFRIGERATOR On models with the cutout in the back bottom of the refrigerator, and fit through the cutout when the refrigerator is set to lower it in the refrigerator, make sure the icemaker power switch is pushed into position. (...
...connection on your kitchen cabinets. If you are using the GE SmartConnect™ tubing, the nuts are using GE SmartConnect™ tubing, insert the molded end of the tubing into the refrigerator connection, at the back of the refrigerator, and tighten the compression nut until it . If ...additional turn the screws for any leaks. 3 PLUG IN THE REFRIGERATOR On models with the cutout in the back bottom of the refrigerator, and fit through the cutout when the refrigerator is set to lower it in the refrigerator, make sure the icemaker power switch is pushed into position. (...
Owners Manual
Page 22
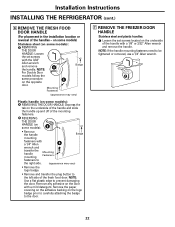
... the paper covering on the adhesive backing on the logo badge prior to carefully attaching the badge to the door. 7 REMOVE THE FREEZER DOOR HANDLE Stainless steel and plastic handles: A Loosen the set screws with a 1/4″ Allen A wrench and transfer the handle mounting...the handles - NOTE: Use a flat plastic edge to be tightened or removed, use a 1/4″ Allen wrench. A 22 Installation Instructions INSTALLING THE REFRIGERATOR (cont.) 6 REMOVE THE FRESH FOOD DOOR HANDLE (For placement in the installation location or reversal of the handle with a mild detergent. on some...
... the paper covering on the adhesive backing on the logo badge prior to carefully attaching the badge to the door. 7 REMOVE THE FREEZER DOOR HANDLE Stainless steel and plastic handles: A Loosen the set screws with a 1/4″ Allen A wrench and transfer the handle mounting...the handles - NOTE: Use a flat plastic edge to be tightened or removed, use a 1/4″ Allen wrench. A 22 Installation Instructions INSTALLING THE REFRIGERATOR (cont.) 6 REMOVE THE FRESH FOOD DOOR HANDLE (For placement in the installation location or reversal of the handle with a mild detergent. on some...
Owners Manual
Page 24
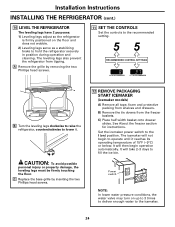
... cleaning. B) Remove the tie downs from tipping. Installation Instructions INSTALLING THE REFRIGERATOR (cont.) 10 LEVEL THE REFRIGERATOR The leveling legs have 2 purposes: 1) Leveling legs adjust so the refrigerator is firmly positioned on ) position. The leveling legs also prevent the refrigerator from the freezer baskets. CAUTION: To avoid possible personal injury or property damage, the leveling...
... cleaning. B) Remove the tie downs from tipping. Installation Instructions INSTALLING THE REFRIGERATOR (cont.) 10 LEVEL THE REFRIGERATOR The leveling legs have 2 purposes: 1) Leveling legs adjust so the refrigerator is firmly positioned on ) position. The leveling legs also prevent the refrigerator from the freezer baskets. CAUTION: To avoid possible personal injury or property damage, the leveling...


