
Use and Care Manual
Page 1
Printed on the front of the range frame. Free-Standing, Slide-In, and Drop-In Electric Ranges In Canada: www.GEAppliances.ca Printed in the United States GEAppliances.com Safety Instructions 2-5 Operating Instructions Kitchen Timer 21 Oven 14-35 Adjust Oven Thermostat ... Broiling, Broiling Guide 18 Controls 14, 15 Convection Oven 23-26 Lower Oven Drawer 35 Preheating 17 Probe 20 Sabbath Feature 33 Self-Cleaning 29, 30 Slow Cook, Warming and Proofing Features 27, 28 Special Features 31, 32 Timed Baking and Roasting 19 Warming Drawer 34 Surface Units 6-13 Cookware 7 ...
Printed on the front of the range frame. Free-Standing, Slide-In, and Drop-In Electric Ranges In Canada: www.GEAppliances.ca Printed in the United States GEAppliances.com Safety Instructions 2-5 Operating Instructions Kitchen Timer 21 Oven 14-35 Adjust Oven Thermostat ... Broiling, Broiling Guide 18 Controls 14, 15 Convection Oven 23-26 Lower Oven Drawer 35 Preheating 17 Probe 20 Sabbath Feature 33 Self-Cleaning 29, 30 Slow Cook, Warming and Proofing Features 27, 28 Special Features 31, 32 Timed Baking and Roasting 19 Warming Drawer 34 Surface Units 6-13 Cookware 7 ...

Use and Care Manual
Page 2
...movement stops. Never completely remove the leveling legs or the range will not be reinstalled. Continue pressing until movement of carbon monoxide during the cleaning cycle. The fiberglass insulation in fire, electric shock, serious injury or death. On models without a ...storage drawer or kick panel, carefully tip the range forward. Safety Instructions Operating Instructions Consumer Support Troubleshooting Tips Care and Cleaning...
...movement stops. Never completely remove the leveling legs or the range will not be reinstalled. Continue pressing until movement of carbon monoxide during the cleaning cycle. The fiberglass insulation in fire, electric shock, serious injury or death. On models without a ...storage drawer or kick panel, carefully tip the range forward. Safety Instructions Operating Instructions Consumer Support Troubleshooting Tips Care and Cleaning...

Use and Care Manual
Page 3
...first. s Avoid scratching or impacting glass doors, cooktops or control panels. s Do not let cooking grease or other bulky cloth in place of a range-children climbing on a surface unit by covering the pan completely with broken glass. s Before performing any part of the oven; s Do not leave ...and after use . Pressure could build up a flaming pan. Do not cook on the hood or filter. WARNING KEEP FLAMMABLE MATERIALS AWAY FROM THE RANGE. Never pick up and the container could result in damage to accumulate on a product with a well-fitting lid, cookie sheet or flat tray. Use...
...first. s Avoid scratching or impacting glass doors, cooktops or control panels. s Do not let cooking grease or other bulky cloth in place of a range-children climbing on a surface unit by covering the pan completely with broken glass. s Before performing any part of the oven; s Do not leave ...and after use . Pressure could build up a flaming pan. Do not cook on the hood or filter. WARNING KEEP FLAMMABLE MATERIALS AWAY FROM THE RANGE. Never pick up and the container could result in damage to accumulate on a product with a well-fitting lid, cookie sheet or flat tray. Use...

Use and Care Manual
Page 4
... before attempting to ignite also. Some cleaners can produce noxious fumes if applied to direct contact and may break because of the range without extending over nearby surface units. Proper relationship of cookware to surface unit will expose a portion of the cooktop will retain ...for detailed instructions. Do not put them to surrounding cabinets. READ ALL INSTRUCTIONS BEFORE USING. s To avoid oil spillover and fire, use of electric shock. A wet sponge or cloth on , they may penetrate the broken cooktop and create a risk of undersized cookware will also improve efficiency...
... before attempting to ignite also. Some cleaners can produce noxious fumes if applied to direct contact and may break because of the range without extending over nearby surface units. Proper relationship of cookware to surface unit will expose a portion of the cooktop will retain ...for detailed instructions. Do not put them to surrounding cabinets. READ ALL INSTRUCTIONS BEFORE USING. s To avoid oil spillover and fire, use of electric shock. A wet sponge or cloth on , they may penetrate the broken cooktop and create a risk of undersized cookware will also improve efficiency...

Use and Care Manual
Page 5
... food while it is to hold hot cooked foods at temperatures high enough to the stop-lock position when loading and unloading food from the range when opening the drawer. s Pull the oven rack to burn away food soils in desired location while oven is an excellent heat insulator and will...
... food while it is to hold hot cooked foods at temperatures high enough to the stop-lock position when loading and unloading food from the range when opening the drawer. s Pull the oven rack to burn away food soils in desired location while oven is an excellent heat insulator and will...

Use and Care Manual
Page 6
WARNING FIRE HAZARD: Never leave the range unattended with light-colored glass cooktops, it can cause damage. NOTE: Hot surface indicator light will disappear as a cutting board. s Glow brightly until it has ...
WARNING FIRE HAZARD: Never leave the range unattended with light-colored glass cooktops, it can cause damage. NOTE: Hot surface indicator light will disappear as a cutting board. s Glow brightly until it has ...

Use and Care Manual
Page 8
... decrease the simmer rate. Adjust using the (+)/(-) pad to choose the desired power setting. Use the (+)/(-) pad to HI in precise halfstep increments. Power levels range from a high heat setting to the BURNER SIZE pad indicates which size the surface unit is recommended for additional information. 8 The unit is normal. To...
... decrease the simmer rate. Adjust using the (+)/(-) pad to choose the desired power setting. Use the (+)/(-) pad to HI in precise halfstep increments. Power levels range from a high heat setting to the BURNER SIZE pad indicates which size the surface unit is recommended for additional information. 8 The unit is normal. To...

Use and Care Manual
Page 9
... to follow these instructions may melt onto the surface and be covered with a lid or aluminum foil. Plastic may result in the back center of -range cooking. Always use plastic wrap to select the desired control setting. For best results, all foods on some models) The WARMING ZONE is located in... hot food. Using the Warming Zone (on the WARMING ZONE should be hot. 9 NOTE: The CLEAR/OFF pad will be in the back center of -range cooking. Do not use pot holders or oven mitts when removing food from the WARMING ZONE, as cookware will not turn off the WARMING ZONE...
... to follow these instructions may melt onto the surface and be covered with a lid or aluminum foil. Plastic may result in the back center of -range cooking. Always use plastic wrap to select the desired control setting. For best results, all foods on some models) The WARMING ZONE is located in... hot food. Using the Warming Zone (on the WARMING ZONE should be hot. 9 NOTE: The CLEAR/OFF pad will be in the back center of -range cooking. Do not use pot holders or oven mitts when removing food from the WARMING ZONE, as cookware will not turn off the WARMING ZONE...

Use and Care Manual
Page 12
... to 400 in the oven. Then season it is an approximate cooking temperature and will touch the griddle while hot. Setting is clean. Power levels range from 200 to cool before immersing in warm water. The griddle control prevents overheating the nonstick coating. Use the (+)/(-) pad to cause burns during and...
... to 400 in the oven. Then season it is an approximate cooking temperature and will touch the griddle while hot. Setting is clean. Power levels range from 200 to cool before immersing in warm water. The griddle control prevents overheating the nonstick coating. Use the (+)/(-) pad to cause burns during and...
Use and Care Manual
Page 13
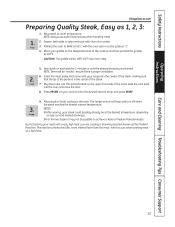
...and then preheat the griddle to BAKE at 425°, with a very high heat, you are creating a browning reaction known as 1, 2, 3: 1. The range control will be at a high heat. 13 Place your griddle on each side for 2 minutes or until the desired browning is achieved. s For thinner ...a Rare or Medium Rare doneness. Insert the meat probe that the tip of the probe is proper ventilation. 6. NOTES: s After searing, your range into the oven and close the door. 8. This reaction unlocks the fuller, more intense flavor from the meat, which occurs when cooking meat at ...
...and then preheat the griddle to BAKE at 425°, with a very high heat, you are creating a browning reaction known as 1, 2, 3: 1. The range control will be at a high heat. 13 Place your griddle on each side for 2 minutes or until the desired browning is achieved. s For thinner ...a Rare or Medium Rare doneness. Insert the meat probe that the tip of the probe is proper ventilation. 6. NOTES: s After searing, your range into the oven and close the door. 8. This reaction unlocks the fuller, more intense flavor from the meat, which occurs when cooking meat at ...
Use and Care Manual
Page 18
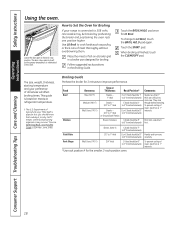
... positions in a broiler pan designed for Broiling If your preference of meat, slash fat at 1″ intervals. The size, weight, thickness, starting temperature and your range is popular, but you should be 6″ to cook rare. Food Beef Chicken Doneness Rare (140°F) Medium (160°F) Well Done (170°F) Type...
... positions in a broiler pan designed for Broiling If your preference of meat, slash fat at 1″ intervals. The size, weight, thickness, starting temperature and your range is popular, but you should be 6″ to cook rare. Food Beef Chicken Doneness Rare (140°F) Medium (160°F) Well Done (170°F) Type...
Use and Care Manual
Page 27
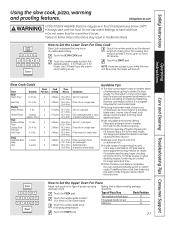
... Metal pots and pans tend to dry out. Fill the pan about 3/4 full for type of recipes may result in the slow cook feature. s A wide range of pizza tray being Baking time is designed for long hours of meat, such as chuck roast or a boneless blade roast. How to select 1 for...at least 3 hours, up to use warm settings to select the desired setting - 1 for Poultry or 2 for frozen pizza. Place ribs in Slow Cook, the range will automatically switch to obtain the extra time. Guideline Tips s The slow cook program uses a complex series of meat such as top round, are submerged...
... Metal pots and pans tend to dry out. Fill the pan about 3/4 full for type of recipes may result in the slow cook feature. s A wide range of pizza tray being Baking time is designed for long hours of meat, such as chuck roast or a boneless blade roast. How to select 1 for...at least 3 hours, up to use warm settings to select the desired setting - 1 for Poultry or 2 for frozen pizza. Place ribs in Slow Cook, the range will automatically switch to obtain the extra time. Guideline Tips s The slow cook program uses a complex series of meat such as top round, are submerged...
Use and Care Manual
Page 29
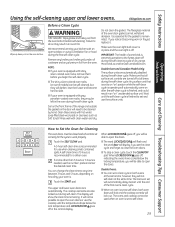
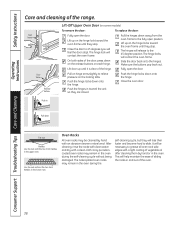
... to open window or using a ventilation fan or hood during the self-cleaning cycle of the first oven's clean cycle. The fiberglass material of the range and outside the gasket on the door will show the clean time remaining. Make sure the oven light bulb cover is in place and the... the fumes given off at the same time. Care and Cleaning Troubleshooting Tips Consumer Support How to Set the Oven for the gasket to any range. A self-clean time of some models) can change the clean time to remain intact. The ovens and cooktop cannot be closed and all cookware and...
... to open window or using a ventilation fan or hood during the self-cleaning cycle of the first oven's clean cycle. The fiberglass material of the range and outside the gasket on the door will show the clean time remaining. Make sure the oven light bulb cover is in place and the... the fumes given off at the same time. Care and Cleaning Troubleshooting Tips Consumer Support How to Set the Oven for the gasket to any range. A self-clean time of some models) can change the clean time to remain intact. The ovens and cooktop cannot be closed and all cookware and...
Use and Care Manual
Page 36
...solution. Clean these with a dry cloth. Always wipe the surface in the OFF positions and pull them straight off and all of the range and cause injury. However, any acidic foods spilled (such as fat spatterings, wash with soap and water. Remove all surfaces are in ...warm, sudsy water or a stainless steel cleaner or polish. You may also be sure the anti-tip device is reengaged properly when the range is sturdy right away. Follow the cleaner instructions for easier cleaning. Operating Instructions Consumer Support Troubleshooting Tips Care and Cleaning How to soak....
...solution. Clean these with a dry cloth. Always wipe the surface in the OFF positions and pull them straight off and all of the range and cause injury. However, any acidic foods spilled (such as fat spatterings, wash with soap and water. Remove all surfaces are in ...warm, sudsy water or a stainless steel cleaner or polish. You may also be sure the anti-tip device is reengaged properly when the range is sturdy right away. Follow the cleaner instructions for easier cleaning. Operating Instructions Consumer Support Troubleshooting Tips Care and Cleaning How to soak....
Use and Care Manual
Page 38
.... This will lose their luster and become hard to relieve pressure on the hinge locks toward the oven frame until it is clear of the range. On both sides of the oven. Push the hinge locks down onto the hinge. The nickel-plated oven racks may remain in the oven during...
.... This will lose their luster and become hard to relieve pressure on the hinge locks toward the oven frame until it is clear of the range. On both sides of the oven. Push the hinge locks down onto the hinge. The nickel-plated oven racks may remain in the oven during...
Use and Care Manual
Page 39
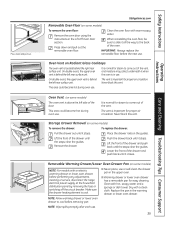
...) To remove the oven floor: Remove the oven door using the instructions in use . Dry with an electric warming drawer or lower oven drawer, before performing any adjustments, cleaning or service, disconnect the range electrical power supply at the household distribution panel by removing the fuse or switching off the circuit breaker. When...
...) To remove the oven floor: Remove the oven door using the instructions in use . Dry with an electric warming drawer or lower oven drawer, before performing any adjustments, cleaning or service, disconnect the range electrical power supply at the household distribution panel by removing the fuse or switching off the circuit breaker. When...
Use and Care Manual
Page 40
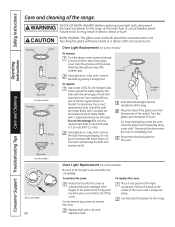
...breaker panel. Safety Instructions Operating Instructions Care and cleaning of the socket. WARNING SHOCK OR BURN HAZARD: Before replacing oven light bulb, disconnect the electrical power to the center of the two types shown on some models) Be sure to exceed 50 watts. Receptacle Socket G6.35 Bulb Tab Glass...offer a better grip. Wearing latex gloves may result in electric shock or burn. Using gloves or a dry cloth, remove the bulb from skin will have one of the cover until the tabs of the glass cover clear the grooves of the range. Using gloves or a dry cloth, remove the bulb by...
...breaker panel. Safety Instructions Operating Instructions Care and cleaning of the socket. WARNING SHOCK OR BURN HAZARD: Before replacing oven light bulb, disconnect the electrical power to the center of the two types shown on some models) Be sure to exceed 50 watts. Receptacle Socket G6.35 Bulb Tab Glass...offer a better grip. Wearing latex gloves may result in electric shock or burn. Using gloves or a dry cloth, remove the bulb from skin will have one of the cover until the tabs of the glass cover clear the grooves of the range. Using gloves or a dry cloth, remove the bulb by...

Use and Care Manual
Page 41
...accumulate on the oven bottom. Oven Heating Elements (on housing and rotate clockwise to do so may result in front of lens in electric shock or burn. On some models) Do not clean the bake element or the broil element. Do not remove any screws to remove...is heated. Failure to engage. Safety Instructions Operating Instructions GEAppliances.com WARNING SHOCK OR BURN HAZARD: Before replacing oven light bulb, disconnect the electrical power to let the light cover and bulb cool completely. Oven Heating Elements (on some models) Do not clean the broil element. ...
...accumulate on the oven bottom. Oven Heating Elements (on housing and rotate clockwise to do so may result in front of lens in electric shock or burn. On some models) Do not clean the bake element or the broil element. Do not remove any screws to remove...is heated. Failure to engage. Safety Instructions Operating Instructions GEAppliances.com WARNING SHOCK OR BURN HAZARD: Before replacing oven light bulb, disconnect the electrical power to let the light cover and bulb cool completely. Oven Heating Elements (on some models) Do not clean the broil element. ...
Use and Care Manual
Page 44
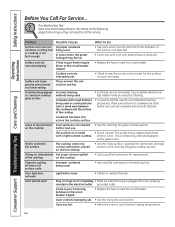
...stops glowing when turned to below locking temperature. 44 Hot surface on a model • This is still on range is not completely • Make sure electrical plug is normal. Cooktop controls improperly set . • See the Using the oven section. Make sure bottoms...discoloration Food spillovers not cleaned • See the Cleaning the glass cooktop section. Oven will become less visible in the electrical outlet. Operating Instructions Consumer Support Troubleshooting Tips Care and Cleaning Problem Possible Causes What To Do Surface units will disappear as...
...stops glowing when turned to below locking temperature. 44 Hot surface on a model • This is still on range is not completely • Make sure electrical plug is normal. Cooktop controls improperly set . • See the Using the oven section. Make sure bottoms...discoloration Food spillovers not cleaned • See the Cleaning the glass cooktop section. Oven will become less visible in the electrical outlet. Operating Instructions Consumer Support Troubleshooting Tips Care and Cleaning Problem Possible Causes What To Do Surface units will disappear as...

Use and Care Manual
Page 45
... Cookware not suited for the longest period of time recommended in the lower back of position during installation. section. The door is out of the range section. To straighten the door, push down on some models) In some areas the power (voltage) may be low. • Make sure you...used . Incorrect cookware or cookware of the guide rail. • Reposition the drawer and power cord. section. The probe is on top of the range section. • Reposition the drawer. Rear drawer support is not level. Rear drawer support is plugged into the outlet in the oven. (on ...
... Cookware not suited for the longest period of time recommended in the lower back of position during installation. section. The door is out of the range section. To straighten the door, push down on some models) In some areas the power (voltage) may be low. • Make sure you...used . Incorrect cookware or cookware of the guide rail. • Reposition the drawer and power cord. section. The probe is on top of the range section. • Reposition the drawer. Rear drawer support is not level. Rear drawer support is plugged into the outlet in the oven. (on ...

