

Use and Care Manual
Page 1
Free-Standing, Slide-In, and Drop-In Electric Ranges In Canada: www.GEAppliances.ca Printed in the United States GEAppliances.com Safety ...14, 15 Convection Oven 23-26 Lower Oven Drawer 35 Preheating 17 Probe 20 Sabbath Feature 33 Self-Cleaning 29, 30 Slow Cook, Warming and Proofing Features 27, 28 Special Features 31, 32 Timed Baking and Roasting 19 Warming Drawer ... 52 Warranty 51 Owner's Manual Quick Set V, Quick Set VI and Next Step Control Write the model and serial numbers here: Model Serial You can find them on a label behind the drawer or behind the lower oven door on...
Free-Standing, Slide-In, and Drop-In Electric Ranges In Canada: www.GEAppliances.ca Printed in the United States GEAppliances.com Safety ...14, 15 Convection Oven 23-26 Lower Oven Drawer 35 Preheating 17 Probe 20 Sabbath Feature 33 Self-Cleaning 29, 30 Slow Cook, Warming and Proofing Features 27, 28 Special Features 31, 32 Timed Baking and Roasting 19 Warming Drawer ... 52 Warranty 51 Owner's Manual Quick Set V, Quick Set VI and Next Step Control Write the model and serial numbers here: Model Serial You can find them on a label behind the drawer or behind the lower oven door on...

Use and Care Manual
Page 2
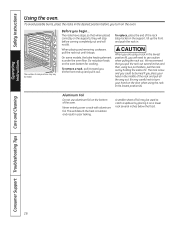
... installed and engaged properly, lower the oven door and gently apply medium force at no cost (in fire, electric shock, serious injury or death. For Drop-In Ranges: To check if the bracket is pulled from the wall for complete details before using a ventilation fan or hood. 2..., birth defects or other reproductive harm, and requires businesses to see that the leveling leg is engaged. On models without a storage drawer or kick panel, carefully tip the range forward. READ ALL INSTRUCTIONS BEFORE USING. The bracket should be secured by a properly installed anti-tip bracket. ...
... installed and engaged properly, lower the oven door and gently apply medium force at no cost (in fire, electric shock, serious injury or death. For Drop-In Ranges: To check if the bracket is pulled from the wall for complete details before using a ventilation fan or hood. 2..., birth defects or other reproductive harm, and requires businesses to see that the leveling leg is engaged. On models without a storage drawer or kick panel, carefully tip the range forward. READ ALL INSTRUCTIONS BEFORE USING. The bracket should be secured by a properly installed anti-tip bracket. ...

Use and Care Manual
Page 4
...a scraper. Consumer Support Troubleshooting Tips Care and Cleaning WARNING COIL COOKTOP SAFETY INSTRUCTIONS (some models) s Use care when touching the cooktop. Do not selfclean the surface units in temperature.... Doing so may result in a dishwasher. Their absence during cooking could damage range parts and wiring. 4 The use a minimum amount of undersized cookware will also improve ... broken cooktop. s To avoid the possibility of a burn or electric shock, always be scratched with excessive amounts of electric shock. s Be sure the drip pans are not covered and are...
...a scraper. Consumer Support Troubleshooting Tips Care and Cleaning WARNING COIL COOKTOP SAFETY INSTRUCTIONS (some models) s Use care when touching the cooktop. Do not selfclean the surface units in temperature.... Doing so may result in a dishwasher. Their absence during cooking could damage range parts and wiring. 4 The use a minimum amount of undersized cookware will also improve ... broken cooktop. s To avoid the possibility of a burn or electric shock, always be scratched with excessive amounts of electric shock. s Be sure the drip pans are not covered and are...

Use and Care Manual
Page 5
...than 2 hours. Grease in warming drawer. s When using cooking or roasting bags in the oven. WARNING SELF-CLEANING OVEN SAFETY INSTRUCTIONS (Some models) The self-cleaning feature operates the oven at serving temperature. Only gray porcelain-coated oven racks may ignite. Excessive amount of the drawer and potentially... the oven when not in or around any kind should be left in an oven can cause burns to clean other utensils from the range when opening the drawer. s Do not touch the heating element or the interior surface of the warming drawer is below 140°F....
...than 2 hours. Grease in warming drawer. s When using cooking or roasting bags in the oven. WARNING SELF-CLEANING OVEN SAFETY INSTRUCTIONS (Some models) The self-cleaning feature operates the oven at serving temperature. Only gray porcelain-coated oven racks may ignite. Excessive amount of the drawer and potentially... the oven when not in or around any kind should be left in an oven can cause burns to clean other utensils from the range when opening the drawer. s Do not touch the heating element or the interior surface of the warming drawer is below 140°F....

Use and Care Manual
Page 6
...zones to follow these instructions can scratch the glass. s Do not use caution when touching the cooktop. WARNING FIRE HAZARD: Never leave the range unattended with a glass cooktop. Keep flammable items away from the surface units when the food is cooked. Do not slide cookware across the ... even after the surface units are high. An indicator light will : s Stay on . It is normal for the first time. NOTE: On models with the number of window cleaner may vary from the oven or surface on . Consumer Support Troubleshooting Tips Care and Cleaning 6 NOTE: Throughout this ...
...zones to follow these instructions can scratch the glass. s Do not use caution when touching the cooktop. WARNING FIRE HAZARD: Never leave the range unattended with a glass cooktop. Keep flammable items away from the surface units when the food is cooked. Do not slide cookware across the ... even after the surface units are high. An indicator light will : s Stay on . It is normal for the first time. NOTE: On models with the number of window cleaner may vary from the oven or surface on . Consumer Support Troubleshooting Tips Care and Cleaning 6 NOTE: Throughout this ...
Use and Care Manual
Page 7
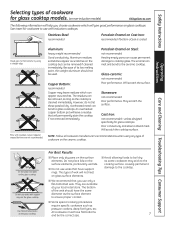
...cookers, deep-fat fryers, etc. Will scratch the cooktop surface. Stainless Steel: recommended Porcelain Enamel on non-induction models) GEAppliances.com The following information will permanently stain the cooktop if not removed immediately. Copper Bottom: recommended Copper ...cooking surface, causing permanent damage to the cooktop. 7 Cast Iron: not recommended-unless designed specifically for glass cooktop models. (on Cast Iron: recommended if bottom of pan is cleaned immediately. Safety Instructions OperaIntOisnptgreurIacnttsiitonrngusctions Care and Cleaning Troubleshooting...
...cookers, deep-fat fryers, etc. Will scratch the cooktop surface. Stainless Steel: recommended Porcelain Enamel on non-induction models) GEAppliances.com The following information will permanently stain the cooktop if not removed immediately. Copper Bottom: recommended Copper ...cooking surface, causing permanent damage to the cooktop. 7 Cast Iron: not recommended-unless designed specifically for glass cooktop models. (on Cast Iron: recommended if bottom of pan is cleaned immediately. Safety Instructions OperaIntOisnptgreurIacnttsiitonrngusctions Care and Cleaning Troubleshooting...

Use and Care Manual
Page 8
...The power level with each touch. then touch the (+)/(-) pad. Use the (+)/(-) pad to select the desired burner size. Power levels range from a high heat setting to HI. Use the (+)/(-) pad to increase or decrease the simmer rate. Safety Instructions Operating Instructions Consumer Support... Troubleshooting Tips Care and Cleaning Using the surface units-Touch pad-controlled models. To turn on , it will glow red for "Keep Warm." The unit is reached. NOTE: This cooktop has a rapid ...
...The power level with each touch. then touch the (+)/(-) pad. Use the (+)/(-) pad to select the desired burner size. Power levels range from a high heat setting to HI. Use the (+)/(-) pad to increase or decrease the simmer rate. Safety Instructions Operating Instructions Consumer Support... Troubleshooting Tips Care and Cleaning Using the surface units-Touch pad-controlled models. To turn on , it will glow red for "Keep Warm." The unit is reached. NOTE: This cooktop has a rapid ...

Use and Care Manual
Page 9
.... "WARMER ON" will not turn off the WARMING ZONE. WARMING ZONE SELECT ON OFF Using the Warming Zone (on some models) The WARMING ZONE is located in the back center of -range cooking. To turn off the WARMING ZONE: Touch the WARMING ZONE ON/OFF pad. Using the Warming Zone (on some... models) The WARMING ZONE is located in the back center of -range cooking. Always use warm settings to clean. Plastic may melt onto the surface and be very difficult to heat cold ...
.... "WARMER ON" will not turn off the WARMING ZONE. WARMING ZONE SELECT ON OFF Using the Warming Zone (on some models) The WARMING ZONE is located in the back center of -range cooking. To turn off the WARMING ZONE: Touch the WARMING ZONE ON/OFF pad. Using the Warming Zone (on some... models) The WARMING ZONE is located in the back center of -range cooking. Always use warm settings to clean. Plastic may melt onto the surface and be very difficult to heat cold ...
Use and Care Manual
Page 10
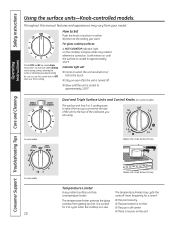
... the surface is turned on or hot to approximately 150°F. Consumer Support Troubleshooting Tips Care and Cleaning On some models. Safety Instructions Operating Instructions Using the surface units-Knob-controlled models. At both OFF and HI the control clicks into position. How to Set Push the knob in and turn the... control knob to OFF when you want. s The pan bottom is no pan on some models) The surface unit has 2 or 3 cooking sizes to select from so you can match the size of the unit to the setting you finish cooking...
... the surface is turned on or hot to approximately 150°F. Consumer Support Troubleshooting Tips Care and Cleaning On some models. Safety Instructions Operating Instructions Using the surface units-Knob-controlled models. At both OFF and HI the control clicks into position. How to Set Push the knob in and turn the... control knob to OFF when you want. s The pan bottom is no pan on some models) The surface unit has 2 or 3 cooking sizes to select from so you can match the size of the unit to the setting you finish cooking...
Use and Care Manual
Page 11
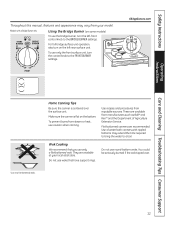
..., use the bridge burner, turn the left -rear surface unit. Do not use woks that you use only the front surface unit, turn on some models) To use caution when canning. Do not use round-bottom woks. You could be seriously burned if the wok tipped over the surface unit.... Models with rippled bottoms may vary from reputable sources. Make sure the canner is centered over . 11 Wok Cooking We recommend that have support rings. To ...
..., use the bridge burner, turn the left -rear surface unit. Do not use woks that you use only the front surface unit, turn on some models) To use caution when canning. Do not use round-bottom woks. You could be seriously burned if the wok tipped over the surface unit.... Models with rippled bottoms may vary from reputable sources. Make sure the canner is centered over . 11 Wok Cooking We recommend that have support rings. To ...

Use and Care Manual
Page 12
CAUTION BURN HAZARD: Griddle surfaces may need to be displayed until the desired temperature has been reached. Power levels range from 200 to activate the griddle. Most griddled foods require cooking on the cooktop. Preheat Type of Food Setting Cook Setting Pancakes 375 375 ...and all surface units are off , touch the ON/OFF pad. NOTE: The nonstick coating will appear in use . Do not cut foods on some models) To use blue or green scrubbing pads or steel wool. "..." Failure to cool before immersing in burns. Use the (+)/(-) pad to avoid degrading the nonstick...
CAUTION BURN HAZARD: Griddle surfaces may need to be displayed until the desired temperature has been reached. Power levels range from 200 to activate the griddle. Most griddled foods require cooking on the cooktop. Preheat Type of Food Setting Cook Setting Pancakes 375 375 ...and all surface units are off , touch the ON/OFF pad. NOTE: The nonstick coating will appear in use . Do not cut foods on some models) To use blue or green scrubbing pads or steel wool. "..." Failure to cool before immersing in burns. Use the (+)/(-) pad to avoid degrading the nonstick...
Use and Care Manual
Page 14
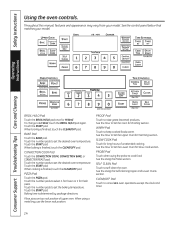
See the control panel below that matches your model. When baking is finished, touch the CLEAR/OFF pad. Touch the number pads to keep cooked foods warm. WARM Pad Touch to set the desired .... SELF CLEAN Pad Touch to cancel ALL oven operations except the clock and timer. 14 Throughout this manual, features and appearance may vary from your model.
See the control panel below that matches your model. When baking is finished, touch the CLEAR/OFF pad. Touch the number pads to keep cooked foods warm. WARM Pad Touch to set the desired .... SELF CLEAN Pad Touch to cancel ALL oven operations except the clock and timer. 14 Throughout this manual, features and appearance may vary from your model.
Use and Care Manual
Page 15
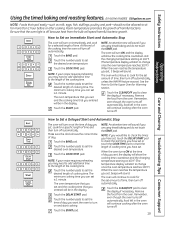
...flash in the display when there has been a power outage. The CONTROL LOCKOUT mode affects all programmed functions must be set . On some models, press START. The lowest time you are lit on the display and "Set" begins to lock out the touch pads and the cooktop..."1" are setting hours and minutes only. The warming drawer starts automatically after you set to the correct time of day for 3 seconds. On some models - toggle between settings by touching the WARMING DRAWER pad. CLOCK Pad NOTE: When setting times, you can set for a timed oven operation and ...
...flash in the display when there has been a power outage. The CONTROL LOCKOUT mode affects all programmed functions must be set . On some models, press START. The lowest time you are lit on the display and "Set" begins to lock out the touch pads and the cooktop..."1" are setting hours and minutes only. The warming drawer starts automatically after you set to the correct time of day for 3 seconds. On some models - toggle between settings by touching the WARMING DRAWER pad. CLOCK Pad NOTE: When setting times, you can set for a timed oven operation and ...
Use and Care Manual
Page 16
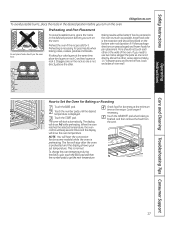
... you place your hand on the door when using two pot holders, pull the rack out by model. The racks have stops, so that you are using a rack in the lowest position (A). On some models, the bake heating element is low and you could be used to use aluminum foil on the...
... you place your hand on the door when using two pot holders, pull the rack out by model. The racks have stops, so that you are using a rack in the lowest position (A). On some models, the bake heating element is low and you could be used to use aluminum foil on the...
Use and Care Manual
Page 17
... oven temperature. This is centered in the oven as much as possible. Cook longer if necessary. Baking results will hear the convection fan (on some models) while the oven is finished, and then remove the food from the front, back and sides of the oven. NOTE: You will be placed on...
... oven temperature. This is centered in the oven as much as possible. Cook longer if necessary. Baking results will hear the convection fan (on some models) while the oven is finished, and then remove the food from the front, back and sides of the oven. NOTE: You will be placed on...
Use and Care Manual
Page 19
... the temperature you entered will continue to clear the display if necessary. Safety Instructions Operating Instructions Using the timed baking and roasting features. (on some models) GEAppliances.com NOTE: Foods that spoil easily-such as milk, eggs, fish, stuffings, poultry and pork-should not be allowed to set the desired length...
... the temperature you entered will continue to clear the display if necessary. Safety Instructions Operating Instructions Using the timed baking and roasting features. (on some models) GEAppliances.com NOTE: Foods that spoil easily-such as milk, eggs, fish, stuffings, poultry and pork-should not be allowed to set the desired length...
Use and Care Manual
Page 20
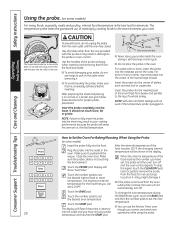
After preparing the meat and placing it on some models) For many foods, especially roasts and poultry, internal food temperature is the best test for doneness. Insert the probe into the food. Plug the probe ... and the oven turn off and the oven control signals. NOTE: Self-clean and Broil settings will be shown in damage to pull on some models) Insert the probe fully into the center of the lowest large muscle. The maximum internal temperature for proper probe placement. When the internal temperature of...
After preparing the meat and placing it on some models) For many foods, especially roasts and poultry, internal food temperature is the best test for doneness. Insert the probe into the food. Plug the probe ... and the oven turn off and the oven control signals. NOTE: Self-clean and Broil settings will be shown in damage to pull on some models) Insert the probe fully into the center of the lowest large muscle. The maximum internal temperature for proper probe placement. When the internal temperature of...
Use and Care Manual
Page 21
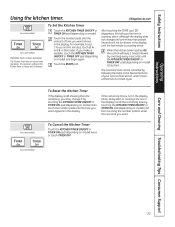
...not change until one beep every 6 seconds until the time you make a mistake, touch the KITCHEN TIMER ON/OFF or TIMER OFF pad (depending on model) and then touching the number pads to set 2 hours and 45 minutes, touch 2, 4 and 5 in the display), recall the remaining time by ... display. this tells you want shows in hours and minutes. Safety Instructions Operating Instructions Using the kitchen timer. GEAppliances.com (on some models) (on some models) To Reset the Kitchen Timer If the display is still showing the time remaining, you may change it by touching the KITCHEN TIMER ...
...not change until one beep every 6 seconds until the time you make a mistake, touch the KITCHEN TIMER ON/OFF or TIMER OFF pad (depending on model) and then touching the number pads to set 2 hours and 45 minutes, touch 2, 4 and 5 in the display), recall the remaining time by ... display. this tells you want shows in hours and minutes. Safety Instructions Operating Instructions Using the kitchen timer. GEAppliances.com (on some models) (on some models) To Reset the Kitchen Timer If the display is still showing the time remaining, you may change it by touching the KITCHEN TIMER ...
Use and Care Manual
Page 22
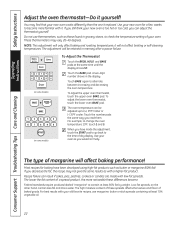
...% fat). Touch BAKE again to contain at least 80% fat by weight. The oven temperature can be retained in memory after a power failure. + (on some models) + BAKE BROIL HI/LO BAKE 12345 67890 START (on the other hand, contain less fat and more noticeable these spreads affects the texture and flavor.... To adjust the lower oven thermostat, touch the lower oven BAKE pad. Touch the BAKE pad. If you would normally. Low-fat spreads, on some models) To Adjust the Thermostat Touch the BROIL HI/LO and BAKE pads at least 70% vegetable oil. 22 For example, to the time of baked...
...% fat). Touch BAKE again to contain at least 80% fat by weight. The oven temperature can be retained in memory after a power failure. + (on some models) + BAKE BROIL HI/LO BAKE 12345 67890 START (on the other hand, contain less fat and more noticeable these spreads affects the texture and flavor.... To adjust the lower oven thermostat, touch the lower oven BAKE pad. Touch the BAKE pad. If you would normally. Low-fat spreads, on some models) To Adjust the Thermostat Touch the BROIL HI/LO and BAKE pads at least 70% vegetable oil. 22 For example, to the time of baked...
Use and Care Manual
Page 23
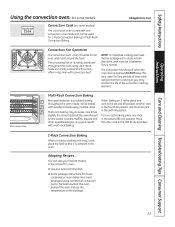
... and the third rack in the sixth (F) position. Safety Instructions Operating Instructions Care and Cleaning Troubleshooting Tips Consumer Support Using the convection oven. (on some models) Convection Cook (on some models) The convection oven comes with one convection cook mode and can be baked with excellent results using commercial convection ovens.
... and the third rack in the sixth (F) position. Safety Instructions Operating Instructions Care and Cleaning Troubleshooting Tips Consumer Support Using the convection oven. (on some models) Convection Cook (on some models) The convection oven comes with one convection cook mode and can be baked with excellent results using commercial convection ovens.


