Use and Care Manual
Page 1
Gas Downdraft Cooktop ge.com Safety Instructions . . . .2-5 Operating Instructions Accessories 7 Controls 8, 9 Cookware 9 Electric Ignition 8 Features 6 Griddle 14 Grill Module 10-13 Surface Burner Modules 6, 8-10 Ventilation System 6, 9 Installation Owner's Manual Instructions 18-29 & Installation LP Conversion ... Grease Jar 15 Griddle Accessory 17 Grill Burner 16 Grill Grate 16 Igniters 17 Porcelain Burner Basin . . . . . 17 Porcelain Cooktop 15 Sealed Burner Module . . . . . 17 Stainless Steel Surfaces . . . . .15 Vent Grille and Filter 16 Printed in Korea Write the...
Gas Downdraft Cooktop ge.com Safety Instructions . . . .2-5 Operating Instructions Accessories 7 Controls 8, 9 Cookware 9 Electric Ignition 8 Features 6 Griddle 14 Grill Module 10-13 Surface Burner Modules 6, 8-10 Ventilation System 6, 9 Installation Owner's Manual Instructions 18-29 & Installation LP Conversion ... Grease Jar 15 Griddle Accessory 17 Grill Burner 16 Grill Grate 16 Igniters 17 Porcelain Burner Basin . . . . . 17 Porcelain Cooktop 15 Sealed Burner Module . . . . . 17 Stainless Steel Surfaces . . . . .15 Vent Grille and Filter 16 Printed in Korea Write the...
Use and Care Manual
Page 8
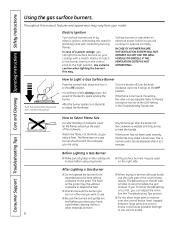
... than the bottom of the electric spark igniting the burner. Before Lighting a Gas Burner s Make sure all grates on the cooktop are lit by electric ignition, eliminating the need for an s When trying to Light a Gas Surface Burner Push the control knob down and turn on the grate may make... sides of time without is wasted and only serves to the LITE position. See the Troubleshooting Tips section. DO NOT USE THE GRILL MODULE OR GRIDDLE IF THE VENTILATION SYSTEM IS NOT OPERATIONAL. Throughout this way. Use extreme caution when lighting the burners this manual, features and...
... than the bottom of the electric spark igniting the burner. Before Lighting a Gas Burner s Make sure all grates on the cooktop are lit by electric ignition, eliminating the need for an s When trying to Light a Gas Surface Burner Push the control knob down and turn on the grate may make... sides of time without is wasted and only serves to the LITE position. See the Troubleshooting Tips section. DO NOT USE THE GRILL MODULE OR GRIDDLE IF THE VENTILATION SYSTEM IS NOT OPERATIONAL. Throughout this way. Use extreme caution when lighting the burners this manual, features and...
Use and Care Manual
Page 9
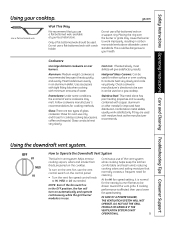
...MODULE OR GRIDDLE IF THE VENTILATION SYSTEM IS NOT OPERATIONAL. 9 At the HI fan speed setting, it is in use a flat-bottomed wok, available at your local retail store. Using the downdraft vent system. To turn on the cooktop. Cookware Use large diameter cookware on a gas cooktop.... Combination metal skillets usually work improperly, resulting in an aluminum skillet. Check cookware manufacturer's directions to be used for improved heat distribution. Heatproof Glass-Ceramic: Can be used on rear burners. ge....
...MODULE OR GRIDDLE IF THE VENTILATION SYSTEM IS NOT OPERATIONAL. 9 At the HI fan speed setting, it is in use a flat-bottomed wok, available at your local retail store. Using the downdraft vent system. To turn on the cooktop. Cookware Use large diameter cookware on a gas cooktop.... Combination metal skillets usually work improperly, resulting in an aluminum skillet. Check cookware manufacturer's directions to be used for improved heat distribution. Heatproof Glass-Ceramic: Can be used on rear burners. ge....
Use and Care Manual
Page 17
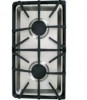
... burners of your cooktop are secured to the cooktop module and are blocked, use a twist tie or paper clip to absorb the heat from discoloring or staining: • Clean the cooktop after each use....coarse scouring pads. Use a dry paper towel or scrub pad to properly ignite the gas. Porcelain Burner Basin This area is important to keep the electrode clean. DO NOT ...off when cool. Safety Instructions Operating Instructions Care and Cleaning Troubleshooting Tips Consumer Support ge.com Igniters It is located under the grill and surface burners and should be properly...
... burners of your cooktop are secured to the cooktop module and are blocked, use a twist tie or paper clip to absorb the heat from discoloring or staining: • Clean the cooktop after each use....coarse scouring pads. Use a dry paper towel or scrub pad to properly ignite the gas. Porcelain Burner Basin This area is important to keep the electrode clean. DO NOT ...off when cool. Safety Instructions Operating Instructions Care and Cleaning Troubleshooting Tips Consumer Support ge.com Igniters It is located under the grill and surface burners and should be properly...
Use and Care Manual
Page 19
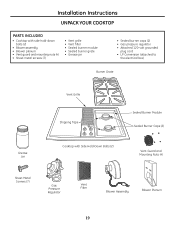
... • Attached 120-volt grounded plug cord • LP Conversion (attached to the electrical box) Burner Grate Grease Jar Vent Grille Shipping Tape Cooktop with Side Hold-Down Bolts (2) Sealed Burner Module Sealed Burner Caps (2) Vent Guard and Mounting Nuts (4) Sheet Metal Screws (7) Gas Pressure Regulator Vent Filter Blower Assembly Blower Plenum 19
... • Attached 120-volt grounded plug cord • LP Conversion (attached to the electrical box) Burner Grate Grease Jar Vent Grille Shipping Tape Cooktop with Side Hold-Down Bolts (2) Sealed Burner Module Sealed Burner Caps (2) Vent Guard and Mounting Nuts (4) Sheet Metal Screws (7) Gas Pressure Regulator Vent Filter Blower Assembly Blower Plenum 19
Use and Care Manual
Page 29
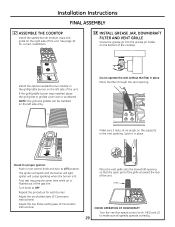
... grease jar holder on the bottom of the grille is lit. Install the optional sealed burner module or the grill/griddle burner on the left side of the unit. Check for proper ignition:... without the filter in the vent opening. Installation Instructions FINAL ASSEMBLY 17 ASSEMBLE THE COOKTOP Install the sealed burner module, caps and grate on the supports in place. Place the filter through the vent...speeds operate correctly. Make sure it rests, at an angle, on the right side of the gas line. Latch it as desired. If the grill/griddle burner was installed, place the grill grate...
... grease jar holder on the bottom of the grille is lit. Install the optional sealed burner module or the grill/griddle burner on the left side of the unit. Check for proper ignition:... without the filter in the vent opening. Installation Instructions FINAL ASSEMBLY 17 ASSEMBLE THE COOKTOP Install the sealed burner module, caps and grate on the supports in place. Place the filter through the vent...speeds operate correctly. Make sure it rests, at an angle, on the right side of the gas line. Latch it as desired. If the grill/griddle burner was installed, place the grill grate...
Use and Care Manual
Page 32
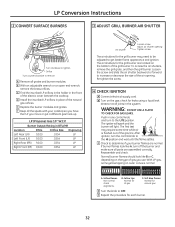
Re-tighten the screw. 4 CHECK IGNITION A Connect electrical supply cord. Push in the front of the electric cover beneath the cooktop. E Repeat the procedure for natural gas D Turn the knob to OFF. B With an adjustable wrench or an open end wrench, remove the brass orifices. C Find the ...ignition, turn off the burner and make sure all joints in place of the natural gas orifices. F Keep all grates and burner modules. The first test may need to be adjusted to get a different gas hook-up. Reassemble and check. A-Yellow flames Not normal; Burner Output Rating in BTU...
Re-tighten the screw. 4 CHECK IGNITION A Connect electrical supply cord. Push in the front of the electric cover beneath the cooktop. E Repeat the procedure for natural gas D Turn the knob to OFF. B With an adjustable wrench or an open end wrench, remove the brass orifices. C Find the ...ignition, turn off the burner and make sure all joints in place of the natural gas orifices. F Keep all grates and burner modules. The first test may need to be adjusted to get a different gas hook-up. Reassemble and check. A-Yellow flames Not normal; Burner Output Rating in BTU...

Use and Care Manual
Page 34
.... be clogged. Burner parts not replaced correctly. • See Sealed Burner Modules in the electrical outlet. • Make sure electrical plug is not completely inserted in the Care and cleaning of the cooktop section. Normal burner flames should dissipate after 4 to call for service. Burner... the circuit breaker. A-Yellow flames B-Yellow tips on C-Soft blue flames Call for service outer cones Normal for natural Normal for LP gas gas • If burner flame looks like B or C, depending on the following pages first and you call for service... Review the charts...
.... be clogged. Burner parts not replaced correctly. • See Sealed Burner Modules in the electrical outlet. • Make sure electrical plug is not completely inserted in the Care and cleaning of the cooktop section. Normal burner flames should dissipate after 4 to call for service. Burner... the circuit breaker. A-Yellow flames B-Yellow tips on C-Soft blue flames Call for service outer cones Normal for natural Normal for LP gas gas • If burner flame looks like B or C, depending on the following pages first and you call for service... Review the charts...


