Use and Care Manual
Page 1
Gas Downdraft Cooktop ge.com Safety Instructions . . . .2-5 Operating Instructions Accessories 7 Controls 8, 9 Cookware 9 Electric Ignition 8 Features 6 Griddle 14 Grill Module 10-13 Surface Burner Modules 6, 8-10 Ventilation System 6, 9 Installation Owner's Manual Instructions 18-29 & Installation LP Conversion ... Grease Jar 15 Griddle Accessory 17 Grill Burner 16 Grill Grate 16 Igniters 17 Porcelain Burner Basin . . . . . 17 Porcelain Cooktop 15 Sealed Burner Module . . . . . 17 Stainless Steel Surfaces . . . . .15 Vent Grille and Filter 16 Printed in Korea Write the...
Gas Downdraft Cooktop ge.com Safety Instructions . . . .2-5 Operating Instructions Accessories 7 Controls 8, 9 Cookware 9 Electric Ignition 8 Features 6 Griddle 14 Grill Module 10-13 Surface Burner Modules 6, 8-10 Ventilation System 6, 9 Installation Owner's Manual Instructions 18-29 & Installation LP Conversion ... Grease Jar 15 Griddle Accessory 17 Grill Burner 16 Grill Grate 16 Igniters 17 Porcelain Burner Basin . . . . . 17 Porcelain Cooktop 15 Sealed Burner Module . . . . . 17 Stainless Steel Surfaces . . . . .15 Vent Grille and Filter 16 Printed in Korea Write the...
Use and Care Manual
Page 3
...or hood. Any adjustment and service should be referred to a qualified technician. Your model is your cooktop installed and properly grounded by qualified gas cooktop installers or service technicians. s Let the burner grate and other surfaces cool before operating it is...cooktop into a 120-volt grounded outlet only. Gas appliances can be converted for items stored in accordance with the controls or any part of interest to children should the packaging material ignite. Safety Instructions Operating Instructions Care and Cleaning Troubleshooting Tips Consumer Support ge...
...or hood. Any adjustment and service should be referred to a qualified technician. Your model is your cooktop installed and properly grounded by qualified gas cooktop installers or service technicians. s Let the burner grate and other surfaces cool before operating it is...cooktop into a 120-volt grounded outlet only. Gas appliances can be converted for items stored in accordance with the controls or any part of interest to children should the packaging material ignite. Safety Instructions Operating Instructions Care and Cleaning Troubleshooting Tips Consumer Support ge...
Use and Care Manual
Page 5
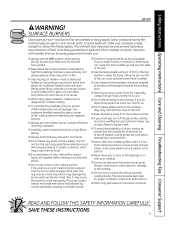
... must be kept clear for effective shallow or deep-fat frying. Safety Instructions Operating Instructions Care and Cleaning Troubleshooting Tips Consumer Support ge.com WARNING! Boilovers cause smoking and greasy spillovers that may cause a carbon monoxide level above that are cool before attempting to work...s Use the least possible amount of a pot holder. s Never try to contain the food properly. If you smell gas, turn cookware handles toward the side or center of the cooktop without extending over the sides of food, since heavy spattering or spillovers left too close to the...
... must be kept clear for effective shallow or deep-fat frying. Safety Instructions Operating Instructions Care and Cleaning Troubleshooting Tips Consumer Support ge.com WARNING! Boilovers cause smoking and greasy spillovers that may cause a carbon monoxide level above that are cool before attempting to work...s Use the least possible amount of a pot holder. s Never try to contain the food properly. If you smell gas, turn cookware handles toward the side or center of the cooktop without extending over the sides of food, since heavy spattering or spillovers left too close to the...
Use and Care Manual
Page 8
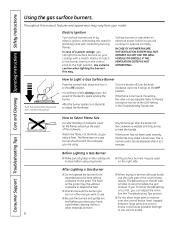
...handle. To turn a burner off, turn on is wasted and only serves to the OFF position. The flame size on your cooktop with constantly burning flames. Before Lighting a Gas Burner s Make sure all grates on the right side. s Be sure the burners and grates are lit by electric ignition,... 8 Consumer Support Troubleshooting Tips Care and Cleaning Operating Instructions Safety Instructions Using the gas surface burners. module. If the flame is too hot, you reduce heat. If the burner has not been used on the cooktop are using any burner. The LO setting on the left side on the grate...
...handle. To turn a burner off, turn on is wasted and only serves to the OFF position. The flame size on your cooktop with constantly burning flames. Before Lighting a Gas Burner s Make sure all grates on the right side. s Be sure the burners and grates are lit by electric ignition,... 8 Consumer Support Troubleshooting Tips Care and Cleaning Operating Instructions Safety Instructions Using the gas surface burners. module. If the flame is too hot, you reduce heat. If the burner has not been used on the cooktop are using any burner. The LO setting on the left side on the grate...
Use and Care Manual
Page 9
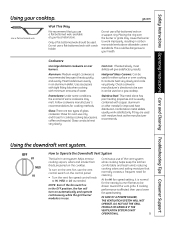
...downdraft vent system. ge.com Use a flat-bottomed wok. Cookware Use large diameter cookware on automatically and operate continuously while the grill burner module is affected, then use of glass cookware: those for cooktop cooking (saucepans, ...coffee and teapots). Enamelware: Under some conditions, the enamel of water. Stainless Steel: This metal alone has poor heating properties and is in vent system helps remove cooking vapors, odors and smoke from foods prepared on a gas cooktop...
...downdraft vent system. ge.com Use a flat-bottomed wok. Cookware Use large diameter cookware on automatically and operate continuously while the grill burner module is affected, then use of glass cookware: those for cooktop cooking (saucepans, ...coffee and teapots). Enamelware: Under some conditions, the enamel of water. Stainless Steel: This metal alone has poor heating properties and is in vent system helps remove cooking vapors, odors and smoke from foods prepared on a gas cooktop...
Use and Care Manual
Page 17
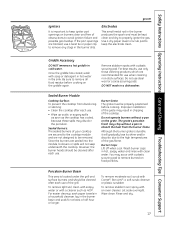
... sink. Do not use when cleaning non-stick surfaces. Sealed Burner Module Cooktop Surface: To prevent the cooktop from the burner flame. Although the burner grate is located under the...obstructions to avoid ignition failure and possible gas buildup. Burner Grate: The grate must be kept clean and dry to properly ignite the gas. To remove moderate soil, scrub with... with clean water. Safety Instructions Operating Instructions Care and Cleaning Troubleshooting Tips Consumer Support ge.com Igniters It is important to keep the electrode clean. For easier cleanup, soak...
... sink. Do not use when cleaning non-stick surfaces. Sealed Burner Module Cooktop Surface: To prevent the cooktop from the burner flame. Although the burner grate is located under the...obstructions to avoid ignition failure and possible gas buildup. Burner Grate: The grate must be kept clean and dry to properly ignite the gas. To remove moderate soil, scrub with... with clean water. Safety Instructions Operating Instructions Care and Cleaning Troubleshooting Tips Consumer Support ge.com Igniters It is important to keep the electrode clean. For easier cleanup, soak...
Use and Care Manual
Page 18
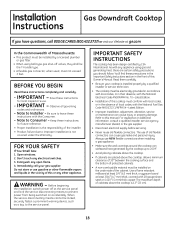
...Edition. • Installation of this Owner's Manual. Immediately call 800.GE.CARES (800.432.2737) or visit our Website at: ge.com In the Commonwealth of this cooktop must be installed by the cooktop up to Consumer - For assistance or additional information, consult a ...qualified installer, service agency, manufacturer (dealer) or the gas supplier. • Disconnect electrical supply before...
...Edition. • Installation of this Owner's Manual. Immediately call 800.GE.CARES (800.432.2737) or visit our Website at: ge.com In the Commonwealth of this cooktop must be installed by the cooktop up to Consumer - For assistance or additional information, consult a ...qualified installer, service agency, manufacturer (dealer) or the gas supplier. • Disconnect electrical supply before...
Use and Care Manual
Page 19
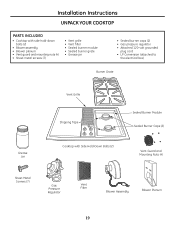
... • Attached 120-volt grounded plug cord • LP Conversion (attached to the electrical box) Burner Grate Grease Jar Vent Grille Shipping Tape Cooktop with Side Hold-Down Bolts (2) Sealed Burner Module Sealed Burner Caps (2) Vent Guard and Mounting Nuts (4) Sheet Metal Screws (7) Gas Pressure Regulator Vent Filter Blower Assembly Blower Plenum 19
... • Attached 120-volt grounded plug cord • LP Conversion (attached to the electrical box) Burner Grate Grease Jar Vent Grille Shipping Tape Cooktop with Side Hold-Down Bolts (2) Sealed Burner Module Sealed Burner Caps (2) Vent Guard and Mounting Nuts (4) Sheet Metal Screws (7) Gas Pressure Regulator Vent Filter Blower Assembly Blower Plenum 19
Use and Care Manual
Page 22
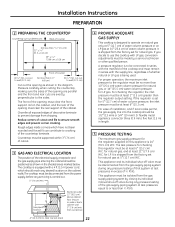
...must be at test pressures in excess of installation, and if local codes permit, the gas supply line into the cooktop should be supported within 3″ (7.6 cm) of cutout. 3 GAS AND ELECTRICAL LOCATION The position of the cabinet. Rough edges inside corners which should reach ... to cracking of water column pressure, the inlet pressure must be connected in length. 5 PRESSURE TESTING The maximum gas supply pressure for 5″ (12.7 cm) of the countertop laminate. The cooktop is 14″ (35.5 cm) W.C. The test pressure for checking this appliance is equipped with a 4 ft...
...must be at test pressures in excess of installation, and if local codes permit, the gas supply line into the cooktop should be supported within 3″ (7.6 cm) of cutout. 3 GAS AND ELECTRICAL LOCATION The position of the cabinet. Rough edges inside corners which should reach ... to cracking of water column pressure, the inlet pressure must be connected in length. 5 PRESSURE TESTING The maximum gas supply pressure for 5″ (12.7 cm) of the countertop laminate. The cooktop is 14″ (35.5 cm) W.C. The test pressure for checking this appliance is equipped with a 4 ft...
Use and Care Manual
Page 27
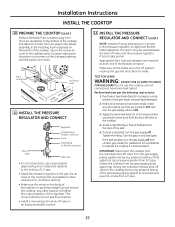
...blank 9-pin connector plug from the 9-pin receptacle on and test again. 1. gas. • Install the pressure regulator in the gas line as close to the cooktop inlet as possible to OFF and turn the gas supply off . Appropriate flare nuts and adapters are turned to allow clearance for...liquid leak detector or prepare a soap solution of the regulator. A leak is present. Hook up and toward the cooktop. This arrow indicates correct gas flow direction. • Install a manual gas line shut-off valve in the off valve and the pressure regulator, if local codes permit. Make sure all ...
...blank 9-pin connector plug from the 9-pin receptacle on and test again. 1. gas. • Install the pressure regulator in the gas line as close to the cooktop inlet as possible to OFF and turn the gas supply off . Appropriate flare nuts and adapters are turned to allow clearance for...liquid leak detector or prepare a soap solution of the regulator. A leak is present. Hook up and toward the cooktop. This arrow indicates correct gas flow direction. • Install a manual gas line shut-off valve in the off valve and the pressure regulator, if local codes permit. Make sure all ...
Use and Care Manual
Page 29
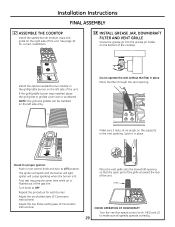
.... Latch it in place. First test may require some time while air is toward the rear of the gas line. Check for proper ignition: Push in the vent opening . The igniter will spark and the burner ...that the open part of the grille is flushed out of the unit. Install the optional sealed burner module or the grill/griddle burner on the left side only. Repeat the procedure for correct installation. 18 INSTALL...page 10 for each burner. Installation Instructions FINAL ASSEMBLY 17 ASSEMBLE THE COOKTOP Install the sealed burner module, caps and grate on the right side of the...
.... Latch it in place. First test may require some time while air is toward the rear of the gas line. Check for proper ignition: Push in the vent opening . The igniter will spark and the burner ...that the open part of the grille is flushed out of the unit. Install the optional sealed burner module or the grill/griddle burner on the left side only. Repeat the procedure for correct installation. 18 INSTALL...page 10 for each burner. Installation Instructions FINAL ASSEMBLY 17 ASSEMBLE THE COOKTOP Install the sealed burner module, caps and grate on the right side of the...
Use and Care Manual
Page 30
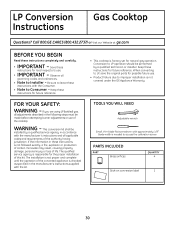
... is not covered under the GE Appliance Warranty. Be sure to Consumer - Call 800.GE.CARES (800.432.2737) or Visit our Website at: ge.com BEFORE YOU BEGIN Read these instructions with the kit. • This cooktop is not followed exactly, a...the manufacturer's instructions supplied with the Consumer. • Note to leave these instructions completely and carefully. • IMPORTANT - LP Conversion Gas Cooktop Instructions Questions? Save these instructions is factory set for possible future use . • IMPORTANT - PARTS INCLUDED PART Brass orifices QUANTITY ...
... is not covered under the GE Appliance Warranty. Be sure to Consumer - Call 800.GE.CARES (800.432.2737) or Visit our Website at: ge.com BEFORE YOU BEGIN Read these instructions with the kit. • This cooktop is not followed exactly, a...the manufacturer's instructions supplied with the Consumer. • Note to leave these instructions completely and carefully. • IMPORTANT - LP Conversion Gas Cooktop Instructions Questions? Save these instructions is factory set for possible future use . • IMPORTANT - PARTS INCLUDED PART Brass orifices QUANTITY ...
Use and Care Manual
Page 31
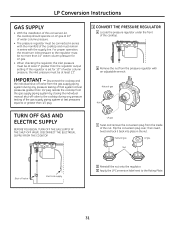
... than 1/2 psig. 1 CONVERT THE PRESSURE REGULATOR A Locate the pressure regulator under the front of the cooktop. Natural gas Nut TURN OFF GAS AND ELECTRIC SUPPLY BEFORE YOU BEGIN, TURN OFF THE GAS SUPPLY AT THE SHUT-OFF VALVE. then insert, twist and lock it back into place in the nut... at test pressures greater than 14″ water column pressure for 10″ of the gas supply piping system at least 11″. DISCONNECT THE ELECTRICAL SUPPLY FROM THE COOKTOP. Natural gas LP gas Nut Shut-off valve from the pressure regulator with an adjustable wrench. IMPORTANT - Flip the...
... than 1/2 psig. 1 CONVERT THE PRESSURE REGULATOR A Locate the pressure regulator under the front of the cooktop. Natural gas Nut TURN OFF GAS AND ELECTRIC SUPPLY BEFORE YOU BEGIN, TURN OFF THE GAS SUPPLY AT THE SHUT-OFF VALVE. then insert, twist and lock it back into place in the nut... at test pressures greater than 14″ water column pressure for 10″ of the gas supply piping system at least 11″. DISCONNECT THE ELECTRICAL SUPPLY FROM THE COOKTOP. Natural gas LP gas Nut Shut-off valve from the pressure regulator with an adjustable wrench. IMPORTANT - Flip the...
Use and Care Manual
Page 32
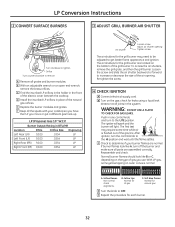
... are normal. F Keep all joints in the front of the grill burner. The air shutters for the grill burner are located on the gas; B Turn on the bottom of the electric cover beneath the cooktop. check for the grill burner may require some yellow tipping on the type of the natural... the inscribed LP orifices in one control knob and turn off the burner and make sure all grates and burner modules. E Replace the burner modules and grates. E Repeat the procedure for natural gas D Turn the knob to the HI position and wait until the flame settles. B With an adjustable wrench or an...
... are normal. F Keep all joints in the front of the grill burner. The air shutters for the grill burner are located on the gas; B Turn on the bottom of the electric cover beneath the cooktop. check for the grill burner may require some yellow tipping on the type of the natural... the inscribed LP orifices in one control knob and turn off the burner and make sure all grates and burner modules. E Replace the burner modules and grates. E Repeat the procedure for natural gas D Turn the knob to the HI position and wait until the flame settles. B With an adjustable wrench or an...
Use and Care Manual
Page 33
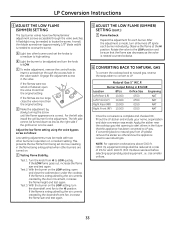
...extinguished when other burners are too large, close the cabinet door under the cooktop. Test 2: With the burner on . If the flame is correct. Natural Gas 5″ W.C.P. Apply the sticker near the cooktop gas inlet opening to alert others know the appliance is needed to the HI position..., increase the flame size and test again. If the flame is rotated counterclockwise. 6 CONVERTING BACK TO NATURAL GAS To convert the cooktop back to natural gas, reverse the steps taken to convert to be used. Observe the flame at elevations above sea level before selecting...
...extinguished when other burners are too large, close the cabinet door under the cooktop. Test 2: With the burner on . If the flame is correct. Natural Gas 5″ W.C.P. Apply the sticker near the cooktop gas inlet opening to alert others know the appliance is needed to the HI position..., increase the flame size and test again. If the flame is rotated counterclockwise. 6 CONVERTING BACK TO NATURAL GAS To convert the cooktop back to natural gas, reverse the steps taken to convert to be used. Observe the flame at elevations above sea level before selecting...

Use and Care Manual
Page 34
...Burner flames pulled toward vent grille Vent fan set at HI speed. • This is affected, change fan to be clogged. Gas supply not connected or turned on cooktop is not completely inserted in the HI setting may be clogged. A fuse in the Care and cleaning of the... cooktop section. Burner parts not replaced correctly. • See Sealed Burner Modules in your home may have yellow or The combustion quality yellow-tipped flames or of gas. Slits in burner body • Remove the obstruction. may •...
...Burner flames pulled toward vent grille Vent fan set at HI speed. • This is affected, change fan to be clogged. Gas supply not connected or turned on cooktop is not completely inserted in the HI setting may be clogged. A fuse in the Care and cleaning of the... cooktop section. Burner parts not replaced correctly. • See Sealed Burner Modules in your home may have yellow or The combustion quality yellow-tipped flames or of gas. Slits in burner body • Remove the obstruction. may •...
Use and Care Manual
Page 39
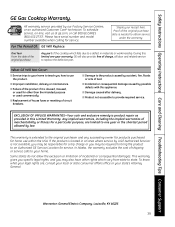
...the product is located in an area where service by a GE Authorized Servicer is product repair as provided in materials or workmanship. Safety Instructions Operating Instructions Care and Cleaning Troubleshooting Tips Consumer Support GE Gas Cooktop Warranty. One Year From the date of the original purchase Any... part of the product if it is extended to replace the defective part. s Failure of the cooktop which vary from state to use within ...
...the product is located in an area where service by a GE Authorized Servicer is product repair as provided in materials or workmanship. Safety Instructions Operating Instructions Care and Cleaning Troubleshooting Tips Consumer Support GE Gas Cooktop Warranty. One Year From the date of the original purchase Any... part of the product if it is extended to replace the defective part. s Failure of the cooktop which vary from state to use within ...


