
Quick Specs
Page 2
...B. For answers to mate with space between cabinets only; Recirculating Charcoal Filter Kit To be used when the Spacemaker microwave oven cannot be used , care should be taken to accommodate exhaust. Filter KitsJX81D- Listed by leaving enough space between the wall studs to align ...than their actual physical size. JVM2052SN GE Spacemaker® Over-the-Range Microwave Oven Dimensions and Installation Information (in appearance. Exhaust Connection: The hood exhaust has been designed to your Monogram,® GE Profile™ or GE® appliance questions, visit our...
...B. For answers to mate with space between cabinets only; Recirculating Charcoal Filter Kit To be used when the Spacemaker microwave oven cannot be used , care should be taken to accommodate exhaust. Filter KitsJX81D- Listed by leaving enough space between the wall studs to align ...than their actual physical size. JVM2052SN GE Spacemaker® Over-the-Range Microwave Oven Dimensions and Installation Information (in appearance. Exhaust Connection: The hood exhaust has been designed to your Monogram,® GE Profile™ or GE® appliance questions, visit our...

Use and Care Manual
Page 1
...22 Popcorn 16 Quick Defrost 21 Soften 17 Soften Chart 20 Time Defrost 22 Control Panel 9 Cooking Guide 24-28 Cookware 23 Features of Your Oven 8 Microwave Oven Functions 10-14 Child Lock 11 Clock 10 Cooking at High Power Levels . . . . . .12 Cooking at Lower Power Levels . ... 16 Sensor Reheat Chart 18 Care and Cleaning Charcoal Filters 32 Grease Filters 31 Inside 29 Outside 29 Replacing the Light Bulbs 30 Stainless Steel 29 Vent Filters 31 Troubleshooting Tips 33, 34 Things That Are Normal With Your Microwave Oven 35 Consumer Support Consumer Support Back Cover Optional...
...22 Popcorn 16 Quick Defrost 21 Soften 17 Soften Chart 20 Time Defrost 22 Control Panel 9 Cooking Guide 24-28 Cookware 23 Features of Your Oven 8 Microwave Oven Functions 10-14 Child Lock 11 Clock 10 Cooking at High Power Levels . . . . . .12 Cooking at Lower Power Levels . ... 16 Sensor Reheat Chart 18 Care and Cleaning Charcoal Filters 32 Grease Filters 31 Inside 29 Outside 29 Replacing the Light Bulbs 30 Stainless Steel 29 Vent Filters 31 Troubleshooting Tips 33, 34 Things That Are Normal With Your Microwave Oven 35 Consumer Support Consumer Support Back Cover Optional...

Use and Care Manual
Page 7
...oven cannot be vented to the outside. However, patients with pacemakers may wish to provide a custom built-in appearance. Filler Panel Kits JX52WH-White JX52BL-Black When replacing a 36″ range hood, filler panel kits fill in the additional width to consult their physicians if they have concerns. Filter Kits JX81D-Recirculating Charcoal Filter... Kit Filter kits are shielded from interference from electronic products, including microwaves. Available at extra cost from your GE supplier. GEAppliances.com READ ...
...oven cannot be vented to the outside. However, patients with pacemakers may wish to provide a custom built-in appearance. Filler Panel Kits JX52WH-White JX52BL-Black When replacing a 36″ range hood, filler panel kits fill in the additional width to consult their physicians if they have concerns. Filter Kits JX81D-Recirculating Charcoal Filter... Kit Filter kits are shielded from interference from electronic products, including microwaves. Available at extra cost from your GE supplier. GEAppliances.com READ ...

Use and Care Manual
Page 31
...microwave oven. 5 Reconnect power or plug in the microwave oven. 2 To remove the grease filters, slide the filters to lock into the frame slots on some models) Vent Fan The vent fan has two metal reusable vent filters. GEAppliances.com Reusable vent filters (on all models) Reusable Vent Filter The metal filters...each opening. For this reason, the filters must always be cleaned once a month, or as lye-based oven cleaners, or place them into the room also use a charcoal filter. Pull the filters downward. To replace, slide the filters into place. 31 They also prevent ...
...microwave oven. 5 Reconnect power or plug in the microwave oven. 2 To remove the grease filters, slide the filters to lock into the frame slots on some models) Vent Fan The vent fan has two metal reusable vent filters. GEAppliances.com Reusable vent filters (on all models) Reusable Vent Filter The metal filters...each opening. For this reason, the filters must always be cleaned once a month, or as lye-based oven cleaners, or place them into the room also use a charcoal filter. Pull the filters downward. To replace, slide the filters into place. 31 They also prevent ...

Use and Care Manual
Page 32
...air will be cleaned. To avoid personal injury or property damage, do not operate oven hood without filters in place. 1 Slide a new charcoal filter into place. The charcoal filter should rest at the main power supply and set the clock. 32 To avoid ...of the oven. See "Optional Kits," page 7, for more information. To Remove the Charcoal Filter WARNING! Turn the power back on usage). The filter should be replaced. Order Part No. WB02X10943 from your GE supplier. Charcoal Filter The charcoal filter cannot be recirculated through a disposable charcoal filter that helps...
...air will be cleaned. To avoid personal injury or property damage, do not operate oven hood without filters in place. 1 Slide a new charcoal filter into place. The charcoal filter should rest at the main power supply and set the clock. 32 To avoid ...of the oven. See "Optional Kits," page 7, for more information. To Remove the Charcoal Filter WARNING! Turn the power back on usage). The filter should be replaced. Order Part No. WB02X10943 from your GE supplier. Charcoal Filter The charcoal filter cannot be recirculated through a disposable charcoal filter that helps...

Installation Instructions
Page 2
... Outside Top Exhaust 12-14 Attach Mounting Plate to Wall 12 Preparation of Top Cabinet 13 Attach Exhaust Damper 13 Mount the Microwave Oven 13, 14 B Outside Back Exhaust 15-18 Prepare Rear Wall for Outside Back Exhaust 15 Attach Mounting Plate to Wall 16 ... 16 Adapt Microwave Oven Blower for Outside Back Exhaust 16, 17 Mount the Microwave Oven 18 C Recirculating 19-22 Attach Mounting Plate to Wall 19 Preparation of Top Cabinet 19 Adapt Microwave Oven Blower for Recirculation 20 Mount the Microwave Oven 21 Install the Charcoal Filter 22 Before You Use Your Microwave Oven 23 2 ...
... Outside Top Exhaust 12-14 Attach Mounting Plate to Wall 12 Preparation of Top Cabinet 13 Attach Exhaust Damper 13 Mount the Microwave Oven 13, 14 B Outside Back Exhaust 15-18 Prepare Rear Wall for Outside Back Exhaust 15 Attach Mounting Plate to Wall 16 ... 16 Adapt Microwave Oven Blower for Outside Back Exhaust 16, 17 Mount the Microwave Oven 18 C Recirculating 19-22 Attach Mounting Plate to Wall 19 Preparation of Top Cabinet 19 Adapt Microwave Oven Blower for Recirculation 20 Mount the Microwave Oven 21 Install the Charcoal Filter 22 Before You Use Your Microwave Oven 23 2 ...

Installation Instructions
Page 11
... Back Exhaust (Horizontal Duct) C. Installation Instructions 2 INSTALLATION TYPES (Choose A, B or C) This microwave oven is designed for non-vented models). Recirculating (Non-Vented Ductless) NOTE: This microwave oven is required for the non-vented exhaust. (See your Owner's Manual for your installation and proceed to...EXHAUST (HORIZONTAL DUCT) See page 12 See page 15 C RECIRCULATING (NON-VENTED DUCTLESS) See page 19 11 A Charcoal Filter Accessory Kit is shipped assembled for Outside Top Exhaust (except for adaptation to that section. Outside Top Exhaust (Vertical Duct) B.
... Back Exhaust (Horizontal Duct) C. Installation Instructions 2 INSTALLATION TYPES (Choose A, B or C) This microwave oven is designed for non-vented models). Recirculating (Non-Vented Ductless) NOTE: This microwave oven is required for the non-vented exhaust. (See your Owner's Manual for your installation and proceed to...EXHAUST (HORIZONTAL DUCT) See page 12 See page 15 C RECIRCULATING (NON-VENTED DUCTLESS) See page 19 11 A Charcoal Filter Accessory Kit is shipped assembled for Outside Top Exhaust (except for adaptation to that section. Outside Top Exhaust (Vertical Duct) B.
Installation Instructions
Page 19
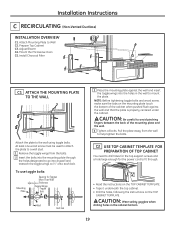
... mounting plate against the wall and that the plate is properly centered under the cabinet. Attach Mounting Plate to the wall using toggle bolts. Install Charcoal Filter C1 ATTACH THE MOUNTING PLATE TO THE WALL Attach the plate to Wall C2. CAUTION: Wear safety goggles when drilling holes in the wall to...; Drill the holes, following the instructions on the mounting plate touch the bottom of the mounting plate and the wall. 4 Tighten all bolts. Mount the Microwave Oven C5.
... mounting plate against the wall and that the plate is properly centered under the cabinet. Attach Mounting Plate to the wall using toggle bolts. Install Charcoal Filter C1 ATTACH THE MOUNTING PLATE TO THE WALL Attach the plate to Wall C2. CAUTION: Wear safety goggles when drilling holes in the wall to...; Drill the holes, following the instructions on the mounting plate touch the bottom of the mounting plate and the wall. 4 Tighten all bolts. Mount the Microwave Oven C5.

Installation Instructions
Page 22
Insert mesh-side up 22 Installation Instructions C5 INSTALLING THE CHARCOAL FILTER 1 Remove 2 screws on the top front of the filter should be visible from the front. 5 Replace the grille and the screws. 6 Close the door. Charcoal Filter 4 Install the charcoal filter. When properly installed, the wire mesh of the grille using a Phillips screwdriver. 2 Open the door. 3 Remove the grille, pulling it straight off.
Insert mesh-side up 22 Installation Instructions C5 INSTALLING THE CHARCOAL FILTER 1 Remove 2 screws on the top front of the filter should be visible from the front. 5 Replace the grille and the screws. 6 Close the door. Charcoal Filter 4 Install the charcoal filter. When properly installed, the wire mesh of the grille using a Phillips screwdriver. 2 Open the door. 3 Remove the grille, pulling it straight off.


