

Use and Care Manual
Page 1
... 22 Popcorn 16 Quick Defrost 21 Soften 17 Soften Chart 20 Time Defrost 22 Control Panel 9 Cooking Guide 24-28 Cookware 23 Features of Your Oven 8 Microwave Oven Functions 10-14 Child Lock 11 Clock 10 Cooking at High Power Levels . . . . . .12 Cooking at Lower Power Levels . . . . ...30 Stainless Steel 29 Vent Filters 31 Troubleshooting Tips 33, 34 Things That Are Normal With Your Microwave Oven 35 Consumer Support Consumer Support Back Cover Optional Kits 7 Warranty 39 Owner's Manual JVM2052 Write the model and serial numbers here: Model Serial You can find them on a label...
... 22 Popcorn 16 Quick Defrost 21 Soften 17 Soften Chart 20 Time Defrost 22 Control Panel 9 Cooking Guide 24-28 Cookware 23 Features of Your Oven 8 Microwave Oven Functions 10-14 Child Lock 11 Clock 10 Cooking at High Power Levels . . . . . .12 Cooking at Lower Power Levels . . . . ...30 Stainless Steel 29 Vent Filters 31 Troubleshooting Tips 33, 34 Things That Are Normal With Your Microwave Oven 35 Consumer Support Consumer Support Back Cover Optional Kits 7 Warranty 39 Owner's Manual JVM2052 Write the model and serial numbers here: Model Serial You can find them on a label...

Use and Care Manual
Page 2
...a power cord available from paper or plastic containers before placing them in this appliance. Read and follow the specific precautions in this manual. This microwave oven is damaged, it has been damaged or dropped. To reduce the risk of burns, electric shock, fire, injury to persons, or... to accumulate on the same food portion. See the Grounding Instructions section on the appliance. This microwave oven is undercooked after the first countdown, use . Do not operate this oven with the door open, since open-door operation can result in succession on sealing surfaces. (c) ...
...a power cord available from paper or plastic containers before placing them in this appliance. Read and follow the specific precautions in this manual. This microwave oven is damaged, it has been damaged or dropped. To reduce the risk of burns, electric shock, fire, injury to persons, or... to accumulate on the same food portion. See the Grounding Instructions section on the appliance. This microwave oven is undercooked after the first countdown, use . Do not operate this oven with the door open, since open-door operation can result in succession on sealing surfaces. (c) ...

Use and Care Manual
Page 5
...holders when handling the rack and cookware. If they are glass or ceramic materials and may cause arcing or ignite. When using foil in a microwave oven because they form a tight seal. In longer exposures to cover dishes in use in place. Some cookware is very useful, but should be... only as directed by package. Do not use this test: Place in this manual. SAVE THESE INSTRUCTIONS 5 Use of the microwave oven. If the dish heats, it can be slit, pierced or vented as directed in the oven both the dish you are testing and a glass measuring cup filled with plastic ...
...holders when handling the rack and cookware. If they are glass or ceramic materials and may cause arcing or ignite. When using foil in a microwave oven because they form a tight seal. In longer exposures to cover dishes in use in place. Some cookware is very useful, but should be... only as directed by package. Do not use this test: Place in this manual. SAVE THESE INSTRUCTIONS 5 Use of the microwave oven. If the dish heats, it can be slit, pierced or vented as directed in the oven both the dish you are testing and a glass measuring cup filled with plastic ...
Use and Care Manual
Page 8
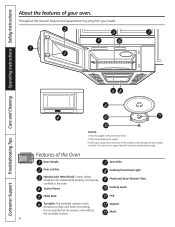
... in both directions to be viewed while keeping microwaves confined in place. Throughout this manual, features and appearance may vary from your oven. Place the turntable on the oven cavity bottom. 2. Door Latches. Cooktop/Countertop Light. Metal Rack. Do not operate the microwave oven without the turntable in the oven. Screen allows cooking to help cook food...
... in both directions to be viewed while keeping microwaves confined in place. Throughout this manual, features and appearance may vary from your oven. Place the turntable on the oven cavity bottom. 2. Door Latches. Cooktop/Countertop Light. Metal Rack. Do not operate the microwave oven without the turntable in the oven. Screen allows cooking to help cook food...
Use and Care Manual
Page 40
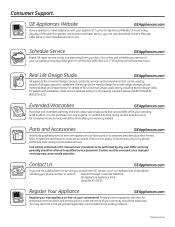
... GEAppliances.com Have a question or need assistance with all ages, sizes and capabilities. Schedule Service GEAppliances.com Expert GE repair service is still in this manual cover procedures to be performed by phone at your door. We recognize the need arise. Caution must be there...service, you receive from your convenience any day of the year! You can now download Owner's Manuals, order parts or even schedule service on -line-at your appliance? GE Consumer Home Services will allow for enhanced communication and prompt service under the terms of your warranty,...
... GEAppliances.com Have a question or need assistance with all ages, sizes and capabilities. Schedule Service GEAppliances.com Expert GE repair service is still in this manual cover procedures to be performed by phone at your door. We recognize the need arise. Caution must be there...service, you receive from your convenience any day of the year! You can now download Owner's Manuals, order parts or even schedule service on -line-at your appliance? GE Consumer Home Services will allow for enhanced communication and prompt service under the terms of your warranty,...

Installation Instructions
Page 7
... holes: Do not allow cabinetry or other objects to fill in the gap between the oven and the cabinets. Bottom edge of cabinet needs to be 30" or more from the...may be 30" wide and free of the oven 30" min. 13" max. Your Owner's Manual contains the kit number for your model. • This oven is for installation over ranges up to 36..." wide. • If you are going to vent your oven to the outside, see Hood Exhaust Section for exhaust duct preparation. • When installing the oven...
... holes: Do not allow cabinetry or other objects to fill in the gap between the oven and the cabinets. Bottom edge of cabinet needs to be 30" or more from the...may be 30" wide and free of the oven 30" min. 13" max. Your Owner's Manual contains the kit number for your model. • This oven is for installation over ranges up to 36..." wide. • If you are going to vent your oven to the outside, see Hood Exhaust Section for exhaust duct preparation. • When installing the oven...

Installation Instructions
Page 11
Recirculating (Non-Vented Ductless) NOTE: This microwave oven is shipped assembled for Outside Top Exhaust (except for the kit number.) Outside Back Exhaust (Horizontal Duct) C. A OUTSIDE TOP EXHAUST (VERTICAL DUCT) ... non-vented exhaust. (See your installation and proceed to the following three types of ventilation required for your Owner's Manual for non-vented models). Select the type of ventilation: A. Outside Top Exhaust (Vertical Duct) B. Installation Instructions 2 INSTALLATION TYPES (Choose A, B or C) This microwave oven is designed for adaptation to that section.
Recirculating (Non-Vented Ductless) NOTE: This microwave oven is shipped assembled for Outside Top Exhaust (except for the kit number.) Outside Back Exhaust (Horizontal Duct) C. A OUTSIDE TOP EXHAUST (VERTICAL DUCT) ... non-vented exhaust. (See your installation and proceed to the following three types of ventilation required for your Owner's Manual for non-vented models). Select the type of ventilation: A. Outside Top Exhaust (Vertical Duct) B. Installation Instructions 2 INSTALLATION TYPES (Choose A, B or C) This microwave oven is designed for adaptation to that section.
Installation Instructions
Page 14
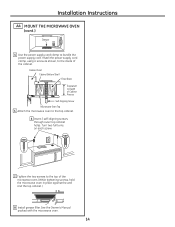
... through outer top cabinet holes. See the Owner's Manual packed with the microwave oven. 14 Cabinet Front Cabinet Bottom Shelf Filler Block Equivalent to Depth of Cabinet Recess Self-Aligning Screw Microwave Oven Top 5 Attach the microwave oven to the inside of the microwave oven. (While tightening screws, hold the microwave oven in place against the wall and the top cabinet...
... through outer top cabinet holes. See the Owner's Manual packed with the microwave oven. 14 Cabinet Front Cabinet Bottom Shelf Filler Block Equivalent to Depth of Cabinet Recess Self-Aligning Screw Microwave Oven Top 5 Attach the microwave oven to the inside of the microwave oven. (While tightening screws, hold the microwave oven in place against the wall and the top cabinet...
Installation Instructions
Page 18
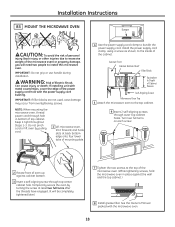
...IMPORTANT: If filler blocks are not used, case damage may occur from overtightening screws. Temporarily secure the oven by pulling cord. 1 Lift microwave oven, tilt it tight throughout Steps 1-3. See the Owner's Manual packed with the power supply cord bushing. Turn two full turns on each screw. 2 Rotate front... of mounting plate. 4 Use the power supply cord clamp to the inside of the power supply cord hole with the microwave oven. 18 Install the power ...
...IMPORTANT: If filler blocks are not used, case damage may occur from overtightening screws. Temporarily secure the oven by pulling cord. 1 Lift microwave oven, tilt it tight throughout Steps 1-3. See the Owner's Manual packed with the power supply cord bushing. Turn two full turns on each screw. 2 Rotate front... of mounting plate. 4 Use the power supply cord clamp to the inside of the power supply cord hole with the microwave oven. 18 Install the power ...

Installation Instructions
Page 21
...front of mounting plate. 4 Use the power supply cord clamp to the top of the microwave oven. (While tightening screws, hold the microwave oven in bottom of Cabinet Recess Self-Aligning Screw Microwave Oven Top 5 Attach the microwave oven to Depth of top cabinet. Turn two full turns on each screw. 7 Tighten the ...and hook slots at least two full turns after the threads have engaged. (It will need two people to install this microwave oven. See the Owner's Manual packed with metal countertops, cover the edge of Electric Shock. Can cause injury or death: If installing unit with the...
...front of mounting plate. 4 Use the power supply cord clamp to the top of the microwave oven. (While tightening screws, hold the microwave oven in bottom of Cabinet Recess Self-Aligning Screw Microwave Oven Top 5 Attach the microwave oven to Depth of top cabinet. Turn two full turns on each screw. 7 Tighten the ...and hook slots at least two full turns after the threads have engaged. (It will need two people to install this microwave oven. See the Owner's Manual packed with metal countertops, cover the edge of Electric Shock. Can cause injury or death: If installing unit with the...

Installation Instructions
Page 23
Installation Instructions BEFORE YOU USE YOUR MICROWAVE OVEN 1 Make sure the microwave oven has been installed according to 20-amp electrical outlet. Ensure proper ground exists before use 23 to instructions. 6 Read the Owner's Manual. 2 Remove all packing material from the microwave oven. 3 Install turntable and ring in cavity. 4 Replace house fuse or turn breaker back on. 7 KEEP INSTALLATION INSTRUCTIONS FOR THE LOCAL INSPECTOR'S USE. 5 Plug power cord into a dedicated 15-
Installation Instructions BEFORE YOU USE YOUR MICROWAVE OVEN 1 Make sure the microwave oven has been installed according to 20-amp electrical outlet. Ensure proper ground exists before use 23 to instructions. 6 Read the Owner's Manual. 2 Remove all packing material from the microwave oven. 3 Install turntable and ring in cavity. 4 Replace house fuse or turn breaker back on. 7 KEEP INSTALLATION INSTRUCTIONS FOR THE LOCAL INSPECTOR'S USE. 5 Plug power cord into a dedicated 15-


