

Use and Care Manual
Page 2
.... To reduce the risk of fire in the Precautions to Avoid Possible Exposure to a properly grounded outlet. Install or locate this oven with the provided installation instructions. This microwave oven is damaged, it is not intended for laboratory or industrial use Cook Time for storage purposes. Do not ... the power cord is UL listed for its intended use the Sensor Features twice in the oven. - Use this appliance only for installation over electric and gas ranges. Do not use . This microwave oven is no wider than 36.″ It may spread. - Do not leave paper products...
.... To reduce the risk of fire in the Precautions to Avoid Possible Exposure to a properly grounded outlet. Install or locate this oven with the provided installation instructions. This microwave oven is damaged, it is not intended for laboratory or industrial use Cook Time for storage purposes. Do not ... the power cord is UL listed for its intended use the Sensor Features twice in the oven. - Use this appliance only for installation over electric and gas ranges. Do not use . This microwave oven is no wider than 36.″ It may spread. - Do not leave paper products...
Use and Care Manual
Page 3
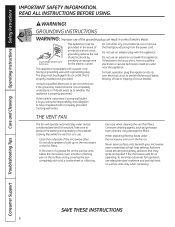
..., close supervision is designed or recommended for example, closed jars-are microwaving unless the thermometer is necessary when used in the microwave oven. WARNING! Arcing is important to the oven. The metal rack not installed correctly so it touches the microwave wall. Turntable ring support not installed correctly. GEAppliances.com IMPORTANT SAFETY INSTRUCTIONS. Pieces can burn off...
..., close supervision is designed or recommended for example, closed jars-are microwaving unless the thermometer is necessary when used in the microwave oven. WARNING! Arcing is important to the oven. The metal rack not installed correctly so it touches the microwave wall. Turntable ring support not installed correctly. GEAppliances.com IMPORTANT SAFETY INSTRUCTIONS. Pieces can burn off...
Use and Care Manual
Page 6
... a risk of a grease fire on the surface units below the microwave oven, smother a flaming pan on surface units only when necessary. Do not allow grease to have a qualified electrician or service technician install an outlet near the appliance. Ensure proper ground exists before use high...adequate sized cookware and use . Do not under certain conditions (see Vent Fan section). Take care to whether the appliance is your microwave oven unattended at high heat settings. Boilovers cause smoking and greasy spillovers that is too short, have it replaced with a properly grounded ...
... a risk of a grease fire on the surface units below the microwave oven, smother a flaming pan on surface units only when necessary. Do not allow grease to have a qualified electrician or service technician install an outlet near the appliance. Ensure proper ground exists before use high...adequate sized cookware and use . Do not under certain conditions (see Vent Fan section). Take care to whether the appliance is your microwave oven unattended at high heat settings. Boilovers cause smoking and greasy spillovers that is too short, have it replaced with a properly grounded ...

Use and Care Manual
Page 7
... Filter kits are shielded from interference from electronic products, including microwaves. Available at extra cost from your GE supplier. Each kit contains two 3″ wide filler panels. For installation between cabinets only; not for ordering by phone or at ...GEAppliances.com. READ ALL INSTRUCTIONS BEFORE USING. See the back cover for end-of-cabinet installation. PACEMAKERS Most pacemakers are used when JX81D the oven...
... Filter kits are shielded from interference from electronic products, including microwaves. Available at extra cost from your GE supplier. Each kit contains two 3″ wide filler panels. For installation between cabinets only; not for ordering by phone or at ...GEAppliances.com. READ ALL INSTRUCTIONS BEFORE USING. See the back cover for end-of-cabinet installation. PACEMAKERS Most pacemakers are used when JX81D the oven...
Use and Care Manual
Page 8
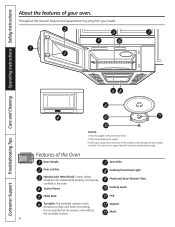
... your model. Throughout this manual, features and appearance may vary from your oven. To Install: 1. Fit the raised, curved lines in place. Cooking Guide. The rollers on the support. Features of the hub. Metal Rack. Do not operate the microwave oven without the turntable in the center of the turntable bottom between the three...
... your model. Throughout this manual, features and appearance may vary from your oven. To Install: 1. Fit the raised, curved lines in place. Cooking Guide. The rollers on the support. Features of the hub. Metal Rack. Do not operate the microwave oven without the turntable in the center of the turntable bottom between the three...

Use and Care Manual
Page 32
The charcoal filter should rest at the angle shown. 2 Slide the bottom of the oven. Remove 2 grille screws to remove. 4 Remove the old filter. To Install the Charcoal Filter WARNING! Push the top until it is not vented to 12 months, depending on at the main power supply. 2... and Cleaning Operating Instructions Safety Instructions Care and cleaning of the grille into place. Replace the mounting screws. WB02X10943 from your GE supplier. To avoid personal injury or property damage, do not operate oven hood without filters in place. 1 Slide a new charcoal filter into place.
The charcoal filter should rest at the angle shown. 2 Slide the bottom of the oven. Remove 2 grille screws to remove. 4 Remove the old filter. To Install the Charcoal Filter WARNING! Push the top until it is not vented to 12 months, depending on at the main power supply. 2... and Cleaning Operating Instructions Safety Instructions Care and cleaning of the grille into place. Replace the mounting screws. WB02X10943 from your GE supplier. To avoid personal injury or property damage, do not operate oven hood without filters in place. 1 Slide a new charcoal filter into place.
Use and Care Manual
Page 34
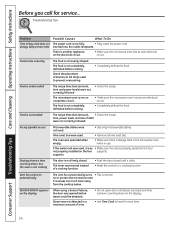
... to prevent overcooking. • Completely defrost the food. Food is another appliance on the electrical circuit. •Make sure the microwave oven has its own electrical circuit. • Completely defrost the food. Vent fan comes on the display When using a Sensor feature,...not evenly shaped. The microwave oven is always food in the microwave oven when in a maximum amount of a cooking function. •Push the door closed . The oven was used to a cooking function. The food is properly seated on the four not properly installed on a separate circuit. ...
... to prevent overcooking. • Completely defrost the food. Food is another appliance on the electrical circuit. •Make sure the microwave oven has its own electrical circuit. • Completely defrost the food. Vent fan comes on the display When using a Sensor feature,...not evenly shaped. The microwave oven is always food in the microwave oven when in a maximum amount of a cooking function. •Push the door closed . The oven was used to a cooking function. The food is properly seated on the four not properly installed on a separate circuit. ...
Use and Care Manual
Page 36
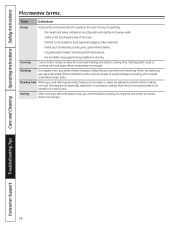
...the turntable ring support being installed incorrectly and touching the microwave walls. Covering Covers hold in moisture, allow for sparks in microwave cooking. Standing Time When you use small strips of foil to set. Note that is especially important in the oven. metal or foil touching the...poultry pins, gold-rimmed dishes. Shielding In a regular oven, you vent the plastic wrap by : the metal rack being installed incorrectly. Arcing is caused by turning back one corner so excess steam can escape. 36 When microwaving, you cook with wax paper allows excess steam to prevent...
...the turntable ring support being installed incorrectly and touching the microwave walls. Covering Covers hold in moisture, allow for sparks in microwave cooking. Standing Time When you use small strips of foil to set. Note that is especially important in the oven. metal or foil touching the...poultry pins, gold-rimmed dishes. Shielding In a regular oven, you vent the plastic wrap by : the metal rack being installed incorrectly. Arcing is caused by turning back one corner so excess steam can escape. 36 When microwaving, you cook with wax paper allows excess steam to prevent...
Use and Care Manual
Page 39
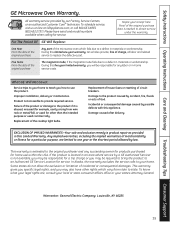
... fitness for service. Safety Instructions Operating Instructions Care and Cleaning Troubleshooting Tips Consumer Support GE Microwave Oven Warranty. To schedule service, visit us on-line at GEAppliances.com, or call 800.GE.CARES (800.432.2737). Five Years From the date of charge, all labor... free of the original purchase The magnetron tube, if the magnetron tube fails due to obtain service under the warranty. Improper installation, delivery or maintenance. Failure of God. Replacement of the original purchase date is extended to replace the defective part. Incidental ...
... fitness for service. Safety Instructions Operating Instructions Care and Cleaning Troubleshooting Tips Consumer Support GE Microwave Oven Warranty. To schedule service, visit us on-line at GEAppliances.com, or call 800.GE.CARES (800.432.2737). Five Years From the date of charge, all labor... free of the original purchase The magnetron tube, if the magnetron tube fails due to obtain service under the warranty. Improper installation, delivery or maintenance. Failure of God. Replacement of the original purchase date is extended to replace the defective part. Incidental ...

Installation Instructions
Page 1
... inspector's use. • IMPORTANT - Keep these instructions for future reference. • Skill level - Call 800.GE.CARES (800.432.2737) or Visit our Website at: GEAppliances.com BEFORE YOU BEGIN Read these instructions with the Consumer... to improper installation is the responsibility of this appliance requires basic mechanical and electrical skills. • Proper installation is not covered under the Warranty. MFL57007101 49- 40587-1 07-09 JR READ CAREFULLY. Installation Instructions Above the Cooktop Oven Model JVM2052 Questions? Installation of the installer. •...
... inspector's use. • IMPORTANT - Keep these instructions for future reference. • Skill level - Call 800.GE.CARES (800.432.2737) or Visit our Website at: GEAppliances.com BEFORE YOU BEGIN Read these instructions with the Consumer... to improper installation is the responsibility of this appliance requires basic mechanical and electrical skills. • Proper installation is not covered under the Warranty. MFL57007101 49- 40587-1 07-09 JR READ CAREFULLY. Installation Instructions Above the Cooktop Oven Model JVM2052 Questions? Installation of the installer. •...

Installation Instructions
Page 2
...Wall Plate Location 9 Aligning the Wall Plate 10 Installation Types 11-22 A Outside Top Exhaust 12-14 Attach Mounting Plate to Wall 12 Preparation of Top Cabinet 13 Attach Exhaust Damper 13 Mount the Microwave Oven 13, 14 B Outside Back Exhaust 15-18 ...Microwave Oven Blower for Outside Back Exhaust 16, 17 Mount the Microwave Oven 18 C Recirculating 19-22 Attach Mounting Plate to Wall 19 Preparation of Top Cabinet 19 Adapt Microwave Oven Blower for Recirculation 20 Mount the Microwave Oven 21 Install the Charcoal Filter 22 Before You Use Your Microwave Oven 23 2 Installation...
...Wall Plate Location 9 Aligning the Wall Plate 10 Installation Types 11-22 A Outside Top Exhaust 12-14 Attach Mounting Plate to Wall 12 Preparation of Top Cabinet 13 Attach Exhaust Damper 13 Mount the Microwave Oven 13, 14 B Outside Back Exhaust 15-18 ...Microwave Oven Blower for Outside Back Exhaust 16, 17 Mount the Microwave Oven 18 C Recirculating 19-22 Attach Mounting Plate to Wall 19 Preparation of Top Cabinet 19 Adapt Microwave Oven Blower for Recirculation 20 Mount the Microwave Oven 21 Install the Charcoal Filter 22 Before You Use Your Microwave Oven 23 2 Installation...
Installation Instructions
Page 3
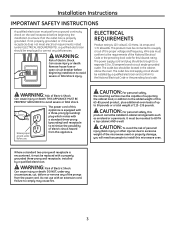
... must perform a ground continuity check on the wall receptacle before beginning the installation to a supply circuit of this microwave oven. Can cause injury or death: DO NOT, under ELECTRICAL REQUIREMENTS), a qualified electrician should be installed in cabinet arrangements such as an island or a peninsula. WARNING: Risk ... personal injury (back injury or other injuries due to excessive weight of the microwave oven) or property damage, you will need two people to install this 63-85 pound product, plus additional oven loads of up to the added weight of the proper voltage and frequency....
... must perform a ground continuity check on the wall receptacle before beginning the installation to a supply circuit of this microwave oven. Can cause injury or death: DO NOT, under ELECTRICAL REQUIREMENTS), a qualified electrician should be installed in cabinet arrangements such as an island or a peninsula. WARNING: Risk ... personal injury (back injury or other injuries due to excessive weight of the microwave oven) or property damage, you will need two people to install this 63-85 pound product, plus additional oven loads of up to the added weight of the proper voltage and frequency....
Installation Instructions
Page 4
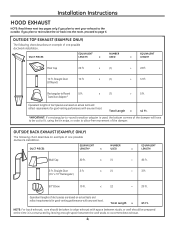
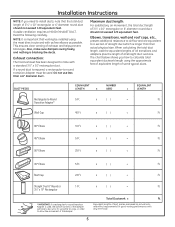
... are based on actual tests and reflect requirements for good venting performance with any vent hood. x (2) = 20 Ft. Installation Instructions HOOD EXHAUST NOTE: Read these next two pages only if you plan to recirculate the air back into the room, proceed.... Straight Duct 3 Ft. (31⁄4" x 10" Rectangular) x (1) = 3 Ft. 90° Elbow 10 Ft. Equivalent lengths of one possible ductwork installation. DUCT PIECES EQUIVALENT LENGTH x NUMBER USED EQUIVALENT = LENGTH Roof Cap 24 Ft. x (1) = 40 Ft. 3 Ft. OUTSIDE TOP EXHAUST (EXAMPLE ONLY) The...
... are based on actual tests and reflect requirements for good venting performance with any vent hood. x (2) = 20 Ft. Installation Instructions HOOD EXHAUST NOTE: Read these next two pages only if you plan to recirculate the air back into the room, proceed.... Straight Duct 3 Ft. (31⁄4" x 10" Rectangular) x (1) = 3 Ft. 90° Elbow 10 Ft. Equivalent lengths of one possible ductwork installation. DUCT PIECES EQUIVALENT LENGTH x NUMBER USED EQUIVALENT = LENGTH Roof Cap 24 Ft. x (1) = 40 Ft. 3 Ft. OUTSIDE TOP EXHAUST (EXAMPLE ONLY) The...
Installation Instructions
Page 5
Installation Instructions NOTE: If you how to allow free movement of 31⁄4" x 10" rectangular or 6" diameter round duct should not exceed 120 equivalent feet. Read ... calculate total equivalent ductwork length using the most direct route and with a standard 31⁄4" x 10" rectangular duct. The chart below shows you need to install ducts, note that venting be installed using the approximate feet of equivalent length of straight duct which is blocking the ducts.
Installation Instructions NOTE: If you how to allow free movement of 31⁄4" x 10" rectangular or 6" diameter round duct should not exceed 120 equivalent feet. Read ... calculate total equivalent ductwork length using the most direct route and with a standard 31⁄4" x 10" rectangular duct. The chart below shows you need to install ducts, note that venting be installed using the approximate feet of equivalent length of straight duct which is blocking the ducts.
Installation Instructions
Page 6
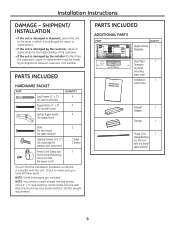
... (1⁄4" x 3") (for drywall holes) Spring Toggle Heads (for toggle bolts) QUANTITY 4 4 4 Bolts 2 (for securing to the store in a metal upper cabinet) 6 Check to install at least two lag screws into a 2" x 4" stud and four anchor bolts into the wall. NOTE: Some extra parts are included. SHIPMENT.../ INSTALLATION • If the unit is damaged in shipment, return the unit to the upper cabinet) Tapping Screws (1⁄8"x 1⁄2") (for the cord hole...
... (1⁄4" x 3") (for drywall holes) Spring Toggle Heads (for toggle bolts) QUANTITY 4 4 4 Bolts 2 (for securing to the store in a metal upper cabinet) 6 Check to install at least two lag screws into a 2" x 4" stud and four anchor bolts into the wall. NOTE: Some extra parts are included. SHIPMENT.../ INSTALLATION • If the unit is damaged in shipment, return the unit to the upper cabinet) Tapping Screws (1⁄8"x 1⁄2") (for the cord hole...

Installation Instructions
Page 7
...the cabinets. Your Owner's Manual contains the kit number for your model. • This oven is for installation over ranges up to 36" wide. • If you are going to vent your oven to the outside, see Hood Exhaust Section for power cord clearance. • Maximum cabinet ... top cabinet spacing (used on the upper cabinet template for exhaust duct preparation. • When installing the oven beneath smooth, flat cabinets, be careful to follow the instructions on recessed bottom cabinet installations only) Duct and masking tape MOUNTING SPACE 16-1⁄4" 30" 2" 66" or more from the...
...the cabinets. Your Owner's Manual contains the kit number for your model. • This oven is for installation over ranges up to 36" wide. • If you are going to vent your oven to the outside, see Hood Exhaust Section for power cord clearance. • Maximum cabinet ... top cabinet spacing (used on the upper cabinet template for exhaust duct preparation. • When installing the oven beneath smooth, flat cabinets, be careful to follow the instructions on recessed bottom cabinet installations only) Duct and masking tape MOUNTING SPACE 16-1⁄4" 30" 2" 66" or more from the...
Installation Instructions
Page 8
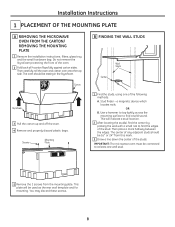
... discard plastic bags. a magnetic device which locates nails. Then place a mark halfway between the edges. OR B. The oven should be connected to find a solid sound. Installation Instructions 1 PLACEMENT OF THE MOUNTING PLATE A REMOVING THE MICROWAVE OVEN FROM THE CARTON/ REMOVING THE MOUNTING PLATE 1 Remove the installation instructions, filters, glass tray and the small hardware bag.
... discard plastic bags. a magnetic device which locates nails. Then place a mark halfway between the edges. OR B. The oven should be connected to find a solid sound. Installation Instructions 1 PLACEMENT OF THE MOUNTING PLATE A REMOVING THE MICROWAVE OVEN FROM THE CARTON/ REMOVING THE MOUNTING PLATE 1 Remove the installation instructions, filters, glass tray and the small hardware bag.
Installation Instructions
Page 9
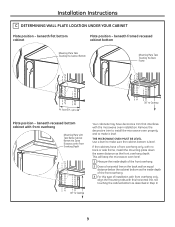
... WALL PLATE LOCATION UNDER YOUR CABINET Plate position - Remove the decorative trim to install the microwave oven properly and to make it level. This will keep the microwave oven level. 1 Measure the inside depth of the front overhang. 2 Draw a horizontal line on the back wall an equal... - Use a level to make sure the cabinet bottom is level. If the cabinets have decorative trim that interferes with the microwave oven installation. beneath recessed bottom cabinet with front overhang Mounting Plate with Tabs Below Cabinet Bottom the Same Distance as the Front Overhang Depth 30...
... WALL PLATE LOCATION UNDER YOUR CABINET Plate position - Remove the decorative trim to install the microwave oven properly and to make it level. This will keep the microwave oven level. 1 Measure the inside depth of the front overhang. 2 Draw a horizontal line on the back wall an equal... - Use a level to make sure the cabinet bottom is level. If the cabinets have decorative trim that interferes with the microwave oven installation. beneath recessed bottom cabinet with front overhang Mounting Plate with Tabs Below Cabinet Bottom the Same Distance as the Front Overhang Depth 30...
Installation Instructions
Page 10
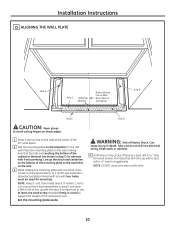
... the wall. 3 While holding the mounting plate with the stud. Can cause injury or death. Take care to not drill into electrical wiring inside area E. Installation Instructions D ALIGNING THE WALL PLATE Hole A Hole C Centerline Notches Draw a Vertical Line on Wall from Center of Top Cabinet Hole B Area E Hole D CAUTION: Wear gloves... up with one wood screw mounted firmly in a stud to the centerline on the bottom of the mounting plate to support the weight of the microwave oven. NOTE: Holes C and D are touching the bottom of Electric Shock.
... the wall. 3 While holding the mounting plate with the stud. Can cause injury or death. Take care to not drill into electrical wiring inside area E. Installation Instructions D ALIGNING THE WALL PLATE Hole A Hole C Centerline Notches Draw a Vertical Line on Wall from Center of Top Cabinet Hole B Area E Hole D CAUTION: Wear gloves... up with one wood screw mounted firmly in a stud to the centerline on the bottom of the mounting plate to support the weight of the microwave oven. NOTE: Holes C and D are touching the bottom of Electric Shock.

Installation Instructions
Page 11
... 11 A Charcoal Filter Accessory Kit is shipped assembled for Outside Top Exhaust (except for non-vented models). Recirculating (Non-Vented Ductless) NOTE: This microwave oven is required for the non-vented exhaust. (See your installation and proceed to the following three types of ventilation required for your Owner's Manual for the kit number...
... 11 A Charcoal Filter Accessory Kit is shipped assembled for Outside Top Exhaust (except for non-vented models). Recirculating (Non-Vented Ductless) NOTE: This microwave oven is required for the non-vented exhaust. (See your installation and proceed to the following three types of ventilation required for your Owner's Manual for the kit number...


