Use and Care Manual
Page 6
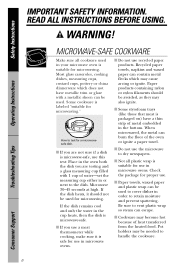
..., measuring cups, custard cups, pottery or china dinnerware which may be used to cover dishes in microwave ovens. Microwave 30-45 seconds at high. If the dish heats, it is safe for microwaving." s Do not use the microwave to vent plastic wrap so steam can burn the floor of metal embedded in the bottom. Be sure...
..., measuring cups, custard cups, pottery or china dinnerware which may be used to cover dishes in microwave ovens. Microwave 30-45 seconds at high. If the dish heats, it is safe for microwaving." s Do not use the microwave to vent plastic wrap so steam can burn the floor of metal embedded in the bottom. Be sure...
Use and Care Manual
Page 7
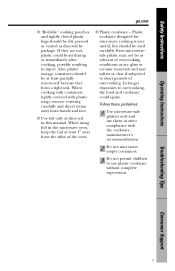
... cookware designed for microwave cooking is very useful, but should be slit, pierced or vented as are not, plastic could ignite. Troubleshooting Tips Consumer Support 7 In longer exposures to use them in the microwave oven, keep the foil... at least partially uncovered because they are glass or ceramic materials and may not be at least 1″ away from hands and face. Safety Instructions Operating Instructions ge...
... cookware designed for microwave cooking is very useful, but should be slit, pierced or vented as are not, plastic could ignite. Troubleshooting Tips Consumer Support 7 In longer exposures to use them in the microwave oven, keep the foil... at least partially uncovered because they are glass or ceramic materials and may not be at least 1″ away from hands and face. Safety Instructions Operating Instructions ge...
Use and Care Manual
Page 9
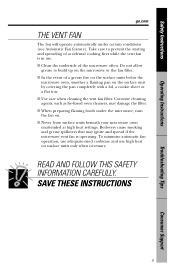
...of a grease fire on the surface units below the microwave oven, smother a flaming pan on . Corrosive cleaning agents, such as lye-based oven cleaners, may ignite and spread if the microwave vent fan is in use high heat on the microwave or the fan filter. Boilovers cause smoking and greasy.... s When preparing flaming foods under certain conditions (see Automatic Fan feature). Safety Instructions Operating Instructions ge.com THE VENT FAN The fan will operate automatically under the microwave, turn the fan on the surface unit by covering the pan completely with a lid, a cookie sheet or a ...
...of a grease fire on the surface units below the microwave oven, smother a flaming pan on . Corrosive cleaning agents, such as lye-based oven cleaners, may ignite and spread if the microwave vent fan is in use high heat on the microwave or the fan filter. Boilovers cause smoking and greasy.... s When preparing flaming foods under certain conditions (see Automatic Fan feature). Safety Instructions Operating Instructions ge.com THE VENT FAN The fan will operate automatically under the microwave, turn the fan on the surface unit by covering the pan completely with a lid, a cookie sheet or a ...
Use and Care Manual
Page 10
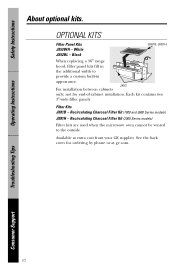
... See the back cover for end-of-cabinet installation. White JX52BL - Recirculating Charcoal Filter Kit (2000 Series models) Filter kits are used when the microwave oven cannot be vented to provide a custom built-in the additional width to the outside. Black JX81B, JX81H When replacing a 36″ range hood, filler panel kits fill... Filter Kit (1800 and 3600 Series models) JX81H - OPTIONAL KITS Filler Panel Kits JX52WH - not for ordering by phone or at extra cost from your GE supplier. Available at...
... See the back cover for end-of-cabinet installation. White JX52BL - Recirculating Charcoal Filter Kit (2000 Series models) Filter kits are used when the microwave oven cannot be vented to provide a custom built-in the additional width to the outside. Black JX81B, JX81H When replacing a 36″ range hood, filler panel kits fill... Filter Kit (1800 and 3600 Series models) JX81H - OPTIONAL KITS Filler Panel Kits JX52WH - not for ordering by phone or at extra cost from your GE supplier. Available at...
Use and Care Manual
Page 11
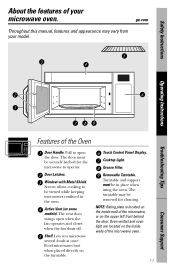
.... Shelf. Touch Control Panel Display. Removable Turntable. Safety Instructions About the features of your model. Oven vent(s) and oven light are located on the turntable. Screen allows cooking to operate. ge.com Throughout this manual, features and appearance may be securely latched for cleaning. Cooktop Light. Door Latches. The turntable may vary from your microwave oven.
.... Shelf. Touch Control Panel Display. Removable Turntable. Safety Instructions About the features of your model. Oven vent(s) and oven light are located on the turntable. Screen allows cooking to operate. ge.com Throughout this manual, features and appearance may be securely latched for cleaning. Cooktop Light. Door Latches. The turntable may vary from your microwave oven.
Use and Care Manual
Page 16
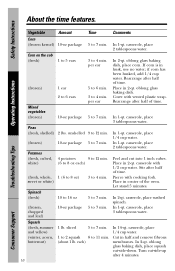
...1 ear 2 to 6 ears 3 to 7 min. if corn has been husked, add 1/4 cup water. Rearrange after half of time. Stir after half of the oven. casserole, place washed spinach. Consumer Support per ear 5 to 6 min. 3 to 4 min. If corn is in half and remove fibrous membranes. Place in ...water. Spinach (fresh) (frozen, chopped and leaf) 10 to 16 oz 10-oz package 5 to 7 min. 5 to 11 min. (about 1 lb. Cover with vented plastic wrap. oblong glass baking dish, place corn. Potatoes (fresh, cubed, white) 4 potatoes 9 to 12 min. (6 to 8 oz each ) In 11⁄2-qt....
...1 ear 2 to 6 ears 3 to 7 min. if corn has been husked, add 1/4 cup water. Rearrange after half of time. Stir after half of the oven. casserole, place washed spinach. Consumer Support per ear 5 to 6 min. 3 to 4 min. If corn is in half and remove fibrous membranes. Place in ...water. Spinach (fresh) (frozen, chopped and leaf) 10 to 16 oz 10-oz package 5 to 7 min. 5 to 11 min. (about 1 lb. Cover with vented plastic wrap. oblong glass baking dish, place corn. Potatoes (fresh, cubed, white) 4 potatoes 9 to 12 min. (6 to 8 oz each ) In 11⁄2-qt....

Use and Care Manual
Page 17
ge.com Time Defrost Allows you to sit out for the length of ... 7 cuts the total defrosting time in the package. Tightly closed packages should not be defrosted and microwaved. If still slightly icy, return to the microwave very briefly, or let it to approximately 1/3. Troubleshooting Tips Consumer Support 17 Power level 3 is.... s When defrosted, food should be slit, pierced or vented AFTER food has partially defrosted. A dull thumping noise may be cool but you select. This sound is normal when the oven is in all areas. Safety Instructions Operating Instructions 1 Press ...
ge.com Time Defrost Allows you to sit out for the length of ... 7 cuts the total defrosting time in the package. Tightly closed packages should not be defrosted and microwaved. If still slightly icy, return to the microwave very briefly, or let it to approximately 1/3. Troubleshooting Tips Consumer Support 17 Power level 3 is.... s When defrosted, food should be slit, pierced or vented AFTER food has partially defrosted. A dull thumping noise may be cool but you select. This sound is normal when the oven is in all areas. Safety Instructions Operating Instructions 1 Press ...

Use and Care Manual
Page 21
...the cooking time to heat an 8-10 oz cup of the microwave oven are essential for additional cooking time. The proper containers and covers are dry before placing food in severely overcooked or burnt food. ge.com Covered Vented Dry off dishes so they can mislead the sensor. If food... is undercooked after the countdown use microwave-safe containers and cover them with lids or vented plastic wrap.
...the cooking time to heat an 8-10 oz cup of the microwave oven are essential for additional cooking time. The proper containers and covers are dry before placing food in severely overcooked or burnt food. ge.com Covered Vented Dry off dishes so they can mislead the sensor. If food... is undercooked after the countdown use microwave-safe containers and cover them with lids or vented plastic wrap.
Use and Care Manual
Page 24
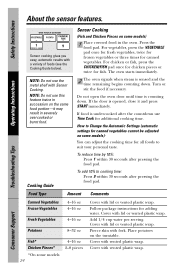
...oz 2-8 pieces Cover with Sensor Cooking. NOTE: Do not use this feature twice in the oven. Cover with fork. Pierce skin with lid or vented plastic wrap. Troubleshooting Tips Consumer Support The oven starts immediately. To add 10% to suit your personal taste. Add 1/4 cup water per... serving. NOTE: Do not use Time Cook for canned vegetables. Cooking Guide 2 The oven signals when steam is counting...
...oz 2-8 pieces Cover with Sensor Cooking. NOTE: Do not use this feature twice in the oven. Cover with fork. Pierce skin with lid or vented plastic wrap. Troubleshooting Tips Consumer Support The oven starts immediately. To add 10% to suit your personal taste. Add 1/4 cup water per... serving. NOTE: Do not use Time Cook for canned vegetables. Cooking Guide 2 The oven signals when steam is counting...
Use and Care Manual
Page 28
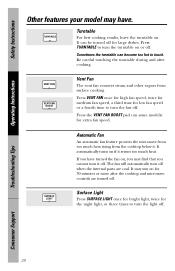
... for the night light, or three times to turn it . Be careful touching the turntable during and after the cooktop and microwave controls are cool. Troubleshooting Tips Consumer Support 28 Press VENT FAN once for high fan speed, twice for medium fan speed, a third time for 30 minutes or more after cooking... below it off. It can become too hot to turn off . Press TURNTABLE to touch. SURFACE LIGHT Automatic Fan An automatic fan feature protects the microwave from surface cooking. Press the VENT FAN BOOST pad (on or off when the internal parts are turned off .
... for the night light, or three times to turn it . Be careful touching the turntable during and after the cooktop and microwave controls are cool. Troubleshooting Tips Consumer Support 28 Press VENT FAN once for high fan speed, twice for medium fan speed, a third time for 30 minutes or more after cooking... below it off. It can become too hot to turn off . Press TURNTABLE to touch. SURFACE LIGHT Automatic Fan An automatic fan feature protects the microwave from surface cooking. Press the VENT FAN BOOST pad (on or off when the internal parts are turned off .
Use and Care Manual
Page 32
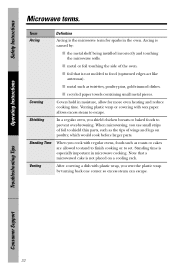
Venting plastic wrap or covering with regular ovens, foods such as roasts or cakes are allowed to stand to finish cooking or to set. When microwaving, you shield chicken breasts or baked foods to shield thin parts, such as twist-ties, poultry pins, gold-rimmed dishes. ... excess steam can escape. Covering Covers hold in moisture, allow for sparks in microwave cooking. Standing Time When you vent the plastic wrap by : s the metal shelf being installed incorrectly and touching the microwave walls. Arcing is not placed on poultry, which would cook before larger parts....
Venting plastic wrap or covering with regular ovens, foods such as roasts or cakes are allowed to stand to finish cooking or to set. When microwaving, you shield chicken breasts or baked foods to shield thin parts, such as twist-ties, poultry pins, gold-rimmed dishes. ... excess steam can escape. Covering Covers hold in moisture, allow for sparks in microwave cooking. Standing Time When you vent the plastic wrap by : s the metal shelf being installed incorrectly and touching the microwave walls. Arcing is not placed on poultry, which would cook before larger parts....
Use and Care Manual
Page 37
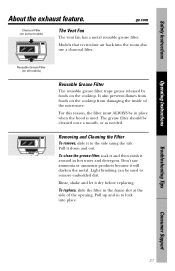
... foods on the cooktop. Pull up and in the frame slot at the side of the microwave. Light brushing can be cleaned once a month, or as needed. ge.com Charcoal Filter (on some models) The Vent Fan The vent fan has a metal reusable grease filter. Safety Instructions Operating Instructions About the exhaust feature. To...
... foods on the cooktop. Pull up and in the frame slot at the side of the microwave. Light brushing can be cleaned once a month, or as needed. ge.com Charcoal Filter (on some models) The Vent Fan The vent fan has a metal reusable grease filter. Safety Instructions Operating Instructions About the exhaust feature. To...
Use and Care Manual
Page 38
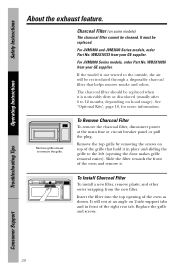
...screws on hood usage). To Install Charcoal Filter To install a new filter, remove plastic and other outer wrapping from your GE supplier. It must be replaced when it is not vented to 12 months, depending on top of the grille that helps remove smoke and odors. WB2X10733 from the new filter.... the left (opening of the right rear tab. Replace the grille and screws. Slide the filter towards the front of the oven and remove it in front of the oven as shown. The charcoal filter should be replaced. Charcoal Filter (on 2 side support tabs and in place and sliding the ...
...screws on hood usage). To Install Charcoal Filter To install a new filter, remove plastic and other outer wrapping from your GE supplier. It must be replaced when it is not vented to 12 months, depending on top of the grille that helps remove smoke and odors. WB2X10733 from the new filter.... the left (opening of the right rear tab. Replace the grille and screws. Slide the filter towards the front of the oven and remove it in front of the oven as shown. The charcoal filter should be replaced. Charcoal Filter (on 2 side support tabs and in place and sliding the ...
Use and Care Manual
Page 40
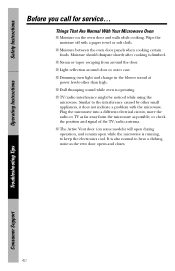
...with a paper towel or soft cloth. s The Active Vent door (on the oven door and walls while cooking. Wipe the moisture off with the microwave. s Dull thumping sound while oven is finished. Similar to keep the electronics cool. Plug the microwave into a different electrical circuit, move the radio or ... Your Microwave Oven s Moisture on some models) will open during operation, and remain open while the microwave is also normal to hear a clicking noise as possible, or check the position and signal of the TV/radio antenna. s Steam or vapor escaping from the microwave as the vent door...
...with a paper towel or soft cloth. s The Active Vent door (on the oven door and walls while cooking. Wipe the moisture off with the microwave. s Dull thumping sound while oven is finished. Similar to keep the electronics cool. Plug the microwave into a different electrical circuit, move the radio or ... Your Microwave Oven s Moisture on some models) will open during operation, and remain open while the microwave is also normal to hear a clicking noise as possible, or check the position and signal of the TV/radio antenna. s Steam or vapor escaping from the microwave as the vent door...
Installation Instructions
Page 4
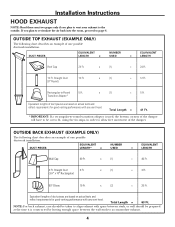
..., using the tin snips, in order to -Round 5 Ft. Equivalent lengths of duct pieces are based on actual tests and reflect requirements for good venting performance with any vent hood. x (1) = 24 Ft. 12 Ft. x (1) = 40 Ft. 3 Ft. x (2) = 20 Ft. x (1) = 12 Ft. Equivalent lengths ... Cap 24 Ft. Straight Duct (6″ Round) 12 Ft. NOTE: For back exhaust, care should be taken to align exhaust with any vent hood. Total Length = 63 Ft. OUTSIDE BACK EXHAUST (EXAMPLE ONLY) The following chart describes an example of one possible ductwork installation. Installation...
..., using the tin snips, in order to -Round 5 Ft. Equivalent lengths of duct pieces are based on actual tests and reflect requirements for good venting performance with any vent hood. x (1) = 24 Ft. 12 Ft. x (1) = 40 Ft. 3 Ft. x (2) = 20 Ft. x (1) = 12 Ft. Equivalent lengths ... Cap 24 Ft. Straight Duct (6″ Round) 12 Ft. NOTE: For back exhaust, care should be taken to align exhaust with any vent hood. Total Length = 63 Ft. OUTSIDE BACK EXHAUST (EXAMPLE ONLY) The following chart describes an example of one possible ductwork installation. Installation...

Installation Instructions
Page 5
...total duct length, add the equivalent lengths of all straight duct sections. DUCT PIECES EQUIVALENT NUMBER EQUIVALENT LENGTH x USED = LENGTH Rectangular-to mate with any vent hood. x ( ) = Ft. x ( ) = Ft. 31⁄4″ x 10″ Rectangular * IMPORTANT: If a rectangular-to allow... free movement of all transitions and adaptors plus the length of the damper. 5 Total Ductwork = Ft. This ensures clear venting of 31⁄4″ x 10″ rectangular or 6″ diameter round duct should not exceed 140 equivalent feet. Maximum duct length...
...total duct length, add the equivalent lengths of all straight duct sections. DUCT PIECES EQUIVALENT NUMBER EQUIVALENT LENGTH x USED = LENGTH Rectangular-to mate with any vent hood. x ( ) = Ft. x ( ) = Ft. 31⁄4″ x 10″ Rectangular * IMPORTANT: If a rectangular-to allow... free movement of all transitions and adaptors plus the length of the damper. 5 Total Ductwork = Ft. This ensures clear venting of 31⁄4″ x 10″ rectangular or 6″ diameter round duct should not exceed 140 equivalent feet. Maximum duct length...

Installation Instructions
Page 7
...8226; If the space between the cabinets is for installation over ranges up to 36″ wide. • If you are going to vent your model. • This microwave oven is greater than 30″, a Filler Panel Kit may be 30″ or More from the Floor to the Top of the... Microwave Bottom Edge of the vent. 7 Your Owner's Manual contains the kit number for your microwave oven to the outside, see Hood Exhaust Section for exhaust duct preparation. • When installing the microwave oven beneath smooth, flat cabinets, be careful to follow the ...
...8226; If the space between the cabinets is for installation over ranges up to 36″ wide. • If you are going to vent your model. • This microwave oven is greater than 30″, a Filler Panel Kit may be 30″ or More from the Floor to the Top of the... Microwave Bottom Edge of the vent. 7 Your Owner's Manual contains the kit number for your microwave oven to the outside, see Hood Exhaust Section for exhaust duct preparation. • When installing the microwave oven beneath smooth, flat cabinets, be careful to follow the ...

Installation Instructions
Page 11
... designed for adaptation to that section. Installation Instructions 2 INSTALLATION TYPES (Choose A, B or C) This microwave oven is shipped assembled for Outside Top Exhaust (except for non-vented models). Outside Back Exhaust (Horizontal Duct) C. A OUTSIDE TOP EXHAUST (VERTICAL DUCT) Adaptor in Place for Outside... Top Exhaust B OUTSIDE BACK EXHAUST (HORIZONTAL DUCT) See page 12 See page 15 C RECIRCULATING (NON-VENTED DUCTLESS) See page 19 11 A Charcoal Filter Accessory Kit is required for the nonvented exhaust. (See your installation and proceed to ...
... designed for adaptation to that section. Installation Instructions 2 INSTALLATION TYPES (Choose A, B or C) This microwave oven is shipped assembled for Outside Top Exhaust (except for non-vented models). Outside Back Exhaust (Horizontal Duct) C. A OUTSIDE TOP EXHAUST (VERTICAL DUCT) Adaptor in Place for Outside... Top Exhaust B OUTSIDE BACK EXHAUST (HORIZONTAL DUCT) See page 12 See page 15 C RECIRCULATING (NON-VENTED DUCTLESS) See page 19 11 A Charcoal Filter Accessory Kit is required for the nonvented exhaust. (See your installation and proceed to ...

Installation Instructions
Page 19
Installation Instructions C RECIRCULATING (Non-Vented Ductless) INSTALLATION OVERVIEW C1. Adjust Blower C5. Attach Mounting Plate to the wall using toggle bolts. Prepare Top Cabinet C3. Mount the Microwave Oven C6. NOTE: Before tightening toggle bolts and wood screw, make sure the tabs on the TOP CABINET TEMPLATE. ...the cabinet when pushed flush against the wall and insert the toggle wings into the holes in the cabinet bottom. 19 Check Microwave Assembly C4. To use toggle bolts: Mounting Plate Spacing for the power cord to fit through the holes designated to help tighten...
Installation Instructions C RECIRCULATING (Non-Vented Ductless) INSTALLATION OVERVIEW C1. Adjust Blower C5. Attach Mounting Plate to the wall using toggle bolts. Prepare Top Cabinet C3. Mount the Microwave Oven C6. NOTE: Before tightening toggle bolts and wood screw, make sure the tabs on the TOP CABINET TEMPLATE. ...the cabinet when pushed flush against the wall and insert the toggle wings into the holes in the cabinet bottom. 19 Check Microwave Assembly C4. To use toggle bolts: Mounting Plate Spacing for the power cord to fit through the holes designated to help tighten...
Dimensions
Page 1
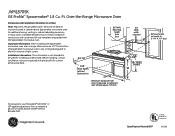
...should equal 1/2-inch. Mounting height from bottom of Spacemaker microwave oven to top of range backguard to your Monogram,® GE Profile™ or GE® appliance questions, visit our website at ge.com or call GE Answer Center® service, 800.626.2000. ... with product/kit for installing unit described. JVM1870SK GE Profile™ Spacemaker® 1.8 Cu. width required 13" MAX. 12" MIN. No additional wiring, venting or cabinet rebuilding necessary in many cases. Important Information: When installing the Spacemaker microwave oven over a range, allow for removal of ...
...should equal 1/2-inch. Mounting height from bottom of Spacemaker microwave oven to top of range backguard to your Monogram,® GE Profile™ or GE® appliance questions, visit our website at ge.com or call GE Answer Center® service, 800.626.2000. ... with product/kit for installing unit described. JVM1870SK GE Profile™ Spacemaker® 1.8 Cu. width required 13" MAX. 12" MIN. No additional wiring, venting or cabinet rebuilding necessary in many cases. Important Information: When installing the Spacemaker microwave oven over a range, allow for removal of ...


