Use and Care Manual
Page 2
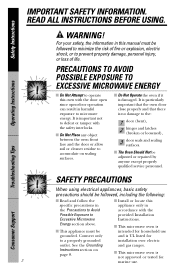
... for to defeat or tamper with the Possible Exposure to provided Installation Excessive Microwave Instructions. Consumer Support IMPORTANT SAFETY INFORMATION. s Do Not Operate the oven if it is not approved or tested for household use . ...installation over electric outlet. See the Grounding and gas ranges. s Do Not Place any object between the oven front face and the door or allow soil or cleaner residue to prevent property damage, personal injury, or loss of fire or explosion, electric shock, or to accumulate on page 8. Energy section above. s This microwave oven...
... for to defeat or tamper with the Possible Exposure to provided Installation Excessive Microwave Instructions. Consumer Support IMPORTANT SAFETY INFORMATION. s Do Not Operate the oven if it is not approved or tested for household use . ...installation over electric outlet. See the Grounding and gas ranges. s Do Not Place any object between the oven front face and the door or allow soil or cleaner residue to prevent property damage, personal injury, or loss of fire or explosion, electric shock, or to accumulate on page 8. Energy section above. s This microwave oven...
Use and Care Manual
Page 3
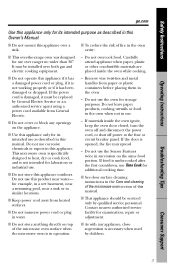
... in this manual. If food is opened, the fire may be installed over a sink. Contact nearest authorized service facility for storage purposes. Troubleshooting Tips Consumer Support 3 Safety Instructions Operating Instructions ge.com Use this appliance only for its intended use this appliance outdoors....this manual. s Do not immerse power cord or plug in similar locations. s As with any openings on top of the microwave oven surface when the microwave oven is not intended for laboratory or industrial use Time Cook for example, in a wet basement, near a swimming pool, near...
... in this manual. If food is opened, the fire may be installed over a sink. Contact nearest authorized service facility for storage purposes. Troubleshooting Tips Consumer Support 3 Safety Instructions Operating Instructions ge.com Use this appliance only for its intended use this appliance outdoors....this manual. s Do not immerse power cord or plug in similar locations. s As with any openings on top of the microwave oven surface when the microwave oven is not intended for laboratory or industrial use Time Cook for example, in a wet basement, near a swimming pool, near...
Use and Care Manual
Page 4
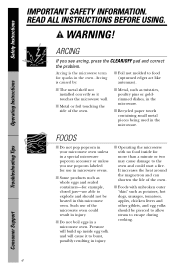
... containing small metal pieces being used in a microwave oven. WARNING! s Metal or foil touching the side of the oven. FOODS s Do not pop popcorn in your microwave oven unless in injury. s Do not boil eggs in the microwave. It increases the heat around the magnetron and...sealed containers-for sparks in this microwave oven. s The metal shelf not installed correctly so it to explode and should be heated in the oven. Troubleshooting Tips Consumer Support 4 Pressure will cause it touches the microwave wall. Arcing is the microwave term for example, closed jars-...
... containing small metal pieces being used in a microwave oven. WARNING! s Metal or foil touching the side of the oven. FOODS s Do not pop popcorn in your microwave oven unless in injury. s Do not boil eggs in the microwave. It increases the heat around the magnetron and...sealed containers-for sparks in this microwave oven. s The metal shelf not installed correctly so it to explode and should be heated in the oven. Troubleshooting Tips Consumer Support 4 Pressure will cause it touches the microwave wall. Arcing is the microwave term for example, closed jars-...

Use and Care Manual
Page 8
... the risk of electric shock. If the power cord is your personal responsibility and obligation to have a qualified electrician or service technician install an outlet near the appliance. Do not under any circumstances cut or remove the third (ground) prong from the power cord. WARNING...! The plug must be plugged into its own electrical outlet to whether the appliance is properly installed and grounded. This appliance is equipped with a power cord having a grounding wire with this appliance into an outlet that is properly grounded...
... the risk of electric shock. If the power cord is your personal responsibility and obligation to have a qualified electrician or service technician install an outlet near the appliance. Do not under any circumstances cut or remove the third (ground) prong from the power cord. WARNING...! The plug must be plugged into its own electrical outlet to whether the appliance is properly installed and grounded. This appliance is equipped with a power cord having a grounding wire with this appliance into an outlet that is properly grounded...
Use and Care Manual
Page 10
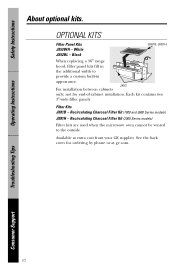
... Available at ge.com. Operating Instructions Troubleshooting Tips Consumer Support 10 Black JX81B, JX81H When replacing a 36″ range hood, filler panel kits fill in the additional width to the outside. JX52 For installation between cabinets ...installation. OPTIONAL KITS Filler Panel Kits JX52WH - Each kit contains two 3″-wide filler panels. Safety Instructions About optional kits. White JX52BL - not for ordering by phone or at extra cost from your GE supplier. Recirculating Charcoal Filter Kit (2000 Series models) Filter kits are used when the microwave oven...
... Available at ge.com. Operating Instructions Troubleshooting Tips Consumer Support 10 Black JX81B, JX81H When replacing a 36″ range hood, filler panel kits fill in the additional width to the outside. JX52 For installation between cabinets ...installation. OPTIONAL KITS Filler Panel Kits JX52WH - Each kit contains two 3″-wide filler panels. Safety Instructions About optional kits. White JX52BL - not for ordering by phone or at extra cost from your GE supplier. Recirculating Charcoal Filter Kit (2000 Series models) Filter kits are used when the microwave oven...
Use and Care Manual
Page 32
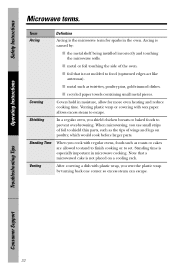
...32 s metal such as roasts or cakes are allowed to stand to finish cooking or to set. When microwaving, you vent the plastic wrap by : s the metal shelf being installed incorrectly and touching the microwave walls. s metal or foil touching the side of wings and legs on a cooling rack. Standing time...by turning back one corner so excess steam can escape. Arcing is not molded to shield thin parts, such as the tips of the oven. Venting plastic wrap or covering with plastic wrap, you use small strips of foil to food (upturned edges act like antennas). Shielding In ...
...32 s metal such as roasts or cakes are allowed to stand to finish cooking or to set. When microwaving, you vent the plastic wrap by : s the metal shelf being installed incorrectly and touching the microwave walls. s metal or foil touching the side of wings and legs on a cooling rack. Standing time...by turning back one corner so excess steam can escape. Arcing is not molded to shield thin parts, such as the tips of the oven. Venting plastic wrap or covering with plastic wrap, you use small strips of foil to food (upturned edges act like antennas). Shielding In ...
Use and Care Manual
Page 38
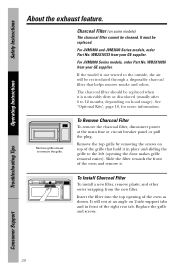
...rear tab. For JVM2000 Series models, order Part No. Slide the filter towards the front of the oven and remove it in front of the grille that hold it . The charcoal filter should be recirculated ...through a disposable charcoal filter that helps remove smoke and odors. WB2X10956 from your GE supplier. Charcoal Filter (on 2 side support tabs and in place and sliding the grille to the outside...some models) The charcoal filter cannot be replaced. To Install Charcoal Filter To install a new filter, remove plastic and other outer wrapping from your...
...rear tab. For JVM2000 Series models, order Part No. Slide the filter towards the front of the oven and remove it in front of the grille that hold it . The charcoal filter should be recirculated ...through a disposable charcoal filter that helps remove smoke and odors. WB2X10956 from your GE supplier. Charcoal Filter (on 2 side support tabs and in place and sliding the grille to the outside...some models) The charcoal filter cannot be replaced. To Install Charcoal Filter To install a new filter, remove plastic and other outer wrapping from your...

Use and Care Manual
Page 43
... Year From the date of the original purchase Any part of the microwave oven which vary from wire rack or metal/foil), or used commercially. What GE Will Not Cover: s Service trips to your home. s Improper installation, delivery or maintenance. Consumer Support This warranty is abused, misused (...your legal rights are limited to replace the defective part. Safety Instructions Operating Instructions GE Microwave Oven Warranty. To schedule service, on-line, 24 hours a day, visit us at ge.com, or call 800.GE.CARES (800.432.2737). Please have other than the intended purpose or used...
... Year From the date of the original purchase Any part of the microwave oven which vary from wire rack or metal/foil), or used commercially. What GE Will Not Cover: s Service trips to your home. s Improper installation, delivery or maintenance. Consumer Support This warranty is abused, misused (...your legal rights are limited to replace the defective part. Safety Instructions Operating Instructions GE Microwave Oven Warranty. To schedule service, on-line, 24 hours a day, visit us at ge.com, or call 800.GE.CARES (800.432.2737). Please have other than the intended purpose or used...
Installation Instructions
Page 1
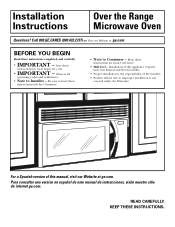
... instrucciones, visite nuestro sitio de internet ge.com. Be sure to Consumer - Installation of this appliance requires basic mechanical and electrical skills. • Proper installation is not covered under the Warranty. For a Spanish version of the installer. • Product failure due to Installer - READ CAREFULLY. Installation Instructions Over the Range Microwave Oven Questions? KEEP THESE INSTRUCTIONS. Observe all...
... instrucciones, visite nuestro sitio de internet ge.com. Be sure to Consumer - Installation of this appliance requires basic mechanical and electrical skills. • Proper installation is not covered under the Warranty. For a Spanish version of the installer. • Product failure due to Installer - READ CAREFULLY. Installation Instructions Over the Range Microwave Oven Questions? KEEP THESE INSTRUCTIONS. Observe all...

Installation Instructions
Page 2
...-22 Attach Mounting Plate to Wall 19 Preparation of Top Cabinet 19 Check Microwave Assembly 20 Adapting Microwave Blower for Recirculation 20, 21 Mount the Microwave Oven ..........21, 22 Installing the Charcoal Filter 22 Before You Use Your Microwave 23 Step-by-step installation guide Placement of Mounting Plate 8-10 Removing the Mounting Plate 8 Finding the Wall...
...-22 Attach Mounting Plate to Wall 19 Preparation of Top Cabinet 19 Check Microwave Assembly 20 Adapting Microwave Blower for Recirculation 20, 21 Mount the Microwave Oven ..........21, 22 Installing the Charcoal Filter 22 Before You Use Your Microwave 23 Step-by-step installation guide Placement of Mounting Plate 8-10 Removing the Mounting Plate 8 Finding the Wall...

Installation Instructions
Page 3
...proper voltage and frequency. ELECTRICAL REQUIREMENTS Product rating is properly grounded. to avoid severe or fatal shock injury. NOTE: For easier installation and personal safety, it is properly grounded. FOR PERSONAL SAFETY, THIS APPLIANCE MUST BE PROPERLY GROUNDED TO AVOID SEVERE OR FATAL...safety, remove house fuse or open circuit breaker before use 3 The outlet box should be located in the cabinet above the microwave oven. The installer must be capable of supporting the cabinet load, in cabinet arrangements such as an island or a peninsula. If not properly ...
...proper voltage and frequency. ELECTRICAL REQUIREMENTS Product rating is properly grounded. to avoid severe or fatal shock injury. NOTE: For easier installation and personal safety, it is properly grounded. FOR PERSONAL SAFETY, THIS APPLIANCE MUST BE PROPERLY GROUNDED TO AVOID SEVERE OR FATAL...safety, remove house fuse or open circuit breaker before use 3 The outlet box should be located in the cabinet above the microwave oven. The installer must be capable of supporting the cabinet load, in cabinet arrangements such as an island or a peninsula. If not properly ...
Installation Instructions
Page 4
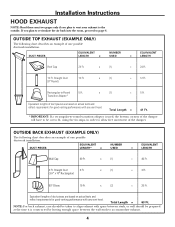
... NUMBER EQUIVALENT LENGTH x USED = LENGTH Roof Cap 24 Ft. x (1) = 12 Ft. Equivalent lengths of one possible ductwork installation. Rectangular-to allow free movement of duct pieces are based on actual tests and reflect requirements for good venting performance with any vent... Ft. NOTE: For back exhaust, care should be prepared at the time it is used, the bottom corners of one possible ductwork installation. Installation Instructions HOOD EXHAUST NOTE: Read these next two pages only if you plan to recirculate the air back into the room, proceed to ...
... NUMBER EQUIVALENT LENGTH x USED = LENGTH Roof Cap 24 Ft. x (1) = 12 Ft. Equivalent lengths of one possible ductwork installation. Rectangular-to allow free movement of duct pieces are based on actual tests and reflect requirements for good venting performance with any vent... Ft. NOTE: For back exhaust, care should be prepared at the time it is used, the bottom corners of one possible ductwork installation. Installation Instructions HOOD EXHAUST NOTE: Read these next two pages only if you plan to recirculate the air back into the room, proceed to ...

Installation Instructions
Page 5
Installation Instructions NOTE: If you how to calculate total equivalent ductwork length using the approximate feet of equivalent length of straight duct which is longer than a 6&#... and nothing is required, a rectangular-to-round transition adaptor must be used , the bottom corners of the damper will have to be installed using the tin snips, in order to install ducts, note that venting be cut to -Round 5 Ft. x ( ) = Ft. 90° Elbow 45° Elbow 90° Elbow 10 Ft...
Installation Instructions NOTE: If you how to calculate total equivalent ductwork length using the approximate feet of equivalent length of straight duct which is longer than a 6&#... and nothing is required, a rectangular-to-round transition adaptor must be used , the bottom corners of the damper will have to be installed using the tin snips, in order to install ducts, note that venting be cut to -Round 5 Ft. x ( ) = Ft. 90° Elbow 45° Elbow 90° Elbow 10 Ft...
Installation Instructions
Page 6
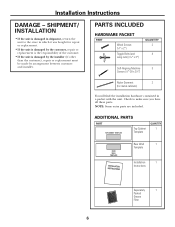
... the responsibility of the customer. • If the unit is damaged by the installer (if other than the customer), repair or replacement must be made by arrangement between customer and installer. Installation Instructions DAMAGE - Check to the store in which it was bought for metal cabinets...) You will find the installation hardware contained in shipment, return the unit to make sure you have ...
... the responsibility of the customer. • If the unit is damaged by the installer (if other than the customer), repair or replacement must be made by arrangement between customer and installer. Installation Instructions DAMAGE - Check to the store in which it was bought for metal cabinets...) You will find the installation hardware contained in shipment, return the unit to make sure you have ...

Installation Instructions
Page 7
..., flat cabinets, be careful to follow the instructions on the top cabinet template for your model. • This microwave oven is greater than 30″, a Filler Panel Kit may be used on recessed bottom cabinet installations only) Saw (saber, hole or keyhole) Stud finder or Hammer (optional) Safety goggles Level Duct and masking...
..., flat cabinets, be careful to follow the instructions on the top cabinet template for your model. • This microwave oven is greater than 30″, a Filler Panel Kit may be used on recessed bottom cabinet installations only) Saw (saber, hole or keyhole) Stud finder or Hammer (optional) Safety goggles Level Duct and masking...

Installation Instructions
Page 8
... MOUNTING PLATE A. a magnetic device which locates nails. THE MICROWAVE MUST BE CONNECTED TO AT LEAST ONE WALL STUD. 5 Remove the 2 screws from this mark. 3 Draw a line down the center of the stud. REMOVING THE MICROWAVE OVEN FROM THE CARTON/ REMOVING THE MOUNTING PLATE 1 Remove the installation instructions, filters, glass tray and the small hardware...
... MOUNTING PLATE A. a magnetic device which locates nails. THE MICROWAVE MUST BE CONNECTED TO AT LEAST ONE WALL STUD. 5 Remove the 2 screws from this mark. 3 Draw a line down the center of the stud. REMOVING THE MICROWAVE OVEN FROM THE CARTON/ REMOVING THE MOUNTING PLATE 1 Remove the installation instructions, filters, glass tray and the small hardware...

Installation Instructions
Page 9
...touching the cabinet bottom as the front overhang depth. beneath recessed bottom cabinet with front overhang Mounting Plate with the microwave installation. THE MICROWAVE MUST BE LEVEL. This will keep the microwave level. 1 Measure the inside depth of the front overhang. 2 Draw a horizontal line on the back wall an... equal distance below the cabinet bottom as the inside depth of the front overhang. 3 For this type of installation with front overhang only, ...
...touching the cabinet bottom as the front overhang depth. beneath recessed bottom cabinet with front overhang Mounting Plate with the microwave installation. THE MICROWAVE MUST BE LEVEL. This will keep the microwave level. 1 Measure the inside depth of the front overhang. 2 Draw a horizontal line on the back wall an... equal distance below the cabinet bottom as the inside depth of the front overhang. 3 For this type of installation with front overhang only, ...
Installation Instructions
Page 10
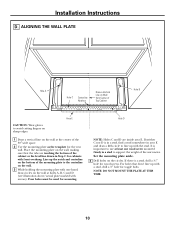
... screw mounted firmly in Step C for toggle bolts. ALIGNING THE WALL PLATE Hole A Hole C Centerline Notches Draw a Vertical Line on Wall from Center of the microwave. Installation Instructions D.
... screw mounted firmly in Step C for toggle bolts. ALIGNING THE WALL PLATE Hole A Hole C Centerline Notches Draw a Vertical Line on Wall from Center of the microwave. Installation Instructions D.

Installation Instructions
Page 11
Outside Back Exhaust (Horizontal Duct) C. Recirculating (Non-Vented Ductless) NOTE: This microwave is shipped assembled for Outside Top Exhaust (except for your Owner's Manual for adaptation to that section. Select the type ... (NON-VENTED DUCTLESS) See page 19 11 A Charcoal Filter Accessory Kit is required for the nonvented exhaust. (See your installation and proceed to the following three types of ventilation required for non-vented models). Installation Instructions 2 INSTALLATION TYPES (Choose A, B or C) This microwave oven is designed for the kit number.)
Outside Back Exhaust (Horizontal Duct) C. Recirculating (Non-Vented Ductless) NOTE: This microwave is shipped assembled for Outside Top Exhaust (except for your Owner's Manual for adaptation to that section. Select the type ... (NON-VENTED DUCTLESS) See page 19 11 A Charcoal Filter Accessory Kit is required for the nonvented exhaust. (See your installation and proceed to the following three types of ventilation required for non-vented models). Installation Instructions 2 INSTALLATION TYPES (Choose A, B or C) This microwave oven is designed for the kit number.)
Installation Instructions
Page 12
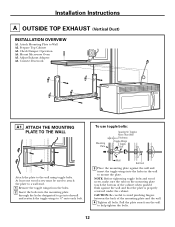
Mount Microwave Oven A5. Wall Bolt End 3 Place the mounting plate against the wall and that the plate is properly centered under the cabinet. CAUTION: Be careful to ... cabinet when pushed flush against the wall and insert the toggle wings into drywall and reattach the toggle wings to Wall A2. Installation Instructions A OUTSIDE TOP EXHAUST (Vertical Duct) INSTALLATION OVERVIEW A1. Prepare Top Cabinet A3. NOTE: Before tightening toggle bolts and wood screw, make sure the tabs on the mounting plate...
Mount Microwave Oven A5. Wall Bolt End 3 Place the mounting plate against the wall and that the plate is properly centered under the cabinet. CAUTION: Be careful to ... cabinet when pushed flush against the wall and insert the toggle wings into drywall and reattach the toggle wings to Wall A2. Installation Instructions A OUTSIDE TOP EXHAUST (Vertical Duct) INSTALLATION OVERVIEW A1. Prepare Top Cabinet A3. NOTE: Before tightening toggle bolts and wood screw, make sure the tabs on the mounting plate...


