Use and Care Manual
Page 10
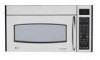
JX52 For installation between cabinets only; Recirculating Charcoal Filter Kit (1800 and 3600 Series models) JX81H - Recirculating Charcoal Filter Kit (2000 Series models) Filter kits are used when the microwave oven cannot be vented to provide a custom built-in appearance. Black JX81B, ...JX81H When replacing a 36″ range hood, filler panel kits fill in the additional width to the outside. White JX52BL - not for ordering by phone or at extra cost from your GE...
JX52 For installation between cabinets only; Recirculating Charcoal Filter Kit (1800 and 3600 Series models) JX81H - Recirculating Charcoal Filter Kit (2000 Series models) Filter kits are used when the microwave oven cannot be vented to provide a custom built-in appearance. Black JX81B, ...JX81H When replacing a 36″ range hood, filler panel kits fill in the additional width to the outside. White JX52BL - not for ordering by phone or at extra cost from your GE...
Use and Care Manual
Page 29
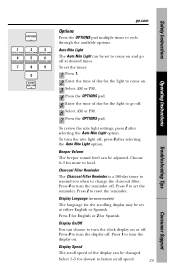
...Enter the time of day for the light to turn the display off. Beeper Volume The beeper sound level can be changed. Charcoal Filter Reminder The Charcoal Filter Reminder is a 180-day timer to remind you when to reset the reminder. Press 0 to come on and go off....nite light settings, press 2 after selecting the Auto Nite Light option. Press 2 to change the charcoal filter. Choose 0-3 for slowest to loud. Press 1 for English or 2 for Spanish. Safety Instructions ge.com Operating Instructions Troubleshooting Tips OPTIONS 1 2 3 EXPRESS COOK EXPRESS COOK EXPRESS COOK 4 5 ...
...Enter the time of day for the light to turn the display off. Beeper Volume The beeper sound level can be changed. Charcoal Filter Reminder The Charcoal Filter Reminder is a 180-day timer to remind you when to reset the reminder. Press 0 to come on and go off....nite light settings, press 2 after selecting the Auto Nite Light option. Press 2 to change the charcoal filter. Choose 0-3 for slowest to loud. Press 1 for English or 2 for Spanish. Safety Instructions ge.com Operating Instructions Troubleshooting Tips OPTIONS 1 2 3 EXPRESS COOK EXPRESS COOK EXPRESS COOK 4 5 ...
Use and Care Manual
Page 37
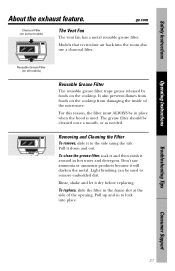
... at the side of the microwave. To replace, slide the filter in hot water and detergent. Don't use a charcoal filter. To clean the grease filter, soak it and then swish it will darken the metal. Rinse, shake and let it down and out. ge.com Charcoal Filter (on the cooktop from foods... on some models) The Vent Fan The vent fan has a metal reusable grease filter. Reusable Grease Filter (on all models) Reusable Grease Filter The reusable grease filter traps grease released by foods on the cooktop....
... at the side of the microwave. To replace, slide the filter in hot water and detergent. Don't use a charcoal filter. To clean the grease filter, soak it and then swish it will darken the metal. Rinse, shake and let it down and out. ge.com Charcoal Filter (on the cooktop from foods... on some models) The Vent Fan The vent fan has a metal reusable grease filter. Reusable Grease Filter (on all models) Reusable Grease Filter The reusable grease filter traps grease released by foods on the cooktop....
Use and Care Manual
Page 38
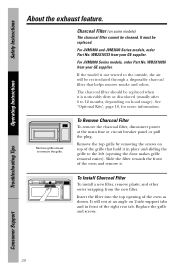
... of the oven as shown. WB2X10956 from your GE supplier. Remove grille screws to the left (opening of the grille that helps remove smoke and odors. To Remove Charcoal Filter To remove the charcoal filter, disconnect power at an angle on some models) The charcoal filter cannot be recirculated through a disposable charcoal filter that hold it . Slide the filter towards the...
... of the oven as shown. WB2X10956 from your GE supplier. Remove grille screws to the left (opening of the grille that helps remove smoke and odors. To Remove Charcoal Filter To remove the charcoal filter, disconnect power at an angle on some models) The charcoal filter cannot be recirculated through a disposable charcoal filter that hold it . Slide the filter towards the...

Installation Instructions
Page 2
...22 Attach Mounting Plate to Wall 19 Preparation of Top Cabinet 19 Check Microwave Assembly 20 Adapting Microwave Blower for Recirculation 20, 21 Mount the Microwave Oven ..........21, 22 Installing the Charcoal Filter 22 Before You Use Your Microwave 23 Step-by-step installation guide Placement of Mounting Plate 8-10 Removing... 12-14 Attach Mounting Plate to Wall 12 Preparation of Top Cabinet 13 Checking for Proper Damper Operation 13 Mount the Microwave Oven 13 Adjust the Exhaust Adaptor 14 Connecting Ductwork 14 B Outside Back Exhaust 15-18 Preparing Rear Wall for Outside Back ...
...22 Attach Mounting Plate to Wall 19 Preparation of Top Cabinet 19 Check Microwave Assembly 20 Adapting Microwave Blower for Recirculation 20, 21 Mount the Microwave Oven ..........21, 22 Installing the Charcoal Filter 22 Before You Use Your Microwave 23 Step-by-step installation guide Placement of Mounting Plate 8-10 Removing... 12-14 Attach Mounting Plate to Wall 12 Preparation of Top Cabinet 13 Checking for Proper Damper Operation 13 Mount the Microwave Oven 13 Adjust the Exhaust Adaptor 14 Connecting Ductwork 14 B Outside Back Exhaust 15-18 Preparing Rear Wall for Outside Back ...

Installation Instructions
Page 11
... 12 See page 15 C RECIRCULATING (NON-VENTED DUCTLESS) See page 19 11 A Charcoal Filter Accessory Kit is shipped assembled for Outside Top Exhaust (except for non-vented models). Select the type of ventilation: A. Installation Instructions 2 INSTALLATION TYPES (Choose A, B or C) This microwave oven is designed for adaptation to the following three types of ventilation required...
... 12 See page 15 C RECIRCULATING (NON-VENTED DUCTLESS) See page 19 11 A Charcoal Filter Accessory Kit is shipped assembled for Outside Top Exhaust (except for non-vented models). Select the type of ventilation: A. Installation Instructions 2 INSTALLATION TYPES (Choose A, B or C) This microwave oven is designed for adaptation to the following three types of ventilation required...

Installation Instructions
Page 19
Mount the Microwave Oven C6. Attach the plate to Wall C2. To use toggle bolts: Mounting Plate Spacing ...screw, make sure the tabs on the TOP CABINET TEMPLATE. Attach Mounting Plate to the wall using toggle bolts. Install Charcoal Filter C1. ATTACH THE MOUNTING PLATE TO THE WALL 3 Place the mounting plate against the wall and that the plate ... bolts into the holes in the cabinet bottom. 19 Adjust Blower C5. CAUTION: Be careful to mount the plate. Check Microwave Assembly C4. At least one wood screw must be used to attach the plate to a wall stud. 1 Remove the toggle...
Mount the Microwave Oven C6. Attach the plate to Wall C2. To use toggle bolts: Mounting Plate Spacing ...screw, make sure the tabs on the TOP CABINET TEMPLATE. Attach Mounting Plate to the wall using toggle bolts. Install Charcoal Filter C1. ATTACH THE MOUNTING PLATE TO THE WALL 3 Place the mounting plate against the wall and that the plate ... bolts into the holes in the cabinet bottom. 19 Adjust Blower C5. CAUTION: Be careful to mount the plate. Check Microwave Assembly C4. At least one wood screw must be used to attach the plate to a wall stud. 1 Remove the toggle...

Installation Instructions
Page 22
...grille using a #2 Phillips screwdriver. 2 Open the door. 3 Remove the grille. MOUNT THE MICROWAVE OVEN (cont.) 5 Insert 2 self-aligning screws through outer top cabinet holes. INSTALLING THE CHARCOAL FILTER 1 On 1400 and 1600 Series models, remove screws on each screw. 6 Tighten center screw ...screws. 6 Close the door. When properly installed, the wire mesh of the microwave oven. (While tightening screws, hold the microwave oven in place against the wall and the top cabinet.) 8 Install grease filter. C6. Installation Instructions C5. Turn two full turns on front of grille using...
...grille using a #2 Phillips screwdriver. 2 Open the door. 3 Remove the grille. MOUNT THE MICROWAVE OVEN (cont.) 5 Insert 2 self-aligning screws through outer top cabinet holes. INSTALLING THE CHARCOAL FILTER 1 On 1400 and 1600 Series models, remove screws on each screw. 6 Tighten center screw ...screws. 6 Close the door. When properly installed, the wire mesh of the microwave oven. (While tightening screws, hold the microwave oven in place against the wall and the top cabinet.) 8 Install grease filter. C6. Installation Instructions C5. Turn two full turns on front of grille using...

Dimensions
Page 2
...176; Elbow E. 90° Elbow F. 45° Elbow G. Optional Accessories (Available at the time it is to be used when the Spacemaker microwave oven cannot be prepared at additional cost) Filler Panel Kits JX52CT-Bisque JX52BL-Black JX52WH-White When replacing a 36" or 42" range hood, this.... 5 ft. 25 ft. 5 ft. 24 ft. Recirculating Charcoal Filter Kit To be used , care should be taken to align exhaust with space between studs, or wall should not exceed 120 equivalent feet. Each kit contains two 3"-wide filler panels. JVM1870SK GE Profile™ Spacemaker® 1.8 Cu. Ft.
...176; Elbow E. 90° Elbow F. 45° Elbow G. Optional Accessories (Available at the time it is to be used when the Spacemaker microwave oven cannot be prepared at additional cost) Filler Panel Kits JX52CT-Bisque JX52BL-Black JX52WH-White When replacing a 36" or 42" range hood, this.... 5 ft. 25 ft. 5 ft. 24 ft. Recirculating Charcoal Filter Kit To be used , care should be taken to align exhaust with space between studs, or wall should not exceed 120 equivalent feet. Each kit contains two 3"-wide filler panels. JVM1870SK GE Profile™ Spacemaker® 1.8 Cu. Ft.


