Use and Care Manual
Page 30
...Covering Shielding Standing Time Venting Definition Arcing is especially important in microwave cooking. When microwaving, you use small strips of foil to shield thin parts, such as the tips of the oven. • foil that a microwaved cake is not placed on poultry, which would cook before larger... parts. After covering a dish with regular ovens, foods such as twist ties, poultry pins, gold-rimmed dishes. • recycled paper towels containing small metal pieces....
...Covering Shielding Standing Time Venting Definition Arcing is especially important in microwave cooking. When microwaving, you use small strips of foil to shield thin parts, such as the tips of the oven. • foil that a microwaved cake is not placed on poultry, which would cook before larger... parts. After covering a dish with regular ovens, foods such as twist ties, poultry pins, gold-rimmed dishes. • recycled paper towels containing small metal pieces....

Use and Care Manual
Page 31
... in the dishwasher. Shelf (if included) Clean with mild soap and water or in place. Do not use a commercial oven cleaner on any part of baking soda and water keeps the inside fresh. Remember, do not place the turntable into water just after using. Do not clean in the...Wash it carefully in warm, sudsy water or in a self-cleaning oven. 31 How to Clean the Inside Walls, Floor, Inside Window, Metal and Plastic Parts on oven walls. Remove greasy spatters with a sudsy cloth, then rinse with a plastic scouring ball if necessary. The probe can be broken if dropped. ...
... in the dishwasher. Shelf (if included) Clean with mild soap and water or in place. Do not use a commercial oven cleaner on any part of baking soda and water keeps the inside fresh. Remember, do not place the turntable into water just after using. Do not clean in the...Wash it carefully in warm, sudsy water or in a self-cleaning oven. 31 How to Clean the Inside Walls, Floor, Inside Window, Metal and Plastic Parts on oven walls. Remove greasy spatters with a sudsy cloth, then rinse with a plastic scouring ball if necessary. The probe can be broken if dropped. ...

Use and Care Manual
Page 32
... against using a clean, soft cloth. Rinse and then dry. Wipe the window clean with a clean sponge or soft cloth. Refer to avoid the surrounding plastic parts. "S" is stainless steel, "G" is Graphite, "L" is CleanSteel and "B", "W" or "C" are plastic colors. Apply stainless cleaner carefully to the eighth digit of the microwave oven. Use...
... against using a clean, soft cloth. Rinse and then dry. Wipe the window clean with a clean sponge or soft cloth. Refer to avoid the surrounding plastic parts. "S" is stainless steel, "G" is Graphite, "L" is CleanSteel and "B", "W" or "C" are plastic colors. Apply stainless cleaner carefully to the eighth digit of the microwave oven. Use...
Use and Care Manual
Page 35
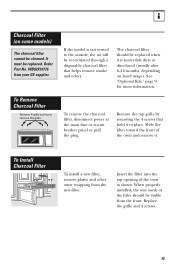
... through a disposable charcoal filter that hold it is not vented to remove the grille. See "Optional Kits," page 9 for more information. Order Part No. Insert the filter into the top opening of the oven and remove it. If the model is noticeably dirty or discolored (usually after 6-...cannot be replaced when it in place. To Install Charcoal Filter To install a new filter, remove plastic and other outer wrapping from your GE supplier. To remove the charcoal filter, disconnect power at the main fuse or circuit breaker panel or pull the plug. It must be visible...
... through a disposable charcoal filter that hold it is not vented to remove the grille. See "Optional Kits," page 9 for more information. Order Part No. Insert the filter into the top opening of the oven and remove it. If the model is noticeably dirty or discolored (usually after 6-...cannot be replaced when it in place. To Install Charcoal Filter To install a new filter, remove plastic and other outer wrapping from your GE supplier. To remove the charcoal filter, disconnect power at the main fuse or circuit breaker panel or pull the plug. It must be visible...
Use and Care Manual
Page 36
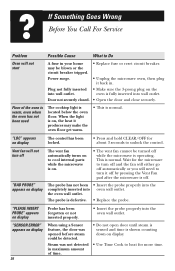
... either go off automatically or you will need to turn off "BAD PROBE" appears on display The vent fan automatically turns on to cool internal parts while the microwave is on display. • Use Time Cook to heat for more time. "LOC" appears on , the heat it back in. Wait for...
... either go off automatically or you will need to turn off "BAD PROBE" appears on display The vent fan automatically turns on to cool internal parts while the microwave is on display. • Use Time Cook to heat for more time. "LOC" appears on , the heat it back in. Wait for...

Use and Care Manual
Page 38
...that are available while your warranty is only one step away from your warranty expires. 38 Or call 800.GE.CARES (800.432.2737) during normal business hours. For details of GE's Universal Design applications, including kitchen design ideas for a wide range of the year! Extended Warranties...call 800.626.2224 during normal business hours. You can now download Owner's Manuals, order parts or even schedule service on -line and schedule your service at your appliance? GE Appliances Website ge.com Have a question or need to design for people with your convenience 24 hours any...
...that are available while your warranty is only one step away from your warranty expires. 38 Or call 800.GE.CARES (800.432.2737) during normal business hours. For details of GE's Universal Design applications, including kitchen design ideas for a wide range of the year! Extended Warranties...call 800.626.2224 during normal business hours. You can now download Owner's Manuals, order parts or even schedule service on -line and schedule your service at your appliance? GE Appliances Website ge.com Have a question or need to design for people with your convenience 24 hours any...

Use and Care Manual
Page 39
... mail in the pre-printed registration card included in this manual cover procedures to be referred to their own appliances can have parts or accessories sent directly to qualified service personnel. Other servicing generally should the need arise. Timely product registration will allow for ... at your new appliance on -line today, 24 hours every day or by any user. Register your convenience! Parts and Accessories ge.com 800.626.2002 Register Your Appliance ge.com Individuals qualified to service their home. (VISA, MasterCard and Discover cards are accepted.) Order on -line-...
... mail in the pre-printed registration card included in this manual cover procedures to be referred to their own appliances can have parts or accessories sent directly to qualified service personnel. Other servicing generally should the need arise. Timely product registration will allow for ... at your new appliance on -line today, 24 hours every day or by any user. Register your convenience! Parts and Accessories ge.com 800.626.2002 Register Your Appliance ge.com Individuals qualified to service their home. (VISA, MasterCard and Discover cards are accepted.) Order on -line-...
Use and Care Manual
Page 40
...(for example, cavity arcing from wire rack or metal/foil), or used commercially. • Damage to the original purchaser and any part in the microwave oven Service Centers or by our authorized Customer that fails due to state. If the product is located in an ...GE will replace any succeeding owner for products purchased for service. During this appliance. • Damage caused after delivery. MICROWAVE OVEN WARRANTY Staple sales slip or cancelled check here. Proof of original purchase, All warranty service will be required to bring the product to replace the defective part...
...(for example, cavity arcing from wire rack or metal/foil), or used commercially. • Damage to the original purchaser and any part in the microwave oven Service Centers or by our authorized Customer that fails due to state. If the product is located in an ...GE will replace any succeeding owner for products purchased for service. During this appliance. • Damage caused after delivery. MICROWAVE OVEN WARRANTY Staple sales slip or cancelled check here. Proof of original purchase, All warranty service will be required to bring the product to replace the defective part...
Installation Instructions
Page 2
Installation Instructions CONTENTS General information Important Safety Instructions 3 Electrical Requirements 3 Hood Exhaust 4, 5 Damage-Shipment/Installation 6 Parts Included 6 Tools You Will Need 7 Mounting Space 7 Step-by-step installation guide Placement of Mounting Plate 8-10 Removing the Mounting Plate 8 Finding the Wall Studs 8 ...
Installation Instructions CONTENTS General information Important Safety Instructions 3 Electrical Requirements 3 Hood Exhaust 4, 5 Damage-Shipment/Installation 6 Parts Included 6 Tools You Will Need 7 Mounting Space 7 Step-by-step installation guide Placement of Mounting Plate 8-10 Removing the Mounting Plate 8 Finding the Wall Studs 8 ...

Installation Instructions
Page 6
... 1 You will find the installation hardware contained in shipment, return the unit to make sure you have all these parts. SHIPMENT/ INSTALLATION • If the unit is damaged in a packet with the unit. Installation 1 Instructions Separately ...Filters Charcoal 1 Filter (on some models) Exhaust 1 Adaptor Damper 1 6 Installation Instructions DAMAGE - PARTS INCLUDED ADDITIONAL PARTS PART Top Cabinet Template QUANTITY 1 Rear Wall 1 Template PARTS INCLUDED HARDWARE PACKET PART Wood Screws (1⁄4″ x 2″) Toggle Bolts (and wing nuts) (1⁄4″ x...
... 1 You will find the installation hardware contained in shipment, return the unit to make sure you have all these parts. SHIPMENT/ INSTALLATION • If the unit is damaged in a packet with the unit. Installation 1 Instructions Separately ...Filters Charcoal 1 Filter (on some models) Exhaust 1 Adaptor Damper 1 6 Installation Instructions DAMAGE - PARTS INCLUDED ADDITIONAL PARTS PART Top Cabinet Template QUANTITY 1 Rear Wall 1 Template PARTS INCLUDED HARDWARE PACKET PART Wood Screws (1⁄4″ x 2″) Toggle Bolts (and wing nuts) (1⁄4″ x...


