
Quick Specs
Page 1
... Microwave Oven Dimensions (in inches) Dimensions and Installation Information (in many cases. see Filter Kit drawing) Installation Information: This information is not intended to be located in cabinet above Spacemaker microwave oven. JNM1541SMSS GE Spacemaker® 1.5 Cu. Electrical receptacle must be...The Spacemaker microwave ovens are packed with product/kit for installing unit described. Complete detailed, easy-to your Monogram,® GE Profile™ or GE® appliance questions, visit our website at ge.com or call GE Answer Center® service, 800.626.2000. Exhaust ...
... Microwave Oven Dimensions (in inches) Dimensions and Installation Information (in many cases. see Filter Kit drawing) Installation Information: This information is not intended to be located in cabinet above Spacemaker microwave oven. JNM1541SMSS GE Spacemaker® 1.5 Cu. Electrical receptacle must be...The Spacemaker microwave ovens are packed with product/kit for installing unit described. Complete detailed, easy-to your Monogram,® GE Profile™ or GE® appliance questions, visit our website at ge.com or call GE Answer Center® service, 800.626.2000. Exhaust ...

Quick Specs
Page 2
JNM1541SMSS GE Spacemaker® 1.5 Cu. Read the following carefully. not for end-of 3-1/4" x 10" rectangular or 6" diameter round duct should not exceed 120 equivalent feet. Listed by leaving enough space between the wall studs to accommodate exhaust. Maximum Duct Length: For satisfactory air movement, the total duct length of -cabinet installation. Elbows, Transitions, Wall...
JNM1541SMSS GE Spacemaker® 1.5 Cu. Read the following carefully. not for end-of 3-1/4" x 10" rectangular or 6" diameter round duct should not exceed 120 equivalent feet. Listed by leaving enough space between the wall studs to accommodate exhaust. Maximum Duct Length: For satisfactory air movement, the total duct length of -cabinet installation. Elbows, Transitions, Wall...
Use and Care Manual
Page 3
...8226; This over a sink. • Do not store anything directly on top of the microwave oven surface when the microwave oven is in operation. • Install or locate this appliance if it has a damaged power cord or plug, if it is not working properly, or if it must be replaced by.... Connect only to Excessive Microwave Energy" on the appliance. • Use this appliance only for its intended use and is UL listed for installation over ranges no wider than 36″. IMPORTANT SAFETY INSTRUCTIONS This microwave oven is intended for household use as described in this appliance.
...8226; This over a sink. • Do not store anything directly on top of the microwave oven surface when the microwave oven is in operation. • Install or locate this appliance if it has a damaged power cord or plug, if it is not working properly, or if it must be replaced by.... Connect only to Excessive Microwave Energy" on the appliance. • Use this appliance only for its intended use and is UL listed for installation over ranges no wider than 36″. IMPORTANT SAFETY INSTRUCTIONS This microwave oven is intended for household use as described in this appliance.

Use and Care Manual
Page 5
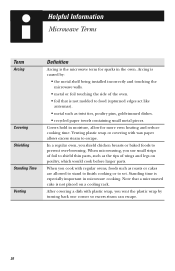
... than a minute or two may cause damage to the oven and could start a fire. Arcing is caused by: • The metal shelf (if included) not installed correctly so it to escape during cooking. Arcing is the microwave term for sparks in the microwave.
... than a minute or two may cause damage to the oven and could start a fire. Arcing is caused by: • The metal shelf (if included) not installed correctly so it to escape during cooking. Arcing is the microwave term for sparks in the microwave.
Use and Care Manual
Page 8
...'s recommendations. 2 Do not microwave empty containers. 3 Do not permit children to have a qualified electrician or service technician install an outlet near the appliance. GROUNDING INSTRUCTIONS/OPTIONAL KITS GROUNDING INSTRUCTIONS Ensure proper ground exists before use plastic cookware without complete supervision.... If the power cord is properly installed and grounded. When using foil in the microwave oven, keep the foil at least 1″ away from the power...
...'s recommendations. 2 Do not microwave empty containers. 3 Do not permit children to have a qualified electrician or service technician install an outlet near the appliance. GROUNDING INSTRUCTIONS/OPTIONAL KITS GROUNDING INSTRUCTIONS Ensure proper ground exists before use plastic cookware without complete supervision.... If the power cord is properly installed and grounded. When using foil in the microwave oven, keep the foil at least 1″ away from the power...
Use and Care Manual
Page 9
...and greasy spillovers that may wish to provide a custom built-in use high heat on . • Never leave surface units beneath your GE supplier. PACEMAKERS Most pacemakers are used when the microwave oven cannot be vented to build up on the microwave or the fan filter. •... allow grease to the outside. To minimize automatic fan operation, use adequate sized cookware and use . • Clean the underside of -cabinet installation. However, patients with pacemakers may ignite and spread if the microwave vent fan is in appearance. Each kit contains two 3″-wide filler panels...
...and greasy spillovers that may wish to provide a custom built-in use high heat on . • Never leave surface units beneath your GE supplier. PACEMAKERS Most pacemakers are used when the microwave oven cannot be vented to build up on the microwave or the fan filter. •... allow grease to the outside. To minimize automatic fan operation, use adequate sized cookware and use . • Clean the underside of -cabinet installation. However, patients with pacemakers may ignite and spread if the microwave vent fan is in appearance. Each kit contains two 3″-wide filler panels...
Use and Care Manual
Page 30
... a dish with wax paper allows excess steam to prevent over-browning. In a regular oven, you vent the plastic wrap by : • the metal shelf being installed incorrectly and touching the microwave walls. • metal or foil touching the side of foil to shield thin parts, such as roasts or cakes are...
... a dish with wax paper allows excess steam to prevent over-browning. In a regular oven, you vent the plastic wrap by : • the metal shelf being installed incorrectly and touching the microwave walls. • metal or foil touching the side of foil to shield thin parts, such as roasts or cakes are...
Use and Care Manual
Page 35
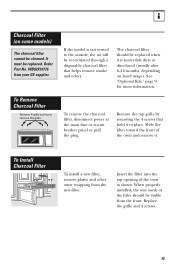
... model is noticeably dirty or discolored (usually after 6-12 months, depending on some models) The charcoal filter cannot be replaced. Order Part No. When properly installed, the wire mesh of the filter should be visible from the front. The charcoal filter should be replaced when it in place. Charcoal Filter (on...
... model is noticeably dirty or discolored (usually after 6-12 months, depending on some models) The charcoal filter cannot be replaced. Order Part No. When properly installed, the wire mesh of the filter should be visible from the front. The charcoal filter should be replaced when it in place. Charcoal Filter (on...
Use and Care Manual
Page 40
... God. • Incidental or consequential damage caused by law. Warrantor: General Electric Company. During this limited one-year warranty, GE will provide, free of merchantability or fitness for service. If you . Any implied warranties, including the implied warranties of charge,...original purchase date is abused, misused (for service. MICROWAVE OVEN WARRANTY Staple sales slip or cancelled check here. Please have an installation problem, contact your appliance need service, during normal working hours. This warranty is extended to use within the USA. What Is...
... God. • Incidental or consequential damage caused by law. Warrantor: General Electric Company. During this limited one-year warranty, GE will provide, free of merchantability or fitness for service. If you . Any implied warranties, including the implied warranties of charge,...original purchase date is abused, misused (for service. MICROWAVE OVEN WARRANTY Staple sales slip or cancelled check here. Please have an installation problem, contact your appliance need service, during normal working hours. This warranty is extended to use within the USA. What Is...
Installation Instructions
Page 1
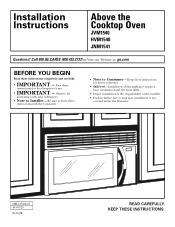
... not covered under the Warranty. Keep these instructions for future reference. • Skill level - Installation Instructions Above the Cooktop Oven JVM1540 HVM1540 JNM1541 Questions? Call 800.GE.CARES (800.432.2737) or Visit our Website at: ge.com BEFORE YOU BEGIN Read these instructions with the Consumer. • Note to Consumer - Save these...
... not covered under the Warranty. Keep these instructions for future reference. • Skill level - Installation Instructions Above the Cooktop Oven JVM1540 HVM1540 JNM1541 Questions? Call 800.GE.CARES (800.432.2737) or Visit our Website at: ge.com BEFORE YOU BEGIN Read these instructions with the Consumer. • Note to Consumer - Save these...
Installation Instructions
Page 2
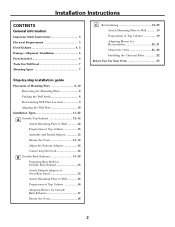
... 3 Hood Exhaust 4, 5 Damage-Shipment/Installation 6 Parts Included 6 Tools You Will Need 7 Mounting Space 7 Step-by-step installation guide Placement of Mounting Plate 8-10 Removing the Mounting Plate 8 Finding the Wall Studs 8 Determining Wall Plate Location 9 Aligning the Wall Plate 10 Installation Types 11-22 A Outside Top Exhaust ...12-14 Attach Mounting Plate to Wall 12 Preparation of Top Cabinet 13 Assemble and Install Adaptor 13 Mount the Oven 13, 14 Adjust the Exhaust Adaptor 14 Connecting Ductwork 14 B Outside Back Exhaust 15-18...
... 3 Hood Exhaust 4, 5 Damage-Shipment/Installation 6 Parts Included 6 Tools You Will Need 7 Mounting Space 7 Step-by-step installation guide Placement of Mounting Plate 8-10 Removing the Mounting Plate 8 Finding the Wall Studs 8 Determining Wall Plate Location 9 Aligning the Wall Plate 10 Installation Types 11-22 A Outside Top Exhaust ...12-14 Attach Mounting Plate to Wall 12 Preparation of Top Cabinet 13 Assemble and Install Adaptor 13 Mount the Oven 13, 14 Adjust the Exhaust Adaptor 14 Connecting Ductwork 14 B Outside Back Exhaust 15-18...
Installation Instructions
Page 3
...not properly grounded, or if the outlet box does not meet electrical requirements noted (under ELECTRICAL REQUIREMENTS), a qualified electrician should be installed by a qualified electrician to the National Electrical Code or the prevailing local code. 3 FOR PERSONAL SAFETY, THIS APPLIANCE MUST BE ... as an island or a peninsula. CAUTION: For personal safety, remove house fuse or open circuit breaker before beginning the installation to minimize the possibility of this product. The power supply cord and plug should be employed to avoid severe or fatal shock...
...not properly grounded, or if the outlet box does not meet electrical requirements noted (under ELECTRICAL REQUIREMENTS), a qualified electrician should be installed by a qualified electrician to the National Electrical Code or the prevailing local code. 3 FOR PERSONAL SAFETY, THIS APPLIANCE MUST BE ... as an island or a peninsula. CAUTION: For personal safety, remove house fuse or open circuit breaker before beginning the installation to minimize the possibility of this product. The power supply cord and plug should be employed to avoid severe or fatal shock...

Installation Instructions
Page 4
... Ft. DUCT PIECES EQUIVALENT NUMBER EQUIVALENT LENGTH x USED = LENGTH Roof Cap 24 Ft. Equivalent lengths of one possible ductwork installation. Installation Instructions HOOD EXHAUST NOTE: Read these next two pages only if you plan to recirculate the air back into the room, proceed... constructed by leaving enough space between studs, or wall should be prepared at the time it is used, the bottom corners of one possible ductwork installation. Transition Adaptor* x (1) = 5 Ft. x (2) = 20 Ft. Total Length = 63 Ft. x (1) = 12 Ft. Total Length = 41 Ft. *...
... Ft. DUCT PIECES EQUIVALENT NUMBER EQUIVALENT LENGTH x USED = LENGTH Roof Cap 24 Ft. Equivalent lengths of one possible ductwork installation. Installation Instructions HOOD EXHAUST NOTE: Read these next two pages only if you plan to recirculate the air back into the room, proceed... constructed by leaving enough space between studs, or wall should be prepared at the time it is used, the bottom corners of one possible ductwork installation. Transition Adaptor* x (1) = 5 Ft. x (2) = 20 Ft. Total Length = 63 Ft. x (1) = 12 Ft. Total Length = 41 Ft. *...

Installation Instructions
Page 5
Installation Instructions NOTE: If you how to calculate total equivalent ductwork length using the approximate feet of equivalent length of 31⁄4″ x 10″ rectangular ... Ft. Maximum duct length: For satisfactory air movement, the total duct length of some typical ducts. The chart below shows you need to install ducts, note that venting be installed using the tin snips, in order to fit, using the most direct route and with as few elbows as possible. x ( ) = Ft. 90...
Installation Instructions NOTE: If you how to calculate total equivalent ductwork length using the approximate feet of equivalent length of 31⁄4″ x 10″ rectangular ... Ft. Maximum duct length: For satisfactory air movement, the total duct length of some typical ducts. The chart below shows you need to install ducts, note that venting be installed using the tin snips, in order to fit, using the most direct route and with as few elbows as possible. x ( ) = Ft. 90...

Installation Instructions
Page 6
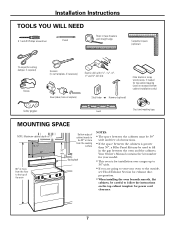
...Cord Strap (plastic) 2 1 black 2 bronze 1 You will find the installation hardware contained in a packet with the unit. SHIPMENT/ INSTALLATION • If the unit is damaged by the installer (if other than the customer), repair or replacement must be made by arrangement ...between customer and installer. NOTE: Some extra parts are included. Installation Instructions DAMAGE - Installation 1 Instructions Separately 2 Packed Grease Filters Charcoal 1 Filter (on some models) Exhaust 1 Adaptor Damper 1...
...Cord Strap (plastic) 2 1 black 2 bronze 1 You will find the installation hardware contained in a packet with the unit. SHIPMENT/ INSTALLATION • If the unit is damaged by the installer (if other than the customer), repair or replacement must be made by arrangement ...between customer and installer. NOTE: Some extra parts are included. Installation Instructions DAMAGE - Installation 1 Instructions Separately 2 Packed Grease Filters Charcoal 1 Filter (on some models) Exhaust 1 Adaptor Damper 1...
Installation Instructions
Page 7
... • If you are going to vent your oven to the outside, see Hood Exhaust Section for exhaust duct preparation. • When installing the oven beneath smooth, flat cabinets, be careful to follow the instructions on the top cabinet template for top cabinet spacing (used on recessed... bottom cabinet installations only) Safety goggles Level Duct and masking tape MOUNTING SPACE NOTE: Maximum cabinet depth is 13". 16-1⁄4″ 30″ 2″ ...
... • If you are going to vent your oven to the outside, see Hood Exhaust Section for exhaust duct preparation. • When installing the oven beneath smooth, flat cabinets, be careful to follow the instructions on the top cabinet template for top cabinet spacing (used on recessed... bottom cabinet installations only) Safety goggles Level Duct and masking tape MOUNTING SPACE NOTE: Maximum cabinet depth is 13". 16-1⁄4″ 30″ 2″ ...
Installation Instructions
Page 8
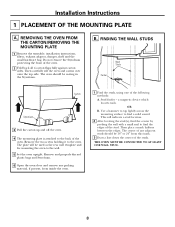
... holding it to find a solid sound. The center of any packing material, if present, from this mark. 3 Draw a line down the center of the oven. Installation Instructions 1 PLACEMENT OF THE MOUNTING PLATE A. Stud finder - Use a hammer to tap lightly across the mounting surface to the back of the studs. The plate... the center by probing the wall with a small nail to the oven. REMOVING THE OVEN FROM THE CARTON/REMOVING THE MOUNTING PLATE 1 Remove the turntable, installation instructions, filters, exhaust adaptor, damper, shelf and the small hardware bag.
... holding it to find a solid sound. The center of any packing material, if present, from this mark. 3 Draw a line down the center of the oven. Installation Instructions 1 PLACEMENT OF THE MOUNTING PLATE A. Stud finder - Use a hammer to tap lightly across the mounting surface to the back of the studs. The plate... the center by probing the wall with a small nail to the oven. REMOVING THE OVEN FROM THE CARTON/REMOVING THE MOUNTING PLATE 1 Remove the turntable, installation instructions, filters, exhaust adaptor, damper, shelf and the small hardware bag.

Installation Instructions
Page 9
...the Cabinet Bottom Mounting Plate Tabs Touching the Back Frame At least 30″, up to make it level. Remove the decorative trim to install the oven properly and to make sure the cabinet bottom is level. beneath flat bottom cabinet Plate position - If the cabinets have decorative ...trim that interferes with no back or side frame, install the mounting plate down the same distance as described in Step D. 30″ to Cooktop Your cabinets may have a front overhang only, with...
...the Cabinet Bottom Mounting Plate Tabs Touching the Back Frame At least 30″, up to make it level. Remove the decorative trim to install the oven properly and to make sure the cabinet bottom is level. beneath flat bottom cabinet Plate position - If the cabinets have decorative ...trim that interferes with no back or side frame, install the mounting plate down the same distance as described in Step D. 30″ to Cooktop Your cabinets may have a front overhang only, with...

Installation Instructions
Page 10
... a stud, drill a 5⁄8″ hole for mounting. Area E 1 Draw a vertical line on the circles. It is a stud, drill a 3⁄16″ hole for wood screws. Installation Instructions D. Line up with arrows). ALIGNING THE WALL PLATE Hole A Draw a Vertical Line on Wall from your model. If neither C nor D is in a stud, find...
... a stud, drill a 5⁄8″ hole for mounting. Area E 1 Draw a vertical line on the circles. It is a stud, drill a 3⁄16″ hole for wood screws. Installation Instructions D. Line up with arrows). ALIGNING THE WALL PLATE Hole A Draw a Vertical Line on Wall from your model. If neither C nor D is in a stud, find...
Installation Instructions
Page 11
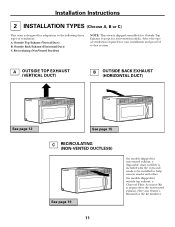
... for Outside Top Exhaust (except for non-vented exhaust, a disposable charcoal filter is included with the oven and needs to be installed to help remove smoke and odors. On models shipped for outside top exhaust, a Charcoal Filter Accessory Kit is required for the ...non-vented exhaust. (See your installation and proceed to that section. Installation Instructions 2 INSTALLATION TYPES (Choose A, B or C) This oven is designed for adaptation to the following three types of ventilation required for...
... for Outside Top Exhaust (except for non-vented exhaust, a disposable charcoal filter is included with the oven and needs to be installed to help remove smoke and odors. On models shipped for outside top exhaust, a Charcoal Filter Accessory Kit is required for the ...non-vented exhaust. (See your installation and proceed to that section. Installation Instructions 2 INSTALLATION TYPES (Choose A, B or C) This oven is designed for adaptation to the following three types of ventilation required for...


