
Quick Specs
Page 1
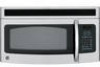
... required Important Information: When installing the Spacemaker microwave oven over 13" a range, allow for current dimensional data. 24-1/2 105° Door open (without obstruction) 29-7/8 15-1/4 16(r-e1a3/r3) 2 16 Minimum distance from bottom of Spacemaker microwave oven to top MAX. 12...not intended to the following three types of light covers. JNM1541SMSS GE Spacemaker® 1.5 Cu. Complete detailed, easy-to your Monogram,® GE Profile™ or GE® appliance questions, visit our website at ge.com or call GE Answer Center® service, 800.626.2000. Mounting ...
... required Important Information: When installing the Spacemaker microwave oven over 13" a range, allow for current dimensional data. 24-1/2 105° Door open (without obstruction) 29-7/8 15-1/4 16(r-e1a3/r3) 2 16 Minimum distance from bottom of Spacemaker microwave oven to top MAX. 12...not intended to the following three types of light covers. JNM1541SMSS GE Spacemaker® 1.5 Cu. Complete detailed, easy-to your Monogram,® GE Profile™ or GE® appliance questions, visit our website at ge.com or call GE Answer Center® service, 800.626.2000. Mounting ...

Use and Care Manual
Page 2
... TO AVOID POSSIBLE EXPOSURE TO EXCESSIVE MICROWAVE ENERGY For your safety, the information in harmful exposure to defeat or tamper with the door open since open-door operation can result in this manual must be adjusted or repaired by anyone except properly qualified service personnel. It is particularly important ...The Oven Should Not be followed to minimize the risk of life. Do Not Place any object between the oven front face and the door or allow soil or cleaner residue to prevent property damage, personal injury or loss of fire or explosion or to accumulate on sealing surfaces...
... TO AVOID POSSIBLE EXPOSURE TO EXCESSIVE MICROWAVE ENERGY For your safety, the information in harmful exposure to defeat or tamper with the door open since open-door operation can result in this manual must be adjusted or repaired by anyone except properly qualified service personnel. It is particularly important ...The Oven Should Not be followed to minimize the risk of life. Do Not Place any object between the oven front face and the door or allow soil or cleaner residue to prevent property damage, personal injury or loss of fire or explosion or to accumulate on sealing surfaces...
Use and Care Manual
Page 4
...Sensor Features twice in the oven cavity: - Carefully attend appliance when paper, plastic or other combustible materials are able to keep the oven door closed jars-are placed inside the oven while cooking. - Do not leave paper products, cooking utensils or food in the oven when not...must only be heated in use this appliance outdoors. Do not use . - If materials inside oven ignite, keep the area clean where the door seals against the microwave. IMPORTANT SAFETY INSTRUCTIONS READ ALL SAFETY INFORMATION BEFORE USING • Do not store this product near a sink or in similar...
...Sensor Features twice in the oven cavity: - Carefully attend appliance when paper, plastic or other combustible materials are able to keep the oven door closed jars-are placed inside the oven while cooking. - Do not leave paper products, cooking utensils or food in the oven when not...must only be heated in use this appliance outdoors. Do not use . - If materials inside oven ignite, keep the area clean where the door seals against the microwave. IMPORTANT SAFETY INSTRUCTIONS READ ALL SAFETY INFORMATION BEFORE USING • Do not store this product near a sink or in similar...
Use and Care Manual
Page 10
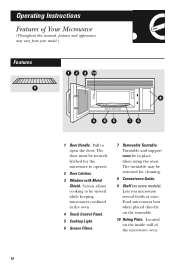
... support must be removed for the microwave to open the door. The turntable may vary from your model.) Features 1 2 3 10 9 4 6 85 76 1 Door Handle. Operating Instructions Features of the microwave oven. 10 The door must be viewed while keeping microwaves confined in place when... using the oven. Pull to operate. 2 Door Latches. 3 Window with Metal Shield. Located on the inside wall...
... support must be removed for the microwave to open the door. The turntable may vary from your model.) Features 1 2 3 10 9 4 6 85 76 1 Door Handle. Operating Instructions Features of the microwave oven. 10 The door must be viewed while keeping microwaves confined in place when... using the oven. Pull to operate. 2 Door Latches. 3 Window with Metal Shield. Located on the inside wall...

Use and Care Manual
Page 12
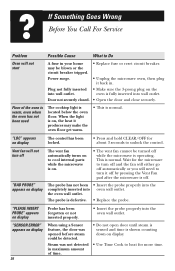
Starts immediately! Food weight Option more/less time serving size serving size serving size serving size food type/serving size 12 Starts immediately! (See Reheat Guide) Starts immediately! Quick Start GUIDE ON MICROWAVE Before you begin, check the guide located on some models) DEFROST AUTO/TIME (Press once) Enter Starts immediately! GUIDES IN BOOK • Cooking • Time Defrost • Reheat 2 Convenience Features Press POPCORN BEVERAGE REHEAT POTATO VEGETABLE (on the inside front of the oven when you open the door.
Starts immediately! Food weight Option more/less time serving size serving size serving size serving size food type/serving size 12 Starts immediately! (See Reheat Guide) Starts immediately! Quick Start GUIDE ON MICROWAVE Before you begin, check the guide located on some models) DEFROST AUTO/TIME (Press once) Enter Starts immediately! GUIDES IN BOOK • Cooking • Time Defrost • Reheat 2 Convenience Features Press POPCORN BEVERAGE REHEAT POTATO VEGETABLE (on the inside front of the oven when you open the door.

Use and Care Manual
Page 14
... POWER LEVEL. You may change power levels automatically during Time Cook to check the food. Time Cook I , Time Cook II counts down. 14 Close the door and press START to 99 minutes and 99 seconds. Select a power level 1-10.) 7 Press START. Power level 10 (High) is automatically set, but you change... Cook I Allows you don't want full power. (Press POWER LEVEL. Select a desired power level 1-10.) 4 Press START. Time Cook II Lets you may open the door during cooking. Here's how to do it for any time up to resume cooking.
... POWER LEVEL. You may change power levels automatically during Time Cook to check the food. Time Cook I , Time Cook II counts down. 14 Close the door and press START to 99 minutes and 99 seconds. Select a power level 1-10.) 7 Press START. Power level 10 (High) is automatically set, but you change... Cook I Allows you don't want full power. (Press POWER LEVEL. Select a desired power level 1-10.) 4 Press START. Time Cook II Lets you may open the door during cooking. Here's how to do it for any time up to resume cooking.

Use and Care Manual
Page 24
Operating Instructions Other Features Your Model May Have Cooking Complete Reminder To remind you that you have food in the oven, the oven will display "FOOD IS READY" or "END" and beep once a minute until you either open the oven door or press CLEAR/OFF. Clock Press to enter the time of day or to check the time of day while microwaving. 1 Press CLOCK. 2 Enter time of day. 3 On some models, select AM or PM. 4 Press START or CLOCK. 24
Operating Instructions Other Features Your Model May Have Cooking Complete Reminder To remind you that you have food in the oven, the oven will display "FOOD IS READY" or "END" and beep once a minute until you either open the oven door or press CLEAR/OFF. Clock Press to enter the time of day or to check the time of day while microwaving. 1 Press CLOCK. 2 Enter time of day. 3 On some models, select AM or PM. 4 Press START or CLOCK. 24

Use and Care Manual
Page 26
... can be used at any time, even when the oven is operating. 1 Press TIMER ON/OFF. 2 Enter time you to stop cooking without opening the door or clearing the display. When Reminder signal occurs, press REMINDER to show that the Reminder is set up , the oven will be lit while the...
... can be used at any time, even when the oven is operating. 1 Press TIMER ON/OFF. 2 Enter time you to stop cooking without opening the door or clearing the display. When Reminder signal occurs, press REMINDER to show that the Reminder is set up , the oven will be lit while the...

Use and Care Manual
Page 31
.... 31 Care and Cleaning Helpful Hints An occasional thorough wiping with a solution of this oven. Nev er use abrasive cleaners or sharp utensils on the Door Some spatters can be washed in place.
.... 31 Care and Cleaning Helpful Hints An occasional thorough wiping with a solution of this oven. Nev er use abrasive cleaners or sharp utensils on the Door Some spatters can be washed in place.

Use and Care Manual
Page 32
...Graphite, "L" is CleanSteel and "B", "W" or "C" are plastic colors. Stainless Steel The stainless steel panel can damage it. Door Seal It's important to keep the area clean where the door seals against using a clean, soft cloth. Wipe the window clean with Stainless Steel Magic or a similar product using cleaners...32 Case Clean the outside of the microwave with ammonia or alcohol, as they can be cleaned with a damp cloth. Door Panel Before cleaning the front door panel, make sure you know what type of the microwave oven. Refer to the eighth digit of warm water and ...
...Graphite, "L" is CleanSteel and "B", "W" or "C" are plastic colors. Stainless Steel The stainless steel panel can damage it. Door Seal It's important to keep the area clean where the door seals against using a clean, soft cloth. Wipe the window clean with Stainless Steel Magic or a similar product using cleaners...32 Case Clean the outside of the microwave with ammonia or alcohol, as they can be cleaned with a damp cloth. Door Panel Before cleaning the front door panel, make sure you know what type of the microwave oven. Refer to the eighth digit of warm water and ...
Use and Care Manual
Page 36
... securely closed. • Open the door and close securely. Vent fan will not start A fuse in your home • Replace fuse or reset circuit breaker. This ...has been forgotten or not inserted properly. • Insert the probe properly into wall outlet. Floor of time. • Do not open door until steam is sensed and time is shown counting down on display. • Use Time Cook to cool internal parts while the microwave ...when the oven has not been used The cooktop light is defective. • Replace the probe. When using a Sensor feature, the door was not detected in .
... securely closed. • Open the door and close securely. Vent fan will not start A fuse in your home • Replace fuse or reset circuit breaker. This ...has been forgotten or not inserted properly. • Insert the probe properly into wall outlet. Floor of time. • Do not open door until steam is sensed and time is shown counting down on display. • Use Time Cook to cool internal parts while the microwave ...when the oven has not been used The cooktop light is defective. • Replace the probe. When using a Sensor feature, the door was not detected in .
Use and Care Manual
Page 37
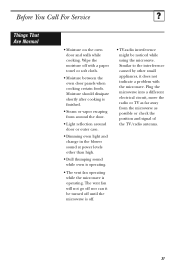
...vent fan will not go off nor can it does not indicate a problem with a paper towel or soft cloth. • Moisture between the oven door panels when cooking certain foods. Similar to the interference caused by other than high. • Dull thumping sound while oven is operating. • The... be turned off until the microwave is finished. • Steam or vapor escaping from the microwave as far away from around the door. • Light reflection around door or outer case. • Dimming oven light and change in the blower sound at power levels other small appliances, it be noticed...
...vent fan will not go off nor can it does not indicate a problem with a paper towel or soft cloth. • Moisture between the oven door panels when cooking certain foods. Similar to the interference caused by other than high. • Dull thumping sound while oven is operating. • The... be turned off until the microwave is finished. • Steam or vapor escaping from the microwave as far away from around the door. • Light reflection around door or outer case. • Dimming oven light and change in the blower sound at power levels other small appliances, it be noticed...

Use and Care Manual
Page 38
...day of the year! Extended Warranties ge.com 800.626.2224 Purchase a GE extended warranty and learn about special discounts that can be there after your door. For the hearing impaired, please call 800.GE.CARES (800.432.2737) during normal business hours. GE Service Numbers We'll Be There!... For details of GE's Universal Design applications, including kitchen design ideas for a wide...
...day of the year! Extended Warranties ge.com 800.626.2224 Purchase a GE extended warranty and learn about special discounts that can be there after your door. For the hearing impaired, please call 800.GE.CARES (800.432.2737) during normal business hours. GE Service Numbers We'll Be There!... For details of GE's Universal Design applications, including kitchen design ideas for a wide...
Installation Instructions
Page 8
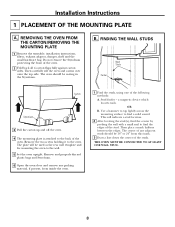
Remove and properly discard plastic bags and Styrofoam. 6 Open the oven door and remove any adjacent studs should be resting in the Styrofoam. Remove the two screws holding it to the back of the oven. The center ...
Remove and properly discard plastic bags and Styrofoam. 6 Open the oven door and remove any adjacent studs should be resting in the Styrofoam. Remove the two screws holding it to the back of the oven. The center ...
Installation Instructions
Page 22
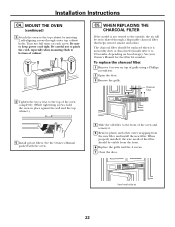
...new filter. See your Owner's Manual for the filter kit number. When properly installed, the wire mesh of grille using a Phillips screwdriver. 2 Open the door. 3 Remove the grille. WHEN REPLACING THE CHARCOAL FILTER If the model is noticeably dirty or discolored (usually after 6 to the top cabinet by inserting 2...air will be replaced when it . 5 Remove plastic and other outer wrapping from the front. 6 Replace the grille and the 4 screws. 7 Close the door. Be careful not to pinch the cord, especially when mounting flush to bottom of the oven and remove it is not vented to the front...
...new filter. See your Owner's Manual for the filter kit number. When properly installed, the wire mesh of grille using a Phillips screwdriver. 2 Open the door. 3 Remove the grille. WHEN REPLACING THE CHARCOAL FILTER If the model is noticeably dirty or discolored (usually after 6 to the top cabinet by inserting 2...air will be replaced when it . 5 Remove plastic and other outer wrapping from the front. 6 Replace the grille and the 4 screws. 7 Close the door. Be careful not to pinch the cord, especially when mounting flush to bottom of the oven and remove it is not vented to the front...


