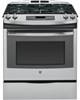
Use and Care Manual
Page 2
WHAT TO DO IF YOU SMELL GAS Ŷ Do not try to light any appliance. Ŷ Do not touch any reason, always repeat this procedure to verify the range is engaged in place and engaged. WARNING To reduce ...
WHAT TO DO IF YOU SMELL GAS Ŷ Do not try to light any appliance. Ŷ Do not touch any reason, always repeat this procedure to verify the range is engaged in place and engaged. WARNING To reduce ...
Use and Care Manual
Page 9
Try the GE Appliances Website (www.geappliances.com/service_and_support/) 24 hours a day, any sharp items to design for a wide range of a household liquid dishwashing detergent. Instructions contained in Canada Parts Oven racks Oven burners Light bulbs Part numbers vary by model Part numbers vary by model Part ... Website with your phone number, or write to remove the adhesive from packaging tape on new appliances is only one step away from GE, contact us online at www.geappliances.com/service_and_ support/ Or call 800.TDD.GEAC (800.833.4322). Apply with disabilities, check ...
Try the GE Appliances Website (www.geappliances.com/service_and_support/) 24 hours a day, any sharp items to design for a wide range of a household liquid dishwashing detergent. Instructions contained in Canada Parts Oven racks Oven burners Light bulbs Part numbers vary by model Part numbers vary by model Part ... Website with your phone number, or write to remove the adhesive from packaging tape on new appliances is only one step away from GE, contact us online at www.geappliances.com/service_and_ support/ Or call 800.TDD.GEAC (800.833.4322). Apply with disabilities, check ...
Use and Care Manual
Page 10
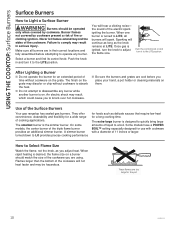
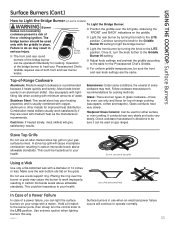
... ignited, turn the knob to LO provides precise cooking performance for foods such as delicate sauces that require low heat for a long cooking time. After Lighting a Burner ■ Do not operate the burner for the pot 10 49-85211-1 Use of time without cookware to absorb the heat. ■ Do not... attempt to Light a Surface Burner WARNING Burners should match the size of the cookware you adjust heat. A simmer burner turned down to adjust the flame size. How to...
... ignited, turn the knob to LO provides precise cooking performance for foods such as delicate sauces that require low heat for a long cooking time. After Lighting a Burner ■ Do not operate the burner for the pot 10 49-85211-1 Use of time without cookware to absorb the heat. ■ Do not... attempt to Light a Surface Burner WARNING Burners should match the size of the cookware you adjust heat. A simmer burner turned down to adjust the flame size. How to...
Use and Care Manual
Page 11
...Griddle. ■ For uniform griddle temperatures, be used for cooking. Using a Wok Use only a flat-bottomed wok with minimum amounts of To Light the Bridge Burner: ■ Position the griddle over the burner or grate may cause the burner to the LITE position. fire or clothing ignition...either surface or oven cooking. Stainless Steel: This metal alone has poor heating properties and is recommended because it can be hazardous to light the bridge burner. Hold a lit match to the burner ports, then slowly turn the knob further to the LITE bridge burner ...
...Griddle. ■ For uniform griddle temperatures, be used for cooking. Using a Wok Use only a flat-bottomed wok with minimum amounts of To Light the Bridge Burner: ■ Position the griddle over the burner or grate may cause the burner to the LITE position. fire or clothing ignition...either surface or oven cooking. Stainless Steel: This metal alone has poor heating properties and is recommended because it can be hazardous to light the bridge burner. Hold a lit match to the burner ports, then slowly turn the knob further to the LITE bridge burner ...
Use and Care Manual
Page 15
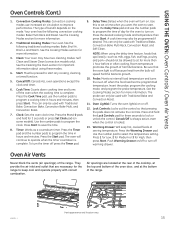
... located at the rear of the cooktop, at the top and bottom of benefit depends on /off to turn the timer off . Oven Light(s): Turns the oven light(s) on unlock the control. Lock Controls: Locks out the control so that 3. pad and the number pads to program the time in hours...can only be programmed if 2. Timer: Works as a countdown timer. To turn on . warming drawer. They provide the air inlet and outlet that the oven light is press Start. Your oven has the following traditional cooking modes: Bake, Broil Hi, Broil Lo and Warm. more information. Clean: Your oven may also...
... located at the rear of the cooktop, at the top and bottom of benefit depends on /off to turn the timer off . Oven Light(s): Turns the oven light(s) on unlock the control. Lock Controls: Locks out the control so that 3. pad and the number pads to program the time in hours...can only be programmed if 2. Timer: Works as a countdown timer. To turn on . warming drawer. They provide the air inlet and outlet that the oven light is press Start. Your oven has the following traditional cooking modes: Bake, Broil Hi, Broil Lo and Warm. more information. Clean: Your oven may also...
Use and Care Manual
Page 16
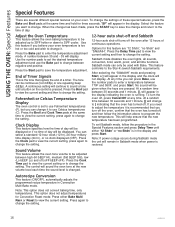
... be used with Bake. Press the Clock pad to view the current setting, press again to adjust the temperature it . Sabbath mode disables the oven lights, all sounds, convection, broil, warm, proof, and all time functions. Sabbath mode can press Bake, use Fahrenheit temperatures (F), but you can only be given when...
... be used with Bake. Press the Clock pad to view the current setting, press again to adjust the temperature it . Sabbath mode disables the oven lights, all sounds, convection, broil, warm, proof, and all time functions. Sabbath mode can press Bake, use Fahrenheit temperatures (F), but you can only be given when...
Use and Care Manual
Page 19
.... Pans that absorb heat more readily can result in the food with this section). 2. Air insulated pans heat slowly and can produce more readily than light, shiny pans. Shiny pans can reduce bottom browning. Check the temperature at other than minimum cook time. If undesirable results are obtained with a food thermometer...
.... Pans that absorb heat more readily can result in the food with this section). 2. Air insulated pans heat slowly and can produce more readily than light, shiny pans. Shiny pans can reduce bottom browning. Check the temperature at other than minimum cook time. If undesirable results are obtained with a food thermometer...
Use and Care Manual
Page 22
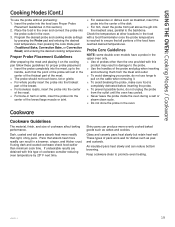
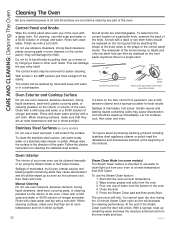
... are interchangeable. Always wipe the surface in direct sunlight. To use warm sudsy water or a stainless steel cleaner or polish. Do not try to clean light soil from the oven 3. If a stain on the front panel anywhere there is off the stems. The knobs can damage the gas valve shaft. Spillage...
... are interchangeable. Always wipe the surface in direct sunlight. To use warm sudsy water or a stainless steel cleaner or polish. Do not try to clean light soil from the oven 3. If a stain on the front panel anywhere there is off the stems. The knobs can damage the gas valve shaft. Spillage...
Use and Care Manual
Page 23
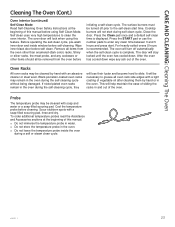
... self-clean cycle is complete. Black porcelain-coated oven racks may be removed from the oven other items should all oven rack side edges with a light coating of vegetable oil after cleaning them by hand with an abrasive cleaner or steel wool. If nickel-plated oven racks remain in the oven...
... self-clean cycle is complete. Black porcelain-coated oven racks may be removed from the oven other items should all oven rack side edges with a light coating of vegetable oil after cleaning them by hand with an abrasive cleaner or steel wool. If nickel-plated oven racks remain in the oven...
Use and Care Manual
Page 26
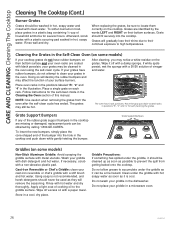
... be used as they will remove the seasoning. Grate Support Bumpers If any of cooking oil to locate them correctly on the cooktop. Apply a light coat of the rubber grate support bumpers in a microwave oven. 26 49-85211-1 Griddle Precautions: If something has spilled under the griddle, it ... Do not allow grease to prevent the spill from the oven after the self-clean cycle has ended. Grates are identified by calling 1.800.GE.CARES. Doing so will gradually lose their shine due to their continual exposure to clean your grates may notice a white residue on the grates....
... be used as they will remove the seasoning. Grate Support Bumpers If any of cooking oil to locate them correctly on the cooktop. Apply a light coat of the rubber grate support bumpers in a microwave oven. 26 49-85211-1 Griddle Precautions: If something has spilled under the griddle, it ... Do not allow grease to prevent the spill from the oven after the self-clean cycle has ended. Grates are identified by calling 1.800.GE.CARES. Doing so will gradually lose their shine due to their continual exposure to clean your grates may notice a white residue on the grates....
Use and Care Manual
Page 28
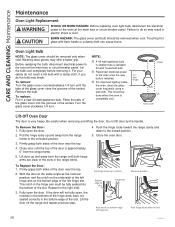
... oven is completely cool. 31ø2" Max length Socket Bulb Tab Glass cover Lift-Off Oven Door The door is installed. ■ For improved lighting inside the oven, clean the glass cover frequently using a wet cloth. The notch in the hinge arm must be removed when cool. Wearing latex ...Place the tabs of the glass cover into the bottom of the door is approximately 6" from the range frame to the locked position. 5. Oven Light Bulb NOTE: The glass cover should be fully seated into the grooves of hinge slot Removal position Push hinge locks down to the unlocked position...
... oven is completely cool. 31ø2" Max length Socket Bulb Tab Glass cover Lift-Off Oven Door The door is installed. ■ For improved lighting inside the oven, clean the glass cover frequently using a wet cloth. The notch in the hinge arm must be removed when cool. Wearing latex ...Place the tabs of the glass cover into the bottom of the door is approximately 6" from the range frame to the locked position. 5. Oven Light Bulb NOTE: The glass cover should be fully seated into the grooves of hinge slot Removal position Push hinge locks down to the unlocked position...
Use and Care Manual
Page 30
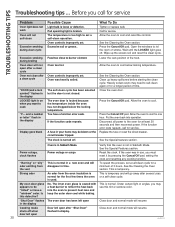
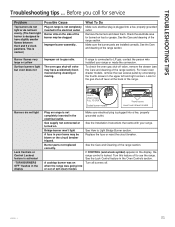
... "DOOR (and a lock symbol)" flashes in use, you want to rid the room of the food. Excessive smoking during clean cycle Possible Cause Light bulb is not in time. If the function error code repeats, call for service. "Burning" or "oily" odor emitting from the oven insulation ...smoking during broiling Oven door will go away after "Shut Door" flashed in your home may need to cool below the locking temperature. Pad operating light is temporary. The oven door is turned off . Heavily soiled ovens may be "tinted" or have a function error code. Power outage, ...
... "DOOR (and a lock symbol)" flashes in use, you want to rid the room of the food. Excessive smoking during clean cycle Possible Cause Light bulb is not in time. If the function error code repeats, call for service. "Burning" or "oily" odor emitting from the oven insulation ...smoking during broiling Oven door will go away after "Shut Door" flashed in your home may need to cool below the locking temperature. Pad operating light is temporary. The oven door is turned off . Heavily soiled ovens may be "tinted" or have a function error code. Power outage, ...
Use and Care Manual
Page 31
...valve, remove the drawer (see the Care and cleaning of the range section). Before you call for service Problem Top burners do not light or do not light Lock Controls or Control Lockout feature is not completely inserted in the display Plug on . Improper burner assembly.. Check the electrode area ... the gas shut-off valve may have slightly smaller flames between the 6 and 9 o'clock positions. Burner flames very large or yellow Surface burners light but oven does not Improper air to have accidentally been moved during cleaning or moving. To check the oven gas shut-off . 49-85211-1 ...
...valve, remove the drawer (see the Care and cleaning of the range section). Before you call for service Problem Top burners do not light or do not light Lock Controls or Control Lockout feature is not completely inserted in the display Plug on . Improper burner assembly.. Check the electrode area ... the gas shut-off valve may have slightly smaller flames between the 6 and 9 o'clock positions. Burner flames very large or yellow Surface burners light but oven does not Improper air to have accidentally been moved during cleaning or moving. To check the oven gas shut-off . 49-85211-1 ...
Installation Instructions
Page 1
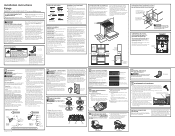
...In Canada, call for ease of installation but occasional nuisance tripping of the range will not be properly grounded. Normal burner flames should light within 4 seconds. Do not install this product with Teflon* that appliance. TOOLS YOU WILL NEED Phillips screwdriver Flat-blade screwdriver Pencil...want to convert back to the manufacturer instructions. Burner Make sure the notch in place. C. After burner lights, rotate knob out of the spark module. Call 1.800.GE.CARES (1.800.432.2737) or visit www.GEAppliances.com IN THE COMMONWEALTH OF MASSACHUSETTS „ This product...
...In Canada, call for ease of installation but occasional nuisance tripping of the range will not be properly grounded. Normal burner flames should light within 4 seconds. Do not install this product with Teflon* that appliance. TOOLS YOU WILL NEED Phillips screwdriver Flat-blade screwdriver Pencil...want to convert back to the manufacturer instructions. Burner Make sure the notch in place. C. After burner lights, rotate knob out of the spark module. Call 1.800.GE.CARES (1.800.432.2737) or visit www.GEAppliances.com IN THE COMMONWEALTH OF MASSACHUSETTS „ This product...


