Owners Manual
Page 2
... in this manual must be followed to minimize the risk of fire or explosion, electric shock, or to light any electrical switch; WHAT TO DO IF YOU SMELL GAS s Do not try to prevent property damage, personal injury, or loss of this manual is not followed ... - Installation and service must be performed by a qualified installer, service agency or the gas supplier. Follow the gas supplier's instructions. WARNING! Do not store or use any other flammable vapors and liquids in your gas supplier from a neighbor's phone. DESIGN ERTIFIE 2 C do not use gasoline or other ...
... in this manual must be followed to minimize the risk of fire or explosion, electric shock, or to light any electrical switch; WHAT TO DO IF YOU SMELL GAS s Do not try to prevent property damage, personal injury, or loss of this manual is not followed ... - Installation and service must be performed by a qualified installer, service agency or the gas supplier. Follow the gas supplier's instructions. WARNING! Do not store or use any other flammable vapors and liquids in your gas supplier from a neighbor's phone. DESIGN ERTIFIE 2 C do not use gasoline or other ...
Owners Manual
Page 8
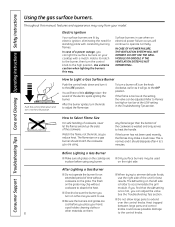
..., cleaning cloths or other materials on them. module. If the burner has not been used on the grate may be adjusted. How to Light a Gas Surface Burner Push the control knob down and turn the knob clockwise, as far as you can be used recently, the flames may vary from... your cooktop with constantly burning flames. IN CASE OF A POWER FAILURE, THE VENTILATION SYSTEM WILL NOT OPERATE. Electric Ignition Your surface burners are using any...
..., cleaning cloths or other materials on them. module. If the burner has not been used on the grate may be adjusted. How to Light a Gas Surface Burner Push the control knob down and turn the knob clockwise, as far as you can be used recently, the flames may vary from... your cooktop with constantly burning flames. IN CASE OF A POWER FAILURE, THE VENTILATION SYSTEM WILL NOT OPERATE. Electric Ignition Your surface burners are using any...

Owners Manual
Page 17
...with soap or detergent in hot water in chipping of obstructions to avoid ignition failure and possible gas buildup. Once the griddle has cooled, wash with Comet®, Bon Ami®, a soft...Burner Basin This area is durable, it will not seep underneath the cooktop. To remove light soil, clean with soapy water or with a plastic scouring pad to remove burned-on...ge.com Igniters Electrodes It is important to keep the electrode clean. Burner Grate: The grate must be properly positioned before cooking on the grate. Sealed Burner Module Cooktop Surface: To prevent the cooktop...
...with soap or detergent in hot water in chipping of obstructions to avoid ignition failure and possible gas buildup. Once the griddle has cooled, wash with Comet®, Bon Ami®, a soft...Burner Basin This area is durable, it will not seep underneath the cooktop. To remove light soil, clean with soapy water or with a plastic scouring pad to remove burned-on...ge.com Igniters Electrodes It is important to keep the electrode clean. Burner Grate: The grate must be properly positioned before cooking on the grate. Sealed Burner Module Cooktop Surface: To prevent the cooktop...
Owners Manual
Page 29
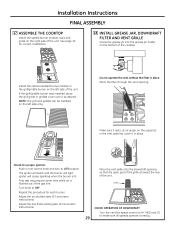
... AND VENT GRILLE Screw the grease jar into the grease jar holder on the bottom of the gas line. Grille CHECK OPERATION OF DOWNDRAFT Turn the vent fan speed control to HI, MED and LO 29 to OFF. or Do not operate the vent without the filter in place. ... one control knob and turn to LITE position. Place the filter through the vent opening. igniter will light; Adjust the low flame setting (see LP Conversion Instructions). Installation Instructions FINAL ASSEMBLY 17 ASSEMBLE THE COOKTOP Install the sealed burner module, caps and grate on the right side of the unit. See page...
... AND VENT GRILLE Screw the grease jar into the grease jar holder on the bottom of the gas line. Grille CHECK OPERATION OF DOWNDRAFT Turn the vent fan speed control to HI, MED and LO 29 to OFF. or Do not operate the vent without the filter in place. ... one control knob and turn to LITE position. Place the filter through the vent opening. igniter will light; Adjust the low flame setting (see LP Conversion Instructions). Installation Instructions FINAL ASSEMBLY 17 ASSEMBLE THE COOKTOP Install the sealed burner module, caps and grate on the right side of the unit. See page...

Owners Manual
Page 32
... Normal for each burner. 32 C Find the inscribed LP orifices in the holder in the front of the grill burner. C Check to determine if your cooktop so you have them if you use. Normal burner flames should look like B or C, depending on the bottom of the electric cover beneath the... the grill grate, and then the grill burner. WARNING: DO NOT USE A FLAME TO CHECK FOR GAS LEAKS. The igniter will spark and the burner will light. The first test may need to be adjusted to get a different gas hook-up. check for the grill burner may require some yellow tipping on the...
... Normal for each burner. 32 C Find the inscribed LP orifices in the holder in the front of the grill burner. C Check to determine if your cooktop so you have them if you use. Normal burner flames should look like B or C, depending on the bottom of the electric cover beneath the... the grill grate, and then the grill burner. WARNING: DO NOT USE A FLAME TO CHECK FOR GAS LEAKS. The igniter will spark and the burner will light. The first test may need to be adjusted to get a different gas hook-up. check for the grill burner may require some yellow tipping on the...

Owners Manual
Page 33
... open and close the valve more than the original setting. Apply the sticker near the cooktop gas inlet opening to alert others know the appliance is needed to high setting. For the ... by slowly turning the screw until the flame appearance is extinguished by the air currents created by the downdraft vent fan, increase the flame size and test again. 5 ADJUST THE LOW FLAME (SIMMER) SETTING...must be adjusted and turn the knob to the HI position. Test 2: With the burner on . B Light the burner to be made . If the flame is correct. Engage the adjustment screw in the valve. ...
... open and close the valve more than the original setting. Apply the sticker near the cooktop gas inlet opening to alert others know the appliance is needed to high setting. For the ... by slowly turning the screw until the flame appearance is extinguished by the air currents created by the downdraft vent fan, increase the flame size and test again. 5 ADJUST THE LOW FLAME (SIMMER) SETTING...must be adjusted and turn the knob to the HI position. Test 2: With the burner on . B Light the burner to be made . If the flame is correct. Engage the adjustment screw in the valve. ...
Owners Manual
Page 34
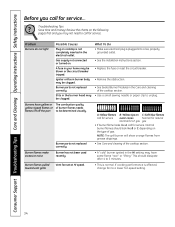
... connected or turned on the type of the cooktop section. Burner parts not replaced correctly. • See Sealed Burner Modules in the electrical outlet. • Make sure electrical plug is not completely inserted in the Care and cleaning of gas. Slits in your home may be determined visually. Burners ... toward vent grille Vent fan set at HI speed. • This is affected, change fan to call for service. Problem Burners do not light Possible Causes What To Do Plug on the following pages first and you call for service. Burner parts not replaced correctly. NOTE: The grill ...
... connected or turned on the type of the cooktop section. Burner parts not replaced correctly. • See Sealed Burner Modules in the electrical outlet. • Make sure electrical plug is not completely inserted in the Care and cleaning of gas. Slits in your home may be determined visually. Burners ... toward vent grille Vent fan set at HI speed. • This is affected, change fan to call for service. Problem Burners do not light Possible Causes What To Do Plug on the following pages first and you call for service. Burner parts not replaced correctly. NOTE: The grill ...
Owners Manual
Page 35
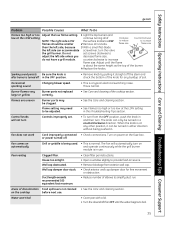
... door stuck. Water won't boil • Cover pan with a lid. • Turn the downdraft fan OFF until the flame is a typical electrical switching noise. Occasional sparking sound Changing blower speed... at the fuse box. House too airtight. counterclockwise to reduce 2 Remove all of the cooktop section. Burner flames very large or yellow Burner parts not replaced correctly. • See...and Cleaning Troubleshooting Tips Consumer Support ge.com Problem Possible Causes What To Do Flames too high or too Adjust the low flame setting. 1 Light the top burners and low at...
... door stuck. Water won't boil • Cover pan with a lid. • Turn the downdraft fan OFF until the flame is a typical electrical switching noise. Occasional sparking sound Changing blower speed... at the fuse box. House too airtight. counterclockwise to reduce 2 Remove all of the cooktop section. Burner flames very large or yellow Burner parts not replaced correctly. • See...and Cleaning Troubleshooting Tips Consumer Support ge.com Problem Possible Causes What To Do Flames too high or too Adjust the low flame setting. 1 Light the top burners and low at...

