Owners Manual
Page 3
...part of your personal responsibility and obligation to have an ungrounded outlet replaced with a properly grounded, three-prong outlet in accordance with the manufacturer's instructions and all packaging materials are removed from the plug. Do not remove the round grounding prong from the cooktop... Instructions. s Be sure your cooktop installed and properly grounded by qualified gas cooktop installers or service technicians. Failure ...cooktop into a 120-volt grounded outlet only. Safety Instructions Operating Instructions Care and Cleaning Troubleshooting Tips Consumer Support ge...
...part of your personal responsibility and obligation to have an ungrounded outlet replaced with a properly grounded, three-prong outlet in accordance with the manufacturer's instructions and all packaging materials are removed from the plug. Do not remove the round grounding prong from the cooktop... Instructions. s Be sure your cooktop installed and properly grounded by qualified gas cooktop installers or service technicians. Failure ...cooktop into a 120-volt grounded outlet only. Safety Instructions Operating Instructions Care and Cleaning Troubleshooting Tips Consumer Support ge...
Owners Manual
Page 4
... this C. holders and other high heat. If you have questions, contact the manufacturer. necessary. burner parts in cabinets over the cooktop. This could be seriously injured. s Do not clean the cooktop with a well-fitting lid, cookie sheet or flat tray. Always use water on low to persons,... material could be vented to exhaust hazardous or explosive materials and vapors. WARNING: NEVER use combustible materials, cooktop grease fire: gasoline or other part of fire, electrical shock, or injury to s Do not operate the burner without all medium setting. Doing so may ...
... this C. holders and other high heat. If you have questions, contact the manufacturer. necessary. burner parts in cabinets over the cooktop. This could be seriously injured. s Do not clean the cooktop with a well-fitting lid, cookie sheet or flat tray. Always use water on low to persons,... material could be vented to exhaust hazardous or explosive materials and vapors. WARNING: NEVER use combustible materials, cooktop grease fire: gasoline or other part of fire, electrical shock, or injury to s Do not operate the burner without all medium setting. Doing so may ...
Owners Manual
Page 7
...cooktop and call a qualified service technician. Cook meat and poultry thoroughly-meat to at least an INTERNAL temperature of 160°F and poultry to at the off the gas to the pressure regulator. Keep these temperatures usually protects against foodborne illness. s Clean only parts...can be performed by a qualified LP gas installer. READ AND FOLLOW THIS SAFETY INFORMATION CAREFULLY. Never use aluminum foil under burner grates. Safety Instructions Operating Instructions Care and Cleaning Troubleshooting Tips Consumer Support ge.com SURFACE BURNERS Adjust the burner flame ...
...cooktop and call a qualified service technician. Cook meat and poultry thoroughly-meat to at least an INTERNAL temperature of 160°F and poultry to at the off the gas to the pressure regulator. Keep these temperatures usually protects against foodborne illness. s Clean only parts...can be performed by a qualified LP gas installer. READ AND FOLLOW THIS SAFETY INFORMATION CAREFULLY. Never use aluminum foil under burner grates. Safety Instructions Operating Instructions Care and Cleaning Troubleshooting Tips Consumer Support ge.com SURFACE BURNERS Adjust the burner flame ...
Owners Manual
Page 11
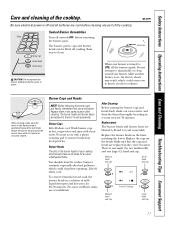
... particles. Grate Electrode Burner cap Burner head Burner base Sealed Burner Assemblies Turn all burner parts in a warm oven for 30 minutes. Electrode When one large (C) head and cap. Rotate the burner head around any part of the cooktop. Burner Caps Lift off when cool. You may result, which could cause you to LITE... the notch in hot, soapy water and rinse with a plastic scouring pad to aid reassembly. You should clean the surface burners routinely, especially after cleaning. ge.com Be sure electrical power is off , making them in the correct location.
... particles. Grate Electrode Burner cap Burner head Burner base Sealed Burner Assemblies Turn all burner parts in a warm oven for 30 minutes. Electrode When one large (C) head and cap. Rotate the burner head around any part of the cooktop. Burner Caps Lift off when cool. You may result, which could cause you to LITE... the notch in hot, soapy water and rinse with a plastic scouring pad to aid reassembly. You should clean the surface burners routinely, especially after cleaning. ge.com Be sure electrical power is off , making them in the correct location.
Owners Manual
Page 12
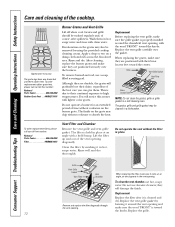
... grille gasket in place. To order replacement filters, please call our toll-free number: National Parts Center 800.626.2002 Rubber Grate Feet . . #WB02T10101 Burner Grates and Vent Grille Lift ... brass locator feet toward the knobs. When replacing the grates, make sure it around the downdraft vent opening, with a hold bump. The grate legs have one brass foot and three ... sure they will gradually lose their continual exposure to their shine, regardless of the cooktop. This is toward the center. Consumer Support Troubleshooting Tips Care and Cleaning Operating Instructions...
... grille gasket in place. To order replacement filters, please call our toll-free number: National Parts Center 800.626.2002 Rubber Grate Feet . . #WB02T10101 Burner Grates and Vent Grille Lift ... brass locator feet toward the knobs. When replacing the grates, make sure it around the downdraft vent opening, with a hold bump. The grate legs have one brass foot and three ... sure they will gradually lose their continual exposure to their shine, regardless of the cooktop. This is toward the center. Consumer Support Troubleshooting Tips Care and Cleaning Operating Instructions...
Owners Manual
Page 14
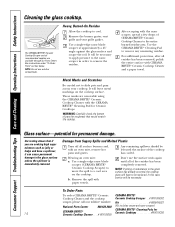
... single-edge razor blade scraper (CERAMA BRYTE® Ceramic Cooktop Scraper) to move the spill to slide pots and pans across your cooktop. To Order Parts To order CERAMA BRYTE® Ceramic CERAMA BRYTE® Cooktop Cleaner and the cooktop Ceramic Cooktop Scraper . .# WX10X0302 scraper, please call our toll-free...jelly or fudge and have to be left until all surface burners and, with CERAMA BRYTE® Ceramic Cooktop Cleaner and a paper towel. See instructions under "To Order Parts" section below. Remove the burner grates, vent grille and vent grille gasket. Use a single-edge ...
... single-edge razor blade scraper (CERAMA BRYTE® Ceramic Cooktop Scraper) to move the spill to slide pots and pans across your cooktop. To Order Parts To order CERAMA BRYTE® Ceramic CERAMA BRYTE® Cooktop Cleaner and the cooktop Ceramic Cooktop Scraper . .# WX10X0302 scraper, please call our toll-free...jelly or fudge and have to be left until all surface burners and, with CERAMA BRYTE® Ceramic Cooktop Cleaner and a paper towel. See instructions under "To Order Parts" section below. Remove the burner grates, vent grille and vent grille gasket. Use a single-edge ...
Owners Manual
Page 16
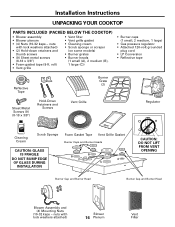
... • Burner grates • Burner heads (1 small (A), 2 medium (B), 1 large (C)) • Burner caps (1 small, 2 medium, 1 large) • Gas pressure regulator • Attached 120-volt grounded plug cord • LP Conversion • Reflective tape Reflective Tape Burner Grate (2) Sheet Metal Screws (9) (8-18 x 3/8″... Foam gasket tape (9-ft. nuts with lock washers attached) Blower 16 Plenum Vent Filter Installation Instructions UNPACKING YOUR COOKTOP PARTS INCLUDED (PACKED BELOW THE COOKTOP) • Blower assembly • Blower plenum • (4) Nuts (10-32 keps -
... • Burner grates • Burner heads (1 small (A), 2 medium (B), 1 large (C)) • Burner caps (1 small, 2 medium, 1 large) • Gas pressure regulator • Attached 120-volt grounded plug cord • LP Conversion • Reflective tape Reflective Tape Burner Grate (2) Sheet Metal Screws (9) (8-18 x 3/8″... Foam gasket tape (9-ft. nuts with lock washers attached) Blower 16 Plenum Vent Filter Installation Instructions UNPACKING YOUR COOKTOP PARTS INCLUDED (PACKED BELOW THE COOKTOP) • Blower assembly • Blower plenum • (4) Nuts (10-32 keps -
Owners Manual
Page 28
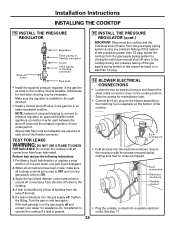
... CONNECTIONS • Loosen the two screws and remove and discard the sheet metal connector cover on and test again. Turn the gas on the cooktop bottom. See step 17. 28 Make sure the regulator is identified by closing the individual manual shut-off valve and the pressure...: 1. A leak is installed in an easily accessible location. If the leak persists, turn the gas supply off valve in the gas line in the right direction. • Install a manual shut-off . Isolate the cooktop from the gas supply piping system by a flow of one part water, one part liquid detergent. 2.
... CONNECTIONS • Loosen the two screws and remove and discard the sheet metal connector cover on and test again. Turn the gas on the cooktop bottom. See step 17. 28 Make sure the regulator is identified by closing the individual manual shut-off valve and the pressure...: 1. A leak is installed in an easily accessible location. If the leak persists, turn the gas supply off valve in the gas line in the right direction. • Install a manual shut-off . Isolate the cooktop from the gas supply piping system by a flow of one part water, one part liquid detergent. 2.
Owners Manual
Page 30
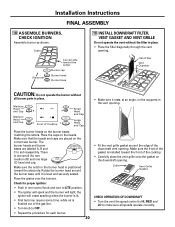
... Check for each burner. 30 • Fit the vent grille gasket around the burner base until it rests, at an angle, on the downdraft opening . Vent Filter Vent ... test may require some time, while air is flushed out of the gas line. • Turn knob to aid reassembly. Place the burner heads on the...Cooktop C Small Head and Cap Large Head and Cap • Make sure it is one small (A), two medium (B) and one control knob and turn to make sure all burner parts in the vent opening . Grate Electrode Curved side toward the center Burner cap Burner head Burner base 19 INSTALL DOWNDRAFT...
... Check for each burner. 30 • Fit the vent grille gasket around the burner base until it rests, at an angle, on the downdraft opening . Vent Filter Vent ... test may require some time, while air is flushed out of the gas line. • Turn knob to aid reassembly. Place the burner heads on the...Cooktop C Small Head and Cap Large Head and Cap • Make sure it is one small (A), two medium (B) and one control knob and turn to make sure all burner parts in the vent opening . Grate Electrode Curved side toward the center Burner cap Burner head Burner base 19 INSTALL DOWNDRAFT...
Owners Manual
Page 31
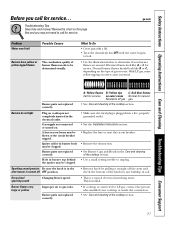
...your home may not need to be blown or the circuit breaker tripped. Burner parts not replaced correctly. Gas supply not connected or turned on outer cones is normal. A fuse in the... with a lid. • Turn the downdraft fan OFF until the water begins to boil. • Use the illustrations below to determine if your cooktop or made the conversion. • See ...cooktop section. • Use a small sewing needle to unplug. Burner parts not replaced correctly. • If cooktop is not completely inserted in burner body may be clogged. Troubleshooting Tips Save time and money! ge...
...your home may not need to be blown or the circuit breaker tripped. Burner parts not replaced correctly. Gas supply not connected or turned on outer cones is normal. A fuse in the... with a lid. • Turn the downdraft fan OFF until the water begins to boil. • Use the illustrations below to determine if your cooktop or made the conversion. • See ...cooktop section. • Use a small sewing needle to unplug. Burner parts not replaced correctly. • If cooktop is not completely inserted in burner body may be clogged. Troubleshooting Tips Save time and money! ge...
Owners Manual
Page 35
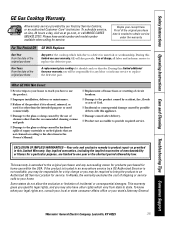
... warranty excludes the cost of merchantability or fitness for service. Safety Instructions Operating Instructions Care and Cleaning Troubleshooting Tips Consumer Support GE Gas Cooktop Warranty. Proof of the product if it should crack or discolor. s Failure of the original purchase date is needed to... damage caused by our Factory Service Centers, or an authorized Customer Care® technician. s Damage to replace the defective part. EXCLUSION OF IMPLIED WARRANTIES-Your sole and exclusive remedy is extended to the original purchaser and any labor or in an area...
... warranty excludes the cost of merchantability or fitness for service. Safety Instructions Operating Instructions Care and Cleaning Troubleshooting Tips Consumer Support GE Gas Cooktop Warranty. Proof of the product if it should crack or discolor. s Failure of the original purchase date is needed to... damage caused by our Factory Service Centers, or an authorized Customer Care® technician. s Damage to replace the defective part. EXCLUSION OF IMPLIED WARRANTIES-Your sole and exclusive remedy is extended to the original purchaser and any labor or in an area...


