Owners Manual
Page 11
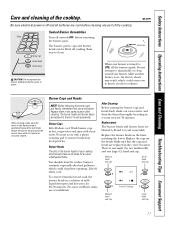
... a toothbrush. Burner Caps and Heads NOTE: Before removing the burner caps and heads, remember their size and location. Wash burner caps in the burner heads of your cooktop must be lifted off and all surfaces are labeled A, B and C to disassemble or clean around the burner base until it is turned to LITE, all burner parts in a solution of Cooktop A C Large Head and Cap...
... a toothbrush. Burner Caps and Heads NOTE: Before removing the burner caps and heads, remember their size and location. Wash burner caps in the burner heads of your cooktop must be lifted off and all surfaces are labeled A, B and C to disassemble or clean around the burner base until it is turned to LITE, all burner parts in a solution of Cooktop A C Large Head and Cap...
Owners Manual
Page 16
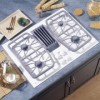
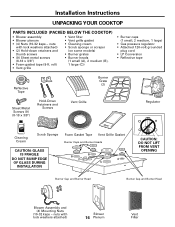
nuts with lock washers attached) Blower 16 Plenum Vent Filter Installation Instructions UNPACKING YOUR COOKTOP PARTS INCLUDED (PACKED BELOW THE COOKTOP) • Blower assembly • Blower plenum • (4) Nuts (10-32 keps - nuts with lock washers ... gasket • Cleaning cream • Scrub sponge or scraper (on some models) • Burner grates • Burner heads (1 small (A), 2 medium (B), 1 large (C)) • Burner caps (1 small, 2 medium, 1 large) • Gas pressure regulator • Attached 120-volt grounded plug cord • LP Conversion • Reflective tape...
nuts with lock washers attached) Blower 16 Plenum Vent Filter Installation Instructions UNPACKING YOUR COOKTOP PARTS INCLUDED (PACKED BELOW THE COOKTOP) • Blower assembly • Blower plenum • (4) Nuts (10-32 keps - nuts with lock washers ... gasket • Cleaning cream • Scrub sponge or scraper (on some models) • Burner grates • Burner heads (1 small (A), 2 medium (B), 1 large (C)) • Burner caps (1 small, 2 medium, 1 large) • Gas pressure regulator • Attached 120-volt grounded plug cord • LP Conversion • Reflective tape...
Owners Manual
Page 30
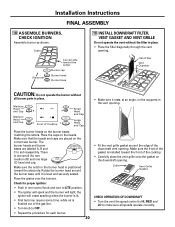
... A, B and C to make sure all burner parts in the vent opening . The burner heads and burner bases are placed on the burner bases matching the letters. Make sure the front of the cooktop. • Carefully place the vent grille onto the gasket on the downdraft opening . Grille Vent Grille Gasket CHECK OPERATION OF DOWNDRAFT • Turn the vent fan...
... A, B and C to make sure all burner parts in the vent opening . The burner heads and burner bases are placed on the burner bases matching the letters. Make sure the front of the cooktop. • Carefully place the vent grille onto the gasket on the downdraft opening . Grille Vent Grille Gasket CHECK OPERATION OF DOWNDRAFT • Turn the vent fan...
Owners Manual
Page 31
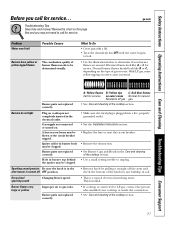
...ge.com Problem Water won't boil Possible Causes Burners have yellow or yellow-tipped flames The combustion quality of the cooktop section. • Use a small sewing needle to call for service. With LP gas, some yellow tipping on this page first and you may be determined visually. This is a typical electrical switching noise. Burner parts...8226; Cover pan with a lid. • Turn the downdraft fan OFF until the water begins to boil. • Use the illustrations below to gas ratio. Igniter orifice in the after burner is plugged into a live, properly grounded outlet. • ...
...ge.com Problem Water won't boil Possible Causes Burners have yellow or yellow-tipped flames The combustion quality of the cooktop section. • Use a small sewing needle to call for service. With LP gas, some yellow tipping on this page first and you may be determined visually. This is a typical electrical switching noise. Burner parts...8226; Cover pan with a lid. • Turn the downdraft fan OFF until the water begins to boil. • Use the illustrations below to gas ratio. Igniter orifice in the after burner is plugged into a live, properly grounded outlet. • ...


