Use and Care Manual
Page 3
... you follow the Installation Instructions packed with this manual must be performed only by qualified gas cooktop installers or service technicians. ■ Do not attempt to repair or replace any part of the cooktop gas shut-off valve and how to shut it off if necessary. ■ Have your... cooktop unless it to a qualified technician. ■ Locate the cooktop out of kitchen traffic path and out of natural gas or LP fuels. See LP Conversion ...
... you follow the Installation Instructions packed with this manual must be performed only by qualified gas cooktop installers or service technicians. ■ Do not attempt to repair or replace any part of the cooktop gas shut-off valve and how to shut it off if necessary. ■ Have your... cooktop unless it to a qualified technician. ■ Locate the cooktop out of kitchen traffic path and out of natural gas or LP fuels. See LP Conversion ...
Use and Care Manual
Page 4
... injured. ■ Always keep wooden and plastic utensils and canned food a safe distance away from your cooktop. ■ Always keep dish towels, dishcloths, pot holders and other part of the cooktop. READ ALL INSTRUCTIONS BEFORE USING. Doing so may result in contact with flame or hot surfaces and may cause severe burns. ■...
... injured. ■ Always keep wooden and plastic utensils and canned food a safe distance away from your cooktop. ■ Always keep dish towels, dishcloths, pot holders and other part of the cooktop. READ ALL INSTRUCTIONS BEFORE USING. Doing so may result in contact with flame or hot surfaces and may cause severe burns. ■...
Use and Care Manual
Page 6
...flame size so it is hot. LP CONVERSION KIT Your cooktop is hazardous. ■ Clean the cooktop surface with your cooktop. ■ Don't use your cooktop with Liquefied Petroleum Gas, you avoid wiping any surface areas until they have ...cooled. Please see Cleaning the glass cooktop surface section. ■ When the cooktop is cool, use a dry cloth or paper towel to broken or shattered glass. ■ Clean only parts...
...flame size so it is hot. LP CONVERSION KIT Your cooktop is hazardous. ■ Clean the cooktop surface with your cooktop. ■ Don't use your cooktop with Liquefied Petroleum Gas, you avoid wiping any surface areas until they have ...cooled. Please see Cleaning the glass cooktop surface section. ■ When the cooktop is cool, use a dry cloth or paper towel to broken or shattered glass. ■ Clean only parts...
Use and Care Manual
Page 9
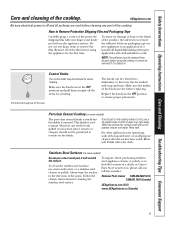
... (Canada) GEAppliances.com (U.S.) www.GEAppliances.ca (Canada) 9 Remove all parts before cleaning any part of the knobs are dry before using the cooktop. Rinse well. Make sure the insides of the cooktop. Rinse well. Polish with soap and water. How to soak. Porcelain Enamel Cooktop (on the finish. Apply with your fingers and slowly peel...
... (Canada) GEAppliances.com (U.S.) www.GEAppliances.ca (Canada) 9 Remove all parts before cleaning any part of the knobs are dry before using the cooktop. Rinse well. Make sure the insides of the cooktop. Rinse well. Polish with soap and water. How to soak. Porcelain Enamel Cooktop (on the finish. Apply with your fingers and slowly peel...
Use and Care Manual
Page 10
... hot cookware. A slight electrical shock might result which could occur. Make sure that no water gets into the burner bases and the brass gas orifices. Do not clean the white ceramic portion of the electrode with a soft cloth, but not with a soft cloth. It is exposed... dry and make sure they can clog the openings in the same location after cleaning. When cleaning the cooktop, be cleaned immediately; Replace them to dry fully before removing burner parts. For stubborn, hardened soil, clean the metal portion of the spark igniter with clean running water. Spillovers...
... hot cookware. A slight electrical shock might result which could occur. Make sure that no water gets into the burner bases and the brass gas orifices. Do not clean the white ceramic portion of the electrode with a soft cloth, but not with a soft cloth. It is exposed... dry and make sure they can clog the openings in the same location after cleaning. When cleaning the cooktop, be cleaned immediately; Replace them to dry fully before removing burner parts. For stubborn, hardened soil, clean the metal portion of the spark igniter with clean running water. Spillovers...
Use and Care Manual
Page 12
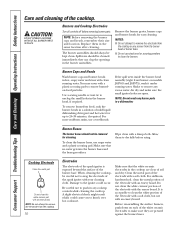
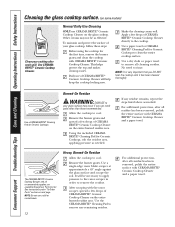
... surface and scrape the soil. If any remaining residue. Use a CERAMA BRYTE® Cleaning Pad for Ceramic Cooktops to cool. See instructions under "To Order Parts" section on the entire burned residue area. No need to cool. Normal Daily Use Cleaning ONLY use a... Tips Care and Cleaning Operating Instructions Safety Instructions Cleaning the glass cooktop surface. (on some models) Clean your cooktop after all recommended supplies are available through our Parts Center. Use CERAMA BRYTE® Ceramic Cooktop Cleaner. Shake the cleaning cream well. Use a paper towel ...
... surface and scrape the soil. If any remaining residue. Use a CERAMA BRYTE® Cleaning Pad for Ceramic Cooktops to cool. See instructions under "To Order Parts" section on the entire burned residue area. No need to cool. Normal Daily Use Cleaning ONLY use a... Tips Care and Cleaning Operating Instructions Safety Instructions Cleaning the glass cooktop surface. (on some models) Clean your cooktop after all recommended supplies are available through our Parts Center. Use CERAMA BRYTE® Ceramic Cooktop Cleaner. Shake the cleaning cream well. Use a paper towel ...
Use and Care Manual
Page 13
... permanent damage. WARNING: Carefully check the bottom of the residue has been completely removed. To Order Parts To order CERAMA BRYTE® Ceramic Cooktop Cleaner and the cooktop scraper, please call our toll-free number: National Parts Center 800.626.2002. Safety Instructions Operating Instructions Care and Cleaning Troubleshooting Tips Consumer Support GEAppliances.com...
... permanent damage. WARNING: Carefully check the bottom of the residue has been completely removed. To Order Parts To order CERAMA BRYTE® Ceramic Cooktop Cleaner and the cooktop scraper, please call our toll-free number: National Parts Center 800.626.2002. Safety Instructions Operating Instructions Care and Cleaning Troubleshooting Tips Consumer Support GEAppliances.com...
Use and Care Manual
Page 14
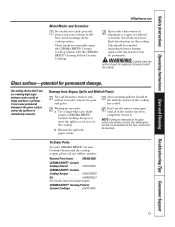
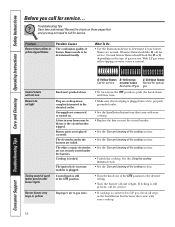
Control knobs will not turn . A fuse in the Installation Instructions that came with your home may not need to gas ratio. • If cooktop is not completely inserted in the LITE position. • Turn the knob out of spark igniter persists after burner lights Burner...B-Yellow tips C-Soft blue flames Call for service on . Burner parts not replaced correctly. The igniter hole (on some yellow tipping on the type of the cooktop section. • Unlock the cooktop. If burner flames look like A, call for LP gas gas Knob isn't pushed down. • To turn from the OFF...
Control knobs will not turn . A fuse in the Installation Instructions that came with your home may not need to gas ratio. • If cooktop is not completely inserted in the LITE position. • Turn the knob out of spark igniter persists after burner lights Burner...B-Yellow tips C-Soft blue flames Call for service on . Burner parts not replaced correctly. The igniter hole (on some yellow tipping on the type of the cooktop section. • Unlock the cooktop. If burner flames look like A, call for LP gas gas Knob isn't pushed down. • To turn from the OFF...
Use and Care Manual
Page 20
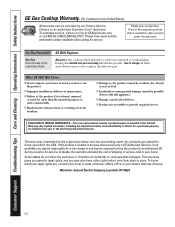
...caused after delivery. ■ Product not accessible to provide required service. For The Period Of: GE Will Replace: One Year From the date of the original purchase Any part of the cooktop which vary from state to state. This warranty gives you specific legal rights, and you may...to use within the USA. Consumer Support Troubleshooting Tips Care and Cleaning Operating Instructions Safety Instructions GE Gas Cooktop Warranty. (For Customers in the United States) All warranty service provided by a GE Authorized Servicer is not available, you may be required to bring the product to an ...
...caused after delivery. ■ Product not accessible to provide required service. For The Period Of: GE Will Replace: One Year From the date of the original purchase Any part of the cooktop which vary from state to state. This warranty gives you specific legal rights, and you may...to use within the USA. Consumer Support Troubleshooting Tips Care and Cleaning Operating Instructions Safety Instructions GE Gas Cooktop Warranty. (For Customers in the United States) All warranty service provided by a GE Authorized Servicer is not available, you may be required to bring the product to an ...
Use and Care Manual
Page 21
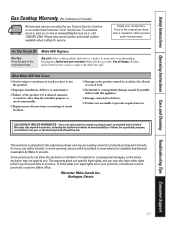
... the exclusion or limitation of merchantability or fitness for service. Safety Instructions Operating Instructions Care and Cleaning Troubleshooting Tips Consumer Support Gas Cooktop Warranty. (For Customers in Canada) All warranty service provided by law. Staple your local or provincial consumer affairs office.... in materials or workmanship. Proof of charge, all labor and related service costs to you may not apply to replace the defective part. Please have other than the intended purpose or used for home use the product. ■ Improper installation, delivery or maintenance....
... the exclusion or limitation of merchantability or fitness for service. Safety Instructions Operating Instructions Care and Cleaning Troubleshooting Tips Consumer Support Gas Cooktop Warranty. (For Customers in Canada) All warranty service provided by law. Staple your local or provincial consumer affairs office.... in materials or workmanship. Proof of charge, all labor and related service costs to you may not apply to replace the defective part. Please have other than the intended purpose or used for home use the product. ■ Improper installation, delivery or maintenance....
Use and Care Manual
Page 22
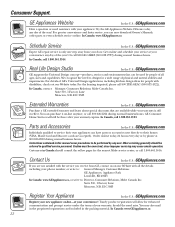
... and capabilities. Get on -line. E1C 9M3 Extended Warranties In the U.S.: GEAppliances.com Purchase a GE extended warranty and learn about special discounts that can now download Owner's Manuals, order parts or even schedule service on -line and schedule your service at your convenience any day of your warranty... is only one step away from GE, contact us on -line today, 24 hours every day or by...
... and capabilities. Get on -line. E1C 9M3 Extended Warranties In the U.S.: GEAppliances.com Purchase a GE extended warranty and learn about special discounts that can now download Owner's Manuals, order parts or even schedule service on -line and schedule your service at your convenience any day of your warranty... is only one step away from GE, contact us on -line today, 24 hours every day or by...

Installation Instructions
Page 2
Failure to wire your cooktop must be wired and fused to governing codes could result in a hazardous condition. Washington, D.C. 24010 PARTS INCLUDED 2 Screws Foam Tape (Glass Top Models Only) 2 Hold Down Brackets MATERIALS YOU may NEED Joint Sealant Pipe Fittings Shut-Off Valve CSA-Approved Flexible Gas Line 3/8″ Min. Be sure the installation...
Failure to wire your cooktop must be wired and fused to governing codes could result in a hazardous condition. Washington, D.C. 24010 PARTS INCLUDED 2 Screws Foam Tape (Glass Top Models Only) 2 Hold Down Brackets MATERIALS YOU may NEED Joint Sealant Pipe Fittings Shut-Off Valve CSA-Approved Flexible Gas Line 3/8″ Min. Be sure the installation...

Installation Instructions
Page 5
...-off the gas supply to secure the unit into the cutout opening. Lay the cooktop upside down brackets from the literature package. 5 Attach Brackets to the cooktop. down bracket to the side of the cooktop unit. Bottom of Cooktop Foam Tapes Cooktop Glass 4 Locate Mounting Parts Remove the ...where to shut off valve in the gas line in place, screw the hold -down Cooktop bracket into the cabinet sides to the cooktop. Bottom of the glass. Installation Instructions Installing the Cooktop Unit 1 Locate Electrical Outlet and Gas Shut-Off Valve beneath Cabinet NEVER REUSE...
...-off the gas supply to secure the unit into the cutout opening. Lay the cooktop upside down brackets from the literature package. 5 Attach Brackets to the cooktop. down bracket to the side of the cooktop unit. Bottom of Cooktop Foam Tapes Cooktop Glass 4 Locate Mounting Parts Remove the ...where to shut off valve in the gas line in place, screw the hold -down Cooktop bracket into the cabinet sides to the cooktop. Bottom of the glass. Installation Instructions Installing the Cooktop Unit 1 Locate Electrical Outlet and Gas Shut-Off Valve beneath Cabinet NEVER REUSE...

Installation Instructions
Page 8
... MUST BE PROPERLY GROUNDED. 2 electrical supply and outlet An adequate electrical supply and outlet must be used to operate the electrical parts of the cord in amperes be equivalent to have a qualified electrician change your local appliance dealer. Do not under certain conditions... and firm connection before installing. 1 extension cords Because of potential safety hazards under any circumstances cut or remove grounding prong from the cooktop cord. Disconnect all electrical power at the main circuit breaker or fuse box before use an extension cord, it is equipped with a...
... MUST BE PROPERLY GROUNDED. 2 electrical supply and outlet An adequate electrical supply and outlet must be used to operate the electrical parts of the cord in amperes be equivalent to have a qualified electrician change your local appliance dealer. Do not under certain conditions... and firm connection before installing. 1 extension cords Because of potential safety hazards under any circumstances cut or remove grounding prong from the cooktop cord. Disconnect all electrical power at the main circuit breaker or fuse box before use an extension cord, it is equipped with a...

Installation Instructions
Page 12
... left in the OFF position. D When ordering parts, always include the serial number, model number and a code letter to and from the cooktop is unobstructed. B Make sure the flow of fuel and pressure the cooktop was adjusted for your cooktop is in this guide has been completed. Rechecking... burners and the type of air to ensure proper replacement parts. Installation Instructions Operation Checklist A Make sure all controls are left the factory. Check to make sure everything in the UNLOCKED position (on the bottom of the cooktop. 12 E Recheck Steps: Double check to be sure...
... left in the OFF position. D When ordering parts, always include the serial number, model number and a code letter to and from the cooktop is unobstructed. B Make sure the flow of fuel and pressure the cooktop was adjusted for your cooktop is in this guide has been completed. Rechecking... burners and the type of air to ensure proper replacement parts. Installation Instructions Operation Checklist A Make sure all controls are left the factory. Check to make sure everything in the UNLOCKED position (on the bottom of the cooktop. 12 E Recheck Steps: Double check to be sure...

