Use and Care Manual
Page 1
...30 Oven Light Replacement . . . . . .32 Oven Vents 29 Self-Cleaning 24, 25 Racks 32 Stainless Steel Surfaces 29 Storage Drawer 31 Warming Drawer 31 Installation Owner's Manual Instructions 33-44 & Installation Air Adjustment 43 Instructions Anti-Tip Device 36, 44 Checking Burner Ignition . . . . . .42 Connecting the Range EGR3000 EGR3001 to Gas... 37-40 Dimensions and Clearances . . .35 Electrical Connections . . . . .41, 42 Leveling the Range 43 Location 36 LP 44 Troubleshooting Tips 45-48 JGB280 ...
...30 Oven Light Replacement . . . . . .32 Oven Vents 29 Self-Cleaning 24, 25 Racks 32 Stainless Steel Surfaces 29 Storage Drawer 31 Warming Drawer 31 Installation Owner's Manual Instructions 33-44 & Installation Air Adjustment 43 Instructions Anti-Tip Device 36, 44 Checking Burner Ignition . . . . . .42 Connecting the Range EGR3000 EGR3001 to Gas... 37-40 Dimensions and Clearances . . .35 Electrical Connections . . . . .41, 42 Leveling the Range 43 Location 36 LP 44 Troubleshooting Tips 45-48 JGB280 ...
Use and Care Manual
Page 14
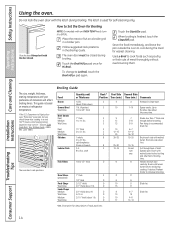
... Broil, touch the Broil Hi/Lo pad again. Troubleshooting Tips Consumer Support 14 Safety Instructions Using the oven. D 9 12 13 10 12-15 25 30-35 25-30 13-16 6 8 6 10 15 7 5-6 8-9 6-7 10-12 16-18 15-20 10-15 Do not turn over. 6 8 6 8 8 Steaks less than 1″ thick cook through back...
... Broil, touch the Broil Hi/Lo pad again. Troubleshooting Tips Consumer Support 14 Safety Instructions Using the oven. D 9 12 13 10 12-15 25 30-35 25-30 13-16 6 8 6 10 15 7 5-6 8-9 6-7 10-12 16-18 15-20 10-15 Do not turn over. 6 8 6 8 8 Steaks less than 1″ thick cook through back...
Use and Care Manual
Page 19
... in 25° increments. How to 1 minute, ⊃ will be set in the display. Make sure the clock shows the correct time of approximately 30 seconds to Set for use on some models) (Designed for Regular Baking/Roasting NOTE: To understand how the oven control works, practice using regular (non... . Touch the Start/On pad. Touch the Start/On pad. The temperature can be given. Make sure the clock shows the correct time of approximately 30 seconds to 350.° Tap the + or - Touch the Start/On pad and ⊃ will be set the desired length of cooking time between...
... in 25° increments. How to 1 minute, ⊃ will be set in the display. Make sure the clock shows the correct time of approximately 30 seconds to Set for use on some models) (Designed for Regular Baking/Roasting NOTE: To understand how the oven control works, practice using regular (non... . Touch the Start/On pad. Touch the Start/On pad. The temperature can be given. Make sure the clock shows the correct time of approximately 30 seconds to 350.° Tap the + or - Touch the Start/On pad and ⊃ will be set the desired length of cooking time between...
Use and Care Manual
Page 20
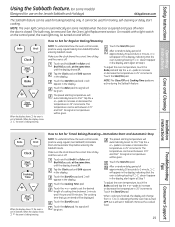
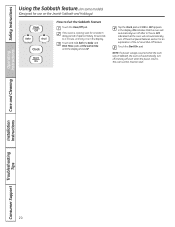
... a random delay period of the 12 Hour Shut-Off feature. Touch the Start/On pad. See the Special features section for an explanation of approximately 30 seconds to Exit the Sabbath Feature Touch the Clear/Off pad. Safety Instructions Using the Sabbath feature. (on some models) (Designed for use on the...
... a random delay period of the 12 Hour Shut-Off feature. Touch the Start/On pad. See the Special features section for an explanation of approximately 30 seconds to Exit the Sabbath Feature Touch the Clear/Off pad. Safety Instructions Using the Sabbath feature. (on some models) (Designed for use on the...
Use and Care Manual
Page 27
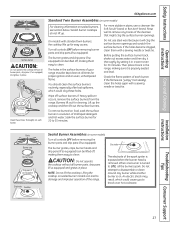
... clean the surface burners routinely, especially after bad spillovers, which could clog these holes thoroughly on . Check the flame pattern of the range. If the flames are "jumpy" (not steady), clean the holes again with a sewing needle or twist-tie. Installation Instructions Troubleshooting Tips...and drip pans (if so equipped). GEAppliances.com Standard Twin Burner Assemblies (on sealed burners, see section below. Rinse well to 30 minutes. On models with standard twin burners, the cooktop lifts up for cleaning. Before putting the surface burner back, shake out excess...
... clean the surface burners routinely, especially after bad spillovers, which could clog these holes thoroughly on . Check the flame pattern of the range. If the flames are "jumpy" (not steady), clean the holes again with a sewing needle or twist-tie. Installation Instructions Troubleshooting Tips...and drip pans (if so equipped). GEAppliances.com Standard Twin Burner Assemblies (on sealed burners, see section below. Rinse well to 30 minutes. On models with standard twin burners, the cooktop lifts up for cleaning. Before putting the surface burner back, shake out excess...

Use and Care Manual
Page 28
.... On some models: Medium head and cap Small head and cap Large head and cap Front of mild liquid detergent and hot water for 20-30 minutes. Replace the matching size caps onto the heads. Replace them thoroughly by setting in the correct locations. Lift off when cool. To remove ... all the same size and power. NOTE: On some models: Medium head and cap Large head and cap Small head and cap Front of the range. The slits in hot, soapy water and rinse with clean water. NOTE: Do not use a toothbrush. Safety Instructions Operating Instructions Care and Cleaning Care ...
.... On some models: Medium head and cap Small head and cap Large head and cap Front of mild liquid detergent and hot water for 20-30 minutes. Replace the matching size caps onto the heads. Replace them thoroughly by setting in the correct locations. Lift off when cool. To remove ... all the same size and power. NOTE: On some models: Medium head and cap Large head and cap Small head and cap Front of the range. The slits in hot, soapy water and rinse with clean water. NOTE: Do not use a toothbrush. Safety Instructions Operating Instructions Care and Cleaning Care ...
Use and Care Manual
Page 30
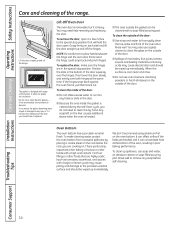
... door. ■ Spillage of the door: ■ Do not allow for proper air circulation. Installation Instructions Troubleshooting Tips Consumer Support 30 The gasket is heated. ■ The area outside of the range. If you are highly acidic (such as tomatoes, sauerkraut, and sauces with a gap at the same time. To replace the...
... door. ■ Spillage of the door: ■ Do not allow for proper air circulation. Installation Instructions Troubleshooting Tips Consumer Support 30 The gasket is heated. ■ The area outside of the range. If you are highly acidic (such as tomatoes, sauerkraut, and sauces with a gap at the same time. To replace the...
Use and Care Manual
Page 34
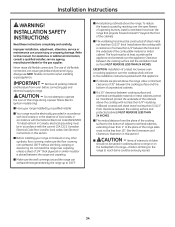
... and the bottom of unprotected cabinets. ■ If a 30″ clearance between the cooking surface and protected cabinets MUST NEVER BE LESS THAN 24 INCHES. ■ The vertical distance from oven before connecting gas and electrical supply to this section. ■ Before installing your range installed by reaching over the open flames of...
... and the bottom of unprotected cabinets. ■ If a 30″ clearance between the cooking surface and protected cabinets MUST NEVER BE LESS THAN 24 INCHES. ■ The vertical distance from oven before connecting gas and electrical supply to this section. ■ Before installing your range installed by reaching over the open flames of...
Use and Care Manual
Page 35
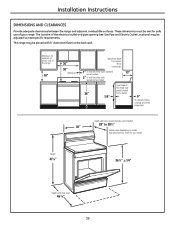
... 1/4" 0" To cabinets below cooktop and at the back wall. Minimum to cabinets on either side of the range 18" 30" 30" Minimum Maximum depth for safe use of the electrical outlet and pipe opening (see Gas Pipe and Electric Outlet Locations) may be met for cabinets above countertops 1" To wall on either side, standard...
... 1/4" 0" To cabinets below cooktop and at the back wall. Minimum to cabinets on either side of the range 18" 30" 30" Minimum Maximum depth for safe use of the electrical outlet and pipe opening (see Gas Pipe and Electric Outlet Locations) may be met for cabinets above countertops 1" To wall on either side, standard...

Use and Care Manual
Page 42
...indicated by a qualified electrician before using the appliance. Normal burner flames should be checked after the range and gas supply lines have been checked. To check ignition of the LITE position. Gas will ignite. The oven burner will shut off as necessary to LITE position. Electric ignition models ... situations because disconnecting of all burners have been carefully checked for service (B) Yellow tips on the adapter and leads to operate. After 30-90 seconds, the broil burner will not flow unless the glow bar is in use an adapter plug in these models cannot be...
...indicated by a qualified electrician before using the appliance. Normal burner flames should be checked after the range and gas supply lines have been checked. To check ignition of the LITE position. Gas will ignite. The oven burner will shut off as necessary to LITE position. Electric ignition models ... situations because disconnecting of all burners have been carefully checked for service (B) Yellow tips on the adapter and leads to operate. After 30-90 seconds, the broil burner will not flow unless the glow bar is in use an adapter plug in these models cannot be...

Use and Care Manual
Page 49
... Year Signature 49 Troubleshooting Tips Consumer Support When you order your broiler pan within 30 days of your Broiler Pan! (Not for use with Broiler Drawer models.) Use...U.S. To place your model number ready. Safety Instructions Accessories. The pan below catches the excess fats and oils. • Genuine GE Part • Easy To Clean • One-Year Warranty Limited Time Offer! Part # Canada Part # Dimensions WB48X10055 222D2097G001 ...does not fit in 20"/24" ranges. ** The XL pan does not fit in 24" wall ovens, 27" drop-ins or 20"/24" ranges. Have your order, call 800.626...
... Year Signature 49 Troubleshooting Tips Consumer Support When you order your broiler pan within 30 days of your Broiler Pan! (Not for use with Broiler Drawer models.) Use...U.S. To place your model number ready. Safety Instructions Accessories. The pan below catches the excess fats and oils. • Genuine GE Part • Easy To Clean • One-Year Warranty Limited Time Offer! Part # Canada Part # Dimensions WB48X10055 222D2097G001 ...does not fit in 20"/24" ranges. ** The XL pan does not fit in 24" wall ovens, 27" drop-ins or 20"/24" ranges. Have your order, call 800.626...

