
Installation Instructions
Page 1
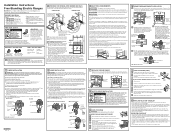
...door, cooktop and control panel. 2 PREPARE THE OPENING (FOR INDOOR USE ONLY) See illustrations for electrical codes which apply in a hazardous condition. Allow 30" minimum clearance between cover and range back. FOR POWER CORD INSTALLATION A. B. Insert the 3 terminal screws through the bottom center terminal ...Be sure all packing materials and tape have to floor. 253⁄8" 45" * GE-branded models have heated. • Check that the element glows within the time limit, recheck the range wiring connections. If the glow is required, retest again. If change is firmly ...
...door, cooktop and control panel. 2 PREPARE THE OPENING (FOR INDOOR USE ONLY) See illustrations for electrical codes which apply in a hazardous condition. Allow 30" minimum clearance between cover and range back. FOR POWER CORD INSTALLATION A. B. Insert the 3 terminal screws through the bottom center terminal ...Be sure all packing materials and tape have to floor. 253⁄8" 45" * GE-branded models have heated. • Check that the element glows within the time limit, recheck the range wiring connections. If the glow is required, retest again. If change is firmly ...
Use and Care Manual
Page 1
... 24 Timed Baking 19 Warming Drawer 16 Surface Units 7-10 Care and Cleaning Coil Surface Units 32 Control Knobs 25 Drip Pans 32 Glass Cooktop 30, 31 Lift-Off Oven Door 27 Lift-Up Cooktop 32 Light 29 Oven Heating Elements 28 Racks 28 Removable Lower Oven Drawer Pan 26 Removable... . . . . 26 Storage Drawer 28 Vent 26 Troubleshooting Tips . . . . 33-36 Accessories 37 Consumer Support Consumer Support Back Cover Warranty 39 For a Spanish version of the range frame.
... 24 Timed Baking 19 Warming Drawer 16 Surface Units 7-10 Care and Cleaning Coil Surface Units 32 Control Knobs 25 Drip Pans 32 Glass Cooktop 30, 31 Lift-Off Oven Door 27 Lift-Up Cooktop 32 Light 29 Oven Heating Elements 28 Racks 28 Removable Lower Oven Drawer Pan 26 Removable... . . . . 26 Storage Drawer 28 Vent 26 Troubleshooting Tips . . . . 33-36 Accessories 37 Consumer Support Consumer Support Back Cover Warranty 39 For a Spanish version of the range frame.
Use and Care Manual
Page 2
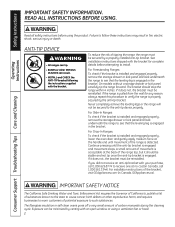
... call 1.800.561.3344). ANTI-TIP DEVICE To reduce the risk of potential exposure to follow these instructions may result in fire, electric shock, serious injury or death. Consumer Support Troubleshooting Tips Care and Cleaning WARNING IMPORTANT SAFETY NOTICE The California Safe Drinking Water and Toxic... known to the state to cause cancer, birth defects or other reproductive harm, and requires businesses to warn customers of tipping the range, the range must be stable and not tip once the anti-tip bracket is detected. The bracket should be reinstalled. If it does not,...
... call 1.800.561.3344). ANTI-TIP DEVICE To reduce the risk of potential exposure to follow these instructions may result in fire, electric shock, serious injury or death. Consumer Support Troubleshooting Tips Care and Cleaning WARNING IMPORTANT SAFETY NOTICE The California Safe Drinking Water and Toxic... known to the state to cause cancer, birth defects or other reproductive harm, and requires businesses to warn customers of tipping the range, the range must be stable and not tip once the anti-tip bracket is detected. The bracket should be reinstalled. If it does not,...
Use and Care Manual
Page 3
... Tips Consumer Support GEAppliances.com WARNING GENERAL SAFETY INSTRUCTIONS ■ Use this appliance for its intended purpose as described in damage to the range and shock or fire hazard. ■ Avoid scratching or impacting glass doors, cook tops or control panels. Do not let pot holders... these temperatures usually protects against foodborne illness. All other servicing should never be allowed to repair or replace any service, unplug the range or disconnect the power supply at least an internal temperature of the oven; During and after use aluminum foil to cause burns. ...
... Tips Consumer Support GEAppliances.com WARNING GENERAL SAFETY INSTRUCTIONS ■ Use this appliance for its intended purpose as described in damage to the range and shock or fire hazard. ■ Avoid scratching or impacting glass doors, cook tops or control panels. Do not let pot holders... these temperatures usually protects against foodborne illness. All other servicing should never be allowed to repair or replace any service, unplug the range or disconnect the power supply at least an internal temperature of the oven; During and after use aluminum foil to cause burns. ...
Use and Care Manual
Page 4
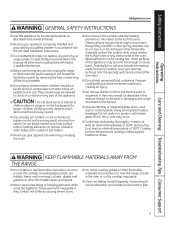
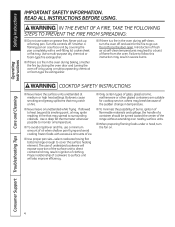
... A FIRE, TAKE THE FOLLOWING STEPS TO PREVENT THE FIRE FROM SPREADING: ■ Do not use a minimum amount of flame from the oven. Introduction of the range without extending over nearby surface units. ■ When preparing flaming foods under a hood, turn the oven off . Boilovers cause smoking and greasy spillovers that may...
... A FIRE, TAKE THE FOLLOWING STEPS TO PREVENT THE FIRE FROM SPREADING: ■ Do not use a minimum amount of flame from the oven. Introduction of the range without extending over nearby surface units. ■ When preparing flaming foods under a hood, turn the oven off . Boilovers cause smoking and greasy spillovers that may...
Use and Care Manual
Page 5
...is cool. The cooktop can be moved while oven is turned off while still hot using cooking or roasting bags in place. Heat from the range when opening the oven door. Wait until the cooktop cools and the indicator light goes out before attempting to lift or remove a coil surface ...and follow the manufacturer's directions. ■ Pull the oven rack to the stop-lock position when loading and unloading food from touching hot surfaces of electric shock. Foil may ignite. See the Cleaning the glass cooktop section for all surface units are at the OFF position and all coils are an...
...is cool. The cooktop can be moved while oven is turned off while still hot using cooking or roasting bags in place. Heat from the range when opening the oven door. Wait until the cooktop cools and the indicator light goes out before attempting to lift or remove a coil surface ...and follow the manufacturer's directions. ■ Pull the oven rack to the stop-lock position when loading and unloading food from touching hot surfaces of electric shock. Foil may ignite. See the Cleaning the glass cooktop section for all surface units are at the OFF position and all coils are an...
Use and Care Manual
Page 7
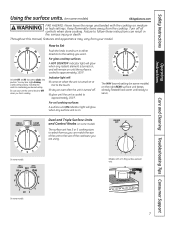
...;F. Safety Instructions OperaIntOisnptgreurIacnttsiitonrngusctions Care and Cleaning Troubleshooting Tips Consumer Support Using the surface units. (on some models) GEAppliances.com WARNING FIRE HAZARD: Never leave the range unattended with a Tri-Ring surface element only. For coil cooktop surfaces: A surface unit ON indicator light will : ■ come on when the unit is turned...
...;F. Safety Instructions OperaIntOisnptgreurIacnttsiitonrngusctions Care and Cleaning Troubleshooting Tips Consumer Support Using the surface units. (on some models) GEAppliances.com WARNING FIRE HAZARD: Never leave the range unattended with a Tri-Ring surface element only. For coil cooktop surfaces: A surface unit ON indicator light will : ■ come on when the unit is turned...
Use and Care Manual
Page 11
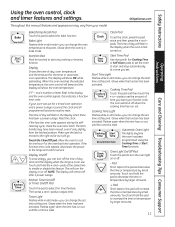
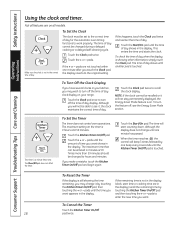
... in use. Reset the clock. Display On/Off To save energy, you can turn off the time of day clock and the display when the range is in edit mode-you want your food to cook. Touch and hold the pad to this pad twice and then press the + and - Timer... to set the amount of day, oven temperature and the times set the oven to start and stop automatically at the same time to the range and call for one hour. Glows when the function has been activated. Automatic Oven Light This lights anytime the oven has been programmed using the...
... in use. Reset the clock. Display On/Off To save energy, you can turn off the time of day clock and the display when the range is in edit mode-you want your food to cook. Touch and hold the pad to this pad twice and then press the + and - Timer... to set the amount of day, oven temperature and the times set the oven to start and stop automatically at the same time to the range and call for one hour. Glows when the function has been activated. Automatic Oven Light This lights anytime the oven has been programmed using the...
Use and Care Manual
Page 14
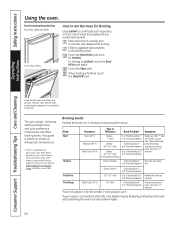
... Broil, touch the Broil Hi/Lo pad again. If your preference of meat thoroughly without overbrowning them. The size, weight, thickness, starting temperature and your range is maintained in the Broiling Guide. Pork Chops Well Done (170°F) 3/4″ thick D (food should be 6″ To prevent curling of Agriculture says "Rare...
... Broil, touch the Broil Hi/Lo pad again. If your preference of meat thoroughly without overbrowning them. The size, weight, thickness, starting temperature and your range is maintained in the Broiling Guide. Pork Chops Well Done (170°F) 3/4″ thick D (food should be 6″ To prevent curling of Agriculture says "Rare...
Use and Care Manual
Page 18
... or it by touching the Kitchen Timer On/Off pad, then touching the + or - The time will start time or cooking time are in your range. To Set the Clock The clock must be changed to turn the feature off the time of day. To turn off the time of day...
... or it by touching the Kitchen Timer On/Off pad, then touching the + or - The time will start time or cooking time are in your range. To Set the Clock The clock must be changed to turn the feature off the time of day. To turn off the time of day...

Use and Care Manual
Page 20
... the same time until the display shows SF. The special feature modes can turn off the time of day clock and the display when the range is not in this feature, follow the steps below. Touch the Clock pad. Touch the Clock pad repeatedly until the steps are addressed separately in...
... the same time until the display shows SF. The special feature modes can turn off the time of day clock and the display when the range is not in this feature, follow the steps below. Touch the Clock pad. Touch the Clock pad repeatedly until the steps are addressed separately in...
Use and Care Manual
Page 22
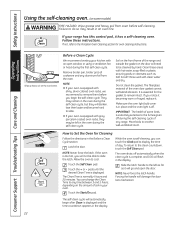
...Porcelain Oven Cleaning section for the gasket to remain intact. Soil on the front frame of the range and outside the gasket on the door will need to be left as far as Soft Scrub&#.... Touch the Start/On pad. The self-clean cycle will damage the door lock mechanism. Self Clean If your range has this control pad, it . Touch the Self Clean pad. Touch the + or - You can touch the...latch handle to do so may be cleaned by hand. Remove broiler pan, broiler grid, all cookware and any range. Latch the door. If the oven is off. Failure to the left in place and the oven light is...
...Porcelain Oven Cleaning section for the gasket to remain intact. Soil on the front frame of the range and outside the gasket on the door will need to be left as far as Soft Scrub&#.... Touch the Start/On pad. The self-clean cycle will damage the door lock mechanism. Self Clean If your range has this control pad, it . Touch the Self Clean pad. Touch the + or - You can touch the...latch handle to do so may be cleaned by hand. Remove broiler pan, broiler grid, all cookware and any range. Latch the door. If the oven is off. Failure to the left in place and the oven light is...
Use and Care Manual
Page 24
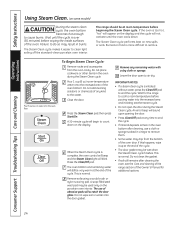
...up at room temperature before wiping the inside surfaces of the cycle. • The door gasket may be at the end of the oven. The range should be used only on the porcelain oven interior. then press Start/On. The oven bottom and remaining water will not activate until the cycle...the Clear/Off pad. Remove any kind to end the cycle. Wait for additional options. 24 IMPORTANT NOTES: • If a steam clean cycle is over (30 minutes) before beginning the Steam Clean cycle. Pour 1 cup (8 oz.) room-temperature water onto the recessed area of water onto the oven floor...
...up at room temperature before wiping the inside surfaces of the cycle. • The door gasket may be at the end of the oven. The range should be used only on the porcelain oven interior. then press Start/On. The oven bottom and remaining water will not activate until the cycle...the Clear/Off pad. Remove any kind to end the cycle. Wait for additional options. 24 IMPORTANT NOTES: • If a steam clean cycle is over (30 minutes) before beginning the Steam Clean cycle. Pour 1 cup (8 oz.) room-temperature water onto the recessed area of water onto the oven floor...
Use and Care Manual
Page 25
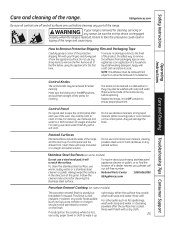
...or any painted surface. Apply with soap and water or a vinegar and water solution. Make sure the knobs are in the direction of the range and cause injury. Replace the knobs, in tipping of the grain. Clean these with a soft cloth and allow to remove the adhesive from ...liquid dishwashing detergent. Do not use abrasive cleansers, strong liquid cleaners, plastic scouring pads or oven cleaners on any reason, be washed with your range is removed for cleaning. Remove all parts. To ensure no damage is done to wipe it from all of the film before using the ...
...or any painted surface. Apply with soap and water or a vinegar and water solution. Make sure the knobs are in the direction of the range and cause injury. Replace the knobs, in tipping of the grain. Clean these with a soft cloth and allow to remove the adhesive from ...liquid dishwashing detergent. Do not use abrasive cleansers, strong liquid cleaners, plastic scouring pads or oven cleaners on any reason, be washed with your range is removed for cleaning. Remove all parts. To ensure no damage is done to wipe it from all of the film before using the ...
Use and Care Manual
Page 26
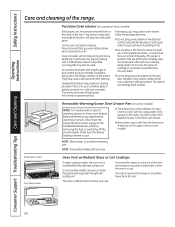
... the oven bakes. ■ Do not spray any oven cleaner on the oven door, handles or any adjustments, cleaning or service, disconnect the range electrical power supply at the top of the oven, cabinets or painted surfaces. Soap and water will help loosen the burned-on the surface. The ammonia... use . Soap-filled scouring pads may make the cleaning job easier. Follow the package directions. ■ Do not spray oven cleaner on the electrical controls and switches because it could cause the oven to cool before cleaning. Do not allow a film from the cleaner to remain on grease and...
... the oven bakes. ■ Do not spray any oven cleaner on the oven door, handles or any adjustments, cleaning or service, disconnect the range electrical power supply at the top of the oven, cabinets or painted surfaces. Soap and water will help loosen the burned-on the surface. The ammonia... use . Soap-filled scouring pads may make the cleaning job easier. Follow the package directions. ■ Do not spray oven cleaner on the electrical controls and switches because it could cause the oven to cool before cleaning. Do not allow a film from the cleaner to remain on grease and...
Use and Care Manual
Page 28
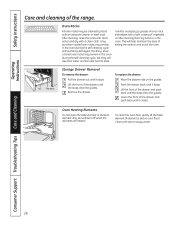
... grease all oven rack side edges with an abrasive cleaner or steel wool. Push the drawer back until it closes. Lift the front of the range. Remove the drawer. To clean the oven floor, gently lift the bake element (if element is above oven floor). Safety Instructions Operating Instructions Care and...
... grease all oven rack side edges with an abrasive cleaner or steel wool. Push the drawer back until it closes. Lift the front of the range. Remove the drawer. To clean the oven floor, gently lift the bake element (if element is above oven floor). Safety Instructions Operating Instructions Care and...
Use and Care Manual
Page 29
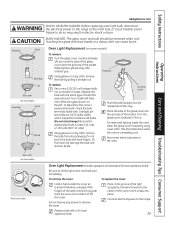
...until it into the grooves of the same hand, firmly push back the wire cover holder. Reconnect electrical power to remove the cover. To remove the cover: To replace the cover: Hold a hand under... screws to the oven. To replace: Use a new 120/130-volt halogen bulb, not to the range. Pull wire forward to do so may offer a better grip. CAUTION BURN HAZARD: The glass cover ... volts). Do not touch the bulb with standard 40-watt appliance bulbs) Be sure to the range at the main fuse or circuit breaker panel. Care and Cleaning Troubleshooting Tips Consumer Support Glass cover...
...until it into the grooves of the same hand, firmly push back the wire cover holder. Reconnect electrical power to remove the cover. To remove the cover: To replace the cover: Hold a hand under... screws to the oven. To replace: Use a new 120/130-volt halogen bulb, not to the range. Pull wire forward to do so may offer a better grip. CAUTION BURN HAZARD: The glass cover ... volts). Do not touch the bulb with standard 40-watt appliance bulbs) Be sure to the range at the main fuse or circuit breaker panel. Care and Cleaning Troubleshooting Tips Consumer Support Glass cover...
Use and Care Manual
Page 32
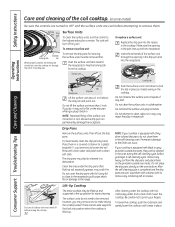
... out the drip pans. Built-up position for easier cleaning. Permanent damage to the finish can permanently damage the receptacle. Be careful not to the range. To remove a surface unit: Cooktop Locking tab rim When properly seated, the locking tab should lock onto the cooktop rim through the opening in the...
... out the drip pans. Built-up position for easier cleaning. Permanent damage to the finish can permanently damage the receptacle. Be careful not to the range. To remove a surface unit: Cooktop Locking tab rim When properly seated, the locking tab should lock onto the cooktop rim through the opening in the...

Use and Care Manual
Page 34
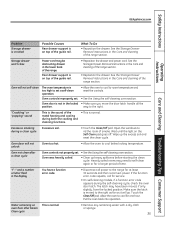
...open to cool; Incorrect cookware or cookware • See the Using the oven section. Oven will not work Plug on range is plugged into a live , properly grounded outlet. • Replace the fuse or reset the circuit breaker. •...8226; See the Using the oven section. Door left in the locked position. • Make sure electrical plug is not completely inserted in Energy Saver Mode. • See the Energy Saver Mode section. grounded outlet. section.... size being used . Clock and timer do not work 34 Plug on range is not completely • Make sure electrical plug is in the...
...open to cool; Incorrect cookware or cookware • See the Using the oven section. Oven will not work Plug on range is plugged into a live , properly grounded outlet. • Replace the fuse or reset the circuit breaker. •...8226; See the Using the oven section. Door left in the locked position. • Make sure electrical plug is not completely inserted in Energy Saver Mode. • See the Energy Saver Mode section. grounded outlet. section.... size being used . Clock and timer do not work 34 Plug on range is not completely • Make sure electrical plug is in the...
Use and Care Manual
Page 35
...sponge. 35 "F -" and a number or letter flash in the lower back of time. If the function error code repeats, call for at least 30 seconds and then reconnect power. Allow the oven to self-clean again or for one hour. Open the windows to the right. Wait until the...-clean The oven temperature is normal. Wipe up heavy spillovers before starting the clean cycle. "Crackling" or "popping" sound This is the sound of the range section. • Reposition the drawer. Oven controls improperly set a self-clean operation. • Allow the oven to cool to set . • See the...
...sponge. 35 "F -" and a number or letter flash in the lower back of time. If the function error code repeats, call for at least 30 seconds and then reconnect power. Allow the oven to self-clean again or for one hour. Open the windows to the right. Wait until the...-clean The oven temperature is normal. Wipe up heavy spillovers before starting the clean cycle. "Crackling" or "popping" sound This is the sound of the range section. • Reposition the drawer. Oven controls improperly set a self-clean operation. • Allow the oven to cool to set . • See the...

