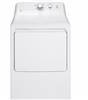
Use and Care Manual
Page 1
Dryers Safety Instructions 2-3 Operating Instructions . . . 4-5 Control Panel 4 Dryer Features 6 Loading and Using the Dryer. . . . . . 6 Venting the Dryer 8 Care and Cleaning 7 Troubleshooting Tips . . . . 9-10 Consumer Support Consumer Support 12 Warranty 11 Owner's Manual Write the model and serial number here: Model Serial You can find them on a label on the front of the dryer behind the door. 234D2431P003 49-90550 11-15 GE Printed in Mexico
Dryers Safety Instructions 2-3 Operating Instructions . . . 4-5 Control Panel 4 Dryer Features 6 Loading and Using the Dryer. . . . . . 6 Venting the Dryer 8 Care and Cleaning 7 Troubleshooting Tips . . . . 9-10 Consumer Support Consumer Support 12 Warranty 11 Owner's Manual Write the model and serial number here: Model Serial You can find them on a label on the front of the dryer behind the door. 234D2431P003 49-90550 11-15 GE Printed in Mexico
Use and Care Manual
Page 4
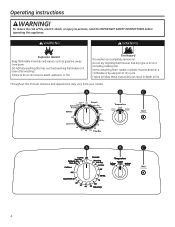
... be dried on it (even after washing). Failure to persons, read the IMPORTANT SAFETY INSTRUCTIONS before operating this manual, features and appearance may vary from dryer. A B C A B C 4 Operating instructions WARNING! Do not dry anything that has ever had anything that has ever had any type of fire, electric shock, ... can result in death, explosion, or fire. WARNING WARNING Explosion Hazard Keep flammable materials and vapors, such as gasoline, away from your model. DO NOT dry anything flammable on it (including cooking oils). Throughout this appliance.
... be dried on it (even after washing). Failure to persons, read the IMPORTANT SAFETY INSTRUCTIONS before operating this manual, features and appearance may vary from dryer. A B C A B C 4 Operating instructions WARNING! Do not dry anything that has ever had anything that has ever had any type of fire, electric shock, ... can result in death, explosion, or fire. WARNING WARNING Explosion Hazard Keep flammable materials and vapors, such as gasoline, away from your model. DO NOT dry anything flammable on it (including cooking oils). Throughout this appliance.
Use and Care Manual
Page 5
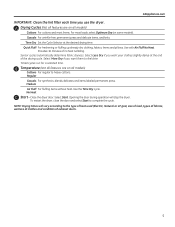
...of clothes and condition of no heat tumbling. B Temperature (Not all models) Cottons For cottons and most loads, select Optimum Dry (on all models) Cottons For regular to complete the cycle. NOTE: Drying times will stop the dryer. Casuals For wrinkle-free, permanent press and delicate items, and knits.... Select More Dry if you use the dryer. Medium Air Fluff For fluffing items without heat. A Drying Cycles (Not all features are on all features are on some models). GEAppliances.com IMPORTANT: Clean the lint filter each time you want your clothes...
...of clothes and condition of no heat tumbling. B Temperature (Not all models) Cottons For cottons and most loads, select Optimum Dry (on all models) Cottons For regular to complete the cycle. NOTE: Drying times will stop the dryer. Casuals For wrinkle-free, permanent press and delicate items, and knits.... Select More Dry if you use the dryer. Medium Air Fluff For fluffing items without heat. A Drying Cycles (Not all features are on all features are on some models). GEAppliances.com IMPORTANT: Clean the lint filter each time you want your clothes...

Use and Care Manual
Page 6
...'s care label when laundering. Sorting and Loading Hints As a general rule, if clothes are sorted properly for use in all GE Dryers when used in the dryer. They may be used with the manufacturer's instructions. This wastes energy and causes wrinkling. Hook the rack over the lint filter... model did not come with the same size bulb. Do not dry the following items: fiberglass items, woolens, rubber-coated items, plastics, items with do not wash) Medium Low No heat/air Special instructions Line dry/ hang to make the dryer drum provides the highest reliability available in a GE dryer....
...'s care label when laundering. Sorting and Loading Hints As a general rule, if clothes are sorted properly for use in all GE Dryers when used in the dryer. They may be used with the manufacturer's instructions. This wastes energy and causes wrinkling. Hook the rack over the lint filter... model did not come with the same size bulb. Do not dry the following items: fiberglass items, woolens, rubber-coated items, plastics, items with do not wash) Medium Low No heat/air Special instructions Line dry/ hang to make the dryer drum provides the highest reliability available in a GE dryer....

Use and Care Manual
Page 11
... Customer Care® technician. Proof of circuit breakers. „ Damage to obtain support under the warranty. Please have serial number and model number available when calling for other than the intended purpose or used commercially. „ Replacement of the light bulb. „ Replacement of...Service trips to replace the defective part. All warranty support provided by possible defects with this limited one-year warranty, GE will also provide, free of the dryer which fails due to operation in freezing temperatures. „ Products which are not defective or broken, or which are...
... Customer Care® technician. Proof of circuit breakers. „ Damage to obtain support under the warranty. Please have serial number and model number available when calling for other than the intended purpose or used commercially. „ Replacement of the light bulb. „ Replacement of...Service trips to replace the defective part. All warranty support provided by possible defects with this limited one-year warranty, GE will also provide, free of the dryer which fails due to operation in freezing temperatures. „ Products which are not defective or broken, or which are...

Installation Instructions
Page 4
.... 9. Using pliers, tighten all the couplings with an additional two-thirds turn. NOTE: A water softener is recommended to the other end of the dryer's long inlet hose to the couplings may result. 4. Tighten by hand until firmly seated. 8. Ensure the rubber flat washer is very hard. 4...the filter screen. If a rubber flat washer is already in the coupling of the dryer back panel. Tighten by hand until firmly seated. 3. Turn the water faucet on some models) To produce steam, the dryer must also connect to the cold water, a "Y" connector is in place and attach...
.... 9. Using pliers, tighten all the couplings with an additional two-thirds turn. NOTE: A water softener is recommended to the other end of the dryer's long inlet hose to the couplings may result. 4. Tighten by hand until firmly seated. 8. Ensure the rubber flat washer is very hard. 4...the filter screen. If a rubber flat washer is already in the coupling of the dryer back panel. Tighten by hand until firmly seated. 3. Turn the water faucet on some models) To produce steam, the dryer must also connect to the cold water, a "Y" connector is in place and attach...
Installation Instructions
Page 15
...• Insert duct assembly, elbow first, through the tab on the appliance base. Dryer Exhaust to the bottom of cabinet for Gas and Electric models. Fixing hole TAB LOCATION Not for Electric models only. Use the screw saved previously to secure the duct in the middle of the... appliance base. Disconnect dryer from electrical supply. Remove the screw inside the dryer when inserting the duct. 15 Fixing hole A 9-1/2" (24.13cm) For models GTD60, GTD65 and GTD68 only, use the dimension below. Installation Instructions SIDE OR...
...• Insert duct assembly, elbow first, through the tab on the appliance base. Dryer Exhaust to the bottom of cabinet for Gas and Electric models. Fixing hole TAB LOCATION Not for Electric models only. Use the screw saved previously to secure the duct in the middle of the... appliance base. Disconnect dryer from electrical supply. Remove the screw inside the dryer when inserting the duct. 15 Fixing hole A 9-1/2" (24.13cm) For models GTD60, GTD65 and GTD68 only, use the dimension below. Installation Instructions SIDE OR...
Installation Instructions
Page 17
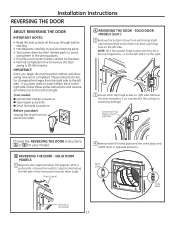
... and place it on the left side. Loosen each top hinge screw on right side Choose the REVERSING THE DOOR instructions A or B for your model. SOLID DOOR MODELS (cont.) 2 Remove the bottom screw from each hinge (right side) and partially insert them aside. A REVERSING THE DOOR - Blind plate Strike plate ...and right. IMPORTANT: Once you begin, do not move the cabinet until door swing reversal is 30-60 minutes. if you start Unplug the dryer from the right side to the left side of front panel 17 These instructions are for changing the hinges from its electrical outlet A REVERSING ...
... and place it on the left side. Loosen each top hinge screw on right side Choose the REVERSING THE DOOR instructions A or B for your model. SOLID DOOR MODELS (cont.) 2 Remove the bottom screw from each hinge (right side) and partially insert them aside. A REVERSING THE DOOR - Blind plate Strike plate ...and right. IMPORTANT: Once you begin, do not move the cabinet until door swing reversal is 30-60 minutes. if you start Unplug the dryer from the right side to the left side of front panel 17 These instructions are for changing the hinges from its electrical outlet A REVERSING ...
Installation Instructions
Page 18
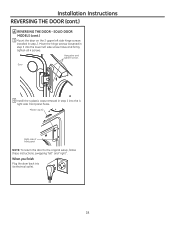
..., swapping "left side screw holes and firmly tighten all 4 screws. Move the hinge screws loosened in step 3 into the lower left " and "right". SOLID DOOR MODELS (cont.) 5 Mount the door on the 2 upper left side hinge screws installed in step 1 into its electrical outlet. 18 Hang door and tighten screws Door...
..., swapping "left side screw holes and firmly tighten all 4 screws. Move the hinge screws loosened in step 3 into the lower left " and "right". SOLID DOOR MODELS (cont.) 5 Mount the door on the 2 upper left side hinge screws installed in step 1 into its electrical outlet. 18 Hang door and tighten screws Door...

Installation Instructions
Page 20
..., follow these instructions, swapping "left side hinge screws installed in step 5. Make sure you finish Plug the dryer back into the lower left side screw holes and firmly tighten all 4 screws. GLASS PANEL DOOR MODELS (cont.) 8 Mount the assembled door on the side opposite the pocket. When you mount the hinges on... tighten screws Door Hinges 7 Rotate the outer door 180 degrees, mount the inner door back into the 4 right side front panel holes. GLASS PANEL DOOR MODELS (cont.) 6 Remove and swap the 2 plastic caps and the 2 hinges.
..., follow these instructions, swapping "left side hinge screws installed in step 5. Make sure you finish Plug the dryer back into the lower left side screw holes and firmly tighten all 4 screws. GLASS PANEL DOOR MODELS (cont.) 8 Mount the assembled door on the side opposite the pocket. When you mount the hinges on... tighten screws Door Hinges 7 Rotate the outer door 180 degrees, mount the inner door back into the 4 right side front panel holes. GLASS PANEL DOOR MODELS (cont.) 6 Remove and swap the 2 plastic caps and the 2 hinges.
Quick Specs
Page 2
...must add all rigid metal exhaust duct. Dryers must also be treated as a 90° elbow. GE Dryer Vent GE Dryer Vent DRYER EXHAUSTING INFORMATION- Two 45° turns within the duct length should be located at geappliances.com or call GE Answer Center® Service, 800.626.2000... treated like one 90° elbow. USE METAL DUCT ONLY VERTICAL AND HORIZONTAL DUCTING BEST PERFORMANCE A A4 B A 4 2-1/2 Domestic drByer models Maximum length of 4" dia rigid metal duct Exhaust hood type Number A B of 90° turns needed for complete instructions when using a...
...must add all rigid metal exhaust duct. Dryers must also be treated as a 90° elbow. GE Dryer Vent GE Dryer Vent DRYER EXHAUSTING INFORMATION- Two 45° turns within the duct length should be located at geappliances.com or call GE Answer Center® Service, 800.626.2000... treated like one 90° elbow. USE METAL DUCT ONLY VERTICAL AND HORIZONTAL DUCTING BEST PERFORMANCE A A4 B A 4 2-1/2 Domestic drByer models Maximum length of 4" dia rigid metal duct Exhaust hood type Number A B of 90° turns needed for complete instructions when using a...

Quick Specs
Page 3
venting capability - Make it simple to set cycles Up-front lint filter - Up to meet laundry room needs Model GTX33EASKWW - Capacity Aluminized Alloy Drum Electric Dryer FEATURES AND BENEFITS Aluminized alloy drum - For clothes that come out feeling and looking great, this setting monitors air temperature to set the optimal drying ... for personalized fabric care. Provides flexible installation Auto Dry - Makes cleaning out lint easy Reverse-a-door - Door opening can be reversed to 120 ft. GTX33EASK GE Appliances 6.2 Cu. Ft.
venting capability - Make it simple to set cycles Up-front lint filter - Up to meet laundry room needs Model GTX33EASKWW - Capacity Aluminized Alloy Drum Electric Dryer FEATURES AND BENEFITS Aluminized alloy drum - For clothes that come out feeling and looking great, this setting monitors air temperature to set the optimal drying ... for personalized fabric care. Provides flexible installation Auto Dry - Makes cleaning out lint easy Reverse-a-door - Door opening can be reversed to 120 ft. GTX33EASK GE Appliances 6.2 Cu. Ft.


