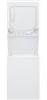
Use and Care Manual
Page 4
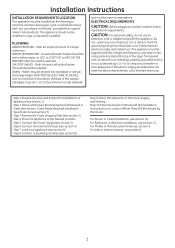
... the possibility of electric shock, unplug this appliance if it is damaged, malfunctioning, partially disassembled, or has missing or broken parts, including a damaged cord or plug. n If yours is a gas dryer, it is equipped with combustible or explosive substances (such as vinegar and/or rust remover. Burns... vicinity of the lint filter). n The laundry process can be put in your hand in this appliance. n You may result from the power supply or disconnect the appliance at least once a year by clothing during operation. n Do not place items exposed to soften your dryer. ...
... the possibility of electric shock, unplug this appliance if it is damaged, malfunctioning, partially disassembled, or has missing or broken parts, including a damaged cord or plug. n If yours is a gas dryer, it is equipped with combustible or explosive substances (such as vinegar and/or rust remover. Burns... vicinity of the lint filter). n The laundry process can be put in your hand in this appliance. n You may result from the power supply or disconnect the appliance at least once a year by clothing during operation. n Do not place items exposed to soften your dryer. ...
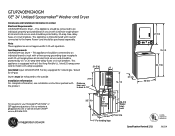
Quick Specs
Page 1
... service and should be connected to the frame. Power cord should be protected by Underwriters Laboratories 360329 or 20-amp time-delay fuses or circuit breakers. listed 20-amp power cord to your Monogram,® GE Profile™ or GE® appliance questions, visit our website at geappliances....com or call GE Answer Center® service, 800.626.2000. 27-1/4 23-3/4 32-7/10 ...
... service and should be connected to the frame. Power cord should be protected by Underwriters Laboratories 360329 or 20-amp time-delay fuses or circuit breakers. listed 20-amp power cord to your Monogram,® GE Profile™ or GE® appliance questions, visit our website at geappliances....com or call GE Answer Center® service, 800.626.2000. 27-1/4 23-3/4 32-7/10 ...
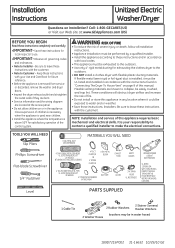
Installation Instructions
Page 1
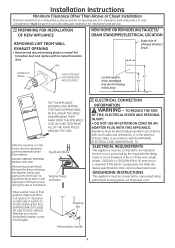
... qualified installer to leave these instructions with the instructions found in water hoses) 2 Washer Hoses 189D7219P002 31-16652 10/29/10 GE These conditions will obstruct dryer airflow and increase the risk of fire. • Do not install or store this appliance in the...TRANSITION DUCT (IF NEEDED.) 4" COVER PLATE (IF NEEDED) (KIT WE1M454) DUCT TAPE EXHAUST HOOD SAFETY GLASSES GLOVES 3/4" STRAIN RELIEF UL RECOGNIZED APPLIANCE POWER CORD KIT (NOT PROVIDED) UL RATED 120/240V,30A WITH 3 OR 4 PRONGS. Be sure to Customer - Save these instructions completely and carefully. ...
... qualified installer to leave these instructions with the instructions found in water hoses) 2 Washer Hoses 189D7219P002 31-16652 10/29/10 GE These conditions will obstruct dryer airflow and increase the risk of fire. • Do not install or store this appliance in the...TRANSITION DUCT (IF NEEDED.) 4" COVER PLATE (IF NEEDED) (KIT WE1M454) DUCT TAPE EXHAUST HOOD SAFETY GLASSES GLOVES 3/4" STRAIN RELIEF UL RECOGNIZED APPLIANCE POWER CORD KIT (NOT PROVIDED) UL RATED 120/240V,30A WITH 3 OR 4 PRONGS. Be sure to Customer - Save these instructions completely and carefully. ...
Installation Instructions
Page 2
... Location Where They Will Be Noticed By the Owner. Do not, under any circumstances, cut or remove the third grounding prong from the power cord. or 20-amp circuit breaker or time-delay fuse. If the electric supply provided does not meet the above the base of the dryer...External Exhaust is Clean (see section 1) and Meets Attached Installation Specifications (see section 2). Step 5 Connect the Power Supply (see section 3). CAUTION: For personal safety, do not use an extension cord or adapter plug with the voltage and frequency indicated on the rating plate (located at 120° to ...
... Location Where They Will Be Noticed By the Owner. Do not, under any circumstances, cut or remove the third grounding prong from the power cord. or 20-amp circuit breaker or time-delay fuse. If the electric supply provided does not meet the above the base of the dryer...External Exhaust is Clean (see section 1) and Meets Attached Installation Specifications (see section 2). Step 5 Connect the Power Supply (see section 3). CAUTION: For personal safety, do not use an extension cord or adapter plug with the voltage and frequency indicated on the rating plate (located at 120° to ...
Installation Instructions
Page 4
... with UL listed transition duct . rear. Make sure there is in place during the rest of washer to a grounded metal, permanent wiring system, via the power cord. 4 Keep bar so it can be connected to provide adequate clearance for air opening to hold tub in the home, remove remaining packing material/carton... back in tub and parts opening are: 0 in. TO REDUCE THE RISK OF FIRE, ELECTRICAL SHOCK AND PERSONAL INJURY: • DO NOT USE AN EXTENSION CORD OR AN ADAPTER PLUG WITH THIS APPLIANCE.
... with UL listed transition duct . rear. Make sure there is in place during the rest of washer to a grounded metal, permanent wiring system, via the power cord. 4 Keep bar so it can be connected to provide adequate clearance for air opening to hold tub in the home, remove remaining packing material/carton... back in tub and parts opening are: 0 in. TO REDUCE THE RISK OF FIRE, ELECTRICAL SHOCK AND PERSONAL INJURY: • DO NOT USE AN EXTENSION CORD OR AN ADAPTER PLUG WITH THIS APPLIANCE.

Installation Instructions
Page 5
...1996, the National Electric code requires that the new constructions utilize a 4-wire connection to power cord entry hole. WARNING:Only a 4-conductor cord shall be used when the appliance is prohibited. Remove the power cord cover located at the lower back. 4. Keep the green ground screw for the new ...neutral (center) terminal of the terminal block (marked L1 and L2). Tighten all terminal block screws (3) completely. 7. Properly secure power cord to power cord entry hole. WARNING: NEVER LEAVE THE COVER OFF OF THE TERMINAL BLOCK. COVER 3 #10 AWG MINIMUM COPPER CONDUCTORS OR 120/240V 30A...
...1996, the National Electric code requires that the new constructions utilize a 4-wire connection to power cord entry hole. WARNING:Only a 4-conductor cord shall be used when the appliance is prohibited. Remove the power cord cover located at the lower back. 4. Keep the green ground screw for the new ...neutral (center) terminal of the terminal block (marked L1 and L2). Tighten all terminal block screws (3) completely. 7. Properly secure power cord to power cord entry hole. WARNING: NEVER LEAVE THE COVER OFF OF THE TERMINAL BLOCK. COVER 3 #10 AWG MINIMUM COPPER CONDUCTORS OR 120/240V 30A...


