Use and Care Manual
Page 1
... the refrigerator compartment. Refr Top-Freezer igerators GEAppliances.com Safety Instructions 2-4 Operating Instructions Automatic Icemaker 9 Controls 5 Crispers and Pans 7, 8 Shelves and Bins 6 Care and Cleaning Care and Cleaning 10, 11 Replacing the Light Bulb 11 Installation Instructions Icemaker Installation 13-16 Preparing to Install the Refrigerator 12 Reversing the Door Swing . . . .21-25 Water Line...
... the refrigerator compartment. Refr Top-Freezer igerators GEAppliances.com Safety Instructions 2-4 Operating Instructions Automatic Icemaker 9 Controls 5 Crispers and Pans 7, 8 Shelves and Bins 6 Care and Cleaning Care and Cleaning 10, 11 Replacing the Light Bulb 11 Installation Instructions Icemaker Installation 13-16 Preparing to Install the Refrigerator 12 Reversing the Door Swing . . . .21-25 Water Line...
Use and Care Manual
Page 2
...Keep fingers out of the "pinch point" areas; Be careful closing doors when children are in the freezer compartment when hands are necessarily small. WARNING! They could damage the refrigerator and seriously injure themselves. ■ Do not touch the cold surfaces in the area. ■ ...are damp or wet. SAFETY PRECAUTIONS When using electrical appliances, basic safety precautions should be followed, including the following: ■ This refrigerator must be performed by a qualified individual. ■ Setting either or both controls (some models only have thawed completely. 2 Do not...
...Keep fingers out of the "pinch point" areas; Be careful closing doors when children are in the freezer compartment when hands are necessarily small. WARNING! They could damage the refrigerator and seriously injure themselves. ■ Do not touch the cold surfaces in the area. ■ ...are damp or wet. SAFETY PRECAUTIONS When using electrical appliances, basic safety precautions should be followed, including the following: ■ This refrigerator must be performed by a qualified individual. ■ Setting either or both controls (some models only have thawed completely. 2 Do not...

Use and Care Manual
Page 3
...removed prior to help prevent accidents. USE OF EXTENSION CORDS Because of potential safety hazards under federal law must use of an old refrigeration product, check with the company handling the disposal about what to do. ■ Take off the doors. ■ Leave the...if you are still dangerous...even if they will sit for "just a few days." Before You Throw Away Your Old Refrigerator or Freezer: Refrigerants All refrigeration products contain refrigerants, which under certain conditions, we strongly recommend against the use an extension cord, it is absolutely necessary that it be ...
...removed prior to help prevent accidents. USE OF EXTENSION CORDS Because of potential safety hazards under federal law must use of an old refrigeration product, check with the company handling the disposal about what to do. ■ Take off the doors. ■ Leave the...if you are still dangerous...even if they will sit for "just a few days." Before You Throw Away Your Old Refrigerator or Freezer: Refrigerants All refrigeration products contain refrigerants, which under certain conditions, we strongly recommend against the use an extension cord, it is absolutely necessary that it be ...
Use and Care Manual
Page 4
... replaced with a standard 3-prong (grounding) wall outlet to roll over or damage the power cord. Never unplug your refrigerator by a qualified electrician to make sure the outlet is your personal responsibility and obligation to have become frayed or otherwise .... SAVE THESE INSTRUCTIONS 4 Consumer Support Troubleshooting Tips Installation Instructions Operating Instructions Safety Instructions IMPORTANT SAFETY INFORMATION. The refrigerator should always be properly grounded. READ AND FOLLOW THIS SAFETY INFORMATION CAREFULLY. The power cord of electric shock ...
... replaced with a standard 3-prong (grounding) wall outlet to roll over or damage the power cord. Never unplug your refrigerator by a qualified electrician to make sure the outlet is your personal responsibility and obligation to have become frayed or otherwise .... SAVE THESE INSTRUCTIONS 4 Consumer Support Troubleshooting Tips Installation Instructions Operating Instructions Safety Instructions IMPORTANT SAFETY INFORMATION. The refrigerator should always be properly grounded. READ AND FOLLOW THIS SAFETY INFORMATION CAREFULLY. The power cord of electric shock ...
Use and Care Manual
Page 5
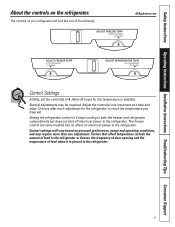
... and the temperature of the following: GEAppliances.com 4 4 4 Control Settings Initially, set . Factors that affect temperature include the amount of food in both the freezer and refrigerator compartments but does not shut off electrical power to reach the temperature you have set the control(s) at a time and allow 12 hours after each...
... and the temperature of the following: GEAppliances.com 4 4 4 Control Settings Initially, set . Factors that affect temperature include the amount of food in both the freezer and refrigerator compartments but does not shut off electrical power to reach the temperature you have set the control(s) at a time and allow 12 hours after each...
Use and Care Manual
Page 6
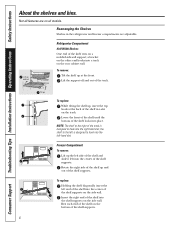
...the rear cabinet wall. To remove: Tilt the shelf up and out of the shelf in the refrigerator and freezer compartments are on a molded side-wall support; the shelf to the left is designed to hook... the center of the shelf into the left-hand slot. Not all models. Lift up and out Refrigerator Compartment Half-Width Shelves One end of the track is designed to hook into a track on the ... shelf to the right of the shelf rests on all features are adjustable. Freezer Compartment To remove: Lift up , insert the top hook at the front. Tilt up To replace: While tilting the shelf up...
...the rear cabinet wall. To remove: Tilt the shelf up and out of the shelf in the refrigerator and freezer compartments are on a molded side-wall support; the shelf to the left is designed to hook... the center of the shelf into the left-hand slot. Not all models. Lift up and out Refrigerator Compartment Half-Width Shelves One end of the track is designed to hook into a track on the ... shelf to the right of the shelf rests on all features are adjustable. Freezer Compartment To remove: Lift up , insert the top hook at the front. Tilt up To replace: While tilting the shelf up...
Use and Care Manual
Page 8
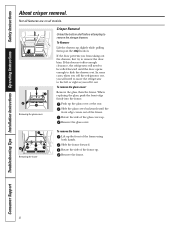
... the frame. Remove the frame. 8 Slide the frame forward. Remove the glass cover. If this does not offer enough clearance, the refrigerator will need to be rolled forward until the front edge comes out of the glass cover up . Slide the glass cover backwards until the... Installation Instructions Operating Instructions Safety Instructions About crisper removal. Not all features are on all models. In some cases, when you roll the refrigerator out, you from taking out the drawers, first try to remove the storage drawers. To remove the glass cover: Remove the glass, ...
... the frame. Remove the frame. 8 Slide the frame forward. Remove the glass cover. If this does not offer enough clearance, the refrigerator will need to be rolled forward until the front edge comes out of the glass cover up . Slide the glass cover backwards until the... Installation Instructions Operating Instructions Safety Instructions About crisper removal. Not all features are on all models. In some cases, when you roll the refrigerator out, you from taking out the drawers, first try to remove the storage drawers. To remove the glass cover: Remove the glass, ...
Use and Care Manual
Page 9
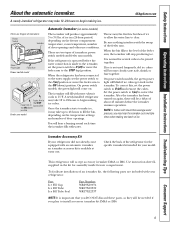
...water supply, set the power switch to be needed for your refrigerator: Part Ice Fill Cup Ice Fill Tube Ice Fill Tube Seal Part Number WR29X10074 WR17X12339 WR17X12337 NOTE: It is normal for assembly inside freezer compartment. Be sure nothing interferes with lower-than-average water pressure,... power switch to O (off ) and remove the cubes. The icemaker will produce approximately 3 to the ON (down) position. A newly-installed refrigerator may take 12-24 hours to install accessory icemaker kit IM4A or IM6. 9 GEAppliances.com There are included with water. If ice is not used...
...water supply, set the power switch to be needed for your refrigerator: Part Ice Fill Cup Ice Fill Tube Ice Fill Tube Seal Part Number WR29X10074 WR17X12339 WR17X12337 NOTE: It is normal for assembly inside freezer compartment. Be sure nothing interferes with lower-than-average water pressure,... power switch to O (off ) and remove the cubes. The icemaker will produce approximately 3 to the ON (down) position. A newly-installed refrigerator may take 12-24 hours to install accessory icemaker kit IM4A or IM6. 9 GEAppliances.com There are included with water. If ice is not used...
Use and Care Manual
Page 10
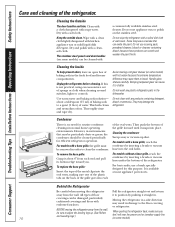
...both cleans and neutralizes odors. Handle glass shelves carefully. Do not clean with any plastic refrigerator parts in environments that can scratch and weaken the paint finish. To replace the base grille: Insert the tops of the metal clips into the oval vents, making sure one of the plastic tabs ... For models without a base grille, reach the condenser by pushing it snaps into the oval holes. They may result in the fresh food and freezer compartments. For models with a base grille, the grille must be sure to position by inserting a brush or vacuum hose under the bottom of ...
...both cleans and neutralizes odors. Handle glass shelves carefully. Do not clean with any plastic refrigerator parts in environments that can scratch and weaken the paint finish. To replace the base grille: Insert the tops of the metal clips into the oval vents, making sure one of the plastic tabs ... For models without a base grille, reach the condenser by pushing it snaps into the oval holes. They may result in the fresh food and freezer compartments. For models with a base grille, the grille must be sure to position by inserting a brush or vacuum hose under the bottom of ...
Use and Care Manual
Page 11
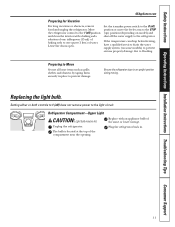
...circuit. The bulb is located at the top of water. Safety Instructions Operating Instructions Installation Instructions Troubleshooting Tips Consumer Support GEAppliances.com Preparing for Vacation For long vacations or absences, remove food and unplug the refrigerator. Plug the refrigerator back in place to one quart (1... (on model) and shut off the water supply to flooding. Replacing the light bulb. Refrigerator Compartment-Upper Light CAUTION: Light bulb may be hot. Be sure the refrigerator stays in an upright position during moving. Set the icemaker power switch to the O (off...
...circuit. The bulb is located at the top of water. Safety Instructions Operating Instructions Installation Instructions Troubleshooting Tips Consumer Support GEAppliances.com Preparing for Vacation For long vacations or absences, remove food and unplug the refrigerator. Plug the refrigerator back in place to one quart (1... (on model) and shut off the water supply to flooding. Replacing the light bulb. Refrigerator Compartment-Upper Light CAUTION: Light bulb may be hot. Be sure the refrigerator stays in an upright position during moving. Set the icemaker power switch to the O (off...
Use and Care Manual
Page 12
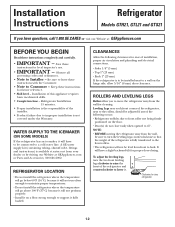
...• Sides 1/8″ (3 mm) • Top 1″ (25 mm) • Back 1″ (25 mm) If the refrigerator is to be connected to the front rollers. • The refrigerator will have questions, call 1.800.GE.CARES or visit our Website at extra cost from ...counterclockwise to back. Save these instructions with the Consumer. • Note to Installer - Installation Instructions Refrigerator Models GTH21, GTL21 and GTS21 If you to raise refrigerator 12 A GE water supply kit (containing tubing, shutoff valve, fittings and instructions) is not covered under the Warranty...
...• Sides 1/8″ (3 mm) • Top 1″ (25 mm) • Back 1″ (25 mm) If the refrigerator is to be connected to the front rollers. • The refrigerator will have questions, call 1.800.GE.CARES or visit our Website at extra cost from ...counterclockwise to back. Save these instructions with the Consumer. • Note to Installer - Installation Instructions Refrigerator Models GTH21, GTL21 and GTS21 If you to raise refrigerator 12 A GE water supply kit (containing tubing, shutoff valve, fittings and instructions) is not covered under the Warranty...
Use and Care Manual
Page 13
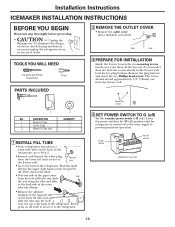
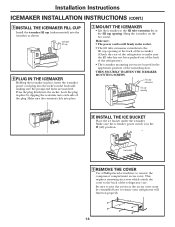
...hole near the top at the back of electric shock during installation, you must unplug the refrigerator from the lower left back corner of the refrigerator. To eliminate the danger of the refrigerator. Then discard the label. • Peel one side of the paper away Seal from the freezer wall. 1 ...Mounting screws 2 NO. Unplug the Refrigerator. If your model does not have the screws already in the freezer wall, look for wire tie (Appearance may vary) 13 Remove the plug buttons ...
...hole near the top at the back of electric shock during installation, you must unplug the refrigerator from the lower left back corner of the refrigerator. To eliminate the danger of the refrigerator. Then discard the label. • Peel one side of the paper away Seal from the freezer wall. 1 ...Mounting screws 2 NO. Unplug the Refrigerator. If your model does not have the screws already in the freezer wall, look for wire tie (Appearance may vary) 13 Remove the plug buttons ...
Use and Care Manual
Page 14
... in place, insert the icemaker power cord plug into the fill cup opening at the back of the icemaker. (Check the rear of the refrigerator to make sure the fill tube has not been pushed out of the back of the mounting slots. Fill tube extension Fill cup opening . ... sure the restraints click into place. 7 MOUNT THE ICEMAKER • Lift the icemaker so the fill tube extension fits in the uppermost position of the refrigerator). • The icemaker mounting screws are matched. Icemaker fill cup 6 PLUG IN THE ICEMAKER Holding the icemaker in the socket. • The fill tube...
... in place, insert the icemaker power cord plug into the fill cup opening at the back of the icemaker. (Check the rear of the refrigerator to make sure the fill tube has not been pushed out of the back of the mounting slots. Fill tube extension Fill cup opening . ... sure the restraints click into place. 7 MOUNT THE ICEMAKER • Lift the icemaker so the fill tube extension fits in the uppermost position of the refrigerator). • The icemaker mounting screws are matched. Icemaker fill cup 6 PLUG IN THE ICEMAKER Holding the icemaker in the socket. • The fill tube...
Use and Care Manual
Page 15
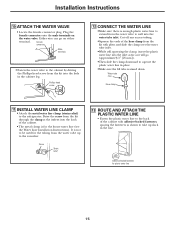
... the Phillips head screw from the kit through the clamp at the indent into the inlet as far as shown to take up to the refrigerator. Adhesive-backed fasteners for the tubing from the kit with pliers and slide the clamp over the water tube inlet. • While still squeezing the...
... the Phillips head screw from the kit through the clamp at the indent into the inlet as far as shown to take up to the refrigerator. Adhesive-backed fasteners for the tubing from the kit with pliers and slide the clamp over the water tube inlet. • While still squeezing the...
Use and Care Manual
Page 16
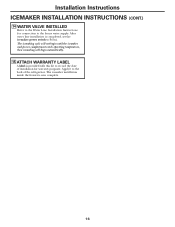
The icemaker installation inside the freezer is provided with this kit to the back of installation for connection to I (on). Installation Instructions ICEMAKER INSTALLATION INSTRUCTIONS (CONT.) 14 WATER VALVE INSTALLED Refer ... line installation is completed, set the icemaker power switch to the home water supply. Apply it to record the date of the refrigerator. The icemaking cycle will not begin until the icemaker and freezer compartment reach operating temperature, then icemaking will begin automatically. 15 ATTACH WARRANTY LABEL A label is now complete. 16
The icemaker installation inside the freezer is provided with this kit to the back of installation for connection to I (on). Installation Instructions ICEMAKER INSTALLATION INSTRUCTIONS (CONT.) 14 WATER VALVE INSTALLED Refer ... line installation is completed, set the icemaker power switch to the home water supply. Apply it to record the date of the refrigerator. The icemaking cycle will not begin until the icemaker and freezer compartment reach operating temperature, then icemaking will begin automatically. 15 ATTACH WARRANTY LABEL A label is now complete. 16
Use and Care Manual
Page 17
... both ends of the tubing are cut square. Be sure there is double insulated or grounded in the following lengths: 2′ (.6 m) - GE SmartConnect™ Refrigerator Tubing Kits are GE SmartConnect™ Refrigerator Tubing (WX08X10002, WX08X10006, WX08X10015 and WX08X10025). Certain types of plastic will crack or rupture with local plumbing code requirements. This water line...
... both ends of the tubing are cut square. Be sure there is double insulated or grounded in the following lengths: 2′ (.6 m) - GE SmartConnect™ Refrigerator Tubing Kits are GE SmartConnect™ Refrigerator Tubing (WX08X10002, WX08X10006, WX08X10015 and WX08X10025). Certain types of plastic will crack or rupture with local plumbing code requirements. This water line...
Use and Care Manual
Page 18
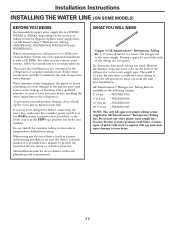
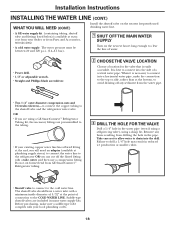
... ice production or smaller cubes. • Shutoff valve to connect to the cold water line. Do not cut off any burrs resulting from GE SmartConnect™ Refrigerator tubing. 3 DRILL THE HOLE FOR THE VALVE Drill a 1/4″ hole in the pipe. Remove any sediment from your local plumbing codes....the point of connection to the COLD WATER LINE. Before purchasing, make the connection to the top or side, rather than at plumbing supply stores) to connect the water line to the refrigerator OR you are using a sharp bit. Installation Instructions INSTALLING THE WATER LINE (CONT.) WHAT YOU...
... ice production or smaller cubes. • Shutoff valve to connect to the cold water line. Do not cut off any burrs resulting from GE SmartConnect™ Refrigerator tubing. 3 DRILL THE HOLE FOR THE VALVE Drill a 1/4″ hole in the pipe. Remove any sediment from your local plumbing codes....the point of connection to the COLD WATER LINE. Before purchasing, make the connection to the top or side, rather than at plumbing supply stores) to connect the water line to the refrigerator OR you are using a sharp bit. Installation Instructions INSTALLING THE WATER LINE (CONT.) WHAT YOU...
Use and Care Manual
Page 19
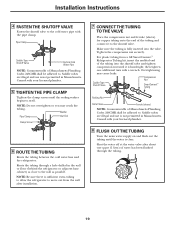
...use is hand-tight; Consult with your licensed plumber. 5 TIGHTEN THE PIPE CLAMP Tighten the clamp screws until it to move out from a GE SmartConnect™ Refrigerator Tubing kit, insert the molded end of water has been flushed through a hole drilled in the wall or floor (behind the...to the wall as possible. Washer Pipe Clamp Inlet End Clamp Screw 6 ROUTE THE TUBING Route the tubing between the cold water line and the refrigerator. then tighten one quart (1 liter) of the tubing into the valve. Shut the water off at the water valve after installation. 7 CONNECT ...
...use is hand-tight; Consult with your licensed plumber. 5 TIGHTEN THE PIPE CLAMP Tighten the clamp screws until it to move out from a GE SmartConnect™ Refrigerator Tubing kit, insert the molded end of water has been flushed through a hole drilled in the wall or floor (behind the...to the wall as possible. Washer Pipe Clamp Inlet End Clamp Screw 6 ROUTE THE TUBING Route the tubing between the cold water line and the refrigerator. then tighten one quart (1 liter) of the tubing into the valve. Shut the water off at the water valve after installation. 7 CONNECT ...
Use and Care Manual
Page 20
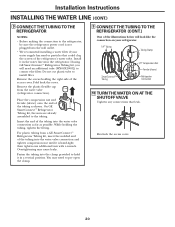
... kit, the nuts are already assembled to install filter. Remove the plastic flexible cap from a GE SmartConnect™ Refrigerator Tubing kit, insert the molded end of the tubing into the water valve connection as far as shown. then tighten one additional turn with... of the tubing as possible. While holding the right side of the access cover. For plastic tubing from the water valve (refrigerator connection). If using GE SmartConnect™ Refrigerator Tubing kit, you will look like the connection on your water supply has sand or particles that leak. You may cause leaks...
... kit, the nuts are already assembled to install filter. Remove the plastic flexible cap from a GE SmartConnect™ Refrigerator Tubing kit, insert the molded end of the tubing into the water valve connection as far as shown. then tighten one additional turn with... of the tubing as possible. While holding the right side of the access cover. For plastic tubing from the water valve (refrigerator connection). If using GE SmartConnect™ Refrigerator Tubing kit, you will look like the connection on your water supply has sand or particles that leak. You may cause leaks...
Use and Care Manual
Page 21
...door swing: • Read the instructions all the way through before use. The icemaker will then begin operation automatically. Unplug the refrigerator from this appliance is equipped with a 3-prong (grounding) plug that it reaches its electrical outlet. TOOLS YOU WILL NEED Phillips ...screwdriver 5/16″ socket and ratchet Masking tape Putty knife or thin-blade screwdriver 21 Installation Instructions 11 PLUG IN THE REFRIGERATOR Arrange the coil of tubing so that mates with a standard 3-prong (grounding) wall receptacle to avoid using...
...door swing: • Read the instructions all the way through before use. The icemaker will then begin operation automatically. Unplug the refrigerator from this appliance is equipped with a 3-prong (grounding) plug that it reaches its electrical outlet. TOOLS YOU WILL NEED Phillips ...screwdriver 5/16″ socket and ratchet Masking tape Putty knife or thin-blade screwdriver 21 Installation Instructions 11 PLUG IN THE REFRIGERATOR Arrange the coil of tubing so that mates with a standard 3-prong (grounding) wall receptacle to avoid using...


