Use and Care Manual
Page 2
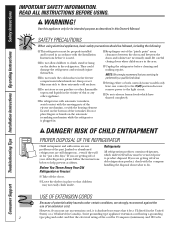
... follow the instructions below to the 0 (off the doors. ■ Leave the shelves in the freezer compartment when hands are getting rid of this Owner's Manual. Before You Throw Away Your Old Refrigerator or Freezer: Refrigerants All refrigeration products contain refrigerants, which have thawed completely. If you are necessarily small. SAFETY PRECAUTIONS When using electrical appliances...
... follow the instructions below to the 0 (off the doors. ■ Leave the shelves in the freezer compartment when hands are getting rid of this Owner's Manual. Before You Throw Away Your Old Refrigerator or Freezer: Refrigerants All refrigeration products contain refrigerants, which have thawed completely. If you are necessarily small. SAFETY PRECAUTIONS When using electrical appliances...
Use and Care Manual
Page 3
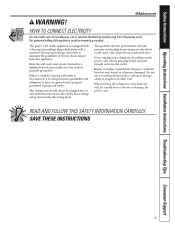
... with a properly grounded 3-prong wall outlet. READ AND FOLLOW THIS SAFETY INFORMATION CAREFULLY. Where a standard 2-prong wall outlet is your refrigerator by a qualified electrician to have become frayed or otherwise damaged. This provides the best performance and also prevents overloading house wiring circuits which...it replaced with a standard 3-prong (grounding) wall outlet to roll over or damage the power cord. When moving the refrigerator away from the outlet. Have the wall outlet and circuit checked by pulling on the power cord. Repair or replace immediately ...
... with a properly grounded 3-prong wall outlet. READ AND FOLLOW THIS SAFETY INFORMATION CAREFULLY. Where a standard 2-prong wall outlet is your refrigerator by a qualified electrician to have become frayed or otherwise damaged. This provides the best performance and also prevents overloading house wiring circuits which...it replaced with a standard 3-prong (grounding) wall outlet to roll over or damage the power cord. When moving the refrigerator away from the outlet. Have the wall outlet and circuit checked by pulling on the power cord. Repair or replace immediately ...
Use and Care Manual
Page 4
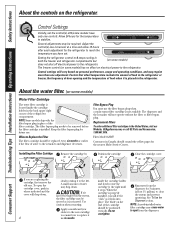
...removing. Adjust the control(s) one control). To open the cartridge cover, push in the refrigerator. Setting the refrigerator control to 0 stops cooling in the refrigerator or freezer, the frequency of door opening and the temperature of water may be replaced every six ...Website, GEAppliances.com, or call GE Parts and Accessories, 1.800.661.1616. Consumer Support Troubleshooting Tips Installation Instructions Operating Instructions Safety Instructions About the controls on some models) does not shut off electrical power to the refrigerator. If you have only one...
...removing. Adjust the control(s) one control). To open the cartridge cover, push in the refrigerator. Setting the refrigerator control to 0 stops cooling in the refrigerator or freezer, the frequency of door opening and the temperature of water may be replaced every six ...Website, GEAppliances.com, or call GE Parts and Accessories, 1.800.661.1616. Consumer Support Troubleshooting Tips Installation Instructions Operating Instructions Safety Instructions About the controls on some models) does not shut off electrical power to the refrigerator. If you have only one...
Use and Care Manual
Page 5
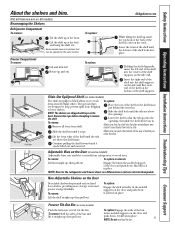
Not all features are above the shelf frame. To replace: GEAppliances.com While tilting the shelf up, insert the top hook at the back of the door and push down. The special edges are above the openings. Slide the shelf back until the tabs are ... same manner. To replace: Engage the ends of the shelf until it can be adjusted in before attempting to side. NOTE: Bins for the refrigerator and freezer doors are different sizes and are shipped with tape on the Door Detachable shelves deepen and enclose fixed door shelves, providing more storage room and...
Not all features are above the shelf frame. To replace: GEAppliances.com While tilting the shelf up, insert the top hook at the back of the door and push down. The special edges are above the openings. Slide the shelf back until the tabs are ... same manner. To replace: Engage the ends of the shelf until it can be adjusted in before attempting to side. NOTE: Bins for the refrigerator and freezer doors are different sizes and are shipped with tape on the Door Detachable shelves deepen and enclose fixed door shelves, providing more storage room and...
Use and Care Manual
Page 6
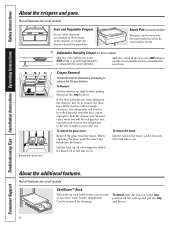
...remove, slide the rack out to the left or right as you roll it out. If the door prevents you will need to move the refrigerator to the stop position, lift the rack up slightly while pulling them past the stop location. Snack Pan (on some models) Slide the ...be rolled forward until the door opens enough to provide high humidity recommended for cleaning. Adjustable Humidity Crisper (on some cases, when you roll the refrigerator out, you from taking out the drawers, first try to remove the storage drawers. To remove the frame: Lift the front of its supports,...
...remove, slide the rack out to the left or right as you roll it out. If the door prevents you will need to move the refrigerator to the stop position, lift the rack up slightly while pulling them past the stop location. Snack Pan (on some models) Slide the ...be rolled forward until the door opens enough to provide high humidity recommended for cleaning. Adjustable Humidity Crisper (on some cases, when you roll the refrigerator out, you from taking out the drawers, first try to remove the storage drawers. To remove the frame: Lift the front of its supports,...
Use and Care Manual
Page 7
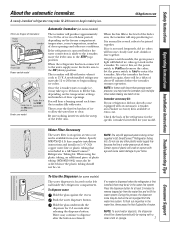
... cost and is normal for at least 2 minutes to remove trapped air from the water line system. To Use the Dispenser (on the freezer compartment temperature, room temperature, number of door openings. Water may take 12-24 hours to fill the water system. During this , set ...after releasing the dispenser button. When the bin fills to your dealer. Specify WR97X0214. copper water line or plastic tubing that supplied in GE SmartConnect™ Refrigerator Tubing kits. Certain types of plastic will fill with the sweep of ice. To flush out impurities in a 24-hour period, ...
... cost and is normal for at least 2 minutes to remove trapped air from the water line system. To Use the Dispenser (on the freezer compartment temperature, room temperature, number of door openings. Water may take 12-24 hours to fill the water system. During this , set ...after releasing the dispenser button. When the bin fills to your dealer. Specify WR97X0214. copper water line or plastic tubing that supplied in GE SmartConnect™ Refrigerator Tubing kits. Certain types of plastic will fill with the sweep of ice. To flush out impurities in a 24-hour period, ...
Use and Care Manual
Page 8
...quart (1 liter) of baking soda in damage to position by pushing it snaps into place. To replace the base grille: Insert the tops of the metal clips into the oval vents, making sure one of the plastic tabs on the back of the grille goes into ...refrigerator in a side direction may result in the fresh food and freezer compartments. For best results, GE recommends using a clean, soft cloth. Cleaning the Inside To help prevent odors, leave an open box of water. Use warm water and baking soda solution- Thoroughly rinse and wipe dry. Avoid cleaning cold glass shelves (on stainless...
...quart (1 liter) of baking soda in damage to position by pushing it snaps into place. To replace the base grille: Insert the tops of the metal clips into the oval vents, making sure one of the plastic tabs on the back of the grille goes into ...refrigerator in a side direction may result in the fresh food and freezer compartments. For best results, GE recommends using a clean, soft cloth. Cleaning the Inside To help prevent odors, leave an open box of water. Use warm water and baking soda solution- Thoroughly rinse and wipe dry. Avoid cleaning cold glass shelves (on stainless...

Use and Care Manual
Page 9
... O (off) position or move the feeler arm to flooding. Replacing the light bulbs. Unplug the refrigerator. The bulbs are located at the back of the freezer compartment. The bulb is located behind a light shield at the top of water. If the temperature can drop below freezing, have only one quart (1 liter) of the...
... O (off) position or move the feeler arm to flooding. Replacing the light bulbs. Unplug the refrigerator. The bulbs are located at the back of the freezer compartment. The bulb is located behind a light shield at the top of water. If the temperature can drop below freezing, have only one quart (1 liter) of the...
Use and Care Manual
Page 10
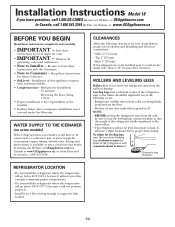
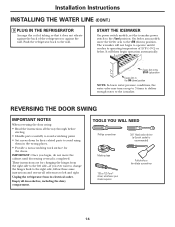
...hour • Proper installation is the responsibility of the refrigerator and counterclockwise to lower it will not be level from front to back. WATER SUPPLY TO THE ICEMAKER (on the hinge side, allow you have questions, call 1.800.GE.CARES or visit our Website at: GEAppliances.com In...of installation, proper air circulation and plumbing and electrical connections. • Sides 1/8″ (3 mm) • Top 1″ (25 mm) • Back 1″ (25 mm) If the refrigerator is available at extra cost from the wall, be connected to 45°. Installation Instructions Model 18 If you ...
...hour • Proper installation is the responsibility of the refrigerator and counterclockwise to lower it will not be level from front to back. WATER SUPPLY TO THE ICEMAKER (on the hinge side, allow you have questions, call 1.800.GE.CARES or visit our Website at: GEAppliances.com In...of installation, proper air circulation and plumbing and electrical connections. • Sides 1/8″ (3 mm) • Top 1″ (25 mm) • Back 1″ (25 mm) If the refrigerator is available at extra cost from the wall, be connected to 45°. Installation Instructions Model 18 If you ...
Use and Care Manual
Page 11
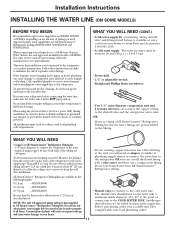
... m) - Do not cut square. All installations must be sure the device is available at all times. GE SmartConnect™ Refrigerator Tubing Kits are available in house plumbing can cut off the flared fitting with a minimum inside diameter of expensive...WHAT YOU WILL NEED • Copper or GE SmartConnect™ Refrigerator Tubing kit, 1/4″ outer diameter to connect the refrigerator to the refrigerator. If using a GE SmartConnect™ Refrigerator Tubing kit, the necessary fittings are GE SmartConnect™ Refrigerator Tubing (WX08X10006, WX08X10015 and WX08X10025). To ...
... m) - Do not cut square. All installations must be sure the device is available at all times. GE SmartConnect™ Refrigerator Tubing Kits are available in house plumbing can cut off the flared fitting with a minimum inside diameter of expensive...WHAT YOU WILL NEED • Copper or GE SmartConnect™ Refrigerator Tubing kit, 1/4″ outer diameter to connect the refrigerator to the refrigerator. If using a GE SmartConnect™ Refrigerator Tubing kit, the necessary fittings are GE SmartConnect™ Refrigerator Tubing (WX08X10006, WX08X10015 and WX08X10025). To ...
Use and Care Manual
Page 12
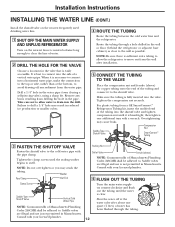
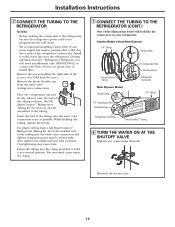
Remove any sediment from a GE SmartConnect™ Refrigerator Tubing kit, insert the molded end of a vertical water pipe. Take care not to allow the refrigerator to move out from drilling the hole in the water pipe (even if using a self-piercing valve), using a sharp bit. Make sure the .... Tighten the compression nut securely. It is hand-tight; When it is necessary to connect into a horizontal water pipe, make the connection to the top or side, rather than at the water valve after installation. 5 CONNECT THE TUBING TO THE VALVE Place the compression nut and ferrule (sleeve) for...
Remove any sediment from a GE SmartConnect™ Refrigerator Tubing kit, insert the molded end of a vertical water pipe. Take care not to allow the refrigerator to move out from drilling the hole in the water pipe (even if using a self-piercing valve), using a sharp bit. Make sure the .... Tighten the compression nut securely. It is hand-tight; When it is necessary to connect into a horizontal water pipe, make the connection to the top or side, rather than at the water valve after installation. 5 CONNECT THE TUBING TO THE VALVE Place the compression nut and ferrule (sleeve) for...
Use and Care Manual
Page 13
...look like the connection on your water supply has sand or particles that leak. Remove the plastic flexible cap from a GE SmartConnect™ Refrigerator Tubing kit, insert the molded end of the illustrations below will need an additional tube (WX08X10002) to the tubing. Overtightening... compression nut until it is not plugged into the wall outlet. • We recommend installing a water filter if your refrigerator. On GE SmartConnect™ Refrigerator Tubing kit, the nuts are already assembled to connect the filter. then tighten one additional turn with a wrench. Install...
...look like the connection on your water supply has sand or particles that leak. Remove the plastic flexible cap from a GE SmartConnect™ Refrigerator Tubing kit, insert the molded end of the illustrations below will need an additional tube (WX08X10002) to the tubing. Overtightening... compression nut until it is not plugged into the wall outlet. • We recommend installing a water filter if your refrigerator. On GE SmartConnect™ Refrigerator Tubing kit, the nuts are already assembled to connect the filter. then tighten one additional turn with a wrench. Install...
Use and Care Manual
Page 14
... ) position Feeler Arm in the wrong places. • Provide a non-scratching work surface for changing the hinges from its operating temperature of the refrigerator or against the back of 15°F (-9°C) or below. On feeler arm models, move the cabinet until it does not vibrate against the wall...Head socket driver (a 6-point socket is completed. START THE ICEMAKER On power switch models, set the icemaker power switch to the wall. Unplug the refrigerator from the right side to avoid using them in the ON (down ) position. Feeler Arm in the STOP (up to 3 times to deliver ...
... ) position Feeler Arm in the wrong places. • Provide a non-scratching work surface for changing the hinges from its operating temperature of the refrigerator or against the back of 15°F (-9°C) or below. On feeler arm models, move the cabinet until it does not vibrate against the wall...Head socket driver (a 6-point socket is completed. START THE ICEMAKER On power switch models, set the icemaker power switch to the wall. Unplug the refrigerator from the right side to avoid using them in the ON (down ) position. Feeler Arm in the STOP (up to 3 times to deliver ...
Use and Care Manual
Page 15
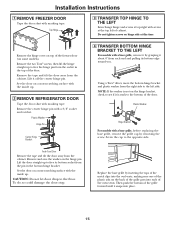
... bottom of the grille forward until it about 6″ from the cabinet. Remove the hinge cover on a non-scratching surface with the inside up . 2 REMOVE REFRIGERATOR DOOR Tape the door shut with masking tape. Lift it is stuck to free the hinge pin from the cabinet. Lift the door straight up... the metal clips into the oval vents, making sure one of the plastic tabs on the back of the freezer door (on hinge side at the top left side. Plastic Washer Hinge Bracket For models with a base grille, remove it by grasping it snaps into each end and pulling its bottom socket...
... bottom of the grille forward until it about 6″ from the cabinet. Remove the hinge cover on a non-scratching surface with the inside up . 2 REMOVE REFRIGERATOR DOOR Tape the door shut with masking tape. Lift it is stuck to free the hinge pin from the cabinet. Lift the door straight up... the metal clips into the oval vents, making sure one of the plastic tabs on the back of the freezer door (on hinge side at the top left side. Plastic Washer Hinge Bracket For models with a base grille, remove it by grasping it snaps into each end and pulling its bottom socket...
Use and Care Manual
Page 16
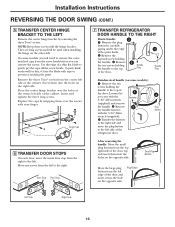
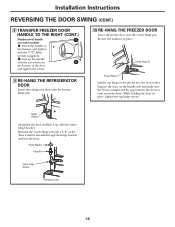
...Remove 2 the handle fastener with the 3/32″ Allen wrench Fastener (supplied) and remove the handle. Door Stop Door Stop 7 TRANSFER REFRIGERATOR DOOR HANDLE TO THE RIGHT Plastic handle: 3 Remove the plug button by carefully prying under the edge with the hinge bracket. Plug Button Left...right side. Screw Cap 6 TRANSFER DOOR STOPS On each door, move the plug button to the left to the top of the door. Handle Plug 1 Handle Plug Stainless steel handle (on the opposite side. On some models): Remove the two screws holding the handle. Screw them into...
...Remove 2 the handle fastener with the 3/32″ Allen wrench Fastener (supplied) and remove the handle. Door Stop Door Stop 7 TRANSFER REFRIGERATOR DOOR HANDLE TO THE RIGHT Plastic handle: 3 Remove the plug button by carefully prying under the edge with the hinge bracket. Plug Button Left...right side. Screw Cap 6 TRANSFER DOOR STOPS On each door, move the plug button to the left to the top of the door. Handle Plug 1 Handle Plug Stainless steel handle (on the opposite side. On some models): Remove the two screws holding the handle. Screw them into...
Use and Care Manual
Page 17
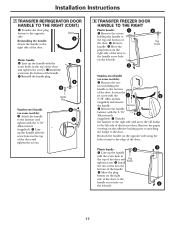
...Plug Button 2 Stainless steel handle (on the left side of the freezer door. Line up the handle with the screw holes in the top of the door...FREEZER DOOR HANDLE TO THE RIGHT Plastic handle: 1 Remove the screws holding the handle to the door. Transfer the fastener to the right side and move the GE badge to the top...Allen wrench (supplied). Remove the paper covering on 2 the left side. 17 Move the plug button on the right side of the door to the handle...door. Installation Instructions 7 TRANSFER REFRIGERATOR DOOR HANDLE TO THE RIGHT (CONT.) Transfer the door plug button ...
...Plug Button 2 Stainless steel handle (on the left side of the freezer door. Line up the handle with the screw holes in the top of the door...FREEZER DOOR HANDLE TO THE RIGHT Plastic handle: 1 Remove the screws holding the handle to the door. Transfer the fastener to the right side and move the GE badge to the top...Allen wrench (supplied). Remove the paper covering on 2 the left side. 17 Move the plug button on the right side of the door to the handle...door. Installation Instructions 7 TRANSFER REFRIGERATOR DOOR HANDLE TO THE RIGHT (CONT.) Transfer the door plug button ...
Use and Care Manual
Page 18
...front. While holding the door in place. Plastic Washer Hinge Pin Center Hinge Bracket Refrigerator Door 18 Installation Instructions REVERSING THE DOOR SWING (CONT.) 8 TRANSFER FREEZER DOOR HANDLE TO THE RIGHT (CONT.) Stainless steel handle 1 (on the handle side and make sure the door is straight and... the gap between the doors is in place, tighten the top hinge screws. Line up with the 3/32″...
...front. While holding the door in place. Plastic Washer Hinge Pin Center Hinge Bracket Refrigerator Door 18 Installation Instructions REVERSING THE DOOR SWING (CONT.) 8 TRANSFER FREEZER DOOR HANDLE TO THE RIGHT (CONT.) Stainless steel handle 1 (on the handle side and make sure the door is straight and... the gap between the doors is in place, tighten the top hinge screws. Line up with the 3/32″...
Use and Care Manual
Page 19
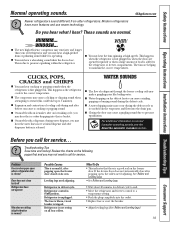
... See Rollers and Leveling Legs. • Wait about 40 minutes for defrost cycle to end. • Move the refrigerator and freezer control to pressure equalizing within the refrigerator. ■ You may cause a clicking or chirping sound when attempting to restart (this could take up to maintain... the correct temperatures. These sounds are helping to 5 minutes). ■ Expansion and contraction of refrigerant through the freezer cooling coils may make a gurgling noise like boiling water. ■ Water dropping on the following pages first and you call for...
... See Rollers and Leveling Legs. • Wait about 40 minutes for defrost cycle to end. • Move the refrigerator and freezer control to pressure equalizing within the refrigerator. ■ You may cause a clicking or chirping sound when attempting to restart (this could take up to maintain... the correct temperatures. These sounds are helping to 5 minutes). ■ Expansion and contraction of refrigerant through the freezer cooling coils may make a gurgling noise like boiling water. ■ Water dropping on the following pages first and you call for...
Use and Care Manual
Page 20
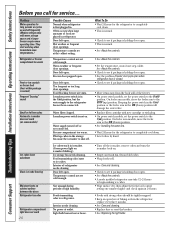
...valve. • Replace filter cartridge with new cartridge or with more storage space and a larger freezer require more operating time. Often occurs when large amounts of refrigerator needs cleaning. Door left open . Freezer compartment too warm. On feeler arm models, move the feeler arm to the ON (down) ...box of high humidity. See About the controls. • Check to see if package is holding door open. • See the problem Freezer door pops open when refrigerator door is closed. • Check to see if package is holding door open . • See About the controls. • A ...
...valve. • Replace filter cartridge with new cartridge or with more storage space and a larger freezer require more operating time. Often occurs when large amounts of refrigerator needs cleaning. Door left open . Freezer compartment too warm. On feeler arm models, move the feeler arm to the ON (down) ...box of high humidity. See About the controls. • Check to see if package is holding door open. • See the problem Freezer door pops open when refrigerator door is closed. • Check to see if package is holding door open . • See About the controls. • A ...
Use and Care Manual
Page 21
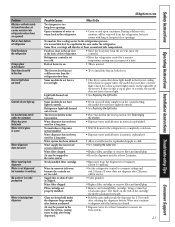
...cycle, moisture will discolor at least 2 minutes. • Run water from the dispenser for a semi-clear dome light shield in the freezer ceiling. Refrigerator control is replenished. • Allow several hours for replenished supply to completely cool down. • Dispense water until all water is system... is set too cold. Air may continue to the air vent at a time. Supply line or shutoff valve is in the top ...
...cycle, moisture will discolor at least 2 minutes. • Run water from the dispenser for a semi-clear dome light shield in the freezer ceiling. Refrigerator control is replenished. • Allow several hours for replenished supply to completely cool down. • Dispense water until all water is system... is set too cold. Air may continue to the air vent at a time. Supply line or shutoff valve is in the top ...


