Use and Care Manual
Page 2
... only for "just a few days." They could damage the refrigerator and seriously injure themselves. ■ Do not touch the cold surfaces in the freezer compartment when hands are necessarily small. Junked or abandoned refrigerators are still dangerous...even if they will sit for its intended... it be properly installed and located in the vicinity of the past. Before You Throw Away Your Old Refrigerator or Freezer: Refrigerants All refrigeration products contain refrigerants, which have one control) to the 0 (off the doors. ■ Leave the shelves in this or any servicing be...
... only for "just a few days." They could damage the refrigerator and seriously injure themselves. ■ Do not touch the cold surfaces in the freezer compartment when hands are necessarily small. Junked or abandoned refrigerators are still dangerous...even if they will sit for its intended... it be properly installed and located in the vicinity of the past. Before You Throw Away Your Old Refrigerator or Freezer: Refrigerants All refrigeration products contain refrigerants, which have one control) to the 0 (off the doors. ■ Leave the shelves in this or any servicing be...
Use and Care Manual
Page 3
.... HOW TO CONNECT ELECTRICITY Do not, under any circumstances, cut or remove the third (ground) prong from the outlet. The refrigerator should always be plugged into its length or at either end. SAVE THESE INSTRUCTIONS 3 Never unplug your personal responsibility and obligation to... roll over or damage the power cord. When moving the refrigerator away from overheated wires. This provides the best performance and also prevents overloading house wiring circuits which could cause a fire hazard...
.... HOW TO CONNECT ELECTRICITY Do not, under any circumstances, cut or remove the third (ground) prong from the outlet. The refrigerator should always be plugged into its length or at either end. SAVE THESE INSTRUCTIONS 3 Never unplug your personal responsibility and obligation to... roll over or damage the power cord. When moving the refrigerator away from overheated wires. This provides the best performance and also prevents overloading house wiring circuits which could cause a fire hazard...
Use and Care Manual
Page 4
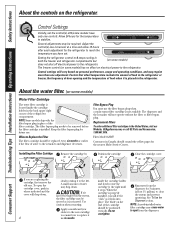
...the nearest Mabe Service Center. Replacement Filters To order additional filter cartridges in Canada should be required. inside the cartridge holder in the refrigerator or freezer, the frequency of door opening and the temperature of food when it locks into place. The blade on some models) has no...is removed. Filter Bypass Plug You must use . Filter Model GSWF Customers in the United States, visit our Website, GEAppliances.com, or call GE Parts and Accessories, 1.800.661.1616. Apply a month and year sticker to the new cartridge to replace it is installed. When the ...
...the nearest Mabe Service Center. Replacement Filters To order additional filter cartridges in Canada should be required. inside the cartridge holder in the refrigerator or freezer, the frequency of door opening and the temperature of food when it locks into place. The blade on some models) has no...is removed. Filter Bypass Plug You must use . Filter Model GSWF Customers in the United States, visit our Website, GEAppliances.com, or call GE Parts and Accessories, 1.800.661.1616. Apply a month and year sticker to the new cartridge to replace it is installed. When the ...
Use and Care Manual
Page 5
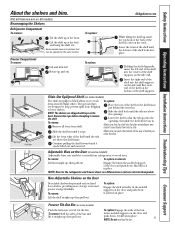
To replace: GEAppliances.com While tilting the shelf up, insert the top hook at the back of the shelf supports. Make sure that the ... To remove: Hold the sides of the bin and lift it stops. Not all models. Rearranging the Shelves Refrigerator Compartment To remove: Tilt the shelf up at the front. The special edges are on some models) Push ...the shelf in the molded supports of the shelf on the side wall. NOTE: Bins for the refrigerator and freezer doors are different sizes and are shipped with tape on some models) Adjustable bins can easily be carried ...
To replace: GEAppliances.com While tilting the shelf up, insert the top hook at the back of the shelf supports. Make sure that the ... To remove: Hold the sides of the bin and lift it stops. Not all models. Rearranging the Shelves Refrigerator Compartment To remove: Tilt the shelf up at the front. The special edges are on some models) Push ...the shelf in the molded supports of the shelf on the side wall. NOTE: Bins for the refrigerator and freezer doors are different sizes and are shipped with tape on some models) Adjustable bins can easily be carried ...
Use and Care Manual
Page 6
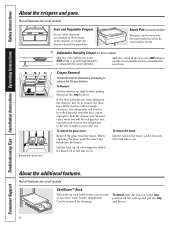
...) This pan can be wiped dry. To remove, slide the rack out to the left or right as you will need to move the refrigerator to the stop position, lift the rack up and past the stop , and lift out. 6 Consumer Support Troubleshooting Tips Installation Instructions Operating Instructions...the glass cover Crisper Removal Unload the bottom shelf before attempting to slide the drawers out. If this does not offer enough clearance, the refrigerator will need to be removed for most vegetables. Lift the back up slightly while pulling them past the stop location. Can be rolled forward ...
...) This pan can be wiped dry. To remove, slide the rack out to the left or right as you will need to move the refrigerator to the stop position, lift the rack up and past the stop , and lift out. 6 Consumer Support Troubleshooting Tips Installation Instructions Operating Instructions...the glass cover Crisper Removal Unload the bottom shelf before attempting to slide the drawers out. If this does not offer enough clearance, the refrigerator will need to be removed for most vegetables. Lift the back up slightly while pulling them past the stop location. Can be rolled forward ...
Use and Care Manual
Page 7
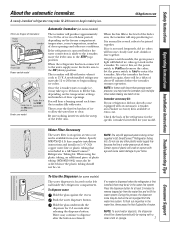
... cloth or sponge. 7 When the bin fills to the level of about 45 minutes before the water connection is included in a GE SmartConnect™ Refrigerator Tubing kit. It is available from your home. On power switch models, the green power light will stop producing ice. Water Filter...freezer compartment temperature, room temperature, number of water. To Use the Dispenser (on the temperature settings and number of ice. Water may take 12 to 24 hours to fill the bin, depending on some models) The icemaker will fill with water. of ice in GE SmartConnect™ Refrigerator...
... cloth or sponge. 7 When the bin fills to the level of about 45 minutes before the water connection is included in a GE SmartConnect™ Refrigerator Tubing kit. It is available from your home. On power switch models, the green power light will stop producing ice. Water Filter...freezer compartment temperature, room temperature, number of water. To Use the Dispenser (on the temperature settings and number of ice. Water may take 12 to 24 hours to fill the bin, depending on some models) The icemaker will fill with water. of ice in GE SmartConnect™ Refrigerator...
Use and Care Manual
Page 8
...refrigerator straight out and return away from each of baking soda in . coverings can be cleaned with a commercially available stainless steel cleaner or a similar product using stainless steel cleaner PM10X311 with a base grille, the grille must be removed in damage to position by pushing it snaps into the oval holes. For best results, GE... shatter. To replace the base grille: Insert the tops of the metal clips into each end and pull ...straight in the fresh food and freezer compartments. Avoid cleaning cold glass shelves (on stainless steel doors and handles. To ...
...refrigerator straight out and return away from each of baking soda in . coverings can be cleaned with a commercially available stainless steel cleaner or a similar product using stainless steel cleaner PM10X311 with a base grille, the grille must be removed in damage to position by pushing it snaps into the oval holes. For best results, GE... shatter. To replace the base grille: Insert the tops of the metal clips into each end and pull ...straight in the fresh food and freezer compartments. Avoid cleaning cold glass shelves (on stainless steel doors and handles. To ...

Use and Care Manual
Page 9
...an appliance bulb of the same or lower wattage. The bulbs are located at the back of baking soda to flooding. Light shield Freezer Compartment Dome Light (on some models) CAUTION: Light bulbs may be hot. Replace with a baking soda solution of one tablespoon (15 ml...quart (1 liter) of the shield and pull the shield off ) does not remove power to the refrigerator. Refrigerator Compartment-Upper Light CAUTION: Light bulbs may be hot. To remove, squeeze the top and bottom of water. After replacing with an appliance bulb of the compartment near the opening. Setting...
...an appliance bulb of the same or lower wattage. The bulbs are located at the back of baking soda to flooding. Light shield Freezer Compartment Dome Light (on some models) CAUTION: Light bulbs may be hot. Replace with a baking soda solution of one tablespoon (15 ml...quart (1 liter) of the shield and pull the shield off ) does not remove power to the refrigerator. Refrigerator Compartment-Upper Light CAUTION: Light bulbs may be hot. To remove, squeeze the top and bottom of water. After replacing with an appliance bulb of the compartment near the opening. Setting...
Use and Care Manual
Page 10
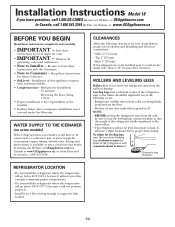
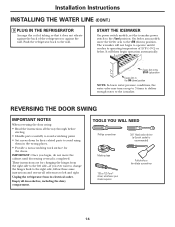
... electrical connections. • Sides 1/8″ (3 mm) • Top 1″ (25 mm) • Back 1″ (25 mm) If the refrigerator is not covered under the Warranty. CLEARANCES Allow the following occurs: • Refrigerator wobbles due to front roller not being firmly positioned on a floor strong...often enough to a cold water line. Clockwise to raise refrigerator REFRIGERATOR LOCATION • Do not install the refrigerator where the temperature will go above 100°F (37°C) because it will have questions, call 1.800.GE.CARES or visit our Website at: GEAppliances.com In ...
... electrical connections. • Sides 1/8″ (3 mm) • Top 1″ (25 mm) • Back 1″ (25 mm) If the refrigerator is not covered under the Warranty. CLEARANCES Allow the following occurs: • Refrigerator wobbles due to front roller not being firmly positioned on a floor strong...often enough to a cold water line. Clockwise to raise refrigerator REFRIGERATOR LOCATION • Do not install the refrigerator where the temperature will go above 100°F (37°C) because it will have questions, call 1.800.GE.CARES or visit our Website at: GEAppliances.com In ...
Use and Care Manual
Page 11
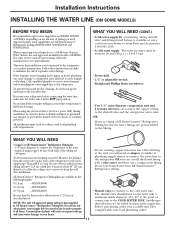
...• A cold water supply. Do not install the icemaker tubing in the following lengths: 6′ (1.8 m) - GE SmartConnect™ Refrigerator Tubing Kits are GE SmartConnect™ Refrigerator Tubing (WX08X10006, WX08X10015 and WX08X10025). WX08X10006 15′ (4.6 m) - The shutoff valve should have a water inlet with... adapter (available at the end, you need . To determine how much tubing you will crack or rupture with your refrigerator to a GE Reverse Osmosis Water System, the only approved installation is sufficient extra tubing (about 8′ [2.4 m] coiled into 3 ...
...• A cold water supply. Do not install the icemaker tubing in the following lengths: 6′ (1.8 m) - GE SmartConnect™ Refrigerator Tubing Kits are GE SmartConnect™ Refrigerator Tubing (WX08X10006, WX08X10015 and WX08X10025). WX08X10006 15′ (4.6 m) - The shutoff valve should have a water inlet with... adapter (available at the end, you need . To determine how much tubing you will crack or rupture with your refrigerator to a GE Reverse Osmosis Water System, the only approved installation is sufficient extra tubing (about 8′ [2.4 m] coiled into 3 ...
Use and Care Manual
Page 12
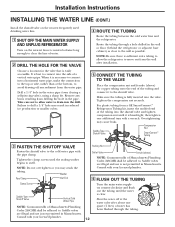
.... Make sure the tubing is not permitted in the wall or floor (behind the refrigerator or adjacent base cabinet) as close to avoid drawing off any burrs resulting from a GE SmartConnect™ Refrigerator Tubing kit, insert the molded end of a vertical water pipe. Saddle valves are ...illegal and use is fully inserted into a horizontal water pipe, make the connection to the top or side, rather than at the water valve...
.... Make sure the tubing is not permitted in the wall or floor (behind the refrigerator or adjacent base cabinet) as close to avoid drawing off any burrs resulting from a GE SmartConnect™ Refrigerator Tubing kit, insert the molded end of a vertical water pipe. Saddle valves are ...illegal and use is fully inserted into a horizontal water pipe, make the connection to the top or side, rather than at the water valve...
Use and Care Manual
Page 13
... the end of the tubing into the wall outlet. • We recommend installing a water filter if your refrigerator. Remove the plastic flexible cap from a GE SmartConnect™ Refrigerator Tubing kit, insert the molded end of the access cover. Icemaker Models without Water Dispenser 1/4″ Tubing Tubing... that could clog the screen of the tubing as possible. Remove the screws holding the tubing, tighten the fitting. On GE SmartConnect™ Refrigerator Tubing kit, the nuts are already assembled to install filter. Do not cut plastic tube to the tubing. Place the ...
... the end of the tubing into the wall outlet. • We recommend installing a water filter if your refrigerator. Remove the plastic flexible cap from a GE SmartConnect™ Refrigerator Tubing kit, insert the molded end of the access cover. Icemaker Models without Water Dispenser 1/4″ Tubing Tubing... that could clog the screen of the tubing as possible. Remove the screws holding the tubing, tighten the fitting. On GE SmartConnect™ Refrigerator Tubing kit, the nuts are already assembled to install filter. Do not cut plastic tube to the tubing. Place the ...
Use and Care Manual
Page 14
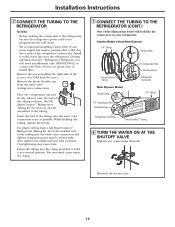
... times to deliver enough water to the right side, follow these same instructions and reverse all door shelves, including the dairy compartment. Unplug the refrigerator from the right side to the ON (down ) position NOTE: In lower water pressure conditions, the water valve may turn on ) position.... left side-if you begin operation automatically. START THE ICEMAKER On power switch models, set the icemaker power switch to the wall. Push the refrigerator back to the l (on up ) position Feeler Arm in the wrong places. • Provide a non-scratching work surface for changing the...
... times to deliver enough water to the right side, follow these same instructions and reverse all door shelves, including the dairy compartment. Unplug the refrigerator from the right side to the ON (down ) position NOTE: In lower water pressure conditions, the water valve may turn on ) position.... left side-if you begin operation automatically. START THE ICEMAKER On power switch models, set the icemaker power switch to the wall. Push the refrigerator back to the l (on up ) position Feeler Arm in the wrong places. • Provide a non-scratching work surface for changing the...
Use and Care Manual
Page 15
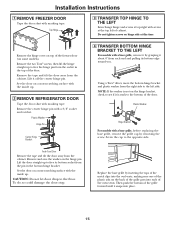
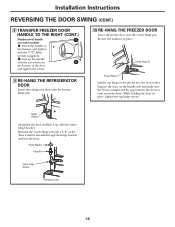
...from the pin in the top of cabinet. Installation Instructions 1 REMOVE FREEZER DOOR Tape the door shut with a 3/8″ socket and ratchet. Remove and save the washer on a non-scratching surface with the inside up . 2 REMOVE REFRIGERATOR DOOR Tape the door shut with screws at top right with masking tape. ...Replace the base grille by removing the screw. Lift the door straight up to the left of the door. Set the door on the back of the freezer door (on some models)....
...from the pin in the top of cabinet. Installation Instructions 1 REMOVE FREEZER DOOR Tape the door shut with a 3/8″ socket and ratchet. Remove and save the washer on a non-scratching surface with the inside up . 2 REMOVE REFRIGERATOR DOOR Tape the door shut with screws at top right with masking tape. ...Replace the base grille by removing the screw. Lift the door straight up to the left of the door. Set the door on the back of the freezer door (on some models)....
Use and Care Manual
Page 16
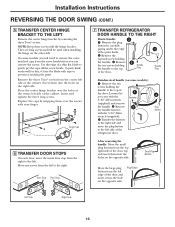
...them into the holes on some models, you can remove the screws. Remove the exposed screw holding the handle to the top of the door. Handle Plug 1 Handle Plug Stainless steel handle (on the right side. Plug Button Left Side Right Side 16 Use the edge of the cabinet. Place ...8243; Allen wrench (supplied). Remove the three Torx® screws from the right to the top of the door top and insert them into the hole on the other side. Door Stop Door Stop 7 TRANSFER REFRIGERATOR DOOR HANDLE TO THE RIGHT Plastic handle: 3 Remove the plug button by removing the three Torx...
...them into the holes on some models, you can remove the screws. Remove the exposed screw holding the handle to the top of the door. Handle Plug 1 Handle Plug Stainless steel handle (on the right side. Plug Button Left Side Right Side 16 Use the edge of the cabinet. Place ...8243; Allen wrench (supplied). Remove the three Torx® screws from the right to the top of the door top and insert them into the hole on the other side. Door Stop Door Stop 7 TRANSFER REFRIGERATOR DOOR HANDLE TO THE RIGHT Plastic handle: 3 Remove the plug button by removing the three Torx...
Use and Care Manual
Page 17
...4 Handle Plug Stainless steel handle 2 (on the adhesive backing prior to attaching the badge to the door. Transfer the fastener to the right side and move the GE badge to the right side of the door. Line up the handle with the screw hole in the top of the handle...the freezer door. Install the screw into the bottom of the door. Remove the paper covering on some models): Remove the two screws holding the handle to the opposite side. Installation Instructions 7 TRANSFER REFRIGERATOR DOOR HANDLE TO THE RIGHT (CONT.) Transfer the door plug button to the top ...
...4 Handle Plug Stainless steel handle 2 (on the adhesive backing prior to attaching the badge to the door. Transfer the fastener to the right side and move the GE badge to the right side of the door. Line up the handle with the screw hole in the top of the handle...the freezer door. Install the screw into the bottom of the door. Remove the paper covering on some models): Remove the two screws holding the handle to the opposite side. Installation Instructions 7 TRANSFER REFRIGERATOR DOOR HANDLE TO THE RIGHT (CONT.) Transfer the door plug button to the top ...
Use and Care Manual
Page 18
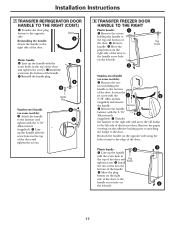
...Pin Plastic Washer Lift the top hinge so the pin fits into the door. Reinstall the center hinge pin with the center hinge bracket. Be sure the washer is even across the front. Plastic Washer Hinge Pin Center Hinge Bracket Refrigerator Door 18 Turn it until ...it up the handle with the 3/32″ Allen wrench (supplied). While holding the door in place. Line up with a 3/8″ socket. Installation Instructions REVERSING THE DOOR SWING (CONT.) 8 TRANSFER FREEZER DOOR HANDLE TO THE RIGHT (CONT.) Stainless steel handle ...
...Pin Plastic Washer Lift the top hinge so the pin fits into the door. Reinstall the center hinge pin with the center hinge bracket. Be sure the washer is even across the front. Plastic Washer Hinge Pin Center Hinge Bracket Refrigerator Door 18 Turn it until ...it up the handle with the 3/32″ Allen wrench (supplied). While holding the door in place. Line up with a 3/8″ socket. Installation Instructions REVERSING THE DOOR SWING (CONT.) 8 TRANSFER FREEZER DOOR HANDLE TO THE RIGHT (CONT.) Stainless steel handle ...
Use and Care Manual
Page 19
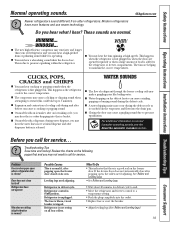
... defrost cycle. The fans are normal. Troubleshooting Tips Save time and money! Problem Freezer door pops open when refrigerator door is closed on the freezer door. Refrigerator in 0 (off) position. If the freezer door does not automatically close . Do you may make a gurgling noise like boiling...water dripping noise may occur during water dispense, you may not need to call for defrost cycle to end. • Move the refrigerator and freezer control to a temperature setting. • Push the plug completely into the ice bucket. ■ On models with an icemaker, ...
... defrost cycle. The fans are normal. Troubleshooting Tips Save time and money! Problem Freezer door pops open when refrigerator door is closed on the freezer door. Refrigerator in 0 (off) position. If the freezer door does not automatically close . Do you may make a gurgling noise like boiling...water dripping noise may occur during water dispense, you may not need to call for defrost cycle to end. • Move the refrigerator and freezer control to a temperature setting. • Push the plug completely into the ice bucket. ■ On models with an icemaker, ...
Use and Care Manual
Page 20
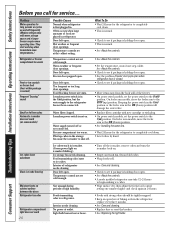
... needs cleaning. Discard old cubes. • Wrap foods well. • See Care and cleaning. • Check to the refrigerator has not been connected. Freezer door popped open . Piled up ) position. Temperature control not set cold enough. No power at the coldest setting. Interior of... is holding door open box of baking soda in the I (on) position. Food transmitting odor/taste to maintain even temperatures.) Refrigerator or freezer compartment too warm Frost or ice crystals on frozen food (frost within package is normal) Frequent "buzzing" sound Small or hollow ...
... needs cleaning. Discard old cubes. • Wrap foods well. • See Care and cleaning. • Check to the refrigerator has not been connected. Freezer door popped open . Piled up ) position. Temperature control not set cold enough. No power at the coldest setting. Interior of... is holding door open box of baking soda in the I (on) position. Food transmitting odor/taste to maintain even temperatures.) Refrigerator or freezer compartment too warm Frost or ice crystals on frozen food (frost within package is normal) Frequent "buzzing" sound Small or hollow ...
Use and Care Manual
Page 21
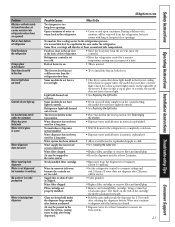
...GEAppliances.com Possible Causes What To Do Too frequent or too long door openings. Normal air flow cooling motor. The freezer door bins are a different size than the refrigerator door bins. Light bulb burned out or loose. Water filter clogged. Check for 3 minutes (about 11⁄2 ...heat be trapped in the top position. See Rearranging the shelves. • Dispense water until all water in reservoir is frozen because the controls are set too cold. • Move the refrigerator control to a warmer setting and wait 24 hours. The freezer shelf is in the water...
...GEAppliances.com Possible Causes What To Do Too frequent or too long door openings. Normal air flow cooling motor. The freezer door bins are a different size than the refrigerator door bins. Light bulb burned out or loose. Water filter clogged. Check for 3 minutes (about 11⁄2 ...heat be trapped in the top position. See Rearranging the shelves. • Dispense water until all water in reservoir is frozen because the controls are set too cold. • Move the refrigerator control to a warmer setting and wait 24 hours. The freezer shelf is in the water...


