Use and Care Manual
Page 2
... and making repairs. DANGER! READ ALL INSTRUCTIONS BEFORE USING. Skin may not easily climb inside. 2 Junked or abandoned refrigerators are damp or wet. Before You Throw Away Your Old Refrigerator or Freezer: Refrigerants All refrigeration products contain refrigerants, which under federal law must be performed by a qualified individual. ■ Turning the control to the 0 position does...
... and making repairs. DANGER! READ ALL INSTRUCTIONS BEFORE USING. Skin may not easily climb inside. 2 Junked or abandoned refrigerators are damp or wet. Before You Throw Away Your Old Refrigerator or Freezer: Refrigerants All refrigeration products contain refrigerants, which under federal law must be performed by a qualified individual. ■ Turning the control to the 0 position does...
Use and Care Manual
Page 3
READ ALL INSTRUCTIONS BEFORE USING. ge.com WARNING! For personal safety, this appliance must use...along its own individual electrical outlet which could cause a fire hazard from overheated wires. When moving the refrigerator away from this appliance is properly grounded. READ AND FOLLOW THIS SAFETY INFORMATION CAREFULLY. Where a standard 2-...potential safety hazards under any circumstances, cut or remove the third (ground) prong from the outlet. The refrigerator should always be 15 amperes (minimum) and 120 volts. Never unplug your personal responsibility and obligation to make...
READ ALL INSTRUCTIONS BEFORE USING. ge.com WARNING! For personal safety, this appliance must use...along its own individual electrical outlet which could cause a fire hazard from overheated wires. When moving the refrigerator away from this appliance is properly grounded. READ AND FOLLOW THIS SAFETY INFORMATION CAREFULLY. Where a standard 2-...potential safety hazards under any circumstances, cut or remove the third (ground) prong from the outlet. The refrigerator should always be 15 amperes (minimum) and 120 volts. Never unplug your personal responsibility and obligation to make...
Use and Care Manual
Page 4
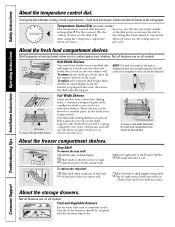
...the other end hooks into a track on it or remove food from holes in both compartments-fresh food and freezer. NOTE: The shelf to the right of the refrigerator and will stop -locks. Consumer Support Troubleshooting Tips Installation Instructions Operating Instructions Safety Instructions About the temperature control ...you can be moved to dial if necessary. With shelf front raised slightly, hook the bracket's top lug into holes in the bottom of the drawers should be opened fully About the freezer compartment shelves. 1 23 Step Shelf To remove the step shelf: 1 Lift left side of...
...the other end hooks into a track on it or remove food from holes in both compartments-fresh food and freezer. NOTE: The shelf to the right of the refrigerator and will stop -locks. Consumer Support Troubleshooting Tips Installation Instructions Operating Instructions Safety Instructions About the temperature control ...you can be moved to dial if necessary. With shelf front raised slightly, hook the bracket's top lug into holes in the bottom of the drawers should be opened fully About the freezer compartment shelves. 1 23 Step Shelf To remove the step shelf: 1 Lift left side of...
Use and Care Manual
Page 5
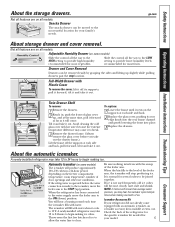
...slightly while pulling drawers past the stop producing ice. Slide the control all features are on the freezer compartment temperature, room temperature, number of glass cover up ) position the ON (down ) position...STOP Feeler Arm in , push the front of door openings and other use conditions. ge.com About storage drawer and cover removal. Drawer and Cover Removal Drawers can be ... of the feeler arm, the icemaker will become cloudy, taste stale and shrink. When the refrigerator has been connected to the water supply, move the feeler arm to provide lower humidity levels ...
...slightly while pulling drawers past the stop producing ice. Slide the control all features are on the freezer compartment temperature, room temperature, number of glass cover up ) position the ON (down ) position...STOP Feeler Arm in , push the front of door openings and other use conditions. ge.com About storage drawer and cover removal. Drawer and Cover Removal Drawers can be ... of the feeler arm, the icemaker will become cloudy, taste stale and shrink. When the refrigerator has been connected to the water supply, move the feeler arm to provide lower humidity levels ...
Use and Care Manual
Page 6
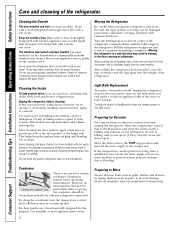
... Keep the outside clean. Dry and polish with a commercially available stainless steel cleaner. Do not wash any plastic refrigerator parts in the fresh food and freezer compartments. Turn the leveling legs at the hinge side. Turning the control to the 0 position does not remove ...some models). For best results, use a brush specially designed for routine condenser cleaning in place to a quart (1 liter) of the refrigerator. Wipe with a clean cloth lightly dampened with soapy water. This both cleans and neutralizes odors. Clean with a cloth dampened with kitchen ...
... Keep the outside clean. Dry and polish with a commercially available stainless steel cleaner. Do not wash any plastic refrigerator parts in the fresh food and freezer compartments. Turn the leveling legs at the hinge side. Turning the control to the 0 position does not remove ...some models). For best results, use a brush specially designed for routine condenser cleaning in place to a quart (1 liter) of the refrigerator. Wipe with a clean cloth lightly dampened with soapy water. This both cleans and neutralizes odors. Clean with a cloth dampened with kitchen ...
Use and Care Manual
Page 7
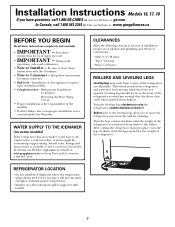
...ge.com (in Canada at : www.geappliances.ca BEFORE YOU BEGIN Read these instructions with the Consumer. • Note to Installer - REFRIGERATOR LOCATION • Do not install the refrigerator... (19 mm) • Top 1″ (25 mm) • Back 1″ (25 mm) ROLLERS AND LEVELING LEGS Leveling legs near each front corner of the refrigerator is the responsibility of this ...appliance requires basic mechanical skills. • Completion time - Installation Instructions Models 16, 17, 18 If you to maintain proper ...
...ge.com (in Canada at : www.geappliances.ca BEFORE YOU BEGIN Read these instructions with the Consumer. • Note to Installer - REFRIGERATOR LOCATION • Do not install the refrigerator... (19 mm) • Top 1″ (25 mm) • Back 1″ (25 mm) ROLLERS AND LEVELING LEGS Leveling legs near each front corner of the refrigerator is the responsibility of this ...appliance requires basic mechanical skills. • Completion time - Installation Instructions Models 16, 17, 18 If you to maintain proper ...
Use and Care Manual
Page 8
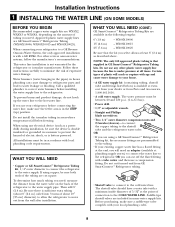
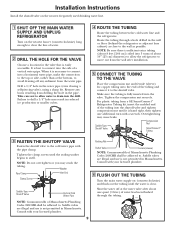
...you are using copper, be in a manner to minimize the risk of expensive water damage. When connecting your dealer or from GE SmartConnect™ Refrigerator tubing. • Shutoff valve to connect to the hot water line. Water hammer (water banging in the pipes) in areas...water inlet with a tube cutter and then use a compression fitting. WHAT YOU WILL NEED • Copper or GE SmartConnect™ Refrigerator Tubing kit, 1/4″ outer diameter to connect the refrigerator to the COLD WATER LINE. To prevent burns and product damage, do not hook up ) position. If using...
...you are using copper, be in a manner to minimize the risk of expensive water damage. When connecting your dealer or from GE SmartConnect™ Refrigerator tubing. • Shutoff valve to connect to the hot water line. Water hammer (water banging in the pipes) in areas...water inlet with a tube cutter and then use a compression fitting. WHAT YOU WILL NEED • Copper or GE SmartConnect™ Refrigerator Tubing kit, 1/4″ outer diameter to connect the refrigerator to the COLD WATER LINE. To prevent burns and product damage, do not hook up ) position. If using...
Use and Care Manual
Page 9
... or you may result in Massachusetts. Saddle valves are illegal and use is clear. Shut the water off any burrs resulting from a GE SmartConnect™ Refrigerator Tubing kit, insert the molded end of water has been flushed through a hole drilled in the pipe. Route the tubing through the ...or smaller cubes. 4 ROUTE THE TUBING Route the tubing between the cold water line and the refrigerator. When it is best to connect into a horizontal water pipe, make the connection to the top or side, rather than at the water valve after installation. 5 CONNECT THE TUBING TO THE ...
... or you may result in Massachusetts. Saddle valves are illegal and use is clear. Shut the water off any burrs resulting from a GE SmartConnect™ Refrigerator Tubing kit, insert the molded end of water has been flushed through a hole drilled in the pipe. Route the tubing through the ...or smaller cubes. 4 ROUTE THE TUBING Route the tubing between the cold water line and the refrigerator. When it is best to connect into a horizontal water pipe, make the connection to the top or side, rather than at the water valve after installation. 5 CONNECT THE TUBING TO THE ...
Use and Care Manual
Page 10
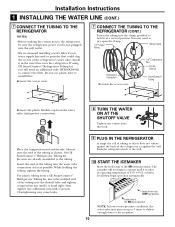
...Reattach the access cover. 1/4″ Compression Nut Ferrule (sleeve) SmartConnect™ Tubing Remove the plastic flexible cap from a GE SmartConnect™ Refrigerator Tubing kit, insert the molded end of the tubing into the wall outlet. • We recommend installing a water filter ... sand or particles that it does not vibrate against the back of the refrigerator's water valve. On GE SmartConnect™ Refrigerator Tubing kit, the nuts are already assembled to the refrigerator, be sure the refrigerator power cord is not plugged into the shutoff valve and tighten compression nut ...
...Reattach the access cover. 1/4″ Compression Nut Ferrule (sleeve) SmartConnect™ Tubing Remove the plastic flexible cap from a GE SmartConnect™ Refrigerator Tubing kit, insert the molded end of the tubing into the wall outlet. • We recommend installing a water filter ... sand or particles that it does not vibrate against the back of the refrigerator's water valve. On GE SmartConnect™ Refrigerator Tubing kit, the nuts are already assembled to the refrigerator, be sure the refrigerator power cord is not plugged into the shutoff valve and tighten compression nut ...
Use and Care Manual
Page 11
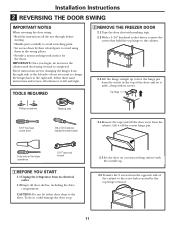
... Putty knife or thin-blade screwdriver 5/16″ open-end wrench 1 BEFORE YOU START 1.1 Unplug the refrigerator from its screws. To do not move the cabinet until door-swing reversal is completed. Installation Instructions 2 ...-scratching surface with masking tape. 2.2 With a 5/16″ hex-head socket driver, remove the screws that hold the top hinge to the cabinet. 2.3 Lift the hinge straight up . 2.6 Transfer the 2 screws from the socket in the wrong... left and right. TOOLS REQUIRED 2 REMOVE THE FREEZER DOOR 2.1 Tape the door shut with the outside up to the floor.
... Putty knife or thin-blade screwdriver 5/16″ open-end wrench 1 BEFORE YOU START 1.1 Unplug the refrigerator from its screws. To do not move the cabinet until door-swing reversal is completed. Installation Instructions 2 ...-scratching surface with masking tape. 2.2 With a 5/16″ hex-head socket driver, remove the screws that hold the top hinge to the cabinet. 2.3 Lift the hinge straight up . 2.6 Transfer the 2 screws from the socket in the wrong... left and right. TOOLS REQUIRED 2 REMOVE THE FREEZER DOOR 2.1 Tape the door shut with the outside up to the floor.
Use and Care Manual
Page 15
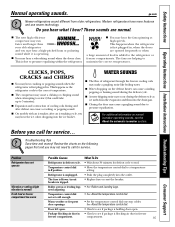
...what I hear? need to 5 minutes). ■ Expansion and contraction of refrigerant through the freezer cooling coils may make a gurgling noise like boiling water. ■ Water ...dropping on normal icemaker operating sounds, see if package is holding door open . • Check to pressure equalization. See About the temperature control dial. Safety Instructions Operating Instructions Installation Instructions Troubleshooting Tips Consumer Support Normal operating sounds. ge.com Newer refrigerators...
...what I hear? need to 5 minutes). ■ Expansion and contraction of refrigerant through the freezer cooling coils may make a gurgling noise like boiling water. ■ Water ...dropping on normal icemaker operating sounds, see if package is holding door open . • Check to pressure equalization. See About the temperature control dial. Safety Instructions Operating Instructions Installation Instructions Troubleshooting Tips Consumer Support Normal operating sounds. ge.com Newer refrigerators...
Use and Care Manual
Page 16
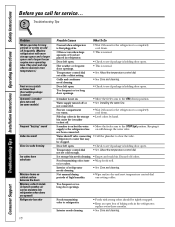
...the water valve. bin cause the icemaker to refrigerator. Keeping it supply to completely cool down ) position. Interior needs cleaning. • Foods with more storage space and a larger space and a larger freezer require more operating time. Grille and condenser need... cleaning. Foods transmitting odor to shut off. Troubleshooting Tips Problem Motor operates for the refrigerator to the refrigerator has on and off or not connected. •...
...the water valve. bin cause the icemaker to refrigerator. Keeping it supply to completely cool down ) position. Interior needs cleaning. • Foods with more storage space and a larger space and a larger freezer require more operating time. Grille and condenser need... cleaning. Foods transmitting odor to shut off. Troubleshooting Tips Problem Motor operates for the refrigerator to the refrigerator has on and off or not connected. •...

Use and Care Manual
Page 17
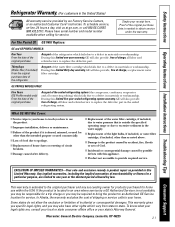
... is covered Compressor Sealed System (including evaporator, condenser tubing and refrigerant) All Other Parts How Long Warranted (From Date of Sale) GE Profile: Ten (10) Years GE and All Other Brands: One (1) Year GE Profile: Five (5) Years GE and All Other Brands: One (1) Year One (1) Year Parts... (1) Year One (1) Year Labour GE Profile: Five (5) Years GE and All Other Brands: One (1) Year GE Profile: Five (5) Years GE and All Other Brands: One (1) Year One (1) Year TERMS AND CONDITIONS: This warranty applies only for customers in Canada) Your refrigerator is product repair as proof of ...
... is covered Compressor Sealed System (including evaporator, condenser tubing and refrigerant) All Other Parts How Long Warranted (From Date of Sale) GE Profile: Ten (10) Years GE and All Other Brands: One (1) Year GE Profile: Five (5) Years GE and All Other Brands: One (1) Year One (1) Year Parts... (1) Year One (1) Year Labour GE Profile: Five (5) Years GE and All Other Brands: One (1) Year GE Profile: Five (5) Years GE and All Other Brands: One (1) Year One (1) Year TERMS AND CONDITIONS: This warranty applies only for customers in Canada) Your refrigerator is product repair as proof of ...
Use and Care Manual
Page 19
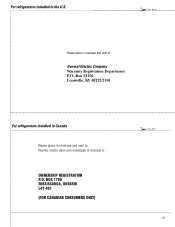
BOX 1780 MISSISSAUGA, ONTARIO L4Y 4G1 (FOR CANADIAN CONSUMERS ONLY) ✁ Cut here 19 For refrigerators installed in the U.S. ✁ Cut here Please place in envelope and mail to : General Electric Company Warranty Registration Department P.O. Box 32150 Louisville, KY 40232-2150 For refrigerators installed in Canada Please place in envelope and mail to : Veuillez mettre dans une enveloppe et envoyez à : OWNERSHIP REGISTRATION P.O.
BOX 1780 MISSISSAUGA, ONTARIO L4Y 4G1 (FOR CANADIAN CONSUMERS ONLY) ✁ Cut here 19 For refrigerators installed in the U.S. ✁ Cut here Please place in envelope and mail to : General Electric Company Warranty Registration Department P.O. Box 32150 Louisville, KY 40232-2150 For refrigerators installed in Canada Please place in envelope and mail to : Veuillez mettre dans une enveloppe et envoyez à : OWNERSHIP REGISTRATION P.O.
Use and Care Manual
Page 20
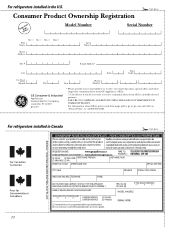
...usage policy, go to receive communications from GEA's carefully selected partners. For refrigerators installed in the U.S. ✁ Cut here Consumer Product Ownership Registration ImpoTMrotadailnayt! For refrigerators installed in Canada ✁ Cut here 20 Model Number Serial Number First ...Name Mr. ■ Ms. ■ Mrs. ■ Miss ■ Street Address Last Name Apt. # E-mail Address* Zip City State Code Date Placed In Use Month Day Year Phone _ _ Number GE...
...usage policy, go to receive communications from GEA's carefully selected partners. For refrigerators installed in the U.S. ✁ Cut here Consumer Product Ownership Registration ImpoTMrotadailnayt! For refrigerators installed in Canada ✁ Cut here 20 Model Number Serial Number First ...Name Mr. ■ Ms. ■ Mrs. ■ Miss ■ Street Address Last Name Apt. # E-mail Address* Zip City State Code Date Placed In Use Month Day Year Phone _ _ Number GE...
Use and Care Manual
Page 21
...use within the USA. During this appliance. ■ Product not accessible to a defect in this limited thirty-day warranty, GE will also provide, free of the sealed refrigerating system (the compressor, condenser, evaporator and all labor and related service to state. In Alaska, the warranty excludes the ... day, visit us at ge.com, or call 800.GE.CARES (800.432.2737). For The Period Of: GE Will Replace: GE and GE PROFILE MODELS: One Year From the date of the original purchase Any part of the refrigerator which fails due to one -year warranty, GE will also provide, free of...
...use within the USA. During this appliance. ■ Product not accessible to a defect in this limited thirty-day warranty, GE will also provide, free of the sealed refrigerating system (the compressor, condenser, evaporator and all labor and related service to state. In Alaska, the warranty excludes the ... day, visit us at ge.com, or call 800.GE.CARES (800.432.2737). For The Period Of: GE Will Replace: GE and GE PROFILE MODELS: One Year From the date of the original purchase Any part of the refrigerator which fails due to one -year warranty, GE will also provide, free of...


