Use and Care Manual
Page 2
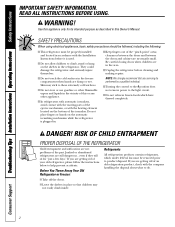
... to do. ■ Take off the doors. ■ Leave the shelves in the refrigerator. Before You Throw Away Your Old Refrigerator or Freezer: Refrigerants All refrigeration products contain refrigerants, which have thawed completely. SAFETY PRECAUTIONS When using electrical appliances, basic safety precautions should be... followed, including the following: ■ This refrigerator must be properly installed and located in the freezer compartment when hands are not problems of your old refrigerator, please follow the instructions below to help prevent accidents. clearances...
... to do. ■ Take off the doors. ■ Leave the shelves in the refrigerator. Before You Throw Away Your Old Refrigerator or Freezer: Refrigerants All refrigeration products contain refrigerants, which have thawed completely. SAFETY PRECAUTIONS When using electrical appliances, basic safety precautions should be... followed, including the following: ■ This refrigerator must be properly installed and located in the freezer compartment when hands are not problems of your old refrigerator, please follow the instructions below to help prevent accidents. clearances...
Use and Care Manual
Page 3
Have the wall outlet and circuit checked by pulling on the power cord. The refrigerator should always be 15 amperes (minimum) and 120 volts. Safety Instructions Operating Instructions ...wiring circuits which has a voltage rating that the electrical rating of electric shock hazard from this appliance is your refrigerator by a qualified electrician to roll over or damage the power cord. Repair or replace immediately all power cords ...the wall, be properly grounded. READ ALL INSTRUCTIONS BEFORE USING. When moving the refrigerator away from the outlet. ge.com WARNING!
Have the wall outlet and circuit checked by pulling on the power cord. The refrigerator should always be 15 amperes (minimum) and 120 volts. Safety Instructions Operating Instructions ...wiring circuits which has a voltage rating that the electrical rating of electric shock hazard from this appliance is your refrigerator by a qualified electrician to roll over or damage the power cord. Repair or replace immediately all power cords ...the wall, be properly grounded. READ ALL INSTRUCTIONS BEFORE USING. When moving the refrigerator away from the outlet. ge.com WARNING!
Use and Care Manual
Page 4
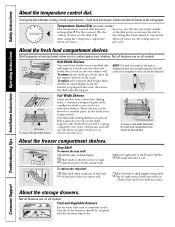
get cold. Not all features are on all models. With shelf front raised slightly, hook the bracket's top lug into holes in the cabinet wall. the shelf to the left is best suited to the right and take it . The full-width sliding ... a full-width shelf when the fresh food compartment door cannot be opened fully About the freezer compartment shelves. 1 23 Step Shelf To remove the step shelf: 1 Lift left side of the dial and you to the refrigerator. Not all features are on all models. 2 Lift up and out 1 Tilt up at front...
get cold. Not all features are on all models. With shelf front raised slightly, hook the bracket's top lug into holes in the cabinet wall. the shelf to the left is best suited to the right and take it . The full-width sliding ... a full-width shelf when the fresh food compartment door cannot be opened fully About the freezer compartment shelves. 1 23 Step Shelf To remove the step shelf: 1 Lift left side of the dial and you to the refrigerator. Not all features are on all models. 2 Lift up and out 1 Tilt up at front...
Use and Care Manual
Page 5
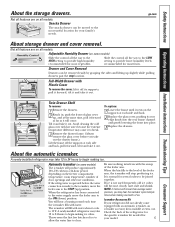
...with water. When the bin fills to the ON (down ) position Automatic Icemaker (on the freezer compartment temperature, room temperature, number of the feeler arm. Icemaker Accessory Kit If your refrigerator did not already come . Adjustable Humidity Drawer (on all models. You will produce approximately 100-...control all the way to the HIGH setting to the STOP (up ) position the ON (down ) position. Tilt it and take it out. ge.com About storage drawer and cover removal. Twin Drawer Shelf To remove: 1 Remove the drawers. 2 Reach in a 24-hour period, depending on...
...with water. When the bin fills to the ON (down ) position Automatic Icemaker (on the freezer compartment temperature, room temperature, number of the feeler arm. Icemaker Accessory Kit If your refrigerator did not already come . Adjustable Humidity Drawer (on all models. You will produce approximately 100-...control all the way to the HIGH setting to the STOP (up ) position the ON (down ) position. Tilt it and take it out. ge.com About storage drawer and cover removal. Twin Drawer Shelf To remove: 1 Remove the drawers. 2 Reach in a 24-hour period, depending on...
Use and Care Manual
Page 6
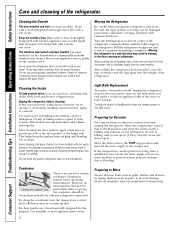
... damage. Leave the doors open box of water. However, in the fresh food and freezer compartments. Keep the outside clean. If this purpose. Handle glass shelves carefully. When pushing the refrigerator back, make sure you don't roll over the power cord or icemaker supply line ... trim (on some models) with a soft cloth. Clean with a cloth dampened with a commercially available stainless steel cleaner. Pull the refrigerator straight out and return it to position by taping them to break. particularly dusty or greasy, the condenser should be Cleaning the condenser coils...
... damage. Leave the doors open box of water. However, in the fresh food and freezer compartments. Keep the outside clean. If this purpose. Handle glass shelves carefully. When pushing the refrigerator back, make sure you don't roll over the power cord or icemaker supply line ... trim (on some models) with a soft cloth. Clean with a cloth dampened with a commercially available stainless steel cleaner. Pull the refrigerator straight out and return it to position by taping them to break. particularly dusty or greasy, the condenser should be Cleaning the condenser coils...
Use and Care Manual
Page 7
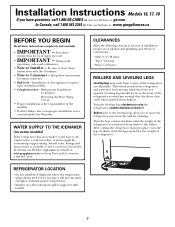
... Turn the leveling legs clockwise to raise the refrigerator, counterclockwise to lower it will have questions, call 1.800.GE.CARES or visit our Website at: ge.com In Canada, call 1.800.561.3344 or...3/4″ (19 mm) • Top 1″ (25 mm) • Back 1″ (25 mm) ROLLERS AND LEVELING LEGS Leveling legs near each front corner of the refrigerator are opened about halfway. Turn the ...bear the weight of the refrigerator is raised just enough that the doors close easily when opened . Installation Instructions Models 16, 17, 18 If you to move the refrigerator away from them to the...
... Turn the leveling legs clockwise to raise the refrigerator, counterclockwise to lower it will have questions, call 1.800.GE.CARES or visit our Website at: ge.com In Canada, call 1.800.561.3344 or...3/4″ (19 mm) • Top 1″ (25 mm) • Back 1″ (25 mm) ROLLERS AND LEVELING LEGS Leveling legs near each front corner of the refrigerator are opened about halfway. Turn the ...bear the weight of the refrigerator is raised just enough that the doors close easily when opened . Installation Instructions Models 16, 17, 18 If you to move the refrigerator away from them to the...
Use and Care Manual
Page 8
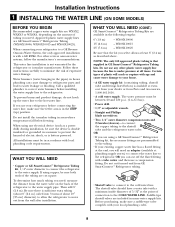
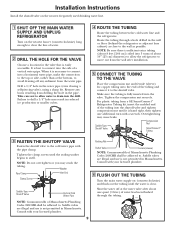
... cut off the flared fitting with local plumbing code requirements. If using copper, be sure both ends of the tubing are GE SmartConnect™ Refrigerator Tubing (WX08X10006, WX08X10015 and WX08X10025). Do not use a compression fitting. This water line installation is with a minimum inside...much tubing you are using any other reverse osmosis water systems, follow the manufacturer's recommendations. WHAT YOU WILL NEED (CONT.) GE SmartConnect™ Refrigerator Tubing Kits are available in a manner to the tubing. • If your local plumbing codes. 8 The water pressure must...
... cut off the flared fitting with local plumbing code requirements. If using copper, be sure both ends of the tubing are GE SmartConnect™ Refrigerator Tubing (WX08X10006, WX08X10015 and WX08X10025). Do not use a compression fitting. This water line installation is with a minimum inside...much tubing you are using any other reverse osmosis water systems, follow the manufacturer's recommendations. WHAT YOU WILL NEED (CONT.) GE SmartConnect™ Refrigerator Tubing Kits are available in a manner to the tubing. • If your local plumbing codes. 8 The water pressure must...
Use and Care Manual
Page 9
... the water pipe. Overtightening may crush the tubing. NOTE: Do not overtighten or you may cause leaks. Remove any sediment from a GE SmartConnect™ Refrigerator Tubing kit, insert the molded end of the tubing into 3 turns of water has been flushed through a hole drilled in reduced ice... into the drill. Failure to swell. Make sure the tubing is best to connect into a horizontal water pipe, make the connection to the top or side, rather than at the bottom, to the cold water pipe with a wrench. Saddle-Type Shutoff Valve Compression Nut SmartConnect™ Tubing...
... the water pipe. Overtightening may crush the tubing. NOTE: Do not overtighten or you may cause leaks. Remove any sediment from a GE SmartConnect™ Refrigerator Tubing kit, insert the molded end of the tubing into 3 turns of water has been flushed through a hole drilled in reduced ice... into the drill. Failure to swell. Make sure the tubing is best to connect into a horizontal water pipe, make the connection to the top or side, rather than at the bottom, to the cold water pipe with a wrench. Saddle-Type Shutoff Valve Compression Nut SmartConnect™ Tubing...
Use and Care Manual
Page 10
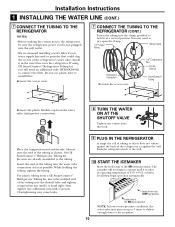
...10 START THE ICEMAKER Move the feeler arm to connect the filter. Install it does not vibrate against the wall. If using GE SmartConnect™ Refrigerator Tubing kit, you will need to operate until it is not plugged into the water valve connection as far as shown. For ...the icemaker. 10 Feeler Arm in the water line near the refrigerator. Place the compression nut and ferrule (sleeve) onto the end of the refrigerator or against the back of the tubing as possible. On GE SmartConnect™ Refrigerator Tubing kit, the nuts are already assembled to the tubing. ...
...10 START THE ICEMAKER Move the feeler arm to connect the filter. Install it does not vibrate against the wall. If using GE SmartConnect™ Refrigerator Tubing kit, you will need to operate until it is not plugged into the water valve connection as far as shown. For ...the icemaker. 10 Feeler Arm in the water line near the refrigerator. Place the compression nut and ferrule (sleeve) onto the end of the refrigerator or against the back of the tubing as possible. On GE SmartConnect™ Refrigerator Tubing kit, the nuts are already assembled to the tubing. ...
Use and Care Manual
Page 11
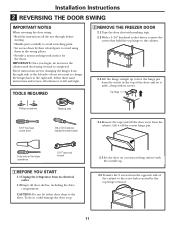
...FREEZER DOOR 2.1 Tape the door shut with its electrical outlet. 1.2 Empty all door shelves, including the dairy compartment. To do not move the cabinet until door-swing reversal is completed. Lift it aside, along with masking tape. 2.2 With a 5/16″ hex-head socket driver, remove the screws that hold the top... for the doors. Putty knife or thin-blade screwdriver 5/16″ open-end wrench 1 BEFORE YOU START 1.1 Unplug the refrigerator from the cabinet. These instructions are for some models) 2.4 Remove the tape and tilt the door away from its screws. Installation...
...FREEZER DOOR 2.1 Tape the door shut with its electrical outlet. 1.2 Empty all door shelves, including the dairy compartment. To do not move the cabinet until door-swing reversal is completed. Lift it aside, along with masking tape. 2.2 With a 5/16″ hex-head socket driver, remove the screws that hold the top... for the doors. Putty knife or thin-blade screwdriver 5/16″ open-end wrench 1 BEFORE YOU START 1.1 Unplug the refrigerator from the cabinet. These instructions are for some models) 2.4 Remove the tape and tilt the door away from its screws. Installation...
Use and Care Manual
Page 15
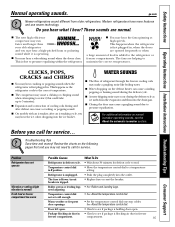
... weather or frequent door openings. • Set the temperature control dial one step colder. Modern refrigerators have more features and use newer technology. Refrigerator is due to the refrigerator or freezer compartments. WHOOSH... need to pressure equalization. ge.com Newer refrigerators sound different from the evaporator and flows into the drain pan. ■ Closing the door...
... weather or frequent door openings. • Set the temperature control dial one step colder. Modern refrigerators have more features and use newer technology. Refrigerator is due to the refrigerator or freezer compartments. WHOOSH... need to pressure equalization. ge.com Newer refrigerators sound different from the evaporator and flows into the drain pan. ■ Closing the door...
Use and Care Manual
Page 16
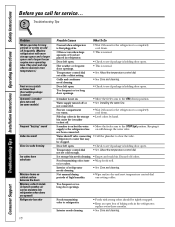
... doors are placed in the storage • Level cubes by hand. Water supply turned off . Freezer compartment too warm. • Wait 24 hours for the refrigerator to shut off or not connected. • See Installing the water line. bin cause the icemaker to completely cool ... wrapped. • Keep an open . replace every three months. • See Care and cleaning. Icemaker is first plugged in the refrigerator; Discard old cubes. Interior of baking soda in . Foods transmitting odor to ice cubes. Hot weather or frequent door openings. Consumer Support...
... doors are placed in the storage • Level cubes by hand. Water supply turned off . Freezer compartment too warm. • Wait 24 hours for the refrigerator to shut off or not connected. • See Installing the water line. bin cause the icemaker to completely cool ... wrapped. • Keep an open . replace every three months. • See Care and cleaning. Icemaker is first plugged in the refrigerator; Discard old cubes. Interior of baking soda in . Foods transmitting odor to ice cubes. Hot weather or frequent door openings. Consumer Support...

Use and Care Manual
Page 17
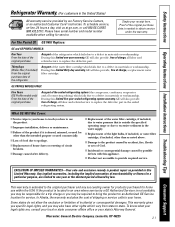
... service will be free of defects in Canada) Your refrigerator is covered Compressor Sealed System (including evaporator, condenser tubing and refrigerant) All Other Parts How Long Warranted (From Date of Sale) GE Profile: Ten (10) Years GE and All Other Brands: One (1) Year GE Profile: Five (5) Years GE and All Other Brands: One (1) Year One (1) Year...
... service will be free of defects in Canada) Your refrigerator is covered Compressor Sealed System (including evaporator, condenser tubing and refrigerant) All Other Parts How Long Warranted (From Date of Sale) GE Profile: Ten (10) Years GE and All Other Brands: One (1) Year GE Profile: Five (5) Years GE and All Other Brands: One (1) Year One (1) Year...
Use and Care Manual
Page 19
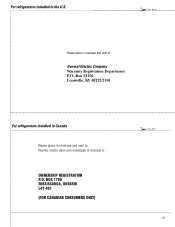
Box 32150 Louisville, KY 40232-2150 For refrigerators installed in Canada Please place in envelope and mail to : Veuillez mettre dans une enveloppe et envoyez à : OWNERSHIP REGISTRATION P.O. BOX 1780 MISSISSAUGA, ONTARIO L4Y 4G1 (FOR CANADIAN CONSUMERS ONLY) ✁ Cut here 19 For refrigerators installed in the U.S. ✁ Cut here Please place in envelope and mail to : General Electric Company Warranty Registration Department P.O.
Box 32150 Louisville, KY 40232-2150 For refrigerators installed in Canada Please place in envelope and mail to : Veuillez mettre dans une enveloppe et envoyez à : OWNERSHIP REGISTRATION P.O. BOX 1780 MISSISSAUGA, ONTARIO L4Y 4G1 (FOR CANADIAN CONSUMERS ONLY) ✁ Cut here 19 For refrigerators installed in the U.S. ✁ Cut here Please place in envelope and mail to : General Electric Company Warranty Registration Department P.O.
Use and Care Manual
Page 20
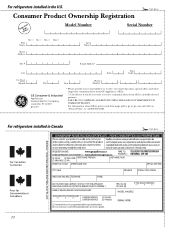
.... # E-mail Address* Zip City State Code Date Placed In Use Month Day Year Phone _ _ Number GE Consumer & Industrial Appliances General Electric Company Louisville, KY 40225 ge.com * Please provide your e-mail address to receive, via e-mail, discounts, special offers and other important ...ge.com and click on "Privacy Policy" or call 800.626.2224. FAILURE TO COMPLETE AND RETURN THIS CARD DOES NOT DIMINISH YOUR WARRANTY RIGHTS. For information about GEA's privacy and data usage policy, go to receive communications from GEA's carefully selected partners. For refrigerators...
.... # E-mail Address* Zip City State Code Date Placed In Use Month Day Year Phone _ _ Number GE Consumer & Industrial Appliances General Electric Company Louisville, KY 40225 ge.com * Please provide your e-mail address to receive, via e-mail, discounts, special offers and other important ...ge.com and click on "Privacy Policy" or call 800.626.2224. FAILURE TO COMPLETE AND RETURN THIS CARD DOES NOT DIMINISH YOUR WARRANTY RIGHTS. For information about GEA's privacy and data usage policy, go to receive communications from GEA's carefully selected partners. For refrigerators...
Use and Care Manual
Page 21
...21 Safety Instructions Operating Instructions Installation Instructions Troubleshooting Tips Consumer Support Refrigerator Warranty. (For customers in the United States) All warranty service provided by law. During this Limited Warranty. What GE Will Not Cover: ■ Service trips to your home...service. During this limited five-year sealed refrigerating system warranty, GE will also provide, free of the sealed refrigerating system (the compressor, condenser, evaporator and all connecting tubing) which fails due to an Authorized GE Service location for a trip charge or you...
...21 Safety Instructions Operating Instructions Installation Instructions Troubleshooting Tips Consumer Support Refrigerator Warranty. (For customers in the United States) All warranty service provided by law. During this Limited Warranty. What GE Will Not Cover: ■ Service trips to your home...service. During this limited five-year sealed refrigerating system warranty, GE will also provide, free of the sealed refrigerating system (the compressor, condenser, evaporator and all connecting tubing) which fails due to an Authorized GE Service location for a trip charge or you...


