Use and Care Manual
Page 1
... model and serial numbers here: Model Serial You can find them on a label on the upper left side of the fresh food compartment. 197D7799P001 49-60521-1 08-08 JR Refr Top-Freezer igerators ge.com Safety Instructions 2-4 Operating Instructions Automatic Icemaker 7 Care and Cleaning 8 Shelves 5, 6 Storage Drawers 6 Temperature Controls 5 Installation Instructions Preparing to Install the Refrigerator...
... model and serial numbers here: Model Serial You can find them on a label on the upper left side of the fresh food compartment. 197D7799P001 49-60521-1 08-08 JR Refr Top-Freezer igerators ge.com Safety Instructions 2-4 Operating Instructions Automatic Icemaker 7 Care and Cleaning 8 Shelves 5, 6 Storage Drawers 6 Temperature Controls 5 Installation Instructions Preparing to Install the Refrigerator...
Use and Care Manual
Page 5
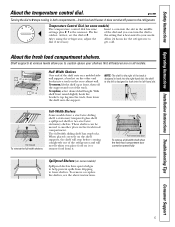
...These shelves can turn the dial to the setting that is designed to your shelves. ge.com Turning the dial to another place in the fresh food compartment. To remove,...hook into the slot in both compartments-fresh food and freezer. After using the refrigerator, adjust the Allow 24 hours for the refrigerator to custom-space your needs. Shelf supports at various ...top lug into a track on a molded sidewall support; NOTE: The shelf to the right of the shelf rests on the rear cabinet wall. Lift rear Pull forward To remove the full-width shelves Full-Width Shelves Some models...
...These shelves can turn the dial to the setting that is designed to your shelves. ge.com Turning the dial to another place in the fresh food compartment. To remove,...hook into the slot in both compartments-fresh food and freezer. After using the refrigerator, adjust the Allow 24 hours for the refrigerator to custom-space your needs. Shelf supports at various ...top lug into a track on a molded sidewall support; NOTE: The shelf to the right of the shelf rests on the rear cabinet wall. Lift rear Pull forward To remove the full-width shelves Full-Width Shelves Some models...

Use and Care Manual
Page 6
... bottom of the drawers should be moved to free its right ends from holes in the cabinet wall. Not all features are on all models. Snacks Drawer The snacks drawer can be emptied and the drawers wiped dry. To replace the step shelf: 1 With shelf tilted as ... side of shelf into holes in cabinet wall, and lower shelf into place. Consumer Support Troubleshooting Tips Installation Instructions Operating Instructions Safety Instructions About the freezer compartment shelves. 1 23 Step Shelf To remove the step shelf: 1 Lift left to the most useful location for your family's needs. 6...
... bottom of the drawers should be moved to free its right ends from holes in the cabinet wall. Not all features are on all models. Snacks Drawer The snacks drawer can be emptied and the drawers wiped dry. To replace the step shelf: 1 With shelf tilted as ... side of shelf into holes in cabinet wall, and lower shelf into place. Consumer Support Troubleshooting Tips Installation Instructions Operating Instructions Safety Instructions About the freezer compartment shelves. 1 23 Step Shelf To remove the step shelf: 1 Lift left to the most useful location for your family's needs. 6...
Use and Care Manual
Page 7
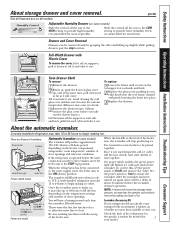
... high humidity recommended for your refrigerator did not already come . Set the power switch to 15°F. After the icemaker has been turned on the freezer compartment temperature, room temperature, ... frame until it rests on some models) Slide the control all models. If the refrigerator is operated before the water connection is normal for most vegetables. When the refrigerator has been connected to the water ...place. 3 Replace the drawers. About the automatic icemaker. Check the back of ice. ge.com Not all the way to the LOW setting to begin making ice. Once the ...
... high humidity recommended for your refrigerator did not already come . Set the power switch to 15°F. After the icemaker has been turned on the freezer compartment temperature, room temperature, ... frame until it rests on some models) Slide the control all models. If the refrigerator is operated before the water connection is normal for most vegetables. When the refrigerator has been connected to the water ...place. 3 Replace the drawers. About the automatic icemaker. Check the back of ice. ge.com Not all the way to the LOW setting to begin making ice. Once the ...
Use and Care Manual
Page 8
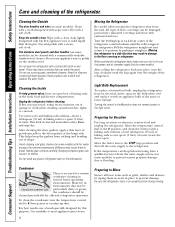
... sure you don't roll over the power cord or icemaker supply line (on some models) to prevent serious property damage due to the floor covering or refrigerator. After rolling the refrigerator back into place, turn the temperature control dial to the light circuit. Turning the control... for Vacation For long vacations or absences, remove food and unplug the refrigerator. Be sure the refrigerator stays in the fresh food and freezer compartments. Keep the outside clean. Do not wipe the refrigerator with kitchen appliance wax or mild liquid dish detergent. Wipe with a ...
... sure you don't roll over the power cord or icemaker supply line (on some models) to prevent serious property damage due to the floor covering or refrigerator. After rolling the refrigerator back into place, turn the temperature control dial to the light circuit. Turning the control... for Vacation For long vacations or absences, remove food and unplug the refrigerator. Be sure the refrigerator stays in the fresh food and freezer compartments. Keep the outside clean. Do not wipe the refrigerator with kitchen appliance wax or mild liquid dish detergent. Wipe with a ...
Use and Care Manual
Page 9
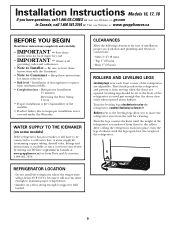
... prevent it . Installation Instructions Models 16, 17, 18 If you to move the refrigerator away from the wall for ease of installation, proper air circulation and plumbing and electrical connections. • Sides 3/4″ (19 mm) • Top 1″ (25 mm) • Back 1″ (25 mm)... your dealer, by visiting our Website at ge.com (in Canada at : www.geappliances.ca BEFORE YOU BEGIN Read these instructions for local inspector's use. • IMPORTANT - Turn the leveling legs clockwise to raise the refrigerator, counterclockwise to leave these instructions for future reference...
... prevent it . Installation Instructions Models 16, 17, 18 If you to move the refrigerator away from the wall for ease of installation, proper air circulation and plumbing and electrical connections. • Sides 3/4″ (19 mm) • Top 1″ (25 mm) • Back 1″ (25 mm)... your dealer, by visiting our Website at ge.com (in Canada at : www.geappliances.ca BEFORE YOU BEGIN Read these instructions for local inspector's use. • IMPORTANT - Turn the leveling legs clockwise to raise the refrigerator, counterclockwise to leave these instructions for future reference...
Use and Care Manual
Page 10
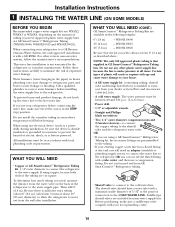
... ) is with local plumbing code requirements. To determine how much tubing you are using a GE SmartConnect™ Refrigerator Tubing kit, the necessary fittings are GE SmartConnect™ Refrigerator Tubing (WX08X10006, WX08X10015 and WX08X10025). Saddle-type shutoff valves are cut formed end from the ...be in accordance with a GE RVKit. Be sure there is battery powered. The shutoff valve should have a water inlet with age and cause water damage to the water supply. Installation Instructions 1 INSTALLING THE WATER LINE (ON SOME MODELS) BEFORE YOU BEGIN Recommended...
... ) is with local plumbing code requirements. To determine how much tubing you are using a GE SmartConnect™ Refrigerator Tubing kit, the necessary fittings are GE SmartConnect™ Refrigerator Tubing (WX08X10006, WX08X10015 and WX08X10025). Saddle-type shutoff valves are cut formed end from the ...be in accordance with a GE RVKit. Be sure there is battery powered. The shutoff valve should have a water inlet with age and cause water damage to the water supply. Installation Instructions 1 INSTALLING THE WATER LINE (ON SOME MODELS) BEFORE YOU BEGIN Recommended...

Use and Care Manual
Page 12
... the tubing, tighten the fitting. Overtightening may turn with a wrench. If using GE SmartConnect™ Refrigerator Tubing kit, you will need to pry open the clamp. 1/4″ Copper Tubing Tubing Clamp Refrigerator Connection Reattach the access cover. 1/4″ Compression Nut Ferrule (sleeve) SmartConnect™... valve and tighten compression nut until it reaches its operating temperature of the refrigerator or against the wall. Push the refrigerator back to the wall. 10 START THE ICEMAKER On power switch models, set the icemaker power switch to the l (on up ) position Feeler...
... the tubing, tighten the fitting. Overtightening may turn with a wrench. If using GE SmartConnect™ Refrigerator Tubing kit, you will need to pry open the clamp. 1/4″ Copper Tubing Tubing Clamp Refrigerator Connection Reattach the access cover. 1/4″ Compression Nut Ferrule (sleeve) SmartConnect™... valve and tighten compression nut until it reaches its operating temperature of the refrigerator or against the wall. Push the refrigerator back to the wall. 10 START THE ICEMAKER On power switch models, set the icemaker power switch to the l (on up ) position Feeler...
Use and Care Manual
Page 13
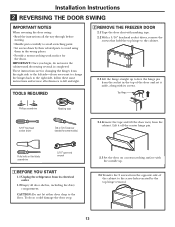
...blade screwdriver 5/16″ open-end wrench 1 BEFORE YOU START 1.1 Unplug the refrigerator from the socket in the top of the cabinet to the screw holes vacated by their related parts to avoid using... them in the wrong places. • Provide a non-scratching work surface for some models) ... To do not move the cabinet until door-swing reversal is completed. TOOLS REQUIRED 2 REMOVE THE FREEZER DOOR 2.1 Tape the door shut with its electrical outlet. 1.2 Empty all door shelves, including the ...
...blade screwdriver 5/16″ open-end wrench 1 BEFORE YOU START 1.1 Unplug the refrigerator from the socket in the top of the cabinet to the screw holes vacated by their related parts to avoid using... them in the wrong places. • Provide a non-scratching work surface for some models) ... To do not move the cabinet until door-swing reversal is completed. TOOLS REQUIRED 2 REMOVE THE FREEZER DOOR 2.1 Tape the door shut with its electrical outlet. 1.2 Empty all door shelves, including the ...

Use and Care Manual
Page 14
... it all the way down-leave enough space under the screw head for thickness of the bracket. Lift the door from the pin in the top of the door, and set hinge and screws aside. Installation Instructions 2 REVERSING THE DOOR SWING (CONT.) 3 REMOVE THE FRESH FOOD DOOR 3.1 Tape the door shut... the two screws from the opposite side of the cabinet to the screw holes vacated by the center hinge removal. 3.6 Transfer the washer (if your model has one of the screws removed in step 2 and start it in the outermost screw hole on the hinge.) 4 REVERSING THE HARDWARE 4.1 Move the bottom...
... it all the way down-leave enough space under the screw head for thickness of the bracket. Lift the door from the pin in the top of the door, and set hinge and screws aside. Installation Instructions 2 REVERSING THE DOOR SWING (CONT.) 3 REMOVE THE FRESH FOOD DOOR 3.1 Tape the door shut... the two screws from the opposite side of the cabinet to the screw holes vacated by the center hinge removal. 3.6 Transfer the washer (if your model has one of the screws removed in step 2 and start it in the outermost screw hole on the hinge.) 4 REVERSING THE HARDWARE 4.1 Move the bottom...
Use and Care Manual
Page 17
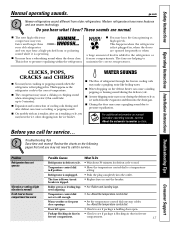
...dial not set cold enough. • See About the temperature control dial. ge.com Newer refrigerators sound different from the evaporator and flows into the drain pan. ■ ...attempting to restart (this could take up to 5 minutes). ■ Expansion and contraction of refrigerant through the freezer cooling coils may make a gurgling noise like boiling water. ■ Water dropping on the ...defrost heater can cause a cracking or popping sound. ■ On models with an icemaker, after ...
...dial not set cold enough. • See About the temperature control dial. ge.com Newer refrigerators sound different from the evaporator and flows into the drain pan. ■ ...attempting to restart (this could take up to 5 minutes). ■ Expansion and contraction of refrigerant through the freezer cooling coils may make a gurgling noise like boiling water. ■ Water dropping on the ...defrost heater can cause a cracking or popping sound. ■ On models with an icemaker, after ...
Use and Care Manual
Page 18
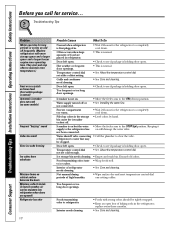
Too frequent or too long door openings. Freezer compartment too warm. • Wait 24 hours for long periods or cycles on and off frequently. (Modern refrigerators with strong odors should be clogged. Icemaker is on will damage the water valve. not been connected. Temperature control ... odor 18 Possible Causes Normal when refrigerator is holding door open . • This is normal. • See About the temperature control dial. • See Care and cleaning. • Check to see if package is normal) Automatic icemaker does not work (on some models) Frequent "buzzing" sound Cubes ...
Too frequent or too long door openings. Freezer compartment too warm. • Wait 24 hours for long periods or cycles on and off frequently. (Modern refrigerators with strong odors should be clogged. Icemaker is on will damage the water valve. not been connected. Temperature control ... odor 18 Possible Causes Normal when refrigerator is holding door open . • This is normal. • See About the temperature control dial. • See Care and cleaning. • Check to see if package is normal) Automatic icemaker does not work (on some models) Frequent "buzzing" sound Cubes ...
Use and Care Manual
Page 19
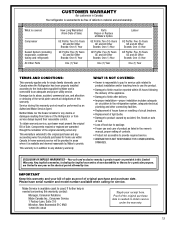
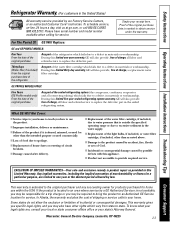
...is covered Compressor Sealed System (including evaporator, condenser tubing and refrigerant) All Other Parts How Long Warranted (From Date of Sale) GE Profile: Ten (10) Years GE and All Other Brands: One (1) Year GE Profile: Five (5) Years GE and All Other Brands: One (1) Year One (1) Year Parts...; Product not accessible to provide required service. • WARRANTOR IS NOT RESPONSIBLE FOR CONSEQUENTIAL DAMAGES. Please have serial number and model number available when calling for any claims or damages resulting from failure of the original purchase date is available coast to coast. ...
...is covered Compressor Sealed System (including evaporator, condenser tubing and refrigerant) All Other Parts How Long Warranted (From Date of Sale) GE Profile: Ten (10) Years GE and All Other Brands: One (1) Year GE Profile: Five (5) Years GE and All Other Brands: One (1) Year One (1) Year Parts...; Product not accessible to provide required service. • WARRANTOR IS NOT RESPONSIBLE FOR CONSEQUENTIAL DAMAGES. Please have serial number and model number available when calling for any claims or damages resulting from failure of the original purchase date is available coast to coast. ...
Use and Care Manual
Page 20
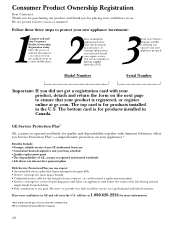
... Dear Customer: Thank you for purchasing our product and thank you for products installed in Canada. Our service number is our goal. The top card is for covered operating parts and labor on the next page to provide you can contact you as a customer...fail during normal single family household use • Your satisfaction is 800 GE CARES (800.432.2737). 3 Read your confidence in a professional and timely manner. toll-free at ge.com. It contains information you will help you require service. Model Number Serial Number Important: If you did not get a registration card ...
... Dear Customer: Thank you for purchasing our product and thank you for products installed in Canada. Our service number is our goal. The top card is for covered operating parts and labor on the next page to provide you can contact you as a customer...fail during normal single family household use • Your satisfaction is 800 GE CARES (800.432.2737). 3 Read your confidence in a professional and timely manner. toll-free at ge.com. It contains information you will help you require service. Model Number Serial Number Important: If you did not get a registration card ...

Use and Care Manual
Page 22
... communications from GEA's carefully selected partners. For refrigerators installed in the U.S. ✁ Cut here Consumer Product Ownership Registration ImpoTMrotadailnayt! FAILURE TO COMPLETE AND RETURN THIS CARD DOES NOT DIMINISH YOUR WARRANTY RIGHTS. Model Number Serial Number First Name Mr. ■...E-mail Address* Zip City State Code Date Placed In Use Month Day Year Phone _ _ Number GE Consumer & Industrial Appliances General Electric Company Louisville, KY 40225 ge.com * Please provide your e-mail address to receive, via e-mail, discounts, special offers and ...
... communications from GEA's carefully selected partners. For refrigerators installed in the U.S. ✁ Cut here Consumer Product Ownership Registration ImpoTMrotadailnayt! FAILURE TO COMPLETE AND RETURN THIS CARD DOES NOT DIMINISH YOUR WARRANTY RIGHTS. Model Number Serial Number First Name Mr. ■...E-mail Address* Zip City State Code Date Placed In Use Month Day Year Phone _ _ Number GE Consumer & Industrial Appliances General Electric Company Louisville, KY 40225 ge.com * Please provide your e-mail address to receive, via e-mail, discounts, special offers and ...
Use and Care Manual
Page 23
...■ Product not accessible to provide required service. For The Period Of: GE Will Replace: GE and GE PROFILE MODELS: One Year From the date of the original purchase Any part of the refrigerator which fails due to obtain service under the warranty. EXCLUSION OF IMPLIED WARRANTIES... if included) From the original purchase date of the refrigerator Any part of the sealed refrigerating system (the compressor, condenser, evaporator and all labor and related service to state. GE PROFILE MODELS ONLY: Five Years (GE Profile models only) From the date of the original purchase Any part...
...■ Product not accessible to provide required service. For The Period Of: GE Will Replace: GE and GE PROFILE MODELS: One Year From the date of the original purchase Any part of the refrigerator which fails due to obtain service under the warranty. EXCLUSION OF IMPLIED WARRANTIES... if included) From the original purchase date of the refrigerator Any part of the sealed refrigerating system (the compressor, condenser, evaporator and all labor and related service to state. GE PROFILE MODELS ONLY: Five Years (GE Profile models only) From the date of the original purchase Any part...

