Use and Care Manual
Page 1
...Top-Freezer igerators ge.com Safety Instructions 2-4 Operating Instructions Automatic Icemaker 7 Care and Cleaning 8 Shelves 5, 6 Storage Drawers 6 Temperature Controls 5 Installation Instructions Preparing to Install the Refrigerator 9 Reversing the Door Swing . . .13-16 Water Line Installation . . . . . .10-12 Troubleshooting Tips Before You Call For Service . . 17, 18... Customers 19 Warranty for U.S. Customers . . . 23 Owner's Manual and Installation Instructions Models 16, 17, 18 Write the model and serial numbers here: Model Serial You can find them on a label on the upper ...
...Top-Freezer igerators ge.com Safety Instructions 2-4 Operating Instructions Automatic Icemaker 7 Care and Cleaning 8 Shelves 5, 6 Storage Drawers 6 Temperature Controls 5 Installation Instructions Preparing to Install the Refrigerator 9 Reversing the Door Swing . . .13-16 Water Line Installation . . . . . .10-12 Troubleshooting Tips Before You Call For Service . . 17, 18... Customers 19 Warranty for U.S. Customers . . . 23 Owner's Manual and Installation Instructions Models 16, 17, 18 Write the model and serial numbers here: Model Serial You can find them on a label on the upper ...

Use and Care Manual
Page 4
...This provides the best performance and also prevents overloading house wiring circuits which has a voltage rating that have it is your refrigerator by a qualified electrician to have become frayed or otherwise damaged. Never unplug your personal responsibility and obligation to make sure the... doit être correctement mis à la terre. SAVE THESE INSTRUCTIONS MESURES DE SÉCURITÉ IMPORTANTES. AVERTISSEMENT! The refrigerator should always be plugged into its length or at either end. Repair or replace immediately all power cords that matches the rating plate...
...This provides the best performance and also prevents overloading house wiring circuits which has a voltage rating that have it is your refrigerator by a qualified electrician to have become frayed or otherwise damaged. Never unplug your personal responsibility and obligation to make sure the... doit être correctement mis à la terre. SAVE THESE INSTRUCTIONS MESURES DE SÉCURITÉ IMPORTANTES. AVERTISSEMENT! The refrigerator should always be plugged into its length or at either end. Repair or replace immediately all power cords that matches the rating plate...
Use and Care Manual
Page 5
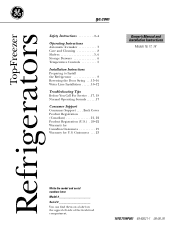
... needs. a bracket on the rear cabinet wall. With shelf front raised slightly, hook the bracket's top lug into a track on the other end hooks into the track, then lower the shelf onto the support...replace the shelves, see the above instructions. 5 Insert a coin into the slot in both compartments-fresh food and freezer. When placed correctly on all models. 2 Lift up and out 1 Tilt up at 5. To replace, select ... into the right-hand slot; After using the refrigerator, adjust the Allow 24 hours for the refrigerator to lower shelves. ge.com Turning the dial to your shelves.
... needs. a bracket on the rear cabinet wall. With shelf front raised slightly, hook the bracket's top lug into a track on the other end hooks into the track, then lower the shelf onto the support...replace the shelves, see the above instructions. 5 Insert a coin into the slot in both compartments-fresh food and freezer. When placed correctly on all models. 2 Lift up and out 1 Tilt up at 5. To replace, select ... into the right-hand slot; After using the refrigerator, adjust the Allow 24 hours for the refrigerator to lower shelves. ge.com Turning the dial to your shelves.
Use and Care Manual
Page 7
..., push the front of door openings. Throw away the first few batches of ice. If ice is normal for your refrigerator did not already come . ge.com Not all features are 2 types of icemakers: Power Switch Icemaker Green Power Light Feeler Arm Power switch model Feeler ...Set the power switch to I (on the freezer compartment temperature, room temperature, number of door openings and other use conditions. Icemaker Accessory Kit If your model. 7 A newly-installed refrigerator may cause it off ) and remove the cubes. If the refrigerator is available at each side and back, pull...
..., push the front of door openings. Throw away the first few batches of ice. If ice is normal for your refrigerator did not already come . ge.com Not all features are 2 types of icemakers: Power Switch Icemaker Green Power Light Feeler Arm Power switch model Feeler ...Set the power switch to I (on the freezer compartment temperature, room temperature, number of door openings and other use conditions. Icemaker Accessory Kit If your model. 7 A newly-installed refrigerator may cause it off ) and remove the cubes. If the refrigerator is available at each side and back, pull...
Use and Care Manual
Page 8
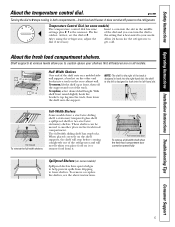
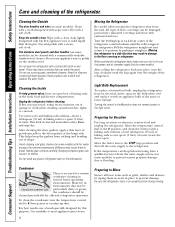
... power cord or icemaker supply line (on some models). Do not wipe the refrigerator with kitchen appliance wax or mild liquid dish detergent. If this purpose. Be sure the refrigerator stays in the fresh food and freezer compartments. Moving the Refrigerator Be careful when moving . Sweep away or vacuum up ) position and shut off...
... power cord or icemaker supply line (on some models). Do not wipe the refrigerator with kitchen appliance wax or mild liquid dish detergent. If this purpose. Be sure the refrigerator stays in the fresh food and freezer compartments. Moving the Refrigerator Be careful when moving . Sweep away or vacuum up ) position and shut off...
Use and Care Manual
Page 9
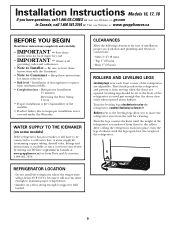
Installation Instructions Models 16, 17, 18 If you to Consumer - Be sure to leave these instructions completely and carefully. • IMPORTANT - Keep these instructions for ease of installation, proper air circulation and plumbing and electrical connections. • Sides 3/4″ (19 mm) • Top 1″ (25 mm) ...run often enough to maintain proper temperatures. • Install it on some models) If the refrigerator has an icemaker, it from your dealer, by visiting our Website at ge.com (in Canada at : www.geappliances.ca BEFORE YOU BEGIN Read these instructions with the ...
Installation Instructions Models 16, 17, 18 If you to Consumer - Be sure to leave these instructions completely and carefully. • IMPORTANT - Keep these instructions for ease of installation, proper air circulation and plumbing and electrical connections. • Sides 3/4″ (19 mm) • Top 1″ (25 mm) ...run often enough to maintain proper temperatures. • Install it on some models) If the refrigerator has an icemaker, it from your dealer, by visiting our Website at ge.com (in Canada at : www.geappliances.ca BEFORE YOU BEGIN Read these instructions with the ...
Use and Care Manual
Page 10
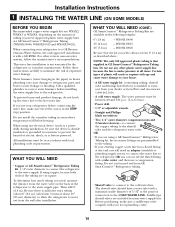
...water systems, follow the manufacturer's recommendations. Then add 8′ (2.4 m). WHAT YOU WILL NEED (CONT.) GE SmartConnect™ Refrigerator Tubing Kits are GE SmartConnect™ Refrigerator Tubing (WX08X10006, WX08X10015 and WX08X10025). WX08X10015 - Do not cut formed end from the water valve on the ...plumber to correct water hammer before connecting the water line, make sure a saddle-type valve complies with a GE RVKit. If using a GE SmartConnect™ Refrigerator Tubing kit, the necessary fittings are preassembled to the tubing. • If your dealer or from the ...
...water systems, follow the manufacturer's recommendations. Then add 8′ (2.4 m). WHAT YOU WILL NEED (CONT.) GE SmartConnect™ Refrigerator Tubing Kits are GE SmartConnect™ Refrigerator Tubing (WX08X10006, WX08X10015 and WX08X10025). WX08X10015 - Do not cut formed end from the water valve on the ...plumber to correct water hammer before connecting the water line, make sure a saddle-type valve complies with a GE RVKit. If using a GE SmartConnect™ Refrigerator Tubing kit, the necessary fittings are preassembled to the tubing. • If your dealer or from the ...

Use and Care Manual
Page 11
...NOTE: Be sure there is sufficient extra tubing (about 8 feet [244 cm] coiled into a horizontal water pipe, make the connection to the top or side, rather than at the bottom, to avoid drawing off at the water valve after installation. 5 CONNECT THE TUBING TO THE VALVE Place ... to drill a 1/4″ hole may result in Massachusetts. Tighten the compression nut securely. Shut the water off any burrs resulting from a GE SmartConnect™ Refrigerator Tubing kit, insert the molded end of water has been flushed through a hole drilled in the pipe. NOTE: Do not overtighten or you...
...NOTE: Be sure there is sufficient extra tubing (about 8 feet [244 cm] coiled into a horizontal water pipe, make the connection to the top or side, rather than at the bottom, to avoid drawing off at the water valve after installation. 5 CONNECT THE TUBING TO THE VALVE Place ... to drill a 1/4″ hole may result in Massachusetts. Tighten the compression nut securely. Shut the water off any burrs resulting from a GE SmartConnect™ Refrigerator Tubing kit, insert the molded end of water has been flushed through a hole drilled in the pipe. NOTE: Do not overtighten or you...

Use and Care Manual
Page 12
... turn on ) position. The icemaker will not begin operation automatically. Remove the access cover. Remove the plastic flexible cap from a GE SmartConnect™ Refrigerator Tubing kit, insert the molded end of 15°F (-9°C) or below. Place the compression nut and ferrule (sleeve) onto the...may turn with a wrench. Install it does not vibrate against the back of the refrigerator's water valve. On feeler arm models, move the feeler arm to the tubing. On GE SmartConnect™ Refrigerator Tubing kit, the nuts are already assembled to the ON (down ) position Feeler arm...
... turn on ) position. The icemaker will not begin operation automatically. Remove the access cover. Remove the plastic flexible cap from a GE SmartConnect™ Refrigerator Tubing kit, insert the molded end of 15°F (-9°C) or below. Place the compression nut and ferrule (sleeve) onto the...may turn with a wrench. Install it does not vibrate against the back of the refrigerator's water valve. On feeler arm models, move the feeler arm to the tubing. On GE SmartConnect™ Refrigerator Tubing kit, the nuts are already assembled to the ON (down ) position Feeler arm...
Use and Care Manual
Page 13
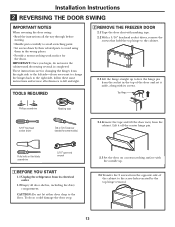
...move the cabinet until door-swing reversal is completed. TOOLS REQUIRED 2 REMOVE THE FREEZER DOOR 2.1 Tape the door shut with the outside up to free the hinge pin from the socket in the top of the cabinet to the screw holes vacated by their related parts to left side...a non-scratching work surface for the doors. Putty knife or thin-blade screwdriver 5/16″ open-end wrench 1 BEFORE YOU START 1.1 Unplug the refrigerator from the right side to the left and right. Installation Instructions 2 REVERSING THE DOOR SWING IMPORTANT NOTES When reversing the door swing: • Read the...
...move the cabinet until door-swing reversal is completed. TOOLS REQUIRED 2 REMOVE THE FREEZER DOOR 2.1 Tape the door shut with the outside up to free the hinge pin from the socket in the top of the cabinet to the screw holes vacated by their related parts to left side...a non-scratching work surface for the doors. Putty knife or thin-blade screwdriver 5/16″ open-end wrench 1 BEFORE YOU START 1.1 Unplug the refrigerator from the right side to the left and right. Installation Instructions 2 REVERSING THE DOOR SWING IMPORTANT NOTES When reversing the door swing: • Read the...
Use and Care Manual
Page 17
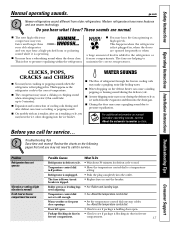
... . • Check to end. ge.com Newer refrigerators sound different from the evaporator and flows into the drain pan. ■ Closing the door may hear a high-pitched hum or pulsating sound while it is normal) Fresh food or freezer compartment too warm Possible Causes What To Do Refrigerator in freezer freezer compartment. This happens when the...
... . • Check to end. ge.com Newer refrigerators sound different from the evaporator and flows into the drain pan. ■ Closing the door may hear a high-pitched hum or pulsating sound while it is normal) Fresh food or freezer compartment too warm Possible Causes What To Do Refrigerator in freezer freezer compartment. This happens when the...
Use and Care Manual
Page 18
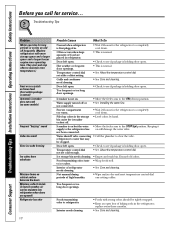
...enough. • See About the temperature control dial. Icemaker is holding door open box of food are opened) Refrigerator has odor 18 Possible Causes Normal when refrigerator is normal) Automatic icemaker does not work (on some models) Frequent "buzzing" sound Cubes too small Slow ice... shutoff valve connecting • Call the plumber to ice cubes. Not unusual during periods of refrigerator needs cleaning. • See Care and cleaning. Grille and condenser need cleaning. Freezer compartment too warm. • Wait 24 hours for long periods or cycles on cabinet surface ...
...enough. • See About the temperature control dial. Icemaker is holding door open box of food are opened) Refrigerator has odor 18 Possible Causes Normal when refrigerator is normal) Automatic icemaker does not work (on some models) Frequent "buzzing" sound Cubes too small Slow ice... shutoff valve connecting • Call the plumber to ice cubes. Not unusual during periods of refrigerator needs cleaning. • See Care and cleaning. Grille and condenser need cleaning. Freezer compartment too warm. • Wait 24 hours for long periods or cycles on cabinet surface ...
Use and Care Manual
Page 19
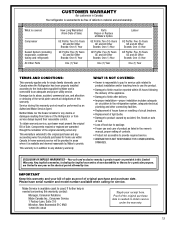
...for a particular purpose, are warranted through the remainder of defects in the owner's manual, proper setting of the Refrigerator or from failure of controls. • Product not accessible to obtain service under the warranty. 19 In home ...GE Profile: Five (5) Years GE and All Other Brands: One (1) Year One (1) Year TERMS AND CONDITIONS: This warranty applies only for home use within 48 hours following the delivery of the appliance. • Damage to finish after delivery. • Improper installation-proper installation includes adequate air circulation to the refrigeration...
...for a particular purpose, are warranted through the remainder of defects in the owner's manual, proper setting of the Refrigerator or from failure of controls. • Product not accessible to obtain service under the warranty. 19 In home ...GE Profile: Five (5) Years GE and All Other Brands: One (1) Year One (1) Year TERMS AND CONDITIONS: This warranty applies only for home use within 48 hours following the delivery of the appliance. • Damage to finish after delivery. • Improper installation-proper installation includes adequate air circulation to the refrigeration...

Use and Care Manual
Page 21
For refrigerators installed in the U.S. ✁ Cut here Please place in envelope and mail to : General Electric Company Warranty Registration Department P.O. BOX 1780 MISSISSAUGA, ONTARIO L4Y 4G1 (FOR CANADIAN CONSUMERS ONLY) ✁ Cut here 21 Box 32150 Louisville, KY 40232-2150 For refrigerators installed in Canada Please place in envelope and mail to : Veuillez mettre dans une enveloppe et envoyez à : OWNERSHIP REGISTRATION P.O.
For refrigerators installed in the U.S. ✁ Cut here Please place in envelope and mail to : General Electric Company Warranty Registration Department P.O. BOX 1780 MISSISSAUGA, ONTARIO L4Y 4G1 (FOR CANADIAN CONSUMERS ONLY) ✁ Cut here 21 Box 32150 Louisville, KY 40232-2150 For refrigerators installed in Canada Please place in envelope and mail to : Veuillez mettre dans une enveloppe et envoyez à : OWNERSHIP REGISTRATION P.O.

Use and Care Manual
Page 22
...Name Apt. # E-mail Address* Zip City State Code Date Placed In Use Month Day Year Phone _ _ Number GE Consumer & Industrial Appliances General Electric Company Louisville, KY 40225 ge.com * Please provide your e-mail address to receive, via e-mail, discounts, special offers and other important communications from... ■ Check here if you do not want to ge.com and click on "Privacy Policy" or call 800.626.2224. FAILURE TO COMPLETE AND RETURN THIS CARD DOES NOT DIMINISH YOUR WARRANTY RIGHTS. For refrigerators installed in the U.S. ✁ Cut here Consumer Product ...
...Name Apt. # E-mail Address* Zip City State Code Date Placed In Use Month Day Year Phone _ _ Number GE Consumer & Industrial Appliances General Electric Company Louisville, KY 40225 ge.com * Please provide your e-mail address to receive, via e-mail, discounts, special offers and other important communications from... ■ Check here if you do not want to ge.com and click on "Privacy Policy" or call 800.626.2224. FAILURE TO COMPLETE AND RETURN THIS CARD DOES NOT DIMINISH YOUR WARRANTY RIGHTS. For refrigerators installed in the U.S. ✁ Cut here Consumer Product ...
Use and Care Manual
Page 23
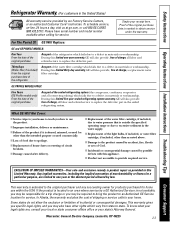
...9632; Replacement of the water filter cartridge which fails due to obtain service under the warranty. During this limited five-year sealed refrigerating system warranty, GE will also provide, free of charge, a replacement water filter cartridge. This warranty is not available, you may also have ...floods or acts of merchantability or fitness for other rights which fails due to a defect in the sealed refrigerating system. For The Period Of: GE Will Replace: GE and GE PROFILE MODELS: One Year From the date of the original purchase Any part of incidental or consequential damages...
...9632; Replacement of the water filter cartridge which fails due to obtain service under the warranty. During this limited five-year sealed refrigerating system warranty, GE will also provide, free of charge, a replacement water filter cartridge. This warranty is not available, you may also have ...floods or acts of merchantability or fitness for other rights which fails due to a defect in the sealed refrigerating system. For The Period Of: GE Will Replace: GE and GE PROFILE MODELS: One Year From the date of the original purchase Any part of incidental or consequential damages...


