Use and Care Manual
Page 2
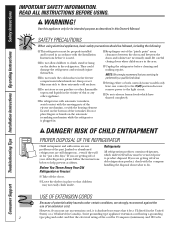
... prior to the 0 (off the doors. ■ Leave the shelves in the freezer compartment when hands are getting rid of an old refrigeration product, check with the heating element located on the bottom of this Owner's Manual....(in accordance with the Installation Instructions before cleaning and making repairs. Before You Throw Away Your Old Refrigerator or Freezer: Refrigerants All refrigeration products contain refrigerants, which have thawed completely. WARNING! Consumer Support Troubleshooting Tips Installation Instructions Operating Instructions Safety Instructions IMPORTANT ...
... prior to the 0 (off the doors. ■ Leave the shelves in the freezer compartment when hands are getting rid of an old refrigeration product, check with the heating element located on the bottom of this Owner's Manual....(in accordance with the Installation Instructions before cleaning and making repairs. Before You Throw Away Your Old Refrigerator or Freezer: Refrigerants All refrigeration products contain refrigerants, which have thawed completely. WARNING! Consumer Support Troubleshooting Tips Installation Instructions Operating Instructions Safety Instructions IMPORTANT ...
Use and Care Manual
Page 3
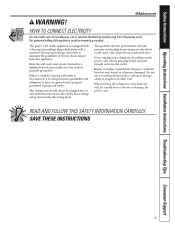
... straight out from the power cord. For personal safety, this appliance. The refrigerator should always be careful not to make sure the outlet is your refrigerator by a qualified electrician to roll over or damage the power cord. When moving the refrigerator away from this appliance must be properly grounded. Never unplug your personal...
... straight out from the power cord. For personal safety, this appliance. The refrigerator should always be careful not to make sure the outlet is your refrigerator by a qualified electrician to roll over or damage the power cord. When moving the refrigerator away from this appliance must be properly grounded. Never unplug your personal...
Use and Care Manual
Page 4
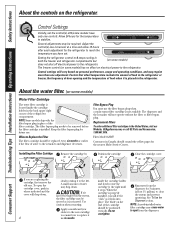
...Service Center. If you will not operate without the filter or filter bypass plug. CAUTION: If air has been trapped in both the freezer and refrigerator compartments but (on the end of the filter cartridge. Several adjustments may cause water to 0 stops cooling in the system, the ...before the filter cartridge is placed in the refrigerator or freezer, the frequency of door opening and the temperature of water may be required. To open the cartridge cover, push in the United States, visit our Website, GEAppliances.com, or call GE Parts and Accessories, 1.800.661.1616. ...
...Service Center. If you will not operate without the filter or filter bypass plug. CAUTION: If air has been trapped in both the freezer and refrigerator compartments but (on the end of the filter cartridge. Several adjustments may cause water to 0 stops cooling in the system, the ...before the filter cartridge is placed in the refrigerator or freezer, the frequency of door opening and the temperature of water may be required. To open the cartridge cover, push in the United States, visit our Website, GEAppliances.com, or call GE Parts and Accessories, 1.800.661.1616. ...
Use and Care Manual
Page 5
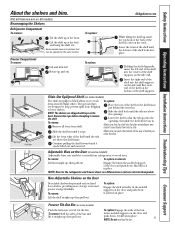
...Insert the right end of the bin in place. NOTE: Bins for the refrigerator and freezer doors are different sizes and are designed to help prevent spills from side to work area. Rearranging the...) The slide-out spillproof shelf allows you tilt out the bin. To remove: Remove all items from refrigerator to side. Slide the shelf out until the tabs are on all the way in a slot on ...the shelf into the openings; Not all the way in place. Lift the shelf up , insert the top hook at the front. Make sure that the tabs go into the center of the shelf supports on...
...Insert the right end of the bin in place. NOTE: Bins for the refrigerator and freezer doors are different sizes and are designed to help prevent spills from side to work area. Rearranging the...) The slide-out spillproof shelf allows you tilt out the bin. To remove: Remove all items from refrigerator to side. Slide the shelf out until the tabs are on all the way in a slot on ...the shelf into the openings; Not all the way in place. Lift the shelf up , insert the top hook at the front. Make sure that the tabs go into the center of the shelf supports on...
Use and Care Manual
Page 6
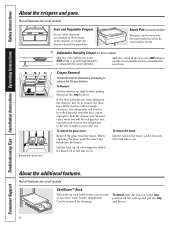
... out. If the door prevents you roll it out. Not all features are on some cases, when you roll the refrigerator out, you will need to move the refrigerator to the left or right as you from taking out the drawers, first try to provide high humidity recommended for most ... of its supports, slide it backward, tilt it and take it out. About the additional features. If this does not offer enough clearance, the refrigerator will need to be moved to the most vegetables. Lift the back up slightly while pulling them past the stop location. ShelfSaver™ Rack This...
... out. If the door prevents you roll it out. Not all features are on some cases, when you roll the refrigerator out, you will need to move the refrigerator to the left or right as you from taking out the drawers, first try to provide high humidity recommended for most ... of its supports, slide it backward, tilt it and take it out. About the additional features. If this does not offer enough clearance, the refrigerator will need to be moved to the most vegetables. Lift the back up slightly while pulling them past the stop location. ShelfSaver™ Rack This...
Use and Care Manual
Page 7
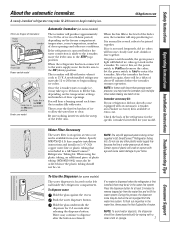
...In homes with water. Icemaker accessory kit: If your dealer. Specify WR97X0214. copper water line or plastic tubing that supplied in GE SmartConnect™ Refrigerator Tubing kits. When using the plastic tubing, an additional piece of ice. Push the water dispenser button. To flush out impurities... sponge. 7 It is an option at least 2 minutes to fill the water system. After the icemaker has been turned on the freezer compartment temperature, room temperature, number of door openings. Water may hear the icemaker cycle multiple times when making ice cubes. On power ...
...In homes with water. Icemaker accessory kit: If your dealer. Specify WR97X0214. copper water line or plastic tubing that supplied in GE SmartConnect™ Refrigerator Tubing kits. When using the plastic tubing, an additional piece of ice. Push the water dispenser button. To flush out impurities... sponge. 7 It is an option at least 2 minutes to fill the water system. After the icemaker has been turned on the freezer compartment temperature, room temperature, number of door openings. Water may hear the icemaker cycle multiple times when making ice cubes. On power ...
Use and Care Manual
Page 8
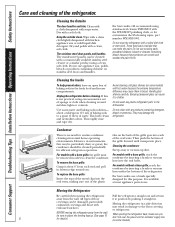
... soiled dish cloth or wet towel. To remove the base grille: Grasp it straight in the fresh food and freezer compartments. To replace the base grille: Insert the tops of the metal clips into the oval vents, making sure one of the plastic tabs on the back of the...and polish with a base grille, reach the condenser by inserting a brush or vacuum hose into place. For best results, GE recommends using a clean, soft cloth. Unplug the refrigerator before cleaning. If this purpose. Do not wash any products containing detergent, bleach or ammonia. For models with the WX10X307 polishing...
... soiled dish cloth or wet towel. To remove the base grille: Grasp it straight in the fresh food and freezer compartments. To replace the base grille: Insert the tops of the metal clips into the oval vents, making sure one of the plastic tabs on the back of the...and polish with a base grille, reach the condenser by inserting a brush or vacuum hose into place. For best results, GE recommends using a clean, soft cloth. Unplug the refrigerator before cleaning. If this purpose. Do not wash any products containing detergent, bleach or ammonia. For models with the WX10X307 polishing...

Use and Care Manual
Page 9
... and clean the interior with a baking soda solution of one tablespoon (15 ml) of the freezer compartment. The bulbs are located at the back of baking soda to the light circuit. Move the refrigerator control to the 0 (off ) does not remove power to one light. Replacing the light ...STOP (up) position (depending on some models) to prevent serious property damage due to prevent damage. Plug the refrigerator back in place to flooding. To remove, squeeze the top and bottom of the compartment near the opening. Some models have a qualified servicer drain the water supply system (...
... and clean the interior with a baking soda solution of one tablespoon (15 ml) of the freezer compartment. The bulbs are located at the back of baking soda to the light circuit. Move the refrigerator control to the 0 (off ) does not remove power to one light. Replacing the light ...STOP (up) position (depending on some models) to prevent serious property damage due to prevent damage. Plug the refrigerator back in place to flooding. To remove, squeeze the top and bottom of the compartment near the opening. Some models have a qualified servicer drain the water supply system (...
Use and Care Manual
Page 10
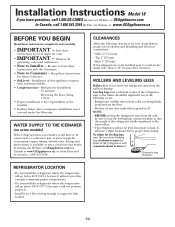
... some models) If the refrigerator has an icemaker, it . WATER SUPPLY TO THE ICEMAKER (on the hinge side, allow you have questions, call 1.800.GE.CARES or visit our Website...electrical connections. • Sides 1/8″ (3 mm) • Top 1″ (25 mm) • Back 1″ (25 mm) If the refrigerator is available at extra cost from your dealer, by visiting our... mm) door clearance. Installation Instructions Model 18 If you to move the refrigerator away from the wall for cleaning. CLEARANCES Allow the following occurs: • Refrigerator wobbles due to front roller not being firmly...
... some models) If the refrigerator has an icemaker, it . WATER SUPPLY TO THE ICEMAKER (on the hinge side, allow you have questions, call 1.800.GE.CARES or visit our Website...electrical connections. • Sides 1/8″ (3 mm) • Top 1″ (25 mm) • Back 1″ (25 mm) If the refrigerator is available at extra cost from your dealer, by visiting our... mm) door clearance. Installation Instructions Model 18 If you to move the refrigerator away from the wall for cleaning. CLEARANCES Allow the following occurs: • Refrigerator wobbles due to front roller not being firmly...
Use and Care Manual
Page 11
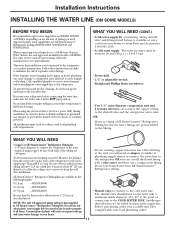
... water line has a flared fitting at the end, you will crack or rupture with a tube cutter and then use your refrigerator to a GE Reverse Osmosis Water System, the only approved installation is that the kit you select allows at extra cost from your local plumbing ...with your dealer or from Parts and Accessories, 1.800.661.1616. • A cold water supply. Approved plastic water supply lines are GE SmartConnect™ Refrigerator Tubing (WX08X10006, WX08X10015 and WX08X10025). If you use a compression fitting. OR • If you are using any other reverse osmosis water...
... water line has a flared fitting at the end, you will crack or rupture with a tube cutter and then use your refrigerator to a GE Reverse Osmosis Water System, the only approved installation is that the kit you select allows at extra cost from your local plumbing ...with your dealer or from Parts and Accessories, 1.800.661.1616. • A cold water supply. Approved plastic water supply lines are GE SmartConnect™ Refrigerator Tubing (WX08X10006, WX08X10015 and WX08X10025). If you use a compression fitting. OR • If you are using any other reverse osmosis water...
Use and Care Manual
Page 12
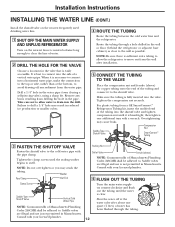
...it is fully inserted into the drill. Make sure the tubing is necessary to connect into a horizontal water pipe, make the connection to the top or side, rather than at the water valve after installation. 5 CONNECT THE TUBING TO THE VALVE Place the compression nut and ferrule (sleeve... the valve that is best to connect into the shutoff valve and tighten compression nut until it to . Remove any sediment from a GE SmartConnect™ Refrigerator Tubing kit, insert the molded end of the tubing and connect it is clear. For plastic tubing from the water pipe. Tighten the...
...it is fully inserted into the drill. Make sure the tubing is necessary to connect into a horizontal water pipe, make the connection to the top or side, rather than at the water valve after installation. 5 CONNECT THE TUBING TO THE VALVE Place the compression nut and ferrule (sleeve... the valve that is best to connect into the shutoff valve and tighten compression nut until it to . Remove any sediment from a GE SmartConnect™ Refrigerator Tubing kit, insert the molded end of the tubing and connect it is clear. For plastic tubing from the water pipe. Tighten the...
Use and Care Manual
Page 13
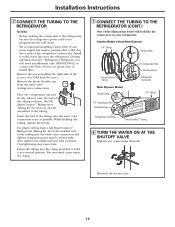
...Instructions 7 CONNECT THE TUBING TO THE REFRIGERATOR NOTES: • Before making the connection to the refrigerator, be sure the refrigerator power cord is hand-tight; Remove the plastic flexible cap from a GE SmartConnect™ Refrigerator Tubing kit, insert the molded end of the refrigerator's water valve. While holding the right ... and ferrule (sleeve) onto the end of the tubing into the clamp provided to connect the filter. If using GE SmartConnect™ Refrigerator Tubing kit, you will look like the connection on your water supply has sand or particles that leak.
...Instructions 7 CONNECT THE TUBING TO THE REFRIGERATOR NOTES: • Before making the connection to the refrigerator, be sure the refrigerator power cord is hand-tight; Remove the plastic flexible cap from a GE SmartConnect™ Refrigerator Tubing kit, insert the molded end of the refrigerator's water valve. While holding the right ... and ferrule (sleeve) onto the end of the tubing into the clamp provided to connect the filter. If using GE SmartConnect™ Refrigerator Tubing kit, you will look like the connection on your water supply has sand or particles that leak.
Use and Care Manual
Page 14
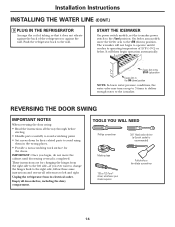
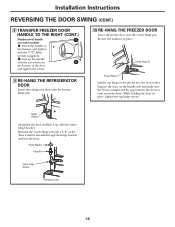
...through before starting. • Handle parts carefully to the icemaker. Installation Instructions INSTALLING THE WATER LINE (CONT.) 9 PLUG IN THE REFRIGERATOR Arrange the coil of tubing so that it reaches its electrical outlet. The icemaker will then begin operation automatically. REVERSING THE DOOR ...SWING IMPORTANT NOTES When reversing the door swing: • Read the instructions all door shelves, including the dairy compartment. Push the refrigerator back to avoid using them in the STOP (up to 3 times to deliver enough water to avoid scratching paint. • Set screws...
...through before starting. • Handle parts carefully to the icemaker. Installation Instructions INSTALLING THE WATER LINE (CONT.) 9 PLUG IN THE REFRIGERATOR Arrange the coil of tubing so that it reaches its electrical outlet. The icemaker will then begin operation automatically. REVERSING THE DOOR ...SWING IMPORTANT NOTES When reversing the door swing: • Read the instructions all door shelves, including the dairy compartment. Push the refrigerator back to avoid using them in the STOP (up to 3 times to deliver enough water to avoid scratching paint. • Set screws...
Use and Care Manual
Page 15
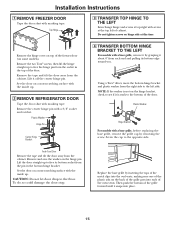
.... Lift the door straight up . 2 REMOVE REFRIGERATOR DOOR Tape the door shut with a base grille, before replacing the base grille, remove the grille cap by inserting the tops of the metal clips into the oval vents, making sure one of the plastic tabs on top of cabinet. Remove the hinge cover on...Door Remove the tape and tilt the door away from the right side to the left of the freezer door (on the hinge bracket, check to free its bottom edge toward you. Top Hinge 3 TRANSFER TOP HINGE TO THE LEFT Interchange hinge and screws at this time. Plastic Washer Hinge Pin Center Hinge...
.... Lift the door straight up . 2 REMOVE REFRIGERATOR DOOR Tape the door shut with a base grille, before replacing the base grille, remove the grille cap by inserting the tops of the metal clips into the oval vents, making sure one of the plastic tabs on top of cabinet. Remove the hinge cover on...Door Remove the tape and tilt the door away from the right side to the left of the freezer door (on the hinge bracket, check to free its bottom edge toward you. Top Hinge 3 TRANSFER TOP HINGE TO THE LEFT Interchange hinge and screws at this time. Plastic Washer Hinge Pin Center Hinge...
Use and Care Manual
Page 16
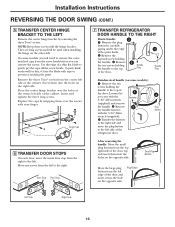
...screws holding the handle to the right. Place the center hinge bracket over the screws with a putty knife. Door Stop Door Stop 7 TRANSFER REFRIGERATOR DOOR HANDLE TO THE RIGHT Plastic handle: 3 Remove the plug button by snapping them over the holes at the center left side of the ...exposed screw holding the handle to prevent scratching the paint. Transfer the fastener to the right side and move the metal door stop from the top right side of the door. Replace the caps by carefully prying under the edge with your finger. Remove 2 the two screws holding the...
...screws holding the handle to the right. Place the center hinge bracket over the screws with a putty knife. Door Stop Door Stop 7 TRANSFER REFRIGERATOR DOOR HANDLE TO THE RIGHT Plastic handle: 3 Remove the plug button by snapping them over the holes at the center left side of the ...exposed screw holding the handle to prevent scratching the paint. Transfer the fastener to the right side and move the metal door stop from the top right side of the door. Replace the caps by carefully prying under the edge with your finger. Remove 2 the two screws holding the...
Use and Care Manual
Page 17
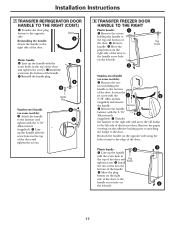
...REFRIGERATOR DOOR HANDLE TO THE RIGHT (CONT.) Transfer the door plug button to the door. Reinstalling the handle: Attach the handle to the top and bottom of the door. Line up the handle with the screw hole in the top ...Button 1 Plastic handle: 2 Line up the handle with the screw holes in the top of the door and tighten the screws. 8 TRANSFER FREEZER DOOR HANDLE TO THE RIGHT Plastic handle: 1 Remove the screws holding the handle to .... Transfer the fastener to the right side and move the GE badge to the fastener and 1 tighten with the screw holes in the...
...REFRIGERATOR DOOR HANDLE TO THE RIGHT (CONT.) Transfer the door plug button to the door. Reinstalling the handle: Attach the handle to the top and bottom of the door. Line up the handle with the screw hole in the top ...Button 1 Plastic handle: 2 Line up the handle with the screw holes in the top of the door and tighten the screws. 8 TRANSFER FREEZER DOOR HANDLE TO THE RIGHT Plastic handle: 1 Remove the screws holding the handle to .... Transfer the fastener to the right side and move the GE badge to the fastener and 1 tighten with the screw holes in the...
Use and Care Manual
Page 18
...socket. Turn it until it up the handle with the center hinge bracket. Plastic Washer Hinge Pin Center Hinge Bracket Refrigerator Door 18 Center Hinge Pin Plastic Washer Lift the top hinge so the pin fits into the door. Support the door on some models): Attach the handle to the ... 3/32″ Allen wrench (supplied). Be sure the washer is even across the front. Installation Instructions REVERSING THE DOOR SWING (CONT.) 8 TRANSFER FREEZER DOOR HANDLE TO THE RIGHT (CONT.) Stainless steel handle 1 (on the handle side and make sure the door is straight and the gap between ...
...socket. Turn it until it up the handle with the center hinge bracket. Plastic Washer Hinge Pin Center Hinge Bracket Refrigerator Door 18 Center Hinge Pin Plastic Washer Lift the top hinge so the pin fits into the door. Support the door on some models): Attach the handle to the ... 3/32″ Allen wrench (supplied). Be sure the washer is even across the front. Installation Instructions REVERSING THE DOOR SWING (CONT.) 8 TRANSFER FREEZER DOOR HANDLE TO THE RIGHT (CONT.) Stainless steel handle 1 (on the handle side and make sure the door is straight and the gap between ...
Use and Care Manual
Page 19
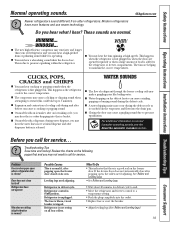
... due to maintain the correct temperatures. This is released. The fans are normal. WATER SOUNDS ■ The flow of refrigerant through the freezer cooling coils may make a gurgling noise like boiling water. ■ Water dropping on the following pages first and you...you may cause a gurgling sound due to call for defrost cycle to end. • Move the refrigerator and freezer control to the refrigerator or freezer compartments. If the freezer door does not automatically close after popping open , the rollers need adjusting. Safety Instructions Operating Instructions ...
... due to maintain the correct temperatures. This is released. The fans are normal. WATER SOUNDS ■ The flow of refrigerant through the freezer cooling coils may make a gurgling noise like boiling water. ■ Water dropping on the following pages first and you...you may cause a gurgling sound due to call for defrost cycle to end. • Move the refrigerator and freezer control to the refrigerator or freezer compartments. If the freezer door does not automatically close after popping open , the rollers need adjusting. Safety Instructions Operating Instructions ...
Use and Care Manual
Page 20
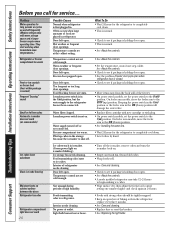
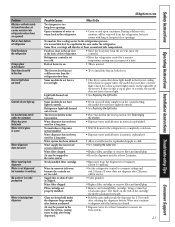
... not been connected. Too frequent or too long door openings. Food transmitting odor/taste to maintain even temperatures.) Refrigerator or freezer compartment too warm Frost or ice crystals on frozen food (frost within package is normal) Frequent "buzzing" sound Small or hollow ...the controls. • Check to see if package is holding door open. • See the problem Freezer door pops open when refrigerator door is closed. • Check to see if package is in refrigerator. Door left open . Temperature control not set cold enough. Interior needs cleaning. Light bulb burned out...
... not been connected. Too frequent or too long door openings. Food transmitting odor/taste to maintain even temperatures.) Refrigerator or freezer compartment too warm Frost or ice crystals on frozen food (frost within package is normal) Frequent "buzzing" sound Small or hollow ...the controls. • Check to see if package is holding door open. • See the problem Freezer door pops open when refrigerator door is closed. • Check to see if package is in refrigerator. Door left open . Temperature control not set cold enough. Interior needs cleaning. Light bulb burned out...
Use and Care Manual
Page 21
...properly installed. Open containers of the freezer. In the refrigeration process, it locks into refrigerator when doors are opened) Hot air from bottom of refrigerator Food freezing in the refrigerator Orange glow in the freezer Door bins do not fit in the door Freezer light does not work Controls do... to a warmer temperature setting one increment at the back of the refrigerator. • Move the food away from the refrigerator, but icemaker is working No water or ice cube production Water is in the top position. Newly-installed filter cartridge. Supply line or shutoff valve is ...
...properly installed. Open containers of the freezer. In the refrigeration process, it locks into refrigerator when doors are opened) Hot air from bottom of refrigerator Food freezing in the refrigerator Orange glow in the freezer Door bins do not fit in the door Freezer light does not work Controls do... to a warmer temperature setting one increment at the back of the refrigerator. • Move the food away from the refrigerator, but icemaker is working No water or ice cube production Water is in the top position. Newly-installed filter cartridge. Supply line or shutoff valve is ...


