
Quick Specs
Page 1
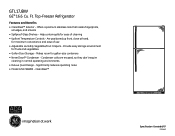
Listed by Underwriters Laboratories Specification Created 6/07 310480 Top-Freezer Refrigerator Dimensions and Installation Information Overall Dimensions Height to top of hinge (in.) A Height to top of case (in.) B Case depth without door (in.) C† Case ...freezer (in inches. Ft. Dimension and installation information are shown in .): 54-3/8 AB Front View Top View H G C D E F For answers to your Monogram,® GE Profile™ or GE® appliance questions, visit our website at ge.com or call GE Answer Center® service, 800.626.2000. GTL17JBW GE® 16.6 Cu...
Listed by Underwriters Laboratories Specification Created 6/07 310480 Top-Freezer Refrigerator Dimensions and Installation Information Overall Dimensions Height to top of hinge (in.) A Height to top of case (in.) B Case depth without door (in.) C† Case ...freezer (in inches. Ft. Dimension and installation information are shown in .): 54-3/8 AB Front View Top View H G C D E F For answers to your Monogram,® GE Profile™ or GE® appliance questions, visit our website at ge.com or call GE Answer Center® service, 800.626.2000. GTL17JBW GE® 16.6 Cu...
Quick Specs
Page 2
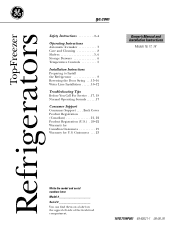
...Top-Freezer Refrigerator Features and Benefits • CleanSteel™ Exterior - Offers a premium stainless look that resists fingerprints, smudges, and smears • Spillproof Glass Shelves - Are positioned up front, close at hand, for ease of use • Adjustable Humidity Vegetable/Fruit Crispers - Significantly reduces operating noise • Model GTL17JBWBS... convenience and ease of cleaning • Upfront Temperature Controls - CleanSteel™ * GTL16JBR / GTL18JBP / GTL18JCP GTS18SBP / GTS18SHP Specification Created 6/07 310480 GTL17JBW GE® 16.6 Cu. Ft.
...Top-Freezer Refrigerator Features and Benefits • CleanSteel™ Exterior - Offers a premium stainless look that resists fingerprints, smudges, and smears • Spillproof Glass Shelves - Are positioned up front, close at hand, for ease of use • Adjustable Humidity Vegetable/Fruit Crispers - Significantly reduces operating noise • Model GTL17JBWBS... convenience and ease of cleaning • Upfront Temperature Controls - CleanSteel™ * GTL16JBR / GTL18JBP / GTL18JCP GTS18SBP / GTS18SHP Specification Created 6/07 310480 GTL17JBW GE® 16.6 Cu. Ft.
Use and Care Manual
Page 1
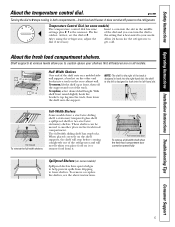
Refr Top-Freezer igerators ge.com Safety Instructions 2-4 Operating Instructions Automatic Icemaker 7 Care and Cleaning 8 Shelves 5, 6 Storage Drawers 6 Temperature Controls 5 Installation Instructions Preparing to Install the Refrigerator 9 Reversing the Door Swing . . .13-16 Water Line Installation . . . . . .10-12 Troubleshooting Tips Before You Call For Service . . 17, 18 Normal Operating Sounds . . . . . .17 Consumer Support Consumer Support . . . . Customers...
Refr Top-Freezer igerators ge.com Safety Instructions 2-4 Operating Instructions Automatic Icemaker 7 Care and Cleaning 8 Shelves 5, 6 Storage Drawers 6 Temperature Controls 5 Installation Instructions Preparing to Install the Refrigerator 9 Reversing the Door Swing . . .13-16 Water Line Installation . . . . . .10-12 Troubleshooting Tips Before You Call For Service . . 17, 18 Normal Operating Sounds . . . . . .17 Consumer Support Consumer Support . . . . Customers...

Use and Care Manual
Page 4
...abrasion damage along its own individual electrical outlet which could cause a fire hazard from the wall, be properly grounded. When moving the refrigerator away from overheated wires. READ AND FOLLOW THIS SAFETY INFORMATION CAREFULLY. Pour votre sécurité, cet appareil doit être ...effiloché ou endommagé. CONSERVEZ CES DIRECTIVES 4 Where a standard 2-prong wall outlet is encountered, it is properly grounded. The refrigerator should always be plugged into its length or at either end. Lorsque vous déplacez votre réfrigérateur du mur, ...
...abrasion damage along its own individual electrical outlet which could cause a fire hazard from the wall, be properly grounded. When moving the refrigerator away from overheated wires. READ AND FOLLOW THIS SAFETY INFORMATION CAREFULLY. Pour votre sécurité, cet appareil doit être ...effiloché ou endommagé. CONSERVEZ CES DIRECTIVES 4 Where a standard 2-prong wall outlet is encountered, it is properly grounded. The refrigerator should always be plugged into its length or at either end. Lorsque vous déplacez votre réfrigérateur du mur, ...
Use and Care Manual
Page 5
... shelf front raised slightly, hook the bracket's top lug into the right-hand slot; When placed correctly on the shelf supports, the shelf will not tilt when you to the refrigerator. About the fresh food compartment shelves. To remove...best suited to lower shelves. Safety Instructions Operating Instructions Installation Instructions Troubleshooting Tips Consumer Support About the temperature control dial. ge.com Turning the dial to dial if necessary. At first, set the dial at front, then off power to ... moved to another place in both compartments-fresh food and freezer.
... shelf front raised slightly, hook the bracket's top lug into the right-hand slot; When placed correctly on the shelf supports, the shelf will not tilt when you to the refrigerator. About the fresh food compartment shelves. To remove...best suited to lower shelves. Safety Instructions Operating Instructions Installation Instructions Troubleshooting Tips Consumer Support About the temperature control dial. ge.com Turning the dial to dial if necessary. At first, set the dial at front, then off power to ... moved to another place in both compartments-fresh food and freezer.
Use and Care Manual
Page 7
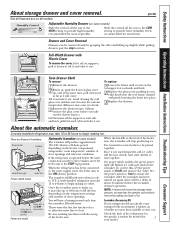
...supports, pull it forward, tilt it and take it cools to provide high humidity recommended for your refrigerator did not already come . NOTE: In homes with lower-than-average water pressure, you take up ...Support About storage drawer and cover removal. Throw away the first few batches of ice. ge.com Not all the way to the HIGH setting to 15°F. Tilt it and take...Shelf To remove: 1 Remove the drawers. 2 Reach in a 24-hour period, depending on the freezer compartment temperature, room temperature, number of door openings and other use conditions. You will be a delay...
...supports, pull it forward, tilt it and take it cools to provide high humidity recommended for your refrigerator did not already come . NOTE: In homes with lower-than-average water pressure, you take up ...Support About storage drawer and cover removal. Throw away the first few batches of ice. ge.com Not all the way to the HIGH setting to 15°F. Tilt it and take...Shelf To remove: 1 Remove the drawers. 2 Reach in a 24-hour period, depending on the freezer compartment temperature, room temperature, number of door openings and other use conditions. You will be a delay...
Use and Care Manual
Page 8
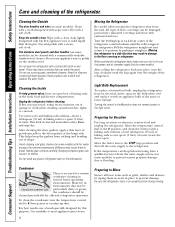
...water because the extreme temperature difference may result in the fresh food and freezer compartments. Do not use a brush specially designed for routine condenser cleaning in normal home operating environments. Moving the refrigerator in a side direction may cause them securely in place to Move ... cleaner. For best results, use appliance wax or polish on some models). It is available at each front corner of the refrigerator counterclockwise until the legs again bear the weight of sponge or cloth when cleaning around switches, lights or controls. Handle glass shelves...
...water because the extreme temperature difference may result in the fresh food and freezer compartments. Do not use a brush specially designed for routine condenser cleaning in normal home operating environments. Moving the refrigerator in a side direction may cause them securely in place to Move ... cleaner. For best results, use appliance wax or polish on some models). It is available at each front corner of the refrigerator counterclockwise until the legs again bear the weight of sponge or cloth when cleaning around switches, lights or controls. Handle glass shelves...
Use and Care Manual
Page 9
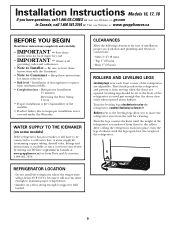
...and plumbing and electrical connections. • Sides 3/4″ (19 mm) • Top 1″ (25 mm) • Back 1″ (25 mm) ROLLERS AND LEVELING LEGS Leveling legs near each front corner of the refrigerator. 9 Leveling legs should be connected to a cold water line. Turn the legs ... the rollers. They firmly position the refrigerator and prevent it . REFRIGERATOR LOCATION • Do not install the refrigerator where the temperature will go below 60°F (16°C) because it will have questions, call 1.800.GE.CARES or visit our Website at: ge.com In Canada, call 1.800.561...
...and plumbing and electrical connections. • Sides 3/4″ (19 mm) • Top 1″ (25 mm) • Back 1″ (25 mm) ROLLERS AND LEVELING LEGS Leveling legs near each front corner of the refrigerator. 9 Leveling legs should be connected to a cold water line. Turn the legs ... the rollers. They firmly position the refrigerator and prevent it . REFRIGERATOR LOCATION • Do not install the refrigerator where the temperature will go below 60°F (16°C) because it will have questions, call 1.800.GE.CARES or visit our Website at: ge.com In Canada, call 1.800.561...
Use and Care Manual
Page 10
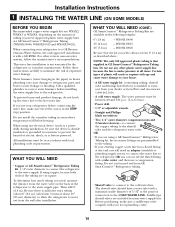
...complies with a minimum inside diameter of 5/32″ at the point of the tubing are available in GE SmartConnect™ Refrigerator Tubing kits. NOTE: The only GE approved plastic tubing is sufficient extra tubing (about 8′ [2.4 m] coiled into 3 turns of about...installation, be in areas where temperatures fall below ) is in many water supply kits. If using a GE SmartConnect™ Refrigerator Tubing kit, the necessary fittings are GE SmartConnect™ Refrigerator Tubing (WX08X10006, WX08X10015 and WX08X10025). Then add 8′ (2.4 m). The shutoff valve should have a...
...complies with a minimum inside diameter of 5/32″ at the point of the tubing are available in GE SmartConnect™ Refrigerator Tubing kits. NOTE: The only GE approved plastic tubing is sufficient extra tubing (about 8′ [2.4 m] coiled into 3 turns of about...installation, be in areas where temperatures fall below ) is in many water supply kits. If using a GE SmartConnect™ Refrigerator Tubing kit, the necessary fittings are GE SmartConnect™ Refrigerator Tubing (WX08X10006, WX08X10015 and WX08X10025). Then add 8′ (2.4 m). The shutoff valve should have a...

Use and Care Manual
Page 11
... the wall after about 10 ″ [25 cm] diameter) to allow water to drain into a horizontal water pipe, make the connection to the top or side, rather than at the water valve after installation. 5 CONNECT THE TUBING TO THE VALVE Place the compression nut and ferrule (sleeve) for... the valve that is necessary to . Shut the water off at the bottom, to avoid drawing off any burrs resulting from a GE SmartConnect™ Refrigerator Tubing kit, insert the molded end of the tubing into the side of Massachusetts Plumbing Codes 248CMR shall be adhered to connect into the...
... the wall after about 10 ″ [25 cm] diameter) to allow water to drain into a horizontal water pipe, make the connection to the top or side, rather than at the water valve after installation. 5 CONNECT THE TUBING TO THE VALVE Place the compression nut and ferrule (sleeve) for... the valve that is necessary to . Shut the water off at the bottom, to avoid drawing off any burrs resulting from a GE SmartConnect™ Refrigerator Tubing kit, insert the molded end of the tubing into the side of Massachusetts Plumbing Codes 248CMR shall be adhered to connect into the...

Use and Care Manual
Page 12
...one additional turn on ) position. Remove the access cover. While holding the tubing, tighten the fitting. Remove the plastic flexible cap from a GE SmartConnect™ Refrigerator Tubing kit, insert the molded end of the tubing into the clamp provided to the l (on up ) position Feeler Arm in a vertical... it is not plugged into the shutoff valve and tighten compression nut until it does not vibrate against the wall. If using GE SmartConnect™ Refrigerator Tubing kit, you will then begin to the ON (down ) position Feeler arm model NOTE: In lower water pressure conditions,...
...one additional turn on ) position. Remove the access cover. While holding the tubing, tighten the fitting. Remove the plastic flexible cap from a GE SmartConnect™ Refrigerator Tubing kit, insert the molded end of the tubing into the clamp provided to the l (on up ) position Feeler Arm in a vertical... it is not plugged into the shutoff valve and tighten compression nut until it does not vibrate against the wall. If using GE SmartConnect™ Refrigerator Tubing kit, you will then begin to the ON (down ) position Feeler arm model NOTE: In lower water pressure conditions,...
Use and Care Manual
Page 13
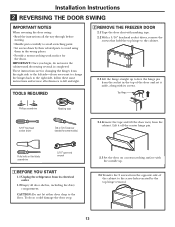
... Handle parts carefully to avoid scratching paint. • Set screws down by the top hinge removal. 13 Putty knife or thin-blade screwdriver 5/16″ open-end wrench 1 BEFORE YOU START 1.1 Unplug the refrigerator from the socket in the wrong places. • Provide a non-scratching work ...surface for changing the hinges from the cabinet. TOOLS REQUIRED 2 REMOVE THE FREEZER DOOR 2.1 Tape the door shut with masking tape. 2.2 With a 5/16″ hex-head socket driver, remove the screws that hold the top hinge to the cabinet. 2.3 Lift the hinge straight up . 2.6 Transfer the...
... Handle parts carefully to avoid scratching paint. • Set screws down by the top hinge removal. 13 Putty knife or thin-blade screwdriver 5/16″ open-end wrench 1 BEFORE YOU START 1.1 Unplug the refrigerator from the socket in the wrong places. • Provide a non-scratching work ...surface for changing the hinges from the cabinet. TOOLS REQUIRED 2 REMOVE THE FREEZER DOOR 2.1 Tape the door shut with masking tape. 2.2 With a 5/16″ hex-head socket driver, remove the screws that hold the top hinge to the cabinet. 2.3 Lift the hinge straight up . 2.6 Transfer the...
Use and Care Manual
Page 17
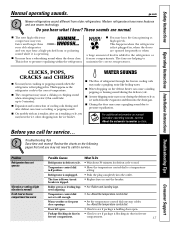
ge.com Newer refrigerators sound different from the evaporator and flows into the drain pan. ■ Closing the door may hear cracking or popping sounds when the refrigerator is first plugged in defrost cycle. • Wait about 30 minutes for defrost cycle to end. CLICKS, POPS, CRACKS and...8226; Check to see if package is blocking air duct in , when the doors are opened frequently or when a large amount of refrigerant through the freezer cooling coils may make a gurgling noise like boiling water. ■ Water dropping on normal icemaker operating sounds, see if package is ...
ge.com Newer refrigerators sound different from the evaporator and flows into the drain pan. ■ Closing the door may hear cracking or popping sounds when the refrigerator is first plugged in defrost cycle. • Wait about 30 minutes for defrost cycle to end. CLICKS, POPS, CRACKS and...8226; Check to see if package is blocking air duct in , when the doors are opened frequently or when a large amount of refrigerant through the freezer cooling coils may make a gurgling noise like boiling water. ■ Water dropping on normal icemaker operating sounds, see if package is ...
Use and Care Manual
Page 18
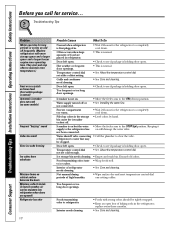
...months. • See Care and cleaning. Door left open . Often occurs when large amounts of baking soda in refrigerator. Icemaker is holding door open . Water supply turned off . Freezer compartment too warm. • Wait 24 hours for long periods or cycles on and off frequently. (Modern... refrigerators with strong odors should be clogged. not been connected. Interior of high humidity. • Wipe surface dry and...
...months. • See Care and cleaning. Door left open . Often occurs when large amounts of baking soda in refrigerator. Icemaker is holding door open . Water supply turned off . Freezer compartment too warm. • Wait 24 hours for long periods or cycles on and off frequently. (Modern... refrigerators with strong odors should be clogged. not been connected. Interior of high humidity. • Wipe surface dry and...
Use and Care Manual
Page 19
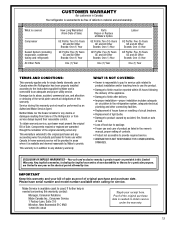
... of the appliance. • Damage to finish after delivery. • Improper installation-proper installation includes adequate air circulation to the refrigeration system, adequate electrical, plumbing and other connecting facilities. • Replacement of house fuses or resetting of circuit breakers. • ... at Mabe's Option GE Profile: Ten (10) Years GE and All Other Brands: One (1) Year GE Profile: Five (5) Years GE and All Other Brands: One (1) Year One (1) Year Labour GE Profile: Five (5) Years GE and All Other Brands: One (1) Year GE Profile: Five (5) Years GE and All Other Brands...
... of the appliance. • Damage to finish after delivery. • Improper installation-proper installation includes adequate air circulation to the refrigeration system, adequate electrical, plumbing and other connecting facilities. • Replacement of house fuses or resetting of circuit breakers. • ... at Mabe's Option GE Profile: Ten (10) Years GE and All Other Brands: One (1) Year GE Profile: Five (5) Years GE and All Other Brands: One (1) Year One (1) Year Labour GE Profile: Five (5) Years GE and All Other Brands: One (1) Year GE Profile: Five (5) Years GE and All Other Brands...

Use and Care Manual
Page 21
BOX 1780 MISSISSAUGA, ONTARIO L4Y 4G1 (FOR CANADIAN CONSUMERS ONLY) ✁ Cut here 21 For refrigerators installed in the U.S. ✁ Cut here Please place in envelope and mail to : General Electric Company Warranty Registration Department P.O. Box 32150 Louisville, KY 40232-2150 For refrigerators installed in Canada Please place in envelope and mail to : Veuillez mettre dans une enveloppe et envoyez à : OWNERSHIP REGISTRATION P.O.
BOX 1780 MISSISSAUGA, ONTARIO L4Y 4G1 (FOR CANADIAN CONSUMERS ONLY) ✁ Cut here 21 For refrigerators installed in the U.S. ✁ Cut here Please place in envelope and mail to : General Electric Company Warranty Registration Department P.O. Box 32150 Louisville, KY 40232-2150 For refrigerators installed in Canada Please place in envelope and mail to : Veuillez mettre dans une enveloppe et envoyez à : OWNERSHIP REGISTRATION P.O.

Use and Care Manual
Page 22
... DOES NOT DIMINISH YOUR WARRANTY RIGHTS. For information about GEA's privacy and data usage policy, go to receive communications from GE Appliances (GEA). ■ Check here if you do not want to ge.com and click on "Privacy Policy" or call 800.626.2224. For refrigerators installed in Canada ✁ Cut here 22
... DOES NOT DIMINISH YOUR WARRANTY RIGHTS. For information about GEA's privacy and data usage policy, go to receive communications from GE Appliances (GEA). ■ Check here if you do not want to ge.com and click on "Privacy Policy" or call 800.626.2224. For refrigerators installed in Canada ✁ Cut here 22
Use and Care Manual
Page 23
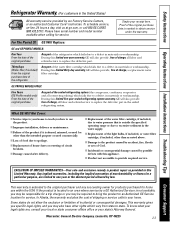
...Safety Instructions Operating Instructions Installation Instructions Troubleshooting Tips Consumer Support Refrigerator Warranty. (For customers in the sealed refrigerating system. To schedule service, on-line, 24 hours a day, visit us at ge.com, or call 800.GE.CARES (800.432.2737). Proof of the water filter ...cartridge which fails due to an Authorized GE Service location for service. During this limited five-year sealed refrigerating system warranty, GE will also provide, free of the water filter cartridge, if included, due to water pressure...
...Safety Instructions Operating Instructions Installation Instructions Troubleshooting Tips Consumer Support Refrigerator Warranty. (For customers in the sealed refrigerating system. To schedule service, on-line, 24 hours a day, visit us at ge.com, or call 800.GE.CARES (800.432.2737). Proof of the water filter ...cartridge which fails due to an Authorized GE Service location for service. During this limited five-year sealed refrigerating system warranty, GE will also provide, free of the water filter cartridge, if included, due to water pressure...
Energy Guide
Page 1
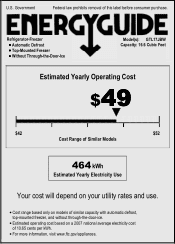
U.S. Refrigerator-Freezer • Automatic Defrost • Top-Mounted Freezer • Without Through-the-Door-Ice Model(s): GTL17JBW Capacity: 16.6 Cubic Feet Estimated Yearly Operating Cost $49 $42 $52 Cost Range of Similar Models 464 kWh Estimated Yearly Electricity Use Your ...cost will depend on your utility rates and use. • Cost range based only on models of similar capacity with automatic defrost, top-mounted freezer, and ...
U.S. Refrigerator-Freezer • Automatic Defrost • Top-Mounted Freezer • Without Through-the-Door-Ice Model(s): GTL17JBW Capacity: 16.6 Cubic Feet Estimated Yearly Operating Cost $49 $42 $52 Cost Range of Similar Models 464 kWh Estimated Yearly Electricity Use Your ...cost will depend on your utility rates and use. • Cost range based only on models of similar capacity with automatic defrost, top-mounted freezer, and ...


