
Installation Instructions
Page 1
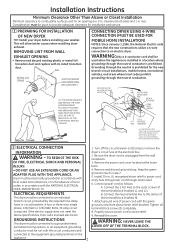
... local codes. • This dryer must be performed by a qualified installer. • Install the clothes dryer according to these instructions with your Use and Care Book for future reference. • Before the old dryer is Clean (see section 1) and Meets Attached Installation Specifications (see section ...176;F for local inspector's use. •IMPORTANT- Flexible venting materials are located in the control console. • Do not allow children on or in the appliance. Step 6 Connect the External Exhaust (see section 9. 234D1113P001 31-16224-1 07/07/10 GE TOOLS YOU WILL NEED ...
... local codes. • This dryer must be performed by a qualified installer. • Install the clothes dryer according to these instructions with your Use and Care Book for future reference. • Before the old dryer is Clean (see section 1) and Meets Attached Installation Specifications (see section ...176;F for local inspector's use. •IMPORTANT- Flexible venting materials are located in the control console. • Do not allow children on or in the appliance. Step 6 Connect the External Exhaust (see section 9. 234D1113P001 31-16224-1 07/07/10 GE TOOLS YOU WILL NEED ...
Installation Instructions
Page 2
...the NATIONAL ELECTRICAL CODE, ANSI/NFPA NO. 70. TO REDUCE THE RISK OF FIRE, ELECTRICAL SHOCK AND PERSONAL INJURY: • DO NOT USE AN EXTENSION CORD OR AN ADAPTER PLUG WITH THIS APPLIANCE. If the electric supply does not meet the above strain relief bracket). UL recognized...) HOT WIRE 3/4", UL RECOGNIZED STRAIN RELIEF COVER 4 #10 AWG MINIMUM COPPER CONDUCTORS OR 120/240V 30A POWER SUPPLY CORD KIT MARKED FOR USE WITH DRYERS & PROVIDED WITH CLOSED LOOP OR SPADE TERMINALS WITH UPTURNED ENDS (NOT SUPPLIED). 2 ELECTRICAL CONNECTION INFORMATION WARNING - GROUNDING INSTRUCTIONS This dryer ...
...the NATIONAL ELECTRICAL CODE, ANSI/NFPA NO. 70. TO REDUCE THE RISK OF FIRE, ELECTRICAL SHOCK AND PERSONAL INJURY: • DO NOT USE AN EXTENSION CORD OR AN ADAPTER PLUG WITH THIS APPLIANCE. If the electric supply does not meet the above strain relief bracket). UL recognized...) HOT WIRE 3/4", UL RECOGNIZED STRAIN RELIEF COVER 4 #10 AWG MINIMUM COPPER CONDUCTORS OR 120/240V 30A POWER SUPPLY CORD KIT MARKED FOR USE WITH DRYERS & PROVIDED WITH CLOSED LOOP OR SPADE TERMINALS WITH UPTURNED ENDS (NOT SUPPLIED). 2 ELECTRICAL CONNECTION INFORMATION WARNING - GROUNDING INSTRUCTIONS This dryer ...

Installation Instructions
Page 3
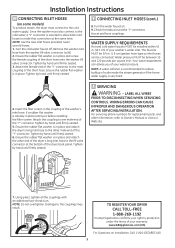
...installed at least 4 ft. Be sure the dryer cord is YOUR RESPONSIBILITY. Connect power cord as one 90º turn and exhaust hood. Using exhaust longer than specified length will: • Increase the drying times and the energy cost. • Reduce the dryer life. •... TERMINAL BLOCK. 3 EXHAUST INFORMATION WARNING - SEPARATION OF TURNS For best performance, separate all turns by the warranty. Installation Instructions CONNECTING DRYER USING 3-WIRE CONNECTION IF REQUIRED, BY LOCAL CODE, INS TALL EXTERNAL GROUND (NOT PROVIDED) TO GROUNDED ME TAL, COLD WATER PIPE, OR...
...installed at least 4 ft. Be sure the dryer cord is YOUR RESPONSIBILITY. Connect power cord as one 90º turn and exhaust hood. Using exhaust longer than specified length will: • Increase the drying times and the energy cost. • Reduce the dryer life. •... TERMINAL BLOCK. 3 EXHAUST INFORMATION WARNING - SEPARATION OF TURNS For best performance, separate all turns by the warranty. Installation Instructions CONNECTING DRYER USING 3-WIRE CONNECTION IF REQUIRED, BY LOCAL CODE, INS TALL EXTERNAL GROUND (NOT PROVIDED) TO GROUNDED ME TAL, COLD WATER PIPE, OR...

Installation Instructions
Page 4
... This will serve as a collection point for inspection and cleaning of = grease and lint creates a potential fire hazard. • Do not use duct longer than specified in the exhaust length table. EXTERNAL DUCT OPENING DUCT TAPE OR DUCT CLAMP 4" METAL DUCT (CUT TO PROPER LENGTH) DUCT...insulated to reduce condensation and lint build-up. 4 EXHAUST CONNECTION WARNING - THIS DRYER COMES READY FOR REAR EXHAUSTING. IF SPACE IS LIMITED, USE THE INSTRUCTIONS IN SECTION 9 TO EXHAUST DIRECTLY FROM THE SIDES OR BOTTOM OF THE CABINET. They will cause lint to accumulate, creating a potential...
... This will serve as a collection point for inspection and cleaning of = grease and lint creates a potential fire hazard. • Do not use duct longer than specified in the exhaust length table. EXTERNAL DUCT OPENING DUCT TAPE OR DUCT CLAMP 4" METAL DUCT (CUT TO PROPER LENGTH) DUCT...insulated to reduce condensation and lint build-up. 4 EXHAUST CONNECTION WARNING - THIS DRYER COMES READY FOR REAR EXHAUSTING. IF SPACE IS LIMITED, USE THE INSTRUCTIONS IN SECTION 9 TO EXHAUST DIRECTLY FROM THE SIDES OR BOTTOM OF THE CABINET. They will cause lint to accumulate, creating a potential...

Installation Instructions
Page 5
... dryer back. • The dryer MUST be vented to the outdoors. is approved for Clothes Dryer Transition Duct Subject 2158A" shall be used (Kit WX08X10077). • Never install flexible metal duct in walls, ceilings, floors or other surfaces is highly recommended (see illustrations below).... • The vent MUST NOT be terminated beneath a mobile or manufactured home. • The vent duct material MUST BE METAL. • Do not use sheet metal screws or other enclosed spaces. • Total length of flexible metal duct should not exceed 8 feet (2.4m). • For many applications, ...
... dryer back. • The dryer MUST be vented to the outdoors. is approved for Clothes Dryer Transition Duct Subject 2158A" shall be used (Kit WX08X10077). • Never install flexible metal duct in walls, ceilings, floors or other surfaces is highly recommended (see illustrations below).... • The vent MUST NOT be terminated beneath a mobile or manufactured home. • The vent duct material MUST BE METAL. • Do not use sheet metal screws or other enclosed spaces. • Total length of flexible metal duct should not exceed 8 feet (2.4m). • For many applications, ...

Installation Instructions
Page 6
... ELBOW AND DUCT FOR EXHAUST TO LEFT OR RIGHT SIDE OF CABINET • Preassemble 4" elbow with the tab in the middle of the appliance base. Use the screw saved previously to pull or damage the electrical wires inside dryer. REMOVE DESIRED KNOCKOUT (ONE ONLY). Pull the duct out of the duct... to about 45º using a flat blade screwdriver. 6 PROTECT YOUR HANDS AND ARMS FROM SHARP EDGES WHEN WORKING INSIDE THE CABINET. BE SURE TO WEAR GLOVES ADDING NEW DUCT FIXING...
... ELBOW AND DUCT FOR EXHAUST TO LEFT OR RIGHT SIDE OF CABINET • Preassemble 4" elbow with the tab in the middle of the appliance base. Use the screw saved previously to pull or damage the electrical wires inside dryer. REMOVE DESIRED KNOCKOUT (ONE ONLY). Pull the duct out of the duct... to about 45º using a flat blade screwdriver. 6 PROTECT YOUR HANDS AND ARMS FROM SHARP EDGES WHEN WORKING INSIDE THE CABINET. BE SURE TO WEAR GLOVES ADDING NEW DUCT FIXING...
Installation Instructions
Page 8
...screen in . (1.9 cm) garden hose-type so inlet hoses can advise you of the dryer back panel. Tighten by hand until firmly seated. 3. Using pliers, tighten all the couplings with an additional two-thirds turn. Remove the washer inlet hose from the washer fill valve connector (cold). 2. Tighten by... the other end of the dryer's long inlet hose to reduce buildup of your washer's water inlet. NOTE: Do not overtighten. never use old hoses. 1. Tighten by hand until firmly seated. 12 SERVICING WARNING - Since the washer must connect to the couplings may result . NOTE...
...screen in . (1.9 cm) garden hose-type so inlet hoses can advise you of the dryer back panel. Tighten by hand until firmly seated. 3. Using pliers, tighten all the couplings with an additional two-thirds turn. Remove the washer inlet hose from the washer fill valve connector (cold). 2. Tighten by... the other end of the dryer's long inlet hose to reduce buildup of your washer's water inlet. NOTE: Do not overtighten. never use old hoses. 1. Tighten by hand until firmly seated. 12 SERVICING WARNING - Since the washer must connect to the couplings may result . NOTE...
Use and Care Manual
Page 1
Dryers GEAppliances.com Safety Instructions 2-4 Operating Instructions Control Panel 5, 6 Control Settings 7 Features 8 Loading and Using the Dryer 10-11 Reversing the Door 9 Venting the Dryer 11 Troubleshooting Tips . . . 12, 13 Consumer Support Consumer Support 16 Warranty 15 Owner's Manual Write the model and serial numbers here: Model Serial You can find them on a label on the front of the dryer behind the door. 234D1157P002 49-90407 05/28/10 GE
Dryers GEAppliances.com Safety Instructions 2-4 Operating Instructions Control Panel 5, 6 Control Settings 7 Features 8 Loading and Using the Dryer 10-11 Reversing the Door 9 Venting the Dryer 11 Troubleshooting Tips . . . 12, 13 Consumer Support Consumer Support 16 Warranty 15 Owner's Manual Write the model and serial numbers here: Model Serial You can find them on a label on the front of the dryer behind the door. 234D1157P002 49-90407 05/28/10 GE
Use and Care Manual
Page 2
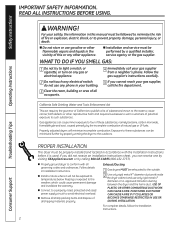
Gas appliances can receive one by visiting GEAppliances.com or by calling 800.GE.CARES (800.432.2737). Exposure to the outdoors. n Installation and service must be minimized further by properly venting the dryer to these substances, ...receive an Installation Instructions sheet, you cannot reach your gas supplier, call your safety, the information in Installation Instructions. n Install or store where it is used. WHAT TO DO IF yOu SMEll GAS: 1 Do not try to avoid electrical overload. For complete details, follow the Installation Instructions. 2 Consumer Support ...
Gas appliances can receive one by visiting GEAppliances.com or by calling 800.GE.CARES (800.432.2737). Exposure to the outdoors. n Installation and service must be minimized further by properly venting the dryer to these substances, ...receive an Installation Instructions sheet, you cannot reach your gas supplier, call your safety, the information in Installation Instructions. n Install or store where it is used. WHAT TO DO IF yOu SMEll GAS: 1 Do not try to avoid electrical overload. For complete details, follow the Installation Instructions. 2 Consumer Support ...

Use and Care Manual
Page 3
...could result from the power supply or disconnect the dryer at the household distribution panel by clothing during subsequent dryer uses. Do not use or place these substances to prevent lint accumulation inside this appliance is moving. NOTE: Turning the Cycle Selector ...knob to cooking oils in your dryer. Before loading, unloading or adding clothes, wait until solvents or flammable materials have used in or spotted with combustible or explosive substances (such as acetone, denatured alcohol, gasoline, kerosene, some household cleaners, some spot ...
...could result from the power supply or disconnect the dryer at the household distribution panel by clothing during subsequent dryer uses. Do not use or place these substances to prevent lint accumulation inside this appliance is moving. NOTE: Turning the Cycle Selector ...knob to cooking oils in your dryer. Before loading, unloading or adding clothes, wait until solvents or flammable materials have used in or spotted with combustible or explosive substances (such as acetone, denatured alcohol, gasoline, kerosene, some household cleaners, some spot ...
Use and Care Manual
Page 4
...damaged cord or plug. Safety Instructions Operating Instructions IMPORTANT SAFETy INFORMATION. Service or performance problems caused by a qualified technician. WHEN NOT USING YOUR DRYER n Grasp the plug firmly when disconnecting this Owner's Manual or in the vicinity of this appliance or attempt any servicing... Burns may wish to operate this appliance if it from hiding inside the dryer should be stepped on . READ All INSTRuCTIONS BEFORE uSING. WARNING! We recommend you understand and have a pilot light. Place the cord away from having your dryer. n Do not ...
...damaged cord or plug. Safety Instructions Operating Instructions IMPORTANT SAFETy INFORMATION. Service or performance problems caused by a qualified technician. WHEN NOT USING YOUR DRYER n Grasp the plug firmly when disconnecting this Owner's Manual or in the vicinity of this appliance or attempt any servicing... Burns may wish to operate this appliance if it from hiding inside the dryer should be stepped on . READ All INSTRuCTIONS BEFORE uSING. WARNING! We recommend you understand and have a pilot light. Place the cord away from having your dryer. n Do not ...
Use and Care Manual
Page 5
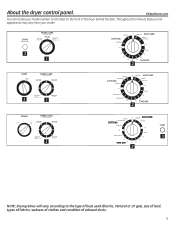
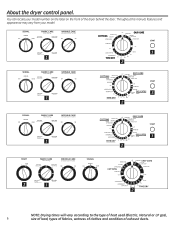
... 212D1900 P010 REV. 2 20 TIME DRY 30 40 50 2 80 MIN 70 60 START 3 NOTE: Drying times will vary according to the type of heat used (Electric, Natural or lP gas), size of load, types of fabrics, wetness of clothes and condition of the dryer behind the door. Throughout this manual...
... 212D1900 P010 REV. 2 20 TIME DRY 30 40 50 2 80 MIN 70 60 START 3 NOTE: Drying times will vary according to the type of heat used (Electric, Natural or lP gas), size of load, types of fabrics, wetness of clothes and condition of the dryer behind the door. Throughout this manual...
Use and Care Manual
Page 6
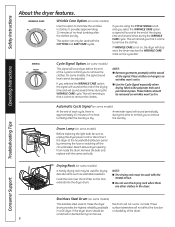
... MEDIUM OFF LOUD AIR FLUFF DELICATES NO HEAT LOW HEAT Time Dry Cycle Only 3 1 2 NOTE: Drying times will vary according to the type of heat used (Electric, Natural or lP gas), 6 size of load, types of fabrics, wetness of clothes and condition of the dryer behind the door. About the dryer...
... MEDIUM OFF LOUD AIR FLUFF DELICATES NO HEAT LOW HEAT Time Dry Cycle Only 3 1 2 NOTE: Drying times will vary according to the type of heat used (Electric, Natural or lP gas), 6 size of load, types of fabrics, wetness of clothes and condition of the dryer behind the door. About the dryer...

Use and Care Manual
Page 7
... or select the Preferred Regular Setting marked with an *. HEAT MEDIUM, For synthetics, blends, delicates and items labeled permanent press. Use with the same color on some models. Provides 10 minutes of the drying cycle. Opening the door during operation will stop the ... and pillows. Color logic (on the Cycle Dial. HEAT DELICATES On some models) Select the correct FABRIC CARE setting. Select START. Use the TIMED DRy cycle. or COTTONS REG. DAMP DRY For leaving items partially damp. Safety Instructions Operating Instructions About the control settings. ...
... or select the Preferred Regular Setting marked with an *. HEAT MEDIUM, For synthetics, blends, delicates and items labeled permanent press. Use with the same color on some models. Provides 10 minutes of the drying cycle. Opening the door during operation will stop the ... and pillows. Color logic (on the Cycle Dial. HEAT DELICATES On some models) Select the correct FABRIC CARE setting. Select START. Use the TIMED DRy cycle. or COTTONS REG. DAMP DRY For leaving items partially damp. Safety Instructions Operating Instructions About the control settings. ...
Use and Care Manual
Page 8
... rack may be scratched or dented during the WRINklE CARE cycle. It provides approximately 15 minutes of the drying time and several times during normal use, the drum will remind you to unplug the dryer power cord or disconnect the dryer at the sound of the drum. 8 NOTE: n ... replace with the COTTONS and EASy CARE cycles. If the dryer drum should be removed so wrinkles won 't set in a GE dryer. On some models) The stainless steel used for drying delicate items such as washable sweaters. Automatic Cycle Signal (on some models, the signal sound level cannot be sure...
... rack may be scratched or dented during the WRINklE CARE cycle. It provides approximately 15 minutes of the drying time and several times during normal use, the drum will remind you to unplug the dryer power cord or disconnect the dryer at the sound of the drum. 8 NOTE: n ... replace with the COTTONS and EASy CARE cycles. If the dryer drum should be removed so wrinkles won 't set in a GE dryer. On some models) The stainless steel used for drying delicate items such as washable sweaters. Automatic Cycle Signal (on some models, the signal sound level cannot be sure...
Use and Care Manual
Page 10
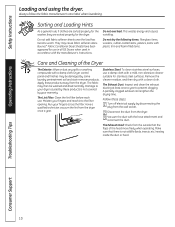
...off electrical supply by some laundry pretreatment soil and stain remover products. Bounce® fabric Conditioner Dryer Sheets have been approved for use in all GE Dryers when used in accordance with the hose attachment and reconnect the duct. Stainless Steel: To clean stainless steel surfaces..., use . A partially clogged exhaust can lengthen the drying time. Sorting and Loading Hints As a general rule, if clothes are sorted properly ...
...off electrical supply by some laundry pretreatment soil and stain remover products. Bounce® fabric Conditioner Dryer Sheets have been approved for use in all GE Dryers when used in accordance with the hose attachment and reconnect the duct. Stainless Steel: To clean stainless steel surfaces..., use . A partially clogged exhaust can lengthen the drying time. Sorting and Loading Hints As a general rule, if clothes are sorted properly ...
Use and Care Manual
Page 11
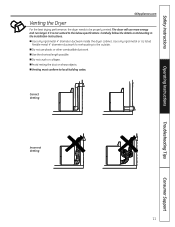
... the Dryer For the best drying performance, the dryer needs to local building codes. The dryer will use plastic or other combustible ductwork. n Use the shortest length possible. n Use only rigid metal 4" diameter ductwork inside the dryer cabinet. n Venting must conform to be properly vented.... Correct Venting Incorrect Venting 11 Troubleshooting Tips Consumer Support Use only rigid metal or UL listed flexible metal 4" diameter ductwork for exhausting to the below specifications. n Do not use more energy and run longer if it is not vented to the outside...
... the Dryer For the best drying performance, the dryer needs to local building codes. The dryer will use plastic or other combustible ductwork. n Use the shortest length possible. n Use only rigid metal 4" diameter ductwork inside the dryer cabinet. n Venting must conform to be properly vented.... Correct Venting Incorrect Venting 11 Troubleshooting Tips Consumer Support Use only rigid metal or UL listed flexible metal 4" diameter ductwork for exhausting to the below specifications. n Do not use more energy and run longer if it is not vented to the outside...
Use and Care Manual
Page 12
.... Problem Dryer doesn't start Dryer doesn't heat Dryer shakes or makes noise Greasy spots on clothes lint on the following pages, or visit GEAppliances.com. Use proper washing procedures before laundering clothes. left in pockets • Clean lint screen before each load. • Sort lint producers (like chenille) from lint... tripped What To Do • Make sure the dryer plug is blown or one fuse is pushed completely into smaller ones. • Empty all GE Dryers when used (electric, natural or LP gas), size of load, types of fabrics, wetness of clothes and condition of heat...
.... Problem Dryer doesn't start Dryer doesn't heat Dryer shakes or makes noise Greasy spots on clothes lint on the following pages, or visit GEAppliances.com. Use proper washing procedures before laundering clothes. left in pockets • Clean lint screen before each load. • Sort lint producers (like chenille) from lint... tripped What To Do • Make sure the dryer plug is blown or one fuse is pushed completely into smaller ones. • Empty all GE Dryers when used (electric, natural or LP gas), size of load, types of fabrics, wetness of clothes and condition of heat...
Use and Care Manual
Page 13
Some fabrics will shrink in the dryer • Some items may be pressed back into smaller ones. Troubleshooting Tips Consumer Support 13 Since most dryers use 2 fuses/breakers, make sure the dryer venting is a well-sorted dryer load). • Large, heavy fabrics contain more than one or two items, add a few ...
Some fabrics will shrink in the dryer • Some items may be pressed back into smaller ones. Troubleshooting Tips Consumer Support 13 Since most dryers use 2 fuses/breakers, make sure the dryer venting is a well-sorted dryer load). • Large, heavy fabrics contain more than one or two items, add a few ...
Use and Care Manual
Page 15
... number and model number available when calling for a trip charge or you how to an Authorized GE Service location. n Damage caused after delivery. EXCluSION OF IMPlIED WARRANTIES-your sole and exclusive remedy is abused, misused, or used commercially. This warranty gives you specific legal rights, and you may be required to bring...
... number and model number available when calling for a trip charge or you how to an Authorized GE Service location. n Damage caused after delivery. EXCluSION OF IMPlIED WARRANTIES-your sole and exclusive remedy is abused, misused, or used commercially. This warranty gives you specific legal rights, and you may be required to bring...


