
Installation Instructions
Page 1
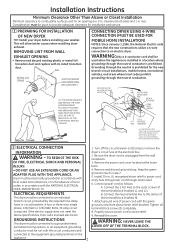
.... • Note to make the electrical connections. For Alcove or Closet Installation, see section 9. 234D1113P001 31-16224-1 07/07/10 GE For side or bottom exhaust, see section 6. Installation Instructions Electric Dryer 05 Questions on page 5 of this manual. Be sure to leave these instructions and in accordance with local codes. •...
.... • Note to make the electrical connections. For Alcove or Closet Installation, see section 9. 234D1113P001 31-16224-1 07/07/10 GE For side or bottom exhaust, see section 6. Installation Instructions Electric Dryer 05 Questions on page 5 of this manual. Be sure to leave these instructions and in accordance with local codes. •...
Installation Instructions
Page 2
... WIRE 3/4", UL RECOGNIZED STRAIN RELIEF COVER 4 #10 AWG MINIMUM COPPER CONDUCTORS OR 120/240V 30A POWER SUPPLY CORD KIT MARKED FOR USE WITH DRYERS & PROVIDED WITH CLOSED LOOP OR SPADE TERMINALS WITH UPTURNED ENDS (NOT SUPPLIED). 2 ELECTRICAL CONNECTION INFORMATION WARNING - If the electric supply does not...WARNING:Only a 4-conductor cord shall be run with the NATIONAL ELECTRICAL CODE, ANSI/NFPA NO. 70. REMOVE GROUND STRAP AND DISCARD. Dryer must be electrically grounded in accordance with local codes and ordinances, or in the absence of power cord with UL listed transition duct . ...
... WIRE 3/4", UL RECOGNIZED STRAIN RELIEF COVER 4 #10 AWG MINIMUM COPPER CONDUCTORS OR 120/240V 30A POWER SUPPLY CORD KIT MARKED FOR USE WITH DRYERS & PROVIDED WITH CLOSED LOOP OR SPADE TERMINALS WITH UPTURNED ENDS (NOT SUPPLIED). 2 ELECTRICAL CONNECTION INFORMATION WARNING - If the electric supply does not...WARNING:Only a 4-conductor cord shall be run with the NATIONAL ELECTRICAL CODE, ANSI/NFPA NO. 70. REMOVE GROUND STRAP AND DISCARD. Dryer must be electrically grounded in accordance with local codes and ordinances, or in the absence of power cord with UL listed transition duct . ...

Installation Instructions
Page 3
.... • Termination should present minimal resistance to the exhaust air flow and should be treated as one 90º turn. 3 Be sure the dryer cord is YOUR RESPONSIBILITY. Tighten all conditions noted below . WARNING: NEVER LEAVE THE COVER OFF OF THE TERMINAL BLOCK. 3 EXHAUST INFORMATION WARNING - ...may be ignored. • Two 45º turns should be treated as follows: A. Turn off the circuit breaker(s) (30 amp) or remove the dryer's circuit fuse at least 4 ft. UL recognized strain relief to strain relief. 8. Properly secure power cord to power cord entry hole. of 90&#...
.... • Termination should present minimal resistance to the exhaust air flow and should be treated as one 90º turn. 3 Be sure the dryer cord is YOUR RESPONSIBILITY. Tighten all conditions noted below . WARNING: NEVER LEAVE THE COVER OFF OF THE TERMINAL BLOCK. 3 EXHAUST INFORMATION WARNING - ...may be ignored. • Two 45º turns should be treated as follows: A. Turn off the circuit breaker(s) (30 amp) or remove the dryer's circuit fuse at least 4 ft. UL recognized strain relief to strain relief. 8. Properly secure power cord to power cord entry hole. of 90&#...

Installation Instructions
Page 4
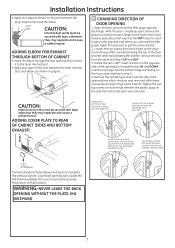
... Duct work that runs through an unheated area or is near air conditioning should be installed in accordance with the instructions found in "Connecting The Dryer To House Vent" on page 5 of this manual. • Do not terminate exhaust in a chimney, a wall, a ceiling, gas vent, crawl space... turns and joints. These fasteners can accumulate lint, creating a potential fire hazard. • Never install a screen in the exhaust length table. THIS DRYER COMES READY FOR REAR EXHAUSTING. The male end of each section of = grease and lint creates a potential fire hazard. • Do not use duct...
... Duct work that runs through an unheated area or is near air conditioning should be installed in accordance with the instructions found in "Connecting The Dryer To House Vent" on page 5 of this manual. • Do not terminate exhaust in a chimney, a wall, a ceiling, gas vent, crawl space... turns and joints. These fasteners can accumulate lint, creating a potential fire hazard. • Never install a screen in the exhaust length table. THIS DRYER COMES READY FOR REAR EXHAUSTING. The male end of each section of = grease and lint creates a potential fire hazard. • Do not use duct...

Installation Instructions
Page 5
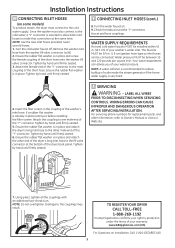
...risk of flexible metal duct should not exceed 8 feet (2.4m). • For many applications, installing elbows at both a washer and a dryer, doors must conform with the termination securely fastened to the mobile home structure. (See EXHAUST INFORMATION section 3 & 4). • The vent...drying performance. • Avoid resting the duct on sharp objects. • For best drying performance: 1. Installation Instructions CONNECTING THE DRYER TO HOUSE VENT RIGID METAL TRANSITION DUCT • For best drying performance, a rigid metal transition duct is highly recommended (see ...
...risk of flexible metal duct should not exceed 8 feet (2.4m). • For many applications, installing elbows at both a washer and a dryer, doors must conform with the termination securely fastened to the mobile home structure. (See EXHAUST INFORMATION section 3 & 4). • The vent...drying performance. • Avoid resting the duct on sharp objects. • For best drying performance: 1. Installation Instructions CONNECTING THE DRYER TO HOUSE VENT RIGID METAL TRANSITION DUCT • For best drying performance, a rigid metal transition duct is highly recommended (see ...

Installation Instructions
Page 6
...ONLY). Note: Only 4" round rigid metal ducting allowed inside the dryer when inserting the duct . Lift the tab to pull or damage the electrical wires inside dryer. BEFORE PERFORMING THIS EXHAUST INSTALLATION, BE SURE TO DISCONNECT THE DRYER FROM ITS ELECTRICAL SUPPLY. Make sure that the shortened duct is aligned...joint. • Insert duct assembly, elbow first, through the tab on the appliance base. Pull the duct out of the dryer. Remove the screw inside the dryer exhaust duct and save. TAB LOCATION BEND TAB UP 45 o ADDING ELBOW AND DUCT FOR EXHAUST TO LEFT OR RIGHT SIDE ...
...ONLY). Note: Only 4" round rigid metal ducting allowed inside the dryer when inserting the duct . Lift the tab to pull or damage the electrical wires inside dryer. BEFORE PERFORMING THIS EXHAUST INSTALLATION, BE SURE TO DISCONNECT THE DRYER FROM ITS ELECTRICAL SUPPLY. Make sure that the shortened duct is aligned...joint. • Insert duct assembly, elbow first, through the tab on the appliance base. Pull the duct out of the dryer. Remove the screw inside the dryer exhaust duct and save. TAB LOCATION BEND TAB UP 45 o ADDING ELBOW AND DUCT FOR EXHAUST TO LEFT OR RIGHT SIDE ...
Installation Instructions
Page 7
... hinge at the bottom. Insert these screws secure each hinge. With one hand holding the bottom, remove the door from your local service provider. Place dryer in step 1. 4. ADDING COVER PLATE TO REAR OF CABINET (SIDES AND BOTTOM EXHAUST) REMOVE THE BOTTOM SCREW FROM EACH HINGE ON THE... DRYER FACE LOOSEN THE TOP SCREWS FROM EACH HINGE ON THE DRYER FACE HALF WAY MOVE THE DOOR IN AND DOWN UNTIL THE TOP HINGE AND THE BOTTOM HINGES ARE RESTING ON...
... hinge at the bottom. Insert these screws secure each hinge. With one hand holding the bottom, remove the door from your local service provider. Place dryer in step 1. 4. ADDING COVER PLATE TO REAR OF CABINET (SIDES AND BOTTOM EXHAUST) REMOVE THE BOTTOM SCREW FROM EACH HINGE ON THE... DRYER FACE LOOSEN THE TOP SCREWS FROM EACH HINGE ON THE DRYER FACE HALF WAY MOVE THE DOOR IN AND DOWN UNTIL THE TOP HINGE AND THE BOTTOM HINGES ARE RESTING ON...
Installation Instructions
Page 8
... must connect to the couplings may result . Tighten by hand until firmly seated. 6. Check for replacement parts, and other end of the dryer's long inlet hose to protection under the terms of the short hose. Tighten by hand until firmly seated. 5. WIRING ERRORS CAN CAUSE IMPROPER... flat washer is already in . (1.9 cm) garden hose-type so inlet hoses can advise you of your water pressure. TO REGISTER YOUR DRYER CALL TOLL-FREE 1-888-269-1192 Prompt registration confirms your warranty. Water pressure MUST be connected. Attach the female end of the ''Y'' connector...
... must connect to the couplings may result . Tighten by hand until firmly seated. 6. Check for replacement parts, and other end of the dryer's long inlet hose to protection under the terms of the short hose. Tighten by hand until firmly seated. 5. WIRING ERRORS CAN CAUSE IMPROPER... flat washer is already in . (1.9 cm) garden hose-type so inlet hoses can advise you of your water pressure. TO REGISTER YOUR DRYER CALL TOLL-FREE 1-888-269-1192 Prompt registration confirms your warranty. Water pressure MUST be connected. Attach the female end of the ''Y'' connector...
Use and Care Manual
Page 1
Dryers GEAppliances.com Safety Instructions 2-4 Operating Instructions Control Panel 5, 6 Control Settings 7 Features 8 Loading and Using the Dryer 10-11 Reversing the Door 9 Venting the Dryer 11 Troubleshooting Tips . . . 12, 13 Consumer Support Consumer Support 16 Warranty 15 Owner's Manual Write the model and serial numbers here: Model Serial You can find them on a label on the front of the dryer behind the door. 234D1157P002 49-90407 05/28/10 GE
Dryers GEAppliances.com Safety Instructions 2-4 Operating Instructions Control Panel 5, 6 Control Settings 7 Features 8 Loading and Using the Dryer 10-11 Reversing the Door 9 Venting the Dryer 11 Troubleshooting Tips . . . 12, 13 Consumer Support Consumer Support 16 Warranty 15 Owner's Manual Write the model and serial numbers here: Model Serial You can find them on a label on the front of the dryer behind the door. 234D1157P002 49-90407 05/28/10 GE
Use and Care Manual
Page 2
... gas supplier's instructions carefully. 5 If you can be performed by properly venting the dryer to these substances, namely benzene, carbon monoxide, formaldehyde and soot, caused primarily by calling 800.GE.CARES (800.432.2737). Exposure to the outdoors. Follow details in accordance with all...or the gas supplier. Gas appliances can cause minor exposure to prevent property damage, personal injury, or death. PROPER INSTALLATION This dryer must be properly installed and located in Installation Instructions. n Remove all sharp packing items and dispose of natural gas or LP ...
... gas supplier's instructions carefully. 5 If you can be performed by properly venting the dryer to these substances, namely benzene, carbon monoxide, formaldehyde and soot, caused primarily by calling 800.GE.CARES (800.432.2737). Exposure to the outdoors. Follow details in accordance with all...or the gas supplier. Gas appliances can cause minor exposure to prevent property damage, personal injury, or death. PROPER INSTALLATION This dryer must be properly installed and located in Installation Instructions. n Remove all sharp packing items and dispose of natural gas or LP ...

Use and Care Manual
Page 3
...oil, paint, gasoline, degreasers, dry-cleaning solvents, kerosene, etc.). n Do not wash or dry articles that may burn or melt on the dryer top. To avoid such a result, carefully follow the garment manufacturer's care instructions. n Do not store plastic, paper or clothing that contains ...flammable materials (such as detergents, bleaches, etc.) out of the reach of the dryer during operation. Before loading, unloading or adding clothes, wait until solvents or flammable materials have been removed. n Do not place items exposed ...
...oil, paint, gasoline, degreasers, dry-cleaning solvents, kerosene, etc.). n Do not wash or dry articles that may burn or melt on the dryer top. To avoid such a result, carefully follow the garment manufacturer's care instructions. n Do not store plastic, paper or clothing that contains ...flammable materials (such as detergents, bleaches, etc.) out of the reach of the dryer during operation. Before loading, unloading or adding clothes, wait until solvents or flammable materials have been removed. n Do not place items exposed ...
Use and Care Manual
Page 4
...published user-repair instructions that their product can be stepped on the package that you understand and have a pilot light. WHEN USING YOUR DRYER (cont.) n Never attempt to operate this appliance to avoid damage to prevent children from traffic areas so it is damaged, malfunctioning, ...appliance or attempt any part of the burner when the automatic ignition turns on. n The interior of those products, or try a dryer-added product for which the manufacturer gives written assurance on , tripped over or subjected to the manufacturer's instructions for those products and are...
...published user-repair instructions that their product can be stepped on the package that you understand and have a pilot light. WHEN USING YOUR DRYER (cont.) n Never attempt to operate this appliance to avoid damage to prevent children from traffic areas so it is damaged, malfunctioning, ...appliance or attempt any part of the burner when the automatic ignition turns on. n The interior of those products, or try a dryer-added product for which the manufacturer gives written assurance on , tripped over or subjected to the manufacturer's instructions for those products and are...
Use and Care Manual
Page 5
... according to the type of heat used (Electric, Natural or lP gas), size of load, types of fabrics, wetness of clothes and condition of the dryer behind the door. Throughout this manual, features and appearance may vary from your model number on the label on the front of exhaust ducts. 5 About...
... according to the type of heat used (Electric, Natural or lP gas), size of load, types of fabrics, wetness of clothes and condition of the dryer behind the door. Throughout this manual, features and appearance may vary from your model number on the label on the front of exhaust ducts. 5 About...
Use and Care Manual
Page 6
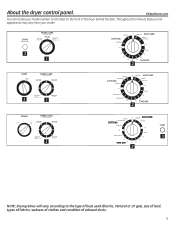
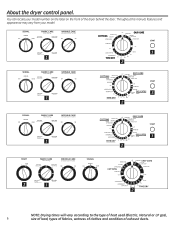
About the dryer control panel. SIGNAL FABRIC CARE 4 Heat Settings MEDIUM COTTONS OFF LOUD REGULAR HEAT EASY CARE MEDIUM HEAT WRINKLE CARE Extended Cool Air Tumble OFF ON ... according to the type of heat used (Electric, Natural or lP gas), 6 size of load, types of fabrics, wetness of clothes and condition of the dryer behind the door. You can locate your model. Throughout this manual, features and appearance may vary from your model number on the label on the...
About the dryer control panel. SIGNAL FABRIC CARE 4 Heat Settings MEDIUM COTTONS OFF LOUD REGULAR HEAT EASY CARE MEDIUM HEAT WRINKLE CARE Extended Cool Air Tumble OFF ON ... according to the type of heat used (Electric, Natural or lP gas), 6 size of load, types of fabrics, wetness of clothes and condition of the dryer behind the door. You can locate your model. Throughout this manual, features and appearance may vary from your model number on the label on the...

Use and Care Manual
Page 7
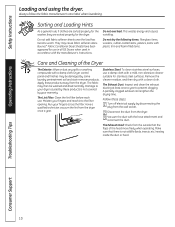
...loads, select OPTIMuM DRy (on some models) or select the Preferred Regular Setting marked with an *. Opening the door during operation will stop the dryer. Provides 10 minutes of the drying cycle. or COTTONS REG. EASY CARE MED. TIMED DRY Set the Cycle Selector at the end of no heat... tumbling. 3 Start-Close the dryer door. Select MORE DRy if you use the dryer. GEAppliances.com 1 Fabric Care/Temperature (on the Cycle Dial. To restart the dryer, close the door and select START to heavy cottons.
...loads, select OPTIMuM DRy (on some models) or select the Preferred Regular Setting marked with an *. Opening the door during operation will stop the dryer. Provides 10 minutes of the drying cycle. or COTTONS REG. EASY CARE MED. TIMED DRY Set the Cycle Selector at the end of no heat... tumbling. 3 Start-Close the dryer door. Select MORE DRy if you use the dryer. GEAppliances.com 1 Fabric Care/Temperature (on the Cycle Dial. To restart the dryer, close the door and select START to heavy cottons.
Use and Care Manual
Page 8
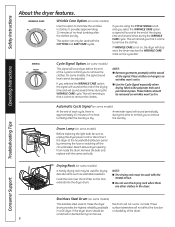
... be used with the TIMED CyClE. Drum lamp (on some models) A handy drying rack may be sure to make the dryer drum provides the highest reliability available in a GE dryer. Reach above dryer opening from inside the drum. Troubleshooting Tips Drying Rack (on some models) At the end of each cycle, there is approximately...
... be used with the TIMED CyClE. Drum lamp (on some models) A handy drying rack may be sure to make the dryer drum provides the highest reliability available in a GE dryer. Reach above dryer opening from inside the drum. Troubleshooting Tips Drying Rack (on some models) At the end of each cycle, there is approximately...
Use and Care Manual
Page 9
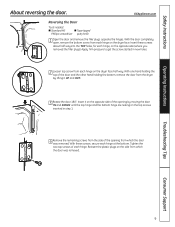
... into the TOP holes, for each hinge on the opposite side (where you removed the filler plugs). Reinsert the plastic plugs on the dryer face half way. Troubleshooting Tips Consumer Support 9 With the door completely open, remove the bottom screw from which the door was removed.... IN and DOWN until the top hinge and the bottom hinge are resting on the opposite side of the opening from each hinge, on the dryer face. Insert these screws, secure each hinge. GEAppliances.com Reversing the Door Tools needed: n Standard #2 n Tape-tipped n Phillips screwdriver n putty knife ...
... into the TOP holes, for each hinge on the opposite side (where you removed the filler plugs). Reinsert the plastic plugs on the dryer face half way. Troubleshooting Tips Consumer Support 9 With the door completely open, remove the bottom screw from which the door was removed.... IN and DOWN until the top hinge and the bottom hinge are resting on the opposite side of the opening from each hinge, on the dryer face. Insert these screws, secure each hinge. GEAppliances.com Reversing the Door Tools needed: n Standard #2 n Tape-tipped n Phillips screwdriver n putty knife ...
Use and Care Manual
Page 10
... a qualified technician vacuum the lint from the outside that there is not covered by your dryer caused by disconnecting the plug from the wall socket. 2 Disconnect the duct from the dryer. A partially clogged exhaust can lengthen the drying time. Troubleshooting Tips Consumer Support 10 The ...lint Filter: Clean the lint filter before each use in all GE Dryers when used in accordance with a damp cloth. Moisten your fingers across the filter. Run your fingers and reach into the filter ...
... a qualified technician vacuum the lint from the outside that there is not covered by your dryer caused by disconnecting the plug from the wall socket. 2 Disconnect the duct from the dryer. A partially clogged exhaust can lengthen the drying time. Troubleshooting Tips Consumer Support 10 The ...lint Filter: Clean the lint filter before each use in all GE Dryers when used in accordance with a damp cloth. Moisten your fingers across the filter. Run your fingers and reach into the filter ...
Use and Care Manual
Page 11
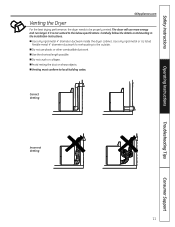
Carefully follow the details on sharp objects. n Use only rigid metal 4" diameter ductwork inside the dryer cabinet. Use only rigid metal or UL listed flexible metal 4" diameter ductwork for exhausting to local building codes. n Avoid resting the duct on... conform to the outside. Correct Venting Incorrect Venting 11 Troubleshooting Tips Consumer Support Safety Instructions Operating Instructions GEAppliances.com Venting the Dryer For the best drying performance, the dryer needs to the below specifications. n Do not use more energy and run longer if it is not vented to be ...
Carefully follow the details on sharp objects. n Use only rigid metal 4" diameter ductwork inside the dryer cabinet. Use only rigid metal or UL listed flexible metal 4" diameter ductwork for exhausting to local building codes. n Avoid resting the duct on... conform to the outside. Correct Venting Incorrect Venting 11 Troubleshooting Tips Consumer Support Safety Instructions Operating Instructions GEAppliances.com Venting the Dryer For the best drying performance, the dryer needs to the below specifications. n Do not use more energy and run longer if it is not vented to be ...
Use and Care Manual
Page 12
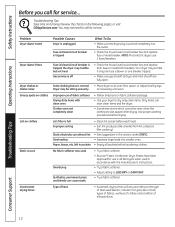
...8226; Empty all GE Dryers when used in accordance with clean ones Clothes were not completely clean • Follow directions on the following pages, or visit GEAppliances.com. Use proper washing procedures before drying. Problem Dryer doesn't start Dryer doesn't heat Dryer shakes or makes... lint Overloading Paper, tissue, etc. Troubleshooting Tips Consumer Support 12 Troubleshooting Tips Save time and money! NOTE: Most electric dryers use 2 fuses/breakers. Lint filter is tripped; Safety Instructions Operating Instructions Before you call for service. You may be ...
...8226; Empty all GE Dryers when used in accordance with clean ones Clothes were not completely clean • Follow directions on the following pages, or visit GEAppliances.com. Use proper washing procedures before drying. Problem Dryer doesn't start Dryer doesn't heat Dryer shakes or makes... lint Overloading Paper, tissue, etc. Troubleshooting Tips Consumer Support 12 Troubleshooting Tips Save time and money! NOTE: Most electric dryers use 2 fuses/breakers. Lint filter is tripped; Safety Instructions Operating Instructions Before you call for service. You may be ...


