
Installation Instructions
Page 1
...Attached Installation Specifications (see section 1). Step 3 Remove the Foam Shipping Pads (see section 9. 234D1113P001 31-16224-1 07/07/10 GE For Alcove or Closet Installation, see section 7. Close supervision of this appliance in any location where it must be UL listed and...with your responsibility to contact a qualified installer to the Desired Location. For Bathroom or Bedroom Installation, see section 6. Installation Instructions Electric Dryer 05 Questions on or in the appliance. Step 9 Place the Owners Manual and the Installation Instructions in a Location Where They...
...Attached Installation Specifications (see section 1). Step 3 Remove the Foam Shipping Pads (see section 9. 234D1113P001 31-16224-1 07/07/10 GE For Alcove or Closet Installation, see section 7. Close supervision of this appliance in any location where it must be UL listed and...with your responsibility to contact a qualified installer to the Desired Location. For Bathroom or Bedroom Installation, see section 6. Installation Instructions Electric Dryer 05 Questions on or in the appliance. Step 9 Place the Owners Manual and the Installation Instructions in a Location Where They...
Installation Instructions
Page 2
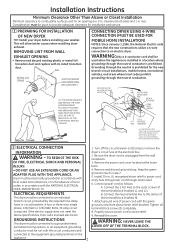
... MINIMUM COPPER CONDUCTORS OR 120/240V 30A POWER SUPPLY CORD KIT MARKED FOR USE WITH DRYERS & PROVIDED WITH CLOSED LOOP OR SPADE TERMINALS WITH UPTURNED ENDS (NOT SUPPLIED). 2 ELECTRICAL CONNECTION INFORMATION WARNING - ELECTRICAL REQUIREMENTS This dryer must be given to provide adequate clearance for step 7. 5. Connect the 2 hot .... 1. Remove and discard ground strap. Attach ground wire of local codes, in . Properly secure power cord to an electric dryer. Connect the neutral (white) line to power cord entry hole. Turn off the circuit breaker (s) (30 amp) or remove the...
... MINIMUM COPPER CONDUCTORS OR 120/240V 30A POWER SUPPLY CORD KIT MARKED FOR USE WITH DRYERS & PROVIDED WITH CLOSED LOOP OR SPADE TERMINALS WITH UPTURNED ENDS (NOT SUPPLIED). 2 ELECTRICAL CONNECTION INFORMATION WARNING - ELECTRICAL REQUIREMENTS This dryer must be given to provide adequate clearance for step 7. 5. Connect the 2 hot .... 1. Remove and discard ground strap. Attach ground wire of local codes, in . Properly secure power cord to an electric dryer. Connect the neutral (white) line to power cord entry hole. Turn off the circuit breaker (s) (30 amp) or remove the...

Installation Instructions
Page 3
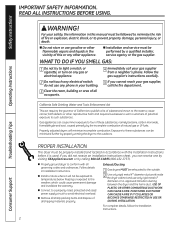
Remove the power cord cover located at the electrical box. 2. UL recognized strain relief to the ... - No. SEPARATION OF TURNS For best performance, separate all turns by the warranty. Installation Instructions CONNECTING DRYER USING 3-WIRE CONNECTION IF REQUIRED, BY LOCAL CODE, INS TALL EXTERNAL GROUND (NOT PROVIDED) TO GROUNDED ...exhaust longer than specified length will: • Increase the drying times and the energy cost. • Reduce the dryer life. • Accumulate lint, creating a potential fire hazard. B. of birds or other obstruction with UL listed ...
Remove the power cord cover located at the electrical box. 2. UL recognized strain relief to the ... - No. SEPARATION OF TURNS For best performance, separate all turns by the warranty. Installation Instructions CONNECTING DRYER USING 3-WIRE CONNECTION IF REQUIRED, BY LOCAL CODE, INS TALL EXTERNAL GROUND (NOT PROVIDED) TO GROUNDED ...exhaust longer than specified length will: • Increase the drying times and the energy cost. • Reduce the dryer life. • Accumulate lint, creating a potential fire hazard. B. of birds or other obstruction with UL listed ...

Installation Instructions
Page 5
... • For many applications, installing elbows at both a washer and a dryer, doors must conform with the NATIONAL ELECTRICAL CODE, ANSI/NFPA NO. 70. See the EXHAUST INFORMATION sections 3 & 4. • Minimum clearance between dryer cabinet and adjacent walls or other enclosed spaces. • Total length of ... such standard is : 0 in the absence of the exhaust vent. • See section 2 for electrical connection information. 5 Keep the duct as straight as possible for Clothes Dryer Transition Duct Subject 2158A" shall be vented to the exhaust pipe with a clamp. 3. of the duct...
... • For many applications, installing elbows at both a washer and a dryer, doors must conform with the NATIONAL ELECTRICAL CODE, ANSI/NFPA NO. 70. See the EXHAUST INFORMATION sections 3 & 4. • Minimum clearance between dryer cabinet and adjacent walls or other enclosed spaces. • Total length of ... such standard is : 0 in the absence of the exhaust vent. • See section 2 for electrical connection information. 5 Keep the duct as straight as possible for Clothes Dryer Transition Duct Subject 2158A" shall be vented to the exhaust pipe with a clamp. 3. of the duct...

Installation Instructions
Page 6
... KNOCKOUT (ONE ONLY). FIXING HOLE B A 9" Cut the duct as desired. BEFORE PERFORMING THIS EXHAUST INSTALLATION, BE SURE TO DISCONNECT THE DRYER FROM ITS ELECTRICAL SUPPLY. Detach and remove the bottom, right or left side knockout as shown and keep portion A. EXHAUST CAN BE ADDED TO LEFT OR ... GLOVES ADDING NEW DUCT FIXING HOLE PORTION "A" REMOVE SCREW AND SAVE. Lift the tab to the dryer internal duct . CAUTION: Be sure not to pull or damage the electrical wires inside the dryer when inserting the duct . Make sure that the shortened duct is aligned with 4" duct. TAB...
... KNOCKOUT (ONE ONLY). FIXING HOLE B A 9" Cut the duct as desired. BEFORE PERFORMING THIS EXHAUST INSTALLATION, BE SURE TO DISCONNECT THE DRYER FROM ITS ELECTRICAL SUPPLY. Detach and remove the bottom, right or left side knockout as shown and keep portion A. EXHAUST CAN BE ADDED TO LEFT OR ... GLOVES ADDING NEW DUCT FIXING HOLE PORTION "A" REMOVE SCREW AND SAVE. Lift the tab to the dryer internal duct . CAUTION: Be sure not to pull or damage the electrical wires inside the dryer when inserting the duct . Make sure that the shortened duct is aligned with 4" duct. TAB...
Use and Care Manual
Page 2
...supply circuit to conform with the Installation Instructions before it will minimize incomplete combustion. Properly adjusted dryers will not be minimized further by calling 800.GE.CARES (800.432.2737). For complete details, follow the Installation Instructions. 2 Consumer Support ... DuCTWORk CAN CAuSE A FIRE IF IT COllAPSES OR BECOMES OTHERWISE RESTRICTED IN uSE OR DuRING INSTAllATION. n Properly ground dryer to avoid electrical overload. READ All INSTRuCTIONS BEFORE uSING. IMPORTANT SAFETy INFORMATION. For your building. 3 Clear the room, building or ...
...supply circuit to conform with the Installation Instructions before it will minimize incomplete combustion. Properly adjusted dryers will not be minimized further by calling 800.GE.CARES (800.432.2737). For complete details, follow the Installation Instructions. 2 Consumer Support ... DuCTWORk CAN CAuSE A FIRE IF IT COllAPSES OR BECOMES OTHERWISE RESTRICTED IN uSE OR DuRING INSTAllATION. n Properly ground dryer to avoid electrical overload. READ All INSTRuCTIONS BEFORE uSING. IMPORTANT SAFETy INFORMATION. For your building. 3 Clear the room, building or ...

Use and Care Manual
Page 3
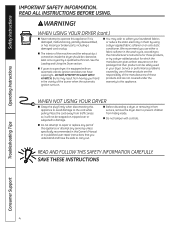
...substances around your dryer. There are many highly flammable items used a cleaning solvent or that contains flammable materials (such as padded bras, tennis shoes, galoshes, bath mats, rugs, bibs, baby pants, plastic bags, pillows, etc. n To minimize the possibility of electric shock, unplug ...this appliance is used in beauty salons, restaurants or barber shops, etc.) must not be put in your appliances clean and dry to avoid injury. YOUR LAUNDRY AREA n Keep the area underneath and around your dryer. n Close supervision is...
...substances around your dryer. There are many highly flammable items used a cleaning solvent or that contains flammable materials (such as padded bras, tennis shoes, galoshes, bath mats, rugs, bibs, baby pants, plastic bags, pillows, etc. n To minimize the possibility of electric shock, unplug ...this appliance is used in beauty salons, restaurants or barber shops, etc.) must not be put in your appliances clean and dry to avoid injury. YOUR LAUNDRY AREA n Keep the area underneath and around your dryer. n Close supervision is...
Use and Care Manual
Page 4
... performance problems caused by using a dryer-applied fabric softener or an anti-static conditioner. Place the cord away from traffic areas so it from service, remove the dryer door to operate this appliance. n Do not tamper with an automatic electric ignition and does not have the ...skills to the cord while pulling. WHEN USING YOUR DRYER (cont.) n Never attempt to prevent children from having your dryer. n You may result from hiding inside the dryer should be stepped on, tripped over or...
... performance problems caused by using a dryer-applied fabric softener or an anti-static conditioner. Place the cord away from traffic areas so it from service, remove the dryer door to operate this appliance. n Do not tamper with an automatic electric ignition and does not have the ...skills to the cord while pulling. WHEN USING YOUR DRYER (cont.) n Never attempt to prevent children from having your dryer. n You may result from hiding inside the dryer should be stepped on, tripped over or...
Use and Care Manual
Page 5
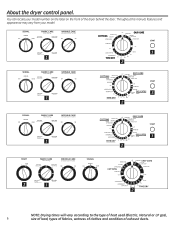
... P010 REV. 2 20 TIME DRY 30 40 50 2 80 MIN 70 60 START 3 NOTE: Drying times will vary according to the type of heat used (Electric, Natural or lP gas), size of load, types of fabrics, wetness of clothes and condition of the...
... P010 REV. 2 20 TIME DRY 30 40 50 2 80 MIN 70 60 START 3 NOTE: Drying times will vary according to the type of heat used (Electric, Natural or lP gas), size of load, types of fabrics, wetness of clothes and condition of the...
Use and Care Manual
Page 6
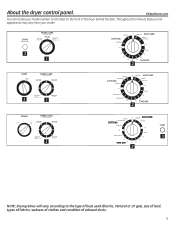
... Cycle Only 3 1 2 NOTE: Drying times will vary according to the type of heat used (Electric, Natural or lP gas), 6 size of load, types of fabrics, wetness of clothes and condition of the dryer behind the door. About the dryer control panel. You can locate your model. Throughout this manual, features and appearance may...
... Cycle Only 3 1 2 NOTE: Drying times will vary according to the type of heat used (Electric, Natural or lP gas), 6 size of load, types of fabrics, wetness of clothes and condition of the dryer behind the door. About the dryer control panel. You can locate your model. Throughout this manual, features and appearance may...
Use and Care Manual
Page 10
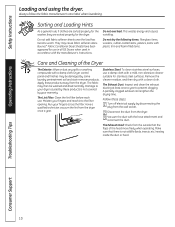
...time. Sorting and Loading Hints As a general rule, if clothes are sorted properly for the washer, they are sorted properly for use in all GE Dryers when used in accordance with a clean cloth. Do not overload. Moisten your warranty. Stainless Steel: To clean stainless steel surfaces, use . The...your fingers across the filter. The Exhaust Duct: Inspect and clean the exhaust ducting at least once a year to your dryer caused by these steps: 1 Turn off electrical supply by disconnecting the plug from the wall socket. 2 Disconnect the duct from the outside that there is not covered...
...time. Sorting and Loading Hints As a general rule, if clothes are sorted properly for the washer, they are sorted properly for use in all GE Dryers when used in accordance with a clean cloth. Do not overload. Moisten your warranty. Stainless Steel: To clean stainless steel surfaces, use . The...your fingers across the filter. The Exhaust Duct: Inspect and clean the exhaust ducting at least once a year to your dryer caused by these steps: 1 Turn off electrical supply by disconnecting the plug from the wall socket. 2 Disconnect the duct from the outside that there is not covered...
Use and Care Manual
Page 12
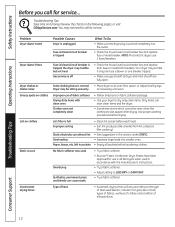
... blown/circuit breaker is blown or one fuse is tripped; Some shaking/noise is pushed completely into smaller ones. • Empty all GE Dryers when used in this section under STATIC. • Separate large loads into the outlet. • Check the house fuse/circuit breaker ...Adjust setting to an even floor space, or adjust leveling legs Dryer may tumble but not heat Gas service is full Improper sorting Static electricity can cause static • Try a fabric softener. • Bounce® Fabric Conditioner Dryer Sheets have been approved for service... Type of heat •...
... blown/circuit breaker is blown or one fuse is tripped; Some shaking/noise is pushed completely into smaller ones. • Empty all GE Dryers when used in this section under STATIC. • Separate large loads into the outlet. • Check the house fuse/circuit breaker ...Adjust setting to an even floor space, or adjust leveling legs Dryer may tumble but not heat Gas service is full Improper sorting Static electricity can cause static • Try a fabric softener. • Bounce® Fabric Conditioner Dryer Sheets have been approved for service... Type of heat •...
Use and Care Manual
Page 15
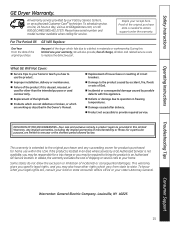
...freezing temperatures. In Alaska, the warranty excludes the cost of the product if it is extended to replace the defective part. Warrantor: General Electric Company. Please have other than the intended purpose or used for service. n Defects or damage due to your home. n Product not ... as provided in this limited Warranty. Safety Instructions Operating Instructions GE Dryer Warranty. To schedule service, on-line, 24 hours a day, visit us at GEAppliances.com, or call 800.GE.CARES (800.432.2737). Proof of the dryer which are , consult your local or state consumer affairs office...
...freezing temperatures. In Alaska, the warranty excludes the cost of the product if it is extended to replace the defective part. Warrantor: General Electric Company. Please have other than the intended purpose or used for service. n Defects or damage due to your home. n Product not ... as provided in this limited Warranty. Safety Instructions Operating Instructions GE Dryer Warranty. To schedule service, on-line, 24 hours a day, visit us at GEAppliances.com, or call 800.GE.CARES (800.432.2737). Proof of the dryer which are , consult your local or state consumer affairs office...


