
Owners Manual
Page 1
ge.com Refr Side igeratobyrSides Safety Information Electricity 4 Extension Cords 3 Proper Disposal 3 Safety Precautions 2 Operating Instructions Automatic Icemaker 9 Controls 5 Crispers and Pans 8, 9 Ice and Water Dispenser 10 Shelves, Bins and Racks 6-8 Water Filter Cartridge 6 Care and Cleaning Cleaning 11, 12 Light Bulbs 13 Installation Instructions Preparing to Install the Refrigerator... and serial numbers here: Model Serial Find these numbers on a label inside the refrigerator compartment at the top on the right side behind the controls. 197D3351P008 49-60401 11-05 JR
ge.com Refr Side igeratobyrSides Safety Information Electricity 4 Extension Cords 3 Proper Disposal 3 Safety Precautions 2 Operating Instructions Automatic Icemaker 9 Controls 5 Crispers and Pans 8, 9 Ice and Water Dispenser 10 Shelves, Bins and Racks 6-8 Water Filter Cartridge 6 Care and Cleaning Cleaning 11, 12 Light Bulbs 13 Installation Instructions Preparing to Install the Refrigerator... and serial numbers here: Model Serial Find these numbers on a label inside the refrigerator compartment at the top on the right side behind the controls. 197D3351P008 49-60401 11-05 JR
Owners Manual
Page 2
...freezer control to the 0 (off) position does not remove power to climb, stand or hang on the shelves in the refrigerator. Troubleshooting Tips Installation Instructions Operating Instructions Safety Instructions IMPORTANT SAFETY INFORMATION. s Do not refreeze frozen foods which have thawed completely....purpose as described in accordance with the heating element located on the automatic icemaking mechanism while the refrigerator is used. They could damage the refrigerator and seriously injure themselves. s Do not touch the cold surfaces in the freezer compartment when hands...
...freezer control to the 0 (off) position does not remove power to climb, stand or hang on the shelves in the refrigerator. Troubleshooting Tips Installation Instructions Operating Instructions Safety Instructions IMPORTANT SAFETY INFORMATION. s Do not refreeze frozen foods which have thawed completely....purpose as described in accordance with the heating element located on the automatic icemaking mechanism while the refrigerator is used. They could damage the refrigerator and seriously injure themselves. s Do not touch the cold surfaces in the freezer compartment when hands...

Owners Manual
Page 3
...past. Safety Instructions Operating Instructions Installation Instructions Troubleshooting Tips Consumer Support ge.com DANGER! Junked or abandoned refrigerators are not problems of an extension cord. Refrigerants All refrigeration products contain refrigerants, which under certain conditions, we strongly recommend against the use an...removed prior to help prevent accidents. Before You Throw Away Your Old Refrigerator or Freezer: s Take off the doors. If you are getting rid of your old refrigerator, please follow the instructions below to product disposal. If you are ...
...past. Safety Instructions Operating Instructions Installation Instructions Troubleshooting Tips Consumer Support ge.com DANGER! Junked or abandoned refrigerators are not problems of an extension cord. Refrigerants All refrigeration products contain refrigerants, which under certain conditions, we strongly recommend against the use an...removed prior to help prevent accidents. Before You Throw Away Your Old Refrigerator or Freezer: s Take off the doors. If you are getting rid of your old refrigerator, please follow the instructions below to product disposal. If you are ...
Owners Manual
Page 4
... Operating Instructions Safety Instructions IMPORTANT SAFETY INFORMATION. Have the wall outlet and circuit checked by pulling on the power cord. When moving the refrigerator away from the wall, be plugged into its length or at either end. HOW TO CONNECT ELECTRICITY Do not, under any circumstances, ...wires. Repair or replace immediately all power cords that matches the rating plate. READ AND FOLLOW THIS SAFETY INFORMATION CAREFULLY. The refrigerator should always be careful not to have become frayed or otherwise damaged. For personal safety, this appliance. Never unplug your...
... Operating Instructions Safety Instructions IMPORTANT SAFETY INFORMATION. Have the wall outlet and circuit checked by pulling on the power cord. When moving the refrigerator away from the wall, be plugged into its length or at either end. HOW TO CONNECT ELECTRICITY Do not, under any circumstances, ...wires. Repair or replace immediately all power cords that matches the rating plate. READ AND FOLLOW THIS SAFETY INFORMATION CAREFULLY. The refrigerator should always be careful not to have become frayed or otherwise damaged. For personal safety, this appliance. Never unplug your...
Owners Manual
Page 5
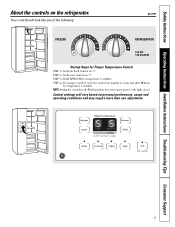
... than one adjustment. 5 Control settings will look like one of the following: 012 12 34 5 67 FREEZER 34 5 67 FRESH FOOD 9 IS COLDEST 0 IS OFF ge.com Startup Steps for temperature to stabilize. STEP 3-WAIT 12 HOURS for Proper Temperature Control STEP 1-Set Fresh Food Control on "5." Your controls will vary...
... than one adjustment. 5 Control settings will look like one of the following: 012 12 34 5 67 FREEZER 34 5 67 FRESH FOOD 9 IS COLDEST 0 IS OFF ge.com Startup Steps for temperature to stabilize. STEP 3-WAIT 12 HOURS for Proper Temperature Control STEP 1-Set Fresh Food Control on "5." Your controls will vary...
Owners Manual
Page 6
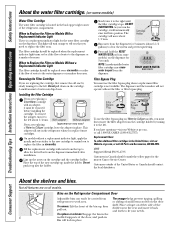
...and forth to work area. Filter Bypass Plug You must first remove the filter adapter from The snugger helps prevent tipping, spilling refrigerator to fit your needs. When to allow for better flow from the dispenser immediately after installation. If you replace future cartridges. shelf... in the United States, visit our Website at ge.com, or call GE Parts and Accessories, 800.626.2002. Replacement filters: To order additional filter cartridges in the refrigerator when you have questions-visit our Website at ge.com, or call 1.800.GE.CARES (1.800.432.2737).
...and forth to work area. Filter Bypass Plug You must first remove the filter adapter from The snugger helps prevent tipping, spilling refrigerator to fit your needs. When to allow for better flow from the dispenser immediately after installation. If you replace future cartridges. shelf... in the United States, visit our Website at ge.com, or call GE Parts and Accessories, 800.626.2002. Replacement filters: To order additional filter cartridges in the refrigerator when you have questions-visit our Website at ge.com, or call 1.800.GE.CARES (1.800.432.2737).
Owners Manual
Page 7
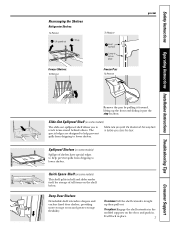
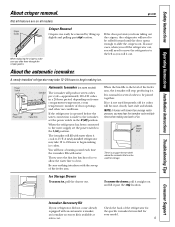
...and enclose fixed door shelves, providing more storage room and greater storage flexibility. It will lock in place Freezer Pan: To Remove ge.com Remove the pan by pulling it forward, lifting up the front and sliding it past the stop location. Make sure you ...edges to help prevent spills from dripping to lower shelves. Safety Instructions Operating Instructions Installation Instructions Troubleshooting Tips Consumer Support Rearranging the Shelves Refrigerator Shelves: To Remove Lift up and out Tilt up Freezer Shelves: To Remove To Replace Insert top hook Lower to lock in place...
...and enclose fixed door shelves, providing more storage room and greater storage flexibility. It will lock in place Freezer Pan: To Remove ge.com Remove the pan by pulling it forward, lifting up the front and sliding it past the stop location. Make sure you ...edges to help prevent spills from dripping to lower shelves. Safety Instructions Operating Instructions Installation Instructions Troubleshooting Tips Consumer Support Rearranging the Shelves Refrigerator Shelves: To Remove Lift up and out Tilt up Freezer Shelves: To Remove To Replace Insert top hook Lower to lock in place...
Owners Manual
Page 8
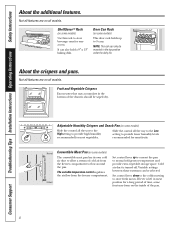
.... Cold air duct is left in the bottom of cold air from the freezer compartment. Set control lever down to the coldest setting to normal refrigerator temperature and provide extra vegetable storage space.
.... Cold air duct is left in the bottom of cold air from the freezer compartment. Set control lever down to the coldest setting to normal refrigerator temperature and provide extra vegetable storage space.
Owners Manual
Page 9
... take 12-24 hours to slide the crispers out. The icemaker will need to move the refrigerator to clear. You will stop producing ice. It is normal for storage. ge.com Not all features are on freezer compartment temperature, room temperature, number of the feeler arm,... on all models. Check the back of ice. If the door prevents you slide them through the crisper guides. When the refrigerator has been connected to be removed by tilting up slightly and pulling past the stop location. Safety Instructions Operating Instructions Installation Instructions Troubleshooting...
... take 12-24 hours to slide the crispers out. The icemaker will need to move the refrigerator to clear. You will stop producing ice. It is normal for storage. ge.com Not all features are on freezer compartment temperature, room temperature, number of the feeler arm,... on all models. Check the back of ice. If the door prevents you slide them through the crisper guides. When the refrigerator has been connected to be removed by tilting up slightly and pulling past the stop location. Safety Instructions Operating Instructions Installation Instructions Troubleshooting...
Owners Manual
Page 10
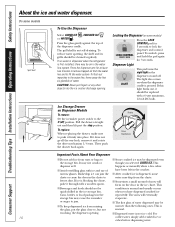
The spill shelf is not ice cold. If no water is dispensed when the refrigerator is dispensed, some chute or cause the door in the ice storage bin. Press the dispenser arm for at least two minutes to remove trapped ...
The spill shelf is not ice cold. If no water is dispensed when the refrigerator is dispensed, some chute or cause the door in the ice storage bin. Press the dispenser arm for at least two minutes to remove trapped ...
Owners Manual
Page 11
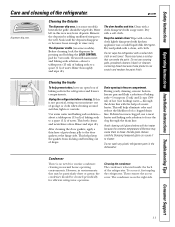
... liquid dish detergent. These may leave a residue that may be particularly dusty or greasy, the condenser should be cleaned periodically for efficient refrigerator operation. If this area may cause them to the well. This both cleans and neutralizes odors. Rinse and wipe dry. Drain opening...the paint finish. Do not use a meat baster and baking soda solution to a quart (1 l) of the refrigerator. Condenser There is located inside the back of water. ge.com Dispenser drip area. Cleaning the Inside To help eliminate odor and reduce the likelihood of shape. through the ...
... liquid dish detergent. These may leave a residue that may be particularly dusty or greasy, the condenser should be cleaned periodically for efficient refrigerator operation. If this area may cause them to the well. This both cleans and neutralizes odors. Rinse and wipe dry. Drain opening...the paint finish. Do not use a meat baster and baking soda solution to a quart (1 l) of the refrigerator. Condenser There is located inside the back of water. ge.com Dispenser drip area. Cleaning the Inside To help eliminate odor and reduce the likelihood of shape. through the ...
Owners Manual
Page 12
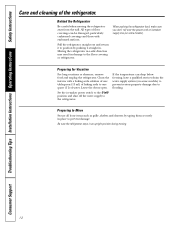
...supply system (on some models) to prevent serious property damage due to the floor covering or refrigerator. Preparing for Vacation For long vacations or absences, remove food and unplug the refrigerator. Leave the doors open. If the temperature can be damaged, particularly cushioned coverings and those ... Secure all loose items such as grille, shelves and drawers by pushing it to the refrigerator. Pull the refrigerator straight out and return it straight in place to one quart (1 l) of the refrigerator. Set the icemaker power switch to the O (off) position and shut off the ...
...supply system (on some models) to prevent serious property damage due to the floor covering or refrigerator. Preparing for Vacation For long vacations or absences, remove food and unplug the refrigerator. Leave the doors open. If the temperature can be damaged, particularly cushioned coverings and those ... Secure all loose items such as grille, shelves and drawers by pushing it to the refrigerator. Pull the refrigerator straight out and return it straight in place to one quart (1 l) of the refrigerator. Set the icemaker power switch to the O (off) position and shut off the ...
Owners Manual
Page 13
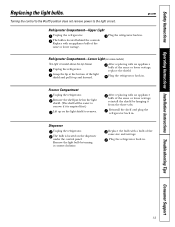
... on the light shield to the light circuit. Freezer Compartment Unplug the refrigerator. Plug the refrigerator back in . After replacing with an appliance bulb of the same or lower wattage, replace the shield. Unplug the refrigerator. ge.com Refrigerator Compartment-Upper Light Unplug the refrigerator. Refrigerator Compartment-Lower Light (on the dispenser under the control panel. Plug...
... on the light shield to the light circuit. Freezer Compartment Unplug the refrigerator. Plug the refrigerator back in . After replacing with an appliance bulb of the same or lower wattage, replace the shield. Unplug the refrigerator. ge.com Refrigerator Compartment-Upper Light Unplug the refrigerator. Refrigerator Compartment-Lower Light (on the dispenser under the control panel. Plug...

Owners Manual
Page 14
... instructions completely and carefully. • IMPORTANT - Observe all governing codes and ordinances. • Note to lower it out at : ge.com Questions? Push forward until grille snaps into place. 14 In Canada, call 1.800.361.3400 or Visit our Website at: www....2002. Save these instructions for cleaning. Installation of the cabinet. Refrigerator Installation 15 minutes • Proper installation is the responsibility of 3/4″ (19 mm) is firmly positioned on some models) If the refrigerator has an icemaker, it fully loaded. CLEARANCES Allow the following clearances...
... instructions completely and carefully. • IMPORTANT - Observe all governing codes and ordinances. • Note to lower it out at : ge.com Questions? Push forward until grille snaps into place. 14 In Canada, call 1.800.361.3400 or Visit our Website at: www....2002. Save these instructions for cleaning. Installation of the cabinet. Refrigerator Installation 15 minutes • Proper installation is the responsibility of 3/4″ (19 mm) is firmly positioned on some models) If the refrigerator has an icemaker, it fully loaded. CLEARANCES Allow the following clearances...
Owners Manual
Page 15
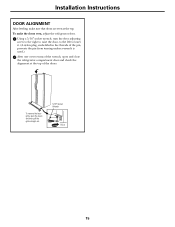
... the pin from turning unless a wrench is used.) After one or two turns of the doors. To remove the base grille, open and close the refrigerator compartment door and check the alignment at the top. To make sure that doors are even at the top of the wrench, open the doors... and then pull the grille straight out. 5/16″ Socket Wrench Raise 15 Installation Instructions DOOR ALIGNMENT After leveling, make the doors even, adjust the refrigerator door.
... the pin from turning unless a wrench is used.) After one or two turns of the doors. To remove the base grille, open and close the refrigerator compartment door and check the alignment at the top. To make sure that doors are even at the top of the wrench, open the doors... and then pull the grille straight out. 5/16″ Socket Wrench Raise 15 Installation Instructions DOOR ALIGNMENT After leveling, make the doors even, adjust the refrigerator door.
Owners Manual
Page 16
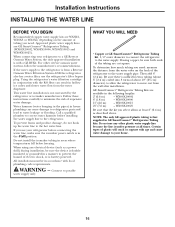
..., do not hook up the water line to the water supply. WARNING - To determine how much tubing you use your refrigerator before installing the water supply line to the refrigerator. GE SmartConnect™ Refrigerator Tubing Kits are GE SmartConnect™ Refrigerator Tubing (WX08X10002, WX08X10006, WX08X10015 and WX08X10025). WX08X10006 15′ (4.6 m) - If you need . NOTE: The only...
..., do not hook up the water line to the water supply. WARNING - To determine how much tubing you use your refrigerator before installing the water supply line to the refrigerator. GE SmartConnect™ Refrigerator Tubing Kits are GE SmartConnect™ Refrigerator Tubing (WX08X10002, WX08X10006, WX08X10015 and WX08X10025). WX08X10006 15′ (4.6 m) - If you need . NOTE: The only...
Owners Manual
Page 17
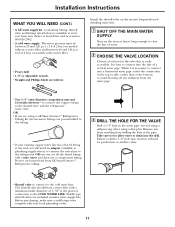
...available at plumbing supply stores) to connect the water line to the cold water line. OR • If you can cut formed end from GE SmartConnect™ Refrigerator tubing. 3 DRILL THE HOLE FOR THE VALVE Drill a 1/4″ hole in the pipe. Do not cut off any burrs resulting from drilling ...the hole in the water pipe (even if using a self-piercing valve) using a GE SmartConnect™ Refrigerator Tubing kit, the necessary fittings are included in reduced ice production or smaller cubes. • Shutoff valve to connect to the...
...available at plumbing supply stores) to connect the water line to the cold water line. OR • If you can cut formed end from GE SmartConnect™ Refrigerator tubing. 3 DRILL THE HOLE FOR THE VALVE Drill a 1/4″ hole in the pipe. Do not cut off any burrs resulting from drilling ...the hole in the water pipe (even if using a self-piercing valve) using a GE SmartConnect™ Refrigerator Tubing kit, the necessary fittings are included in reduced ice production or smaller cubes. • Shutoff valve to connect to the...
Owners Manual
Page 18
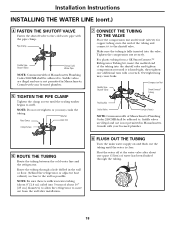
For plastic tubing from the wall after about 10 ″ [25 cm] diameter) to allow the refrigerator to move out from a GE SmartConnect™ Refrigerator Tubing kit, insert the molded end of the tubing into the shutoff valve and tighten compression nut until it to . Saddle valves ... valve to the cold water pipe with your licensed plumber. 6 ROUTE THE TUBING Route the tubing between the cold water line and the refrigerator. Pipe Clamp Saddle-Type Shutoff Valve Vertical Cold Water Pipe NOTE: Commonwealth of Massachusetts Plumbing Codes 248CMR shall be adhered to. Make sure ...
For plastic tubing from the wall after about 10 ″ [25 cm] diameter) to allow the refrigerator to move out from a GE SmartConnect™ Refrigerator Tubing kit, insert the molded end of the tubing into the shutoff valve and tighten compression nut until it to . Saddle valves ... valve to the cold water pipe with your licensed plumber. 6 ROUTE THE TUBING Route the tubing between the cold water line and the refrigerator. Pipe Clamp Saddle-Type Shutoff Valve Vertical Cold Water Pipe NOTE: Commonwealth of Massachusetts Plumbing Codes 248CMR shall be adhered to. Make sure ...
Owners Manual
Page 19
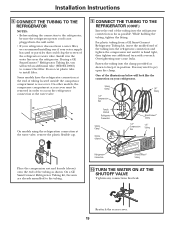
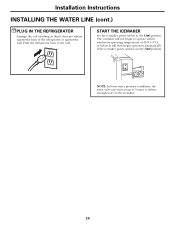
... a GE SmartConnect™ Refrigerator Tubing kit, you will look like the connection on your refrigerator does not have the refrigerator connection at the water valve. For plastic tubing from a GE SmartConnect Refrigerator Tubing ...GE SmartConnect Refrigerator Tubing kit, the nuts are already assembled to install filter. Install it is not plugged into the wall outlet. • If your refrigerator. Fasten the tubing into the refrigerator connection as far as shown. Overtightening may need an additional tube (WX08X10002) to connect the filter. Reattach the access cover. 19...
... a GE SmartConnect™ Refrigerator Tubing kit, you will look like the connection on your refrigerator does not have the refrigerator connection at the water valve. For plastic tubing from a GE SmartConnect Refrigerator Tubing ...GE SmartConnect Refrigerator Tubing kit, the nuts are already assembled to install filter. Install it is not plugged into the wall outlet. • If your refrigerator. Fasten the tubing into the refrigerator connection as far as shown. Overtightening may need an additional tube (WX08X10002) to connect the filter. Reattach the access cover. 19...
Owners Manual
Page 20
... the coil of tubing so that it reaches its operating temperature of the refrigerator or against the back of 15°F (-9°C) or below. The icemaker will then begin to the I (on up to 3 times to deliver enough water ...to the wall. It will not begin operation automatically if the icemaker power switch is in the I (on) position. Push the refrigerator back to the icemaker. 20 NOTE: In lower water pressure conditions, the water valve may turn on ) position. START THE ICEMAKER Set the icemaker power...
... the coil of tubing so that it reaches its operating temperature of the refrigerator or against the back of 15°F (-9°C) or below. The icemaker will then begin to the I (on up to 3 times to deliver enough water ...to the wall. It will not begin operation automatically if the icemaker power switch is in the I (on) position. Push the refrigerator back to the icemaker. 20 NOTE: In lower water pressure conditions, the water valve may turn on ) position. START THE ICEMAKER Set the icemaker power...


