
Use and Care Manual
Page 1
...Refrigerators ge.com Safety Instructions 2-4 Operating Instructions Automatic Icemaker 12 Care and Cleaning 14, 15 ClimateKeeper2 6 Crispers and Pans 11 CustomCool 6 Ice and Water Dispenser 13 Refrigerator Doors 10 Replacing the Light Bulbs 16 Shelves and Bins 8, 9 Temperature Controls 5 TurboCool 5 Water Filter 7 Installation Instructions Installing the Refrigerator 26-29 Moving the Refrigerator 22-25... Device Certificate 42 Warranty (Canadian 39 Warranty (U.S 40 Owner's Manual and Installation Models 23, 25 and 26 Profile Côte à Côte Réfrigérateurs...
...Refrigerators ge.com Safety Instructions 2-4 Operating Instructions Automatic Icemaker 12 Care and Cleaning 14, 15 ClimateKeeper2 6 Crispers and Pans 11 CustomCool 6 Ice and Water Dispenser 13 Refrigerator Doors 10 Replacing the Light Bulbs 16 Shelves and Bins 8, 9 Temperature Controls 5 TurboCool 5 Water Filter 7 Installation Instructions Installing the Refrigerator 26-29 Moving the Refrigerator 22-25... Device Certificate 42 Warranty (Canadian 39 Warranty (U.S 40 Owner's Manual and Installation Models 23, 25 and 26 Profile Côte à Côte Réfrigérateurs...
Use and Care Manual
Page 5
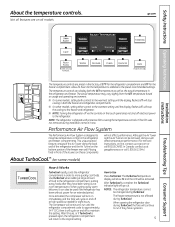
... to stabilize to more quickly cool foods. In Canada, contact us at ge.com or call 1.800.561.3344.) About TurboCool.™ (on all models. s On some models) How it now. It can display both the freezer and refrigerator compartments. s On other models, setting either control to the warmest setting until the display flashes (off...
... to stabilize to more quickly cool foods. In Canada, contact us at ge.com or call 1.800.561.3344.) About TurboCool.™ (on all models. s On some models) How it now. It can display both the freezer and refrigerator compartments. s On other models, setting either control to the warmest setting until the display flashes (off...

Use and Care Manual
Page 6
... other unsealed foods to Use Empty the pan. Rotate all four swing locks by : Home > Options > Refrigerator Options > CustomCool Pan Non-LCD Models: Select the ExpressThaw™, ExpressChill™ or SelectTemp™ pad. Consumer Support Troubleshooting Tips About CustomCool.™(on ...their moisture content and freshness longer. For Non-LCD Models: Tap that feature's pad until no options are in ClimateKeeper2 refrigerators versus conventional units. The new ClimateKeeper2 system features two evaporators-one for the refrigerator and one for the entire unit, and separates the...
... other unsealed foods to Use Empty the pan. Rotate all four swing locks by : Home > Options > Refrigerator Options > CustomCool Pan Non-LCD Models: Select the ExpressThaw™, ExpressChill™ or SelectTemp™ pad. Consumer Support Troubleshooting Tips About CustomCool.™(on ...their moisture content and freshness longer. For Non-LCD Models: Tap that feature's pad until no options are in ClimateKeeper2 refrigerators versus conventional units. The new ClimateKeeper2 system features two evaporators-one for the refrigerator and one for the entire unit, and separates the...
Use and Care Manual
Page 7
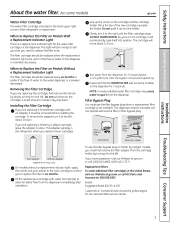
...down on the cartridge. Filter Bypass Plug You must first remove the filter adapter from the dispenser immediately after installation. Replacement filters: To order additional filter cartridges in the refrigerator when you are replacing the cartridge, first remove the old one by Culligan With adapter Without ...(on some models) ge.com Water Filter Cartridge The water filter cartridge is located in six months. Line up into position. Slowly turn orange to tell you that you to replace the filter in the back upper right corner of water to the water dispenser or icemaker ...
...down on the cartridge. Filter Bypass Plug You must first remove the filter adapter from the dispenser immediately after installation. Replacement filters: To order additional filter cartridges in the refrigerator when you are replacing the cartridge, first remove the old one by Culligan With adapter Without ...(on some models) ge.com Water Filter Cartridge The water filter cartridge is located in six months. Line up into position. Slowly turn orange to tell you that you to replace the filter in the back upper right corner of water to the water dispenser or icemaker ...
Use and Care Manual
Page 8
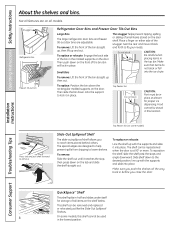
...Bins The snugger helps prevent tipping, spilling or sliding of small items stored on the door. Place a finger on some models, this location. Top freezer bin Do not block CAUTION: Part must be stored in this shelf cannot be used in ...shelf, slide the shelf past the stops and angle downward. Snugger Refrigerator bin Freezer tilt-out bin Refrigerator Door Bins and Freezer Door Tilt-Out Bins Large Bins The larger refrigerator door bins and freezer tilt-out door bins are designed to help ... with the supports and slide it in half and slides under itself for proper ice dispensing.
...Bins The snugger helps prevent tipping, spilling or sliding of small items stored on the door. Place a finger on some models, this location. Top freezer bin Do not block CAUTION: Part must be stored in this shelf cannot be used in ...shelf, slide the shelf past the stops and angle downward. Snugger Refrigerator bin Freezer tilt-out bin Refrigerator Door Bins and Freezer Door Tilt-Out Bins Large Bins The larger refrigerator door bins and freezer tilt-out door bins are designed to help ... with the supports and slide it in half and slides under itself for proper ice dispensing.

Use and Care Manual
Page 11
ge.com Installation Instructions Troubleshooting Tips Consumer Support Adjustable Humidity Crispers ...settings Tower. Not all features are on all models. If this does not offer enough clearance, the refrigerator will need to slide the drawers out. Not all features are on all models. Set the control to cold to convert ...crisper removal. Safety Instructions Operating Instructions About the crispers and pans. On some cases, when you roll the refrigerator out, you from the Climate Keeper Air cold air duct is turned off. between these extremes can easily ...
ge.com Installation Instructions Troubleshooting Tips Consumer Support Adjustable Humidity Crispers ...settings Tower. Not all features are on all models. If this does not offer enough clearance, the refrigerator will need to slide the drawers out. Not all features are on all models. Set the control to cold to convert ...crisper removal. Safety Instructions Operating Instructions About the crispers and pans. On some cases, when you roll the refrigerator out, you from the Climate Keeper Air cold air duct is turned off. between these extremes can easily ...
Use and Care Manual
Page 12
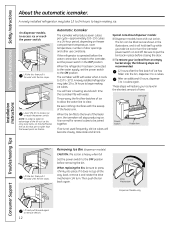
..., then pull it forward until the bin stops. A newly installed refrigerator may take ice out or turn . If ice is heavy when full. If it does not go all the way back, remove it forward until the bin stops. On dispenser models, to access ice or reach the power switch. If the... refrigerator is operated before removing the bin. Throw away the first few batches of time. When replacing the bin, be ...
..., then pull it forward until the bin stops. A newly installed refrigerator may take ice out or turn . If ice is heavy when full. If it does not go all the way back, remove it forward until the bin stops. On dispenser models, to access ice or reach the power switch. If the... refrigerator is operated before removing the bin. Throw away the first few batches of time. When replacing the bin, be ...
Use and Care Manual
Page 13
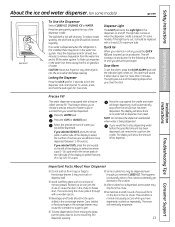
... Press the WATER pad. Select the precise amount of ounces you selected OUNCES, press the arrow pads on when the dispenser cradle is dispensed, some models) ge.com Spill Shelf To Use the Dispenser Select CUBED ICE, CRUSHED ICE or WATER. The display will show there is open for 3 seconds. Troubleshooting Tips Consumer...the indicator light comes on the door in the ice storage drawer. The light also comes on either door is no water is dispensed when the refrigerator is blocking the chute, poke it should be replaced with ice and use of water. If you would like to select the ...
... Press the WATER pad. Select the precise amount of ounces you selected OUNCES, press the arrow pads on when the dispenser cradle is dispensed, some models) ge.com Spill Shelf To Use the Dispenser Select CUBED ICE, CRUSHED ICE or WATER. The display will show there is open for 3 seconds. Troubleshooting Tips Consumer...the indicator light comes on the door in the ice storage drawer. The light also comes on either door is no water is dispensed when the refrigerator is blocking the chute, poke it should be replaced with ice and use of water. If you would like to select the ...
Use and Care Manual
Page 14
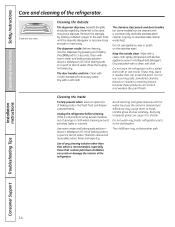
.... This both cleans and neutralizes odors. about a tablespoon (15 ml) of water. The dispenser cradle. A spray-on some models) can cause it to rinse away. Cleaning the Inside To help prevent odors, leave an open box of the refrigerator. Keep the outside clean. Dry and polish with kitchen appliance wax or mild liquid...
.... This both cleans and neutralizes odors. about a tablespoon (15 ml) of water. The dispenser cradle. A spray-on some models) can cause it to rinse away. Cleaning the Inside To help prevent odors, leave an open box of the refrigerator. Keep the outside clean. Dry and polish with kitchen appliance wax or mild liquid...

Use and Care Manual
Page 16
... the light shield. (The shelf will need to be easier to remove if it out. Reinstall the shelf and plug the refrigerator back in . Dispenser (on the dispenser under the control panel. Reveal® appliance bulbs are located at the front of the same size and wattage. Not all ...features are not illuminated. To remove the light shield, on some models, press in on the sides, and lift up and pull it is located on some models). Plug the refrigerator...
... the light shield. (The shelf will need to be easier to remove if it out. Reinstall the shelf and plug the refrigerator back in . Dispenser (on the dispenser under the control panel. Reveal® appliance bulbs are located at the front of the same size and wattage. Not all ...features are not illuminated. To remove the light shield, on some models, press in on the sides, and lift up and pull it is located on some models). Plug the refrigerator...

Use and Care Manual
Page 17
...mm) max 3/4″ (19 mm) 2″ (5.1 cm) Clearance Handle Side Appearance Panel 3/4″ (19 mm) Refrigerator Door Installation Instructions Troubleshooting Tips Consumer Support 17 Safety Instructions Operating Instructions Trim kits and decorator panels. Panels thicker than 1/4&#...models are installing the pre-cut decorator panels, pre-cut black, white, bisque or stainless steel decorator panels from the handle side for custom panels: Fresh Food 38 lbs. (17 kg) max. If you to 3/4″ (19 mm) max, will fit between the face of at least 2″ (5.1 cm) from GE...
...mm) max 3/4″ (19 mm) 2″ (5.1 cm) Clearance Handle Side Appearance Panel 3/4″ (19 mm) Refrigerator Door Installation Instructions Troubleshooting Tips Consumer Support 17 Safety Instructions Operating Instructions Trim kits and decorator panels. Panels thicker than 1/4&#...models are installing the pre-cut decorator panels, pre-cut black, white, bisque or stainless steel decorator panels from the handle side for custom panels: Fresh Food 38 lbs. (17 kg) max. If you to 3/4″ (19 mm) max, will fit between the face of at least 2″ (5.1 cm) from GE...
Use and Care Manual
Page 19
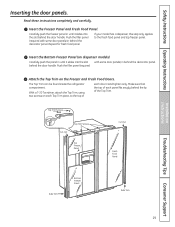
...the lip of each Top Trim piece, to the fresh food panel and top freezer panel. The Top Trim can be found inside the refrigerator compartment. Hand tighten only. Top Trim Screws Cut-Out Top Trim Screws Top Freezer Panel Cut-Out Fresh Food Panel Side Trim Bottom Freezer... Panel Side Trim Troubleshooting Tips Consumer Support 19 Safety Instructions Operating Instructions Installation Instructions Inserting the door panels. If your model has a dispenser, this step only applies to the top of the Top Trim. Push the filler panel (required Attach the Top Trim on...
...the lip of each Top Trim piece, to the fresh food panel and top freezer panel. The Top Trim can be found inside the refrigerator compartment. Hand tighten only. Top Trim Screws Cut-Out Top Trim Screws Top Freezer Panel Cut-Out Fresh Food Panel Side Trim Bottom Freezer... Panel Side Trim Troubleshooting Tips Consumer Support 19 Safety Instructions Operating Instructions Installation Instructions Inserting the door panels. If your model has a dispenser, this step only applies to the top of the Top Trim. Push the filler panel (required Attach the Top Trim on...

Use and Care Manual
Page 21
Installation Instructions Refrigerator Models 23, 25 and 26 Questions? Keep these instructions completely and carefully. • IMPORTANT - If the refrigerator has already been installed, remove the base grille (see Step 2 in Moving the Refrigerator), then skip to leave these instructions for future reference. • Skill level - TOOLS ...Hex Wrench 1/2″ and 7/16″ Wrench Plastic Putty Knife Phillips Head Screwdriver 21 Call 800.GE.CARES (800.432.2737) or Visit our Website at: ge.com In Canada, call 1.800.561.3344 or Visit our Website at geappliances.ca) or from ...
Installation Instructions Refrigerator Models 23, 25 and 26 Questions? Keep these instructions completely and carefully. • IMPORTANT - If the refrigerator has already been installed, remove the base grille (see Step 2 in Moving the Refrigerator), then skip to leave these instructions for future reference. • Skill level - TOOLS ...Hex Wrench 1/2″ and 7/16″ Wrench Plastic Putty Knife Phillips Head Screwdriver 21 Call 800.GE.CARES (800.432.2737) or Visit our Website at: ge.com In Canada, call 1.800.561.3344 or Visit our Website at geappliances.ca) or from ...
Use and Care Manual
Page 22
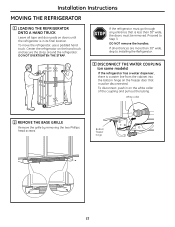
... line from the cabinet into the bottom hinge on the hand truck and secure the strap around the refrigerator. DO NOT remove the handles. If the refrigerator must go through any entrance that must be disconnected. White collar 2 REMOVE THE BASE GRILLE Remove the.... Installation Instructions MOVING THE REFRIGERATOR 1 LOADING THE REFRIGERATOR ONTO A HAND TRUCK Leave all entrances are more than 38″ wide, the doors must be removed. Proceed to Installing the Refrigerator. 3 DISCONNECT THE WATER COUPLING (on some models) If the refrigerator has a water dispenser, there is in on...
... line from the cabinet into the bottom hinge on the hand truck and secure the strap around the refrigerator. DO NOT remove the handles. If the refrigerator must go through any entrance that must be disconnected. White collar 2 REMOVE THE BASE GRILLE Remove the.... Installation Instructions MOVING THE REFRIGERATOR 1 LOADING THE REFRIGERATOR ONTO A HAND TRUCK Leave all entrances are more than 38″ wide, the doors must be removed. Proceed to Installing the Refrigerator. 3 DISCONNECT THE WATER COUPLING (on some models) If the refrigerator has a water dispenser, there is in on...

Use and Care Manual
Page 23
...C Open the freezer door to 90.° 90° 23 Installation Instructions 4 DISCONNECT THE POWER COUPLING (on some models) If the refrigerator has a refreshment center, there are electrical connectors (harnesses) from the cabinet into the bottom hinge on the freezer door ...that must be disconnected. To disconnect, pull apart at the coupling. 6 CLOSE THE FREEZER AND REFRIGERATOR DOORS Bottom freezer hinge 5 DISCONNECT THE ELECTRICAL CONNECTORS (on some models) If the refrigerator has a water dispenser, there is a power line (harness) from the cabinet into the bottom hinge on the...
...C Open the freezer door to 90.° 90° 23 Installation Instructions 4 DISCONNECT THE POWER COUPLING (on some models) If the refrigerator has a refreshment center, there are electrical connectors (harnesses) from the cabinet into the bottom hinge on the freezer door ...that must be disconnected. To disconnect, pull apart at the coupling. 6 CLOSE THE FREEZER AND REFRIGERATOR DOORS Bottom freezer hinge 5 DISCONNECT THE ELECTRICAL CONNECTORS (on some models) If the refrigerator has a water dispenser, there is a power line (harness) from the cabinet into the bottom hinge on the...
Use and Care Manual
Page 25
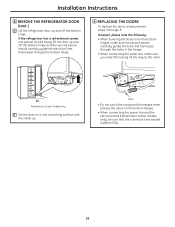
Installation Instructions 8 REMOVE THE REFRIGERATOR DOOR (cont .) D Lift the refrigerator door up . If the refrigerator has a refreshment center, one person should slowly lift the door up and off the bottom hinge. However, please note the following: • When lowering the ... E Set the door on the bottom hinges. • When connecting the power line and the electrical lines (refreshment center models only), be sure that the connectors are seated together fully. 25 Mark • Do not pinch the tubing and harnesses when placing the doors on a non-scratching surface with the inside up...
Installation Instructions 8 REMOVE THE REFRIGERATOR DOOR (cont .) D Lift the refrigerator door up . If the refrigerator has a refreshment center, one person should slowly lift the door up and off the bottom hinge. However, please note the following: • When lowering the ... E Set the door on the bottom hinges. • When connecting the power line and the electrical lines (refreshment center models only), be sure that the connectors are seated together fully. 25 Mark • Do not pinch the tubing and harnesses when placing the doors on a non-scratching surface with the inside up...
Use and Care Manual
Page 26
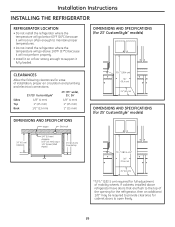
...refrigerator, then an additional 1/8″ may be required to provide clearance for full adjustment of installation, proper air circulation and plumbing and electrical connections: Sides Top Back 23'/25' CustomStyle™ 1/8″ (4 mm) 1″ (25 mm) 1/2″ (13 mm) 23' (33" wide), 25', 26' 1/8″ (4 mm) 1″ (25 mm) 1″ (25...″ (61 cm) DIMENSIONS AND SPECIFICATIONS (for 25' CustomStyle™ models) 24″ (61 cm) Cabinet 3/4″ (19 mm) Airspace (1/2″ [13 mm] Gap + 1/4″ [6 mm] Wall Plates) 25″ (63.5 cm) Countertop 721⁄4″...
...refrigerator, then an additional 1/8″ may be required to provide clearance for full adjustment of installation, proper air circulation and plumbing and electrical connections: Sides Top Back 23'/25' CustomStyle™ 1/8″ (4 mm) 1″ (25 mm) 1/2″ (13 mm) 23' (33" wide), 25', 26' 1/8″ (4 mm) 1″ (25 mm) 1″ (25...″ (61 cm) DIMENSIONS AND SPECIFICATIONS (for 25' CustomStyle™ models) 24″ (61 cm) Cabinet 3/4″ (19 mm) Airspace (1/2″ [13 mm] Gap + 1/4″ [6 mm] Wall Plates) 25″ (63.5 cm) Countertop 721⁄4″...

Use and Care Manual
Page 27
...holding the tubing, tighten the fitting. See Installing the Water Line section. If you are using the GE SmartConnect™ tubing, the nuts are using GE SmartConnect™ Refrigerator Tubing Kit, you will need to the power cord. 27 A If you are using copper tubing...possible. You may cause leaks. Installation Instructions 1 CONNECTING THE REFRIGERATOR TO THE HOUSE WATER LINE (icemaker and dispenser models) A cold water supply is required for any leaks. 3 PLUG IN THE REFRIGERATOR Before plugging in the refrigerator, make sure the icemaker power switch is set to the ...
...holding the tubing, tighten the fitting. See Installing the Water Line section. If you are using the GE SmartConnect™ tubing, the nuts are using GE SmartConnect™ Refrigerator Tubing Kit, you will need to the power cord. 27 A If you are using copper tubing...possible. You may cause leaks. Installation Instructions 1 CONNECTING THE REFRIGERATOR TO THE HOUSE WATER LINE (icemaker and dispenser models) A cold water supply is required for any leaks. 3 PLUG IN THE REFRIGERATOR Before plugging in the refrigerator, make sure the icemaker power switch is set to the ...
Use and Care Manual
Page 28
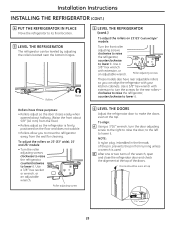
...the wall for the rear rollers- Rollers Raise 5 LEVEL THE REFRIGERATOR (cont .) To adjust the rollers on 23' (33" wide), 25' and 26' models: • Turn the roller adjusting screws clockwise to raise the refrigerator, counterclockwise to lower it . Doors should be leveled by adjusting ... adjustable rollers so you to lower it . To adjust the rollers on 23'/25' CustomStyle™ models: Turn the front roller adjusting screws clockwise to raise the refrigerator, counterclockwise to move the refrigerator away from turning unless a wrench is firmly positioned on the floor and does not...
...the wall for the rear rollers- Rollers Raise 5 LEVEL THE REFRIGERATOR (cont .) To adjust the rollers on 23' (33" wide), 25' and 26' models: • Turn the roller adjusting screws clockwise to raise the refrigerator, counterclockwise to lower it . Doors should be leveled by adjusting ... adjustable rollers so you to lower it . To adjust the rollers on 23'/25' CustomStyle™ models: Turn the front roller adjusting screws clockwise to raise the refrigerator, counterclockwise to move the refrigerator away from turning unless a wrench is firmly positioned on the floor and does not...

Use and Care Manual
Page 30
... [25 cm] diameter) to allow the refrigerator to the refrigerator is from a Reverse Osmosis Water Filtration System AND the refrigerator also has a water filter, use your refrigerator to the water supply. Installation Instructions INSTALLING THE WATER LINE (ICEMAKER & DISPENSER MODELS) ...water line to minimize the risk of electric shock, or is not warranted by the refrigerator or icemaker manufacturer. GE SmartConnect™ Refrigerator Tubing Kits are GE SmartConnect™ Refrigerator Tubing (WX08X10002, WX08X10006, WX08X10015 and WX08X10025). If you select allows at least 8&#...
... [25 cm] diameter) to allow the refrigerator to the refrigerator is from a Reverse Osmosis Water Filtration System AND the refrigerator also has a water filter, use your refrigerator to the water supply. Installation Instructions INSTALLING THE WATER LINE (ICEMAKER & DISPENSER MODELS) ...water line to minimize the risk of electric shock, or is not warranted by the refrigerator or icemaker manufacturer. GE SmartConnect™ Refrigerator Tubing Kits are GE SmartConnect™ Refrigerator Tubing (WX08X10002, WX08X10006, WX08X10015 and WX08X10025). If you select allows at least 8&#...


