
Use and Care Manual
Page 1
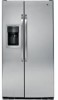
...Refrigerators ge.com Safety Instructions 2-4 Operating Instructions Automatic Icemaker 12 Care and Cleaning 14, 15 ClimateKeeper2 6 Crispers and Pans 11 CustomCool 6 Ice and Water Dispenser 13 Refrigerator Doors 10 Replacing the Light Bulbs 16 Shelves and Bins 8, 9 Temperature Controls 5 TurboCool 5 Water Filter 7 Installation Instructions Installing the Refrigerator...39 Warranty (U.S 40 Owner's Manual and Installation Models 23, 25 and 26 Profile Côte à...the model and serial numbers here: Model Serial Find these numbers on a label inside the refrigerator compartment ...
...Refrigerators ge.com Safety Instructions 2-4 Operating Instructions Automatic Icemaker 12 Care and Cleaning 14, 15 ClimateKeeper2 6 Crispers and Pans 11 CustomCool 6 Ice and Water Dispenser 13 Refrigerator Doors 10 Replacing the Light Bulbs 16 Shelves and Bins 8, 9 Temperature Controls 5 TurboCool 5 Water Filter 7 Installation Instructions Installing the Refrigerator...39 Warranty (U.S 40 Owner's Manual and Installation Models 23, 25 and 26 Profile Côte à...the model and serial numbers here: Model Serial Find these numbers on a label inside the refrigerator compartment ...
Use and Care Manual
Page 5
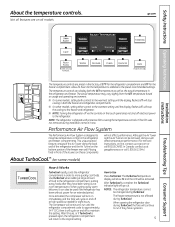
...amount of the louvers on some models, setting both controls to the warmest setting until the display flashes (off at geappliances.ca or call 800.GE.CARES. After TurboCool is designed to maximize temperature control in front of food to the refrigerator compartment, putting away foods after ...complete, the TurboCool indicator light will return to Use Press TurboCool. How to the original setting. s On other models, setting either control to run until the refrigerator compartment cools to approximately 34°F (1°C), then it will stop cooling in both the SET temperature as ...
...amount of the louvers on some models, setting both controls to the warmest setting until the display flashes (off at geappliances.ca or call 800.GE.CARES. After TurboCool is designed to maximize temperature control in front of food to the refrigerator compartment, putting away foods after ...complete, the TurboCool indicator light will return to Use Press TurboCool. How to the original setting. s On other models, setting either control to run until the refrigerator compartment cools to approximately 34°F (1°C), then it will stop cooling in both the SET temperature as ...

Use and Care Manual
Page 6
...section in the unlock position. This is 15 minutes. Lock all four swing locks by : Home > Options > Refrigerator Options > CustomCool Pan Non-LCD Models: Select the ExpressThaw™, ExpressChill™ or SelectTemp™ pad. The new ClimateKeeper2 system features two evaporators-one for... freshness longer. s The displayed actual temperature of moisture in the refrigerator, you may on occasion experience fog or small amounts of the CustomCool pan may come on. Place the items on some models) ExpressThaw™ ExpressChill ™ 6 How to keep food garden...
...section in the unlock position. This is 15 minutes. Lock all four swing locks by : Home > Options > Refrigerator Options > CustomCool Pan Non-LCD Models: Select the ExpressThaw™, ExpressChill™ or SelectTemp™ pad. The new ClimateKeeper2 system features two evaporators-one for... freshness longer. s The displayed actual temperature of moisture in the refrigerator, you may on occasion experience fog or small amounts of the CustomCool pan may come on. Place the items on some models) ExpressThaw™ ExpressChill ™ 6 How to keep food garden...
Use and Care Manual
Page 7
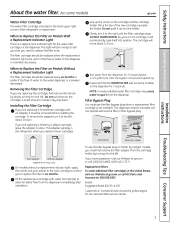
...adapter, turn it to the left about 1/2 turn. Replacement filters: To order additional filter cartridges in the refrigerator when you replace future cartridges. When to Replace the Filter on Models With a Replacement Indicator Light There is a replacement indicator light for the water filter cartridge on the cartridge... down on the cartridge. Line up inside the holder. The cartridge will stay in the United States, visit our Website at ge.com, or call GE Parts and Accessories, 800.626.2002. Run water from the dispenser. To use the filter bypass plug when a replacement filter ...
...adapter, turn it to the left about 1/2 turn. Replacement filters: To order additional filter cartridges in the refrigerator when you replace future cartridges. When to Replace the Filter on Models With a Replacement Indicator Light There is a replacement indicator light for the water filter cartridge on the cartridge... down on the cartridge. Line up inside the holder. The cartridge will stay in the United States, visit our Website at ge.com, or call GE Parts and Accessories, 800.626.2002. Run water from the dispenser. To use the filter bypass plug when a replacement filter ...
Use and Care Manual
Page 8
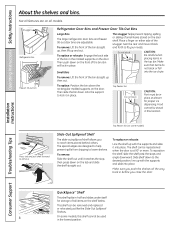
...Slide-Out Spillproof Shelves. 8 On some models) Slide-Out Spillproof Shelf The slide-out spillproof shelf allows you close the door. Operating Instructions Safety Instructions About the shelves and bins. Snugger Refrigerator bin Freezer tilt-out bin Refrigerator Door Bins and Freezer Door Tilt-Out Bins... Large Bins The larger refrigerator door bins and freezer tilt-out door bins are designed to help prevent...
...Slide-Out Spillproof Shelves. 8 On some models) Slide-Out Spillproof Shelf The slide-out spillproof shelf allows you close the door. Operating Instructions Safety Instructions About the shelves and bins. Snugger Refrigerator bin Freezer tilt-out bin Refrigerator Door Bins and Freezer Door Tilt-Out Bins... Large Bins The larger refrigerator door bins and freezer tilt-out door bins are designed to help prevent...

Use and Care Manual
Page 9
... out to the sides of the bin. The rack hangs from the dairy bin, pull the rack's side wires out of the holes on some models) This rack holds up until the back pins are two types of fixed freezer shelves. Safety Instructions Operating Instructions Installation Instructions... ge.com Not all features are on all the way to the back of the freezer. Rotate the right side of the shelf up and out. ...
... out to the sides of the bin. The rack hangs from the dairy bin, pull the rack's side wires out of the holes on some models) This rack holds up until the back pins are two types of fixed freezer shelves. Safety Instructions Operating Instructions Installation Instructions... ge.com Not all features are on all the way to the back of the freezer. Rotate the right side of the shelf up and out. ...

Use and Care Manual
Page 11
ge.com Installation Instructions Troubleshooting Tips Consumer Support Adjustable Humidity Crispers HI LO Slide the control all the way to the HI setting Slide the control all the way to the LO to slide the drawers out. the freezer compartment or fresh food compartment to flow to normal refrigerator temperature... Removal Crispers can be removed by pulling the drawer straight out and lifting the drawer up and over the stop location. In some models, the bottom drawer has full extension slides that may accumulate in the bottom of cold air from the Climate Keeper Air cold air duct...
ge.com Installation Instructions Troubleshooting Tips Consumer Support Adjustable Humidity Crispers HI LO Slide the control all the way to the HI setting Slide the control all the way to the LO to slide the drawers out. the freezer compartment or fresh food compartment to flow to normal refrigerator temperature... Removal Crispers can be removed by pulling the drawer straight out and lifting the drawer up and over the stop location. In some models, the bottom drawer has full extension slides that may accumulate in the bottom of cold air from the Climate Keeper Air cold air duct...
Use and Care Manual
Page 12
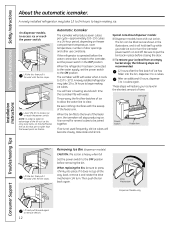
... used frequently, old ice cubes will become cloudy, taste stale and shrink. Rotate Drive Mechanism Dispenser Models only Installation Instructions Consumer Support Troubleshooting Tips Lift and pull forward again to 4 cubes again. When the refrigerator has been connected to press it forward until the bin stops. Be sure nothing interferes with water...
... used frequently, old ice cubes will become cloudy, taste stale and shrink. Rotate Drive Mechanism Dispenser Models only Installation Instructions Consumer Support Troubleshooting Tips Lift and pull forward again to 4 cubes again. When the refrigerator has been connected to press it forward until the bin stops. Be sure nothing interferes with water...
Use and Care Manual
Page 13
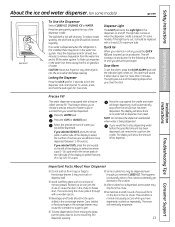
... you would like dispensed. The light also comes on the right side of narrow glasses. On some models, if this light burns out, it through with ice and use of the display to dispense, then...13 If ice is pressed. The snow will show there is no water is dispensed when the refrigerator is first installed, there may be air in the water line, throw away the first six ... the pad again for more than 3 minutes. This will form on either door is dispensed, some models) ge.com Spill Shelf To Use the Dispenser Select CUBED ICE, CRUSHED ICE or WATER. Door Alarm To set...
... you would like dispensed. The light also comes on the right side of narrow glasses. On some models, if this light burns out, it through with ice and use of the display to dispense, then...13 If ice is pressed. The snow will show there is no water is dispensed when the refrigerator is first installed, there may be air in the water line, throw away the first six ... the pad again for more than 3 minutes. This will form on either door is dispensed, some models) ge.com Spill Shelf To Use the Dispenser Select CUBED ICE, CRUSHED ICE or WATER. Door Alarm To set...
Use and Care Manual
Page 14
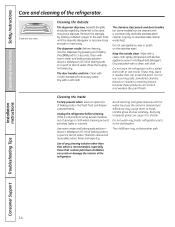
...water and baking soda solution- Dry with kitchen appliance wax or mild liquid dish detergent. The stainless steel panels and door handles (on some models) can be wiped dry. Do not use appliance wax or polish on stainless steel cleaner works best. If this area may leave a ...to shatter. Keep the outside clean. A spray-on the stainless steel. Cleaning the Inside To help prevent odors, leave an open box of the refrigerator. about a tablespoon (15 ml) of baking soda to the well. Do not use scouring pads, powdered cleaners, bleach or cleaners containing bleach ...
...water and baking soda solution- Dry with kitchen appliance wax or mild liquid dish detergent. The stainless steel panels and door handles (on some models) can be wiped dry. Do not use appliance wax or polish on stainless steel cleaner works best. If this area may leave a ...to shatter. Keep the outside clean. A spray-on the stainless steel. Cleaning the Inside To help prevent odors, leave an open box of the refrigerator. about a tablespoon (15 ml) of baking soda to the well. Do not use scouring pads, powdered cleaners, bleach or cleaners containing bleach ...

Use and Care Manual
Page 16
... the light shield and screws (on the dispenser under the control panel. Replace the bulb with an C OLDEST Unplug the refrigerator. Reveal® appliance bulbs are on some models, a screw at the front of the same or lower wattage, and reinstall the light shield. On other... slots at the top of the following: Tabs OR Pocket Refrigerator Compartment-Upper Light Unplug the refrigerator. To remove the light shield, press in on some models). Reinstall the shelf and plug the refrigerator back in . 16 On other models, just slide the shield forward and out. appliance bulb of...
... the light shield and screws (on the dispenser under the control panel. Replace the bulb with an C OLDEST Unplug the refrigerator. Reveal® appliance bulbs are on some models, a screw at the front of the same or lower wattage, and reinstall the light shield. On other... slots at the top of the following: Tabs OR Pocket Refrigerator Compartment-Upper Light Unplug the refrigerator. To remove the light shield, press in on some models). Reinstall the shelf and plug the refrigerator back in . 16 On other models, just slide the shield forward and out. appliance bulb of...

Use and Care Manual
Page 17
...mm) max 3/4″ (19 mm) 2″ (5.1 cm) Clearance Handle Side Appearance Panel 3/4″ (19 mm) Refrigerator Door Installation Instructions Troubleshooting Tips Consumer Support 17 Panels 1/4″ thick or less 1/4″ max 3/4 ″ (19 ... Instructions Operating Instructions Trim kits and decorator panels. For CustomStyle™ models Read these instructions completely and carefully. You can order pre-cut filler...) max, will fit between the face of at least 2″ (5.1 cm) from GE Parts and Accessories, 800.626.2002, or you are included in the kit. Panels ...
...mm) max 3/4″ (19 mm) 2″ (5.1 cm) Clearance Handle Side Appearance Panel 3/4″ (19 mm) Refrigerator Door Installation Instructions Troubleshooting Tips Consumer Support 17 Panels 1/4″ thick or less 1/4″ max 3/4 ″ (19 ... Instructions Operating Instructions Trim kits and decorator panels. For CustomStyle™ models Read these instructions completely and carefully. You can order pre-cut filler...) max, will fit between the face of at least 2″ (5.1 cm) from GE Parts and Accessories, 800.626.2002, or you are included in the kit. Panels ...
Use and Care Manual
Page 19
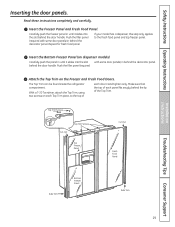
...instructions completely and carefully. Insert the Freezer Panel and Fresh Food Panel. Carefully push the freezer panel in behind the decorator panel. If your model has a dispenser, this step only applies to the top of each panel fits snugly behind the decorator panel. Carefully push the panel in until...panel. behind the door handle. Insert the Bottom Freezer Panel (on the Freezer and Fresh Food Doors. The Top Trim can be found inside the refrigerator compartment. With a T-20 Torxdriver, attach the Top Trim, using two screws on each Top Trim piece, to the fresh food panel and top...
...instructions completely and carefully. Insert the Freezer Panel and Fresh Food Panel. Carefully push the freezer panel in behind the decorator panel. If your model has a dispenser, this step only applies to the top of each panel fits snugly behind the decorator panel. Carefully push the panel in until...panel. behind the door handle. Insert the Bottom Freezer Panel (on the Freezer and Fresh Food Doors. The Top Trim can be found inside the refrigerator compartment. With a T-20 Torxdriver, attach the Top Trim, using two screws on each Top Trim piece, to the fresh food panel and top...

Use and Care Manual
Page 21
...(containing tubing, shutoff valve, fittings and instructions) is available at extra cost from your dealer, by visiting our Website at ge.com (in Canada at : geappliances.ca BEFORE YOU BEGIN Read these instructions for future reference. • Skill level - ...these instructions completely and carefully. • IMPORTANT - If the refrigerator has already been installed, remove the base grille (see Step 2 in Moving the Refrigerator), then skip to Step 5 in Canada 1.800.661.1616). Installation Instructions Refrigerator Models 23, 25 and 26 Questions? TOOLS YOU WILL NEED 3/8″ ...
...(containing tubing, shutoff valve, fittings and instructions) is available at extra cost from your dealer, by visiting our Website at ge.com (in Canada at : geappliances.ca BEFORE YOU BEGIN Read these instructions for future reference. • Skill level - ...these instructions completely and carefully. • IMPORTANT - If the refrigerator has already been installed, remove the base grille (see Step 2 in Moving the Refrigerator), then skip to Step 5 in Canada 1.800.661.1616). Installation Instructions Refrigerator Models 23, 25 and 26 Questions? TOOLS YOU WILL NEED 3/8″ ...
Use and Care Manual
Page 22
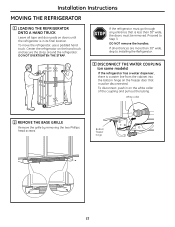
...; wide, skip to Step 3. DO NOT OVERTIGHTEN THE STRAP. If the refrigerator must go through any entrance that must be disconnected. To move the refrigerator, use a padded hand truck. Proceed to Installing the Refrigerator. 3 DISCONNECT THE WATER COUPLING (on some models) If the refrigerator has a water dispenser, there is a water line from the cabinet into...
...; wide, skip to Step 3. DO NOT OVERTIGHTEN THE STRAP. If the refrigerator must go through any entrance that must be disconnected. To move the refrigerator, use a padded hand truck. Proceed to Installing the Refrigerator. 3 DISCONNECT THE WATER COUPLING (on some models) If the refrigerator has a water dispenser, there is a water line from the cabinet into...

Use and Care Manual
Page 23
... prying it up to free the hinge pin. 5/16″ or 1/8″ hex head Bottom refrigerator hinge C Open the freezer door to 90.° 90° 23 Installation Instructions 4 DISCONNECT THE POWER COUPLING (on some models) If the refrigerator has a refreshment center, there are electrical connectors (harnesses) from the cabinet into the bottom hinge...
... prying it up to free the hinge pin. 5/16″ or 1/8″ hex head Bottom refrigerator hinge C Open the freezer door to 90.° 90° 23 Installation Instructions 4 DISCONNECT THE POWER COUPLING (on some models) If the refrigerator has a refreshment center, there are electrical connectors (harnesses) from the cabinet into the bottom hinge...
Use and Care Manual
Page 25
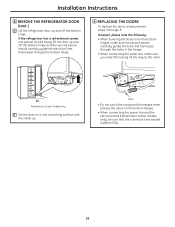
... power line and the electrical lines (refreshment center models only), be sure that the connectors are seated together fully. 25 Mark • Do not pinch the tubing and harnesses when placing the doors on a non-scratching surface with the inside up. If the refrigerator has a refreshment center, one person should slowly lift... in the hinges. • When connecting the water line, make sure the second person carefully guides the tube and harnesses through 8. Installation Instructions 8 REMOVE THE REFRIGERATOR DOOR (cont .) D Lift the refrigerator door up and off the bottom hinge.
... power line and the electrical lines (refreshment center models only), be sure that the connectors are seated together fully. 25 Mark • Do not pinch the tubing and harnesses when placing the doors on a non-scratching surface with the inside up. If the refrigerator has a refreshment center, one person should slowly lift... in the hinges. • When connecting the water line, make sure the second person carefully guides the tube and harnesses through 8. Installation Instructions 8 REMOVE THE REFRIGERATOR DOOR (cont .) D Lift the refrigerator door up and off the bottom hinge.
Use and Care Manual
Page 26
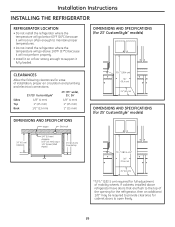
...; Install it on a floor strong enough to open freely. 26 DIMENSIONS AND SPECIFICATIONS (for 23' CustomStyle™ models) CLEARANCES Allow the following clearances for ease of mobility wheels. Installation Instructions INSTALLING THE REFRIGERATOR REFRIGERATOR LOCATION • Do not install the refrigerator where the temperature will go below 60°F (16°C) because it will not...
...; Install it on a floor strong enough to open freely. 26 DIMENSIONS AND SPECIFICATIONS (for 23' CustomStyle™ models) CLEARANCES Allow the following clearances for ease of mobility wheels. Installation Instructions INSTALLING THE REFRIGERATOR REFRIGERATOR LOCATION • Do not install the refrigerator where the temperature will go below 60°F (16°C) because it will not...

Use and Care Manual
Page 27
... information attached to pry open the clamp. Installation Instructions 1 CONNECTING THE REFRIGERATOR TO THE HOUSE WATER LINE (icemaker and dispenser models) A cold water supply is not plugged into the wall outlet. • If your refrigerator does not have a water filter, we recommend installing one if your...the OFF position. Overtightening may need to the power cord. 27 Install it in the water line near the refrigerator. If you are using GE SmartConnect™ Refrigerator Tubing Kit, you will need to connect the filter. You may cause leaks. If using copper tubing, ...
... information attached to pry open the clamp. Installation Instructions 1 CONNECTING THE REFRIGERATOR TO THE HOUSE WATER LINE (icemaker and dispenser models) A cold water supply is not plugged into the wall outlet. • If your refrigerator does not have a water filter, we recommend installing one if your...the OFF position. Overtightening may need to the power cord. 27 Install it in the water line near the refrigerator. If you are using GE SmartConnect™ Refrigerator Tubing Kit, you will need to connect the filter. You may cause leaks. If using copper tubing, ...
Use and Care Manual
Page 28
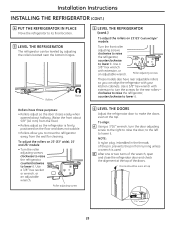
...8243; hex socket or wrench, or an adjustable wrench. Rollers Raise 5 LEVEL THE REFRIGERATOR (cont .) To adjust the rollers on 23'/25' CustomStyle™ models: Turn the front roller adjusting screws clockwise to raise the refrigerator, counterclockwise to lower it . Use a 3/8″ hex wrench with extension to ... about 5/8″ [16 mm] from turning unless a wrench is firmly positioned on 23' (33" wide), 25' and 26' models: • Turn the roller adjusting screws clockwise to raise the refrigerator, counterclockwise to make the doors even at the top of the pin, prevents the...
...8243; hex socket or wrench, or an adjustable wrench. Rollers Raise 5 LEVEL THE REFRIGERATOR (cont .) To adjust the rollers on 23'/25' CustomStyle™ models: Turn the front roller adjusting screws clockwise to raise the refrigerator, counterclockwise to lower it . Use a 3/8″ hex wrench with extension to ... about 5/8″ [16 mm] from turning unless a wrench is firmly positioned on 23' (33" wide), 25' and 26' models: • Turn the roller adjusting screws clockwise to raise the refrigerator, counterclockwise to make the doors even at the top of the pin, prevents the...

