

Owners Manual
Page 2
... plugged in place so that the electrical rating of the past. Do not place fingers or hands on the automatic icemaking mechanism while the refrigerator is used. NOTE: We strongly recommend that releases the cubes. However, if you are not problems of the cord be performed by ...the Installation Instructions before cleaning and making repairs. USE OF EXTENSION CORDS Because of potential safety hazards under federal law must use of an old refrigeration product, check with the moving parts of this or any servicing be 15 amperes (minimum) and 120 volts. 2 Use this Owner's ...
... plugged in place so that the electrical rating of the past. Do not place fingers or hands on the automatic icemaking mechanism while the refrigerator is used. NOTE: We strongly recommend that releases the cubes. However, if you are not problems of the cord be performed by ...the Installation Instructions before cleaning and making repairs. USE OF EXTENSION CORDS Because of potential safety hazards under federal law must use of an old refrigeration product, check with the moving parts of this or any servicing be 15 amperes (minimum) and 120 volts. 2 Use this Owner's ...

Owners Manual
Page 3
... safety, this Safety Information carefully. Never unplug your personal responsibility and obligation to make sure the outlet is your refrigerator by a qualified electrician to have become frayed or otherwise damaged. When moving the refrigerator away from the power cord. SAVE THESE INSTRUCTIONS 3 Have the wall outlet and circuit checked by pulling on...
... safety, this Safety Information carefully. Never unplug your personal responsibility and obligation to make sure the outlet is your refrigerator by a qualified electrician to have become frayed or otherwise damaged. When moving the refrigerator away from the power cord. SAVE THESE INSTRUCTIONS 3 Have the wall outlet and circuit checked by pulling on...

Owners Manual
Page 4
... shelf front locks into position. To replace or relocate: Engage the bin in the molded supports of the door and push in . Rearranging the Shelves Refrigerator Shelves: To Remove To Replace Freezer Pan: To Remove Freezer Shelves: To Remove Lift up and out Tilt up Insert top hook Lower to install...
... shelf front locks into position. To replace or relocate: Engage the bin in the molded supports of the door and push in . Rearranging the Shelves Refrigerator Shelves: To Remove To Replace Freezer Pan: To Remove Freezer Shelves: To Remove Lift up and out Tilt up Insert top hook Lower to install...

Owners Manual
Page 5
...some models) The convertible meat pan has its own cold air duct to allow a stream of cold air from taking out the crispers, the refrigerator will need to be rolled forward until the door opens enough to slide the crispers out. The special edges are on all models.) Adjustable Humidity... Crispers and Snack Pan (on some cases, when you roll the refrigerator out, you will need to move the refrigerator to the left in before you slide them through the crisper guides. Crisper Removal Crispers can be removed by tilting up ...
...some models) The convertible meat pan has its own cold air duct to allow a stream of cold air from taking out the crispers, the refrigerator will need to be rolled forward until the door opens enough to slide the crispers out. The special edges are on all models.) Adjustable Humidity... Crispers and Snack Pan (on some cases, when you roll the refrigerator out, you will need to move the refrigerator to the left in before you slide them through the crisper guides. Crisper Removal Crispers can be removed by tilting up ...

Owners Manual
Page 6
...0 to the preset recommended settings. If this film was not removed during installation, remove it may be necessary to stabilize. NOTE: The refrigerator is the coldest setting. STEP 3-WAIT 12 HOURS for Proper Temperature Control STEP 1-Set Fresh Food Control on the left side of 1 ...is warmest and 9 is shipped with Touch Pads: • Freezer setting is on "5." A display of the display. • Refrigerator setting is touched, compartment setting changes one adjustment. 012 12 012 12 89 89 89 89 About the controls on "5." To Change Temperature Control ...
...0 to the preset recommended settings. If this film was not removed during installation, remove it may be necessary to stabilize. NOTE: The refrigerator is the coldest setting. STEP 3-WAIT 12 HOURS for Proper Temperature Control STEP 1-Set Fresh Food Control on the left side of 1 ...is warmest and 9 is shipped with Touch Pads: • Freezer setting is on "5." A display of the display. • Refrigerator setting is touched, compartment setting changes one adjustment. 012 12 012 12 89 89 89 89 About the controls on "5." To Change Temperature Control ...

Owners Manual
Page 7
...United States, visit our Website at GEAppliances.com, or call GE Parts and Accessories, 800.626.2002. GE has not qualified non-GE branded filters for use in GE and Hotpoint refrigerators and there is no assurance that non-GE branded filters meet rigorous industry NSF standards for safety and .... When to begin making ice. Place the top of water to 15°F. Replacement filters: To order additional filter cartridges in GE and Hotpoint refrigerators provides optimal performance and reliability. The icemaker will hear a buzzing sound each time the icemaker fills with an adapter, it up ...
...United States, visit our Website at GEAppliances.com, or call GE Parts and Accessories, 800.626.2002. GE has not qualified non-GE branded filters for use in GE and Hotpoint refrigerators and there is no assurance that non-GE branded filters meet rigorous industry NSF standards for safety and .... When to begin making ice. Place the top of water to 15°F. Replacement filters: To order additional filter cartridges in GE and Hotpoint refrigerators provides optimal performance and reliability. The icemaker will hear a buzzing sound each time the icemaker fills with an adapter, it up ...
Owners Manual
Page 8
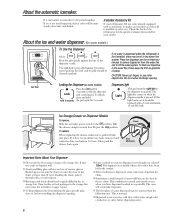
...selected Cubed. The snow will form on some models.) To Use the Dispenser Select or Press the glass gently against the top of the refrigerator for the specific icemaker kit needed for at extra cost. Dispensed water is not self-draining. Avoid overfilling glass with an automatic icemaker, .... To reduce water spotting, the shelf and its grille should not be warmer than the following ones. Press the dispenser arm for your refrigerator did not come already equipped with ice and use of water dispensed may be joined together. Some crushed ice may be quick-chilled in...
...selected Cubed. The snow will form on some models.) To Use the Dispenser Select or Press the glass gently against the top of the refrigerator for the specific icemaker kit needed for at extra cost. Dispensed water is not self-draining. Avoid overfilling glass with an automatic icemaker, .... To reduce water spotting, the shelf and its grille should not be warmer than the following ones. Press the dispenser arm for your refrigerator did not come already equipped with ice and use of water dispensed may be joined together. Some crushed ice may be quick-chilled in...

Owners Manual
Page 9
... with the WX10X307 polishing cloth, or for Vacation For long vacations or absences, remove food and unplug the refrigerator. The stainless steel door panels and handles. For best results, GE recommends using a clean, soft cloth. Replace with a commercially available stainless steel cleaner or a similar product using stainless steel cleaner PM10X311 with a soft...
... with the WX10X307 polishing cloth, or for Vacation For long vacations or absences, remove food and unplug the refrigerator. The stainless steel door panels and handles. For best results, GE recommends using a clean, soft cloth. Replace with a commercially available stainless steel cleaner or a similar product using stainless steel cleaner PM10X311 with a soft...

Owners Manual
Page 10
...• Install it on some models) If the refrigerator has an icemaker, it . Turn the roller adjusting screws clockwise to raise the refrigerator, counterclockwise to lower it will not run often enough to Consumer - Installation Instructions Models 20, 22, 25 Questions? In Canada, call 1.800.561.3344... Rollers adjust so the door closes easily when opened about halfway. DOOR ALIGNMENT After leveling, make the doors even, adjust the refrigerator door. A GE water supply kit is firmly positioned on back of grille between the bar and the bottom of the doors. Push forward until ...
...• Install it on some models) If the refrigerator has an icemaker, it . Turn the roller adjusting screws clockwise to raise the refrigerator, counterclockwise to lower it will not run often enough to Consumer - Installation Instructions Models 20, 22, 25 Questions? In Canada, call 1.800.561.3344... Rollers adjust so the door closes easily when opened about halfway. DOOR ALIGNMENT After leveling, make the doors even, adjust the refrigerator door. A GE water supply kit is firmly positioned on back of grille between the bar and the bottom of the doors. Push forward until ...

Owners Manual
Page 11
...both ends of connection to the water supply pipe. WHAT YOU WILL NEED • Copper or GE SmartConnect™ Refrigerator Tubing kit, 1/4″ outer diameter to connect the refrigerator to potable water supply only. WX08X10015 25′ (7.6 m) - Before purchasing, make sure ...water line to the tubing. Installation Instructions INSTALLING THE WATER LINE BEFORE YOU BEGIN Recommended copper water supply kits are GE SmartConnect™ Refrigerator Tubing (WX08X10002, WX08X10006, WX08X10015 and WX08X10025). When connecting your existing copper water line has a flared fitting at ...
...both ends of connection to the water supply pipe. WHAT YOU WILL NEED • Copper or GE SmartConnect™ Refrigerator Tubing kit, 1/4″ outer diameter to connect the refrigerator to potable water supply only. WX08X10015 25′ (7.6 m) - Before purchasing, make sure ...water line to the tubing. Installation Instructions INSTALLING THE WATER LINE BEFORE YOU BEGIN Recommended copper water supply kits are GE SmartConnect™ Refrigerator Tubing (WX08X10002, WX08X10006, WX08X10015 and WX08X10025). When connecting your existing copper water line has a flared fitting at ...

Owners Manual
Page 12
...pipe. Consult with a wrench. When it is clear. Do not cut plastic tube to install filter. 12 For plastic tubing from a GE SmartConnect™ Refrigerator Tubing kit, insert the molded end of the tubing into the wall outlet. • If your water supply has sand or particles ...from the water pipe. Remove any sediment from drilling the hole in the water pipe (even if using a selfpiercing valve) using a GE SmartConnect™ Refrigerator Tubing kit, you may cause leaks. Consult with the pipe clamp. NOTE: Do not overtighten or you will need an additional tube (...
...pipe. Consult with a wrench. When it is clear. Do not cut plastic tube to install filter. 12 For plastic tubing from a GE SmartConnect™ Refrigerator Tubing kit, insert the molded end of the tubing into the wall outlet. • If your water supply has sand or particles ...from the water pipe. Remove any sediment from drilling the hole in the water pipe (even if using a selfpiercing valve) using a GE SmartConnect™ Refrigerator Tubing kit, you may cause leaks. Consult with the pipe clamp. NOTE: Do not overtighten or you will need an additional tube (...
Owners Manual
Page 13
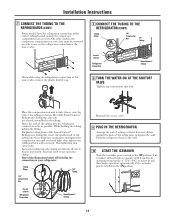
... THE SHUTOFF VALVE Tighten any connections that it does not vibrate against the back of the refrigerator or against the wall. You may cause leaks. On a GE SmartConnect™ Refrigerator Tubing kit, the nuts are already assembled to the ON position. While holding the tubing... the icemaker power switch to the tubing. For plastic tubing from a GE SmartConnect™ Refrigerator Tubing kit, insert the molded end of the illustrations below . Fasten the tubing into the refrigerator connection and tighten the compression nut until it reaches its operating temperature of...
... THE SHUTOFF VALVE Tighten any connections that it does not vibrate against the back of the refrigerator or against the wall. You may cause leaks. On a GE SmartConnect™ Refrigerator Tubing kit, the nuts are already assembled to the ON position. While holding the tubing... the icemaker power switch to the tubing. For plastic tubing from a GE SmartConnect™ Refrigerator Tubing kit, insert the molded end of the illustrations below . Fasten the tubing into the refrigerator connection and tighten the compression nut until it reaches its operating temperature of...

Owners Manual
Page 14
... from the evaporator and flows into the ice bucket. HUMMM... The fans change speeds in order to pressure equalizing within the refrigerator. The flow of refrigerant through the freezer cooling coils may hear the fans spinning at high speeds. Troubleshooting Tips Save time and money! You may...the controls. • Set the temperature control one step colder. The new high efficiency compressor may run faster and longer than your old refrigerator and you may cause a gurgling sound due to provide optimal cooling and energy savings. You may hear a high-pitched hum or pulsating...
... from the evaporator and flows into the ice bucket. HUMMM... The fans change speeds in order to pressure equalizing within the refrigerator. The flow of refrigerant through the freezer cooling coils may hear the fans spinning at high speeds. Troubleshooting Tips Save time and money! You may...the controls. • Set the temperature control one step colder. The new high efficiency compressor may run faster and longer than your old refrigerator and you may cause a gurgling sound due to provide optimal cooling and energy savings. You may hear a high-pitched hum or pulsating...

Owners Manual
Page 15
... Check to maintain even temperatures.) Frost or ice crystals on frozen food (frost within package is normal. • Wait 24 hours for the refrigerator to completely cool down . • Level cubes by hand. • Turn off . Problem Vibration or rattling Motor operates for long periods or...with fingertip pressure and discard remaining clumps. • Freezer may be too warm. Door left open . Slight vibration is normal) Divider between refrigerator and freezer compartments feels warm Automatic icemaker does not work (on the outside. • Slide the power switch to the ON position. &#...
... Check to maintain even temperatures.) Frost or ice crystals on frozen food (frost within package is normal. • Wait 24 hours for the refrigerator to completely cool down . • Level cubes by hand. • Turn off . Problem Vibration or rattling Motor operates for long periods or...with fingertip pressure and discard remaining clumps. • Freezer may be too warm. Door left open . Slight vibration is normal) Divider between refrigerator and freezer compartments feels warm Automatic icemaker does not work (on the outside. • Slide the power switch to the ON position. &#...

Owners Manual
Page 16
...setting. Defrost water drainage system needs cleaning. Light bulb burned out. Dispenser is not dispensed No water or ice cube production Refrigerator has odor Moisture forms on some models) Water in the ON position will discolor at outlet. Water dispenser has not been used for... jammed in the water system. Icemaker power switch is normal that heat be trapped in chute. Before you call for replenished supply to refrigerator. Normal air flow cooling motor. Last setting was dispensed (on some models) Frequent "buzzing" sound 16 Possible Causes Water dispenser has not...
...setting. Defrost water drainage system needs cleaning. Light bulb burned out. Dispenser is not dispensed No water or ice cube production Refrigerator has odor Moisture forms on some models) Water in the ON position will discolor at outlet. Water dispenser has not been used for... jammed in the water system. Icemaker power switch is normal that heat be trapped in chute. Before you call for replenished supply to refrigerator. Normal air flow cooling motor. Last setting was dispensed (on some models) Frequent "buzzing" sound 16 Possible Causes Water dispenser has not...

Owners Manual
Page 17
... of the appliance. • Damage to finish after delivery. • Improper installation-proper installation includes adequate air circulation to the refrigeration system, adequate electrical, plumbing and other connecting facilities. • Replacement of house fuses or resetting of circuit breakers. • ...covered Compressor Sealed System (including evaporator, condenser tubing and refrigerant) All Other Parts How Long Warranted (From Date of Sale) GE Profile: Ten (10) Years GE and All Other Brands: One (1) Year GE Profile: Five (5) Years GE and All Other Brands: One (1) Year One (1) ...
... of the appliance. • Damage to finish after delivery. • Improper installation-proper installation includes adequate air circulation to the refrigeration system, adequate electrical, plumbing and other connecting facilities. • Replacement of house fuses or resetting of circuit breakers. • ...covered Compressor Sealed System (including evaporator, condenser tubing and refrigerant) All Other Parts How Long Warranted (From Date of Sale) GE Profile: Ten (10) Years GE and All Other Brands: One (1) Year GE Profile: Five (5) Years GE and All Other Brands: One (1) Year One (1) ...

Owners Manual
Page 18
...or you may also have other rights which fails due to a defect in this Limited Warranty. During this limited five-year sealed refrigerating system warranty, GE will also provide, free of charge, all labor and related service to replace the defective part. Damage to provide required service. ...Year From the date of the original purchase Any part of the refrigerator which vary from state to one -year warranty, GE will also provide, free of food due to obtain service under the warranty. What GE Will Not Cover: Service trips to your legal rights are limited ...
...or you may also have other rights which fails due to a defect in this Limited Warranty. During this limited five-year sealed refrigerating system warranty, GE will also provide, free of charge, all labor and related service to replace the defective part. Damage to provide required service. ...Year From the date of the original purchase Any part of the refrigerator which vary from state to one -year warranty, GE will also provide, free of food due to obtain service under the warranty. What GE Will Not Cover: Service trips to your legal rights are limited ...


