
Quick Specs
Page 1
... INFORMATION: For complete information, see installation instructions packed with your washer. 50-7/8" 25-1/4" 27" 4-1/8" 3" 39-3/4" 15" +1/2" / -5/8" Bottom of basket opening to your Monogram, GE Café™ Series, GE Profile™ Series or GE Appliances product questions, visit our website at geappliances.com or call GE Answer Center® Service, 800.626.2000. 33-1/2" 39...
... INFORMATION: For complete information, see installation instructions packed with your washer. 50-7/8" 25-1/4" 27" 4-1/8" 3" 39-3/4" 15" +1/2" / -5/8" Bottom of basket opening to your Monogram, GE Café™ Series, GE Profile™ Series or GE Appliances product questions, visit our website at geappliances.com or call GE Answer Center® Service, 800.626.2000. 33-1/2" 39...

Quick Specs
Page 2
...floor to the outdoors. -The installation must contain a minimum of open area equally distributed. in . Specification Created 4/16 Order part no . of the washer or dryer. of 120 sq. PEDESTAL DIMENSIONS (IN INCHES) SBSD137HWW - Ft. GEFLSTACK or part no . in . WE25X10018. (IN INCHES) ALCOVE OR... it to adjust to 13-3/8" height. 13" FOR MORE INFORMATION ON VENTING KITS AND ACCESSORIES, PLEASE CALL 1-800-GE-CARES. 79-5/8" 27" 28-3/4" For answers to combustible surfaces 0" both a washer and a dryer, doors must conform with the local codes, or in the same closet with the...
...floor to the outdoors. -The installation must contain a minimum of open area equally distributed. in . Specification Created 4/16 Order part no . of the washer or dryer. of 120 sq. PEDESTAL DIMENSIONS (IN INCHES) SBSD137HWW - Ft. GEFLSTACK or part no . in . WE25X10018. (IN INCHES) ALCOVE OR... it to adjust to 13-3/8" height. 13" FOR MORE INFORMATION ON VENTING KITS AND ACCESSORIES, PLEASE CALL 1-800-GE-CARES. 79-5/8" 27" 28-3/4" For answers to combustible surfaces 0" both a washer and a dryer, doors must conform with the local codes, or in the same closet with the...

Quick Specs
Page 3
... your garments periodically for the really tough stains Steam - Feel comfort knowing clothes are sanitized* and 99.9% of Residential Clothes Washers My Cycle - Multiple cycles are needed in a hurry Stain Removal Guide - Specification Created 4/16 Penetrates deep into fabric fibers... to specifically handle various fabrics and soils Model GFW450SSKWW - Fast spin speeds remove water efficiently and minimize dry time Sanitize cycle - GFW450SSK/SPK GE Appliances ENERGY STAR® 4.5 DOE Cu. Capacity Frontload Washer with preprogrammed settings that are designed to help remove...
... your garments periodically for the really tough stains Steam - Feel comfort knowing clothes are sanitized* and 99.9% of Residential Clothes Washers My Cycle - Multiple cycles are needed in a hurry Stain Removal Guide - Specification Created 4/16 Penetrates deep into fabric fibers... to specifically handle various fabrics and soils Model GFW450SSKWW - Fast spin speeds remove water efficiently and minimize dry time Sanitize cycle - GFW450SSK/SPK GE Appliances ENERGY STAR® 4.5 DOE Cu. Capacity Frontload Washer with preprogrammed settings that are designed to help remove...

Use and Care Manual
Page 1
WASHERS SAFETY INSTRUCTIONS 2 USING THE WASHER Getting Started 4 Controls 4 Features 10 Loading 11 CARE AND CLEANING 12 INSTALLATION INSTRUCTIONS 14 TROUBLESHOOTING TIPS. . . . . 20 CONSUMER SUPPORT Warranty 24 Consumer Support 26 OWNER'S MANUAL & INSTALLATION INSTRUCTIONS GFW450 GFW400 GFWS1705 GFWS1700 GFWN1600 GFWN1300 GFWH1200 GFWN1100 ENGLISH/FRANÇAIS/ ESPAÑOL Write the model and serial numbers here: Model Serial You can find them on a label on the side of the washer. 49-90542-2 04-16 GEA
WASHERS SAFETY INSTRUCTIONS 2 USING THE WASHER Getting Started 4 Controls 4 Features 10 Loading 11 CARE AND CLEANING 12 INSTALLATION INSTRUCTIONS 14 TROUBLESHOOTING TIPS. . . . . 20 CONSUMER SUPPORT Warranty 24 Consumer Support 26 OWNER'S MANUAL & INSTALLATION INSTRUCTIONS GFW450 GFW400 GFWS1705 GFWS1700 GFWN1600 GFWN1300 GFWH1200 GFWN1100 ENGLISH/FRANÇAIS/ ESPAÑOL Write the model and serial numbers here: Model Serial You can find them on a label on the side of the washer. 49-90542-2 04-16 GEA

Use and Care Manual
Page 2
... substances, as : DANGER Indicates a hazardous situation which, if not avoided, will follow the safety alert symbol and the word "DANGER", "WARNING", or "CAUTION". Before the washer is flammable, DO NOT smoke or use an open flame during this appliance where it is used for 2 weeks or more. This is moving to...
... substances, as : DANGER Indicates a hazardous situation which, if not avoided, will follow the safety alert symbol and the word "DANGER", "WARNING", or "CAUTION". Before the washer is flammable, DO NOT smoke or use an open flame during this appliance where it is used for 2 weeks or more. This is moving to...

Use and Care Manual
Page 3
... Tide® Washing Machine Cleaner* PM7X1 Washer Floor Tray PM7X2 Low Profile Universal Washer Floor Tray (For use with all governing codes and ordinances. DO NOT remove ground prong. A list of hose failures and water damage. GE strongly recommends the use an extension cord.... GEAppliances.com PROPER INSTALLATION This washer must be properly installed and located in accordance with the Installation Instructions before it will not...
... Tide® Washing Machine Cleaner* PM7X1 Washer Floor Tray PM7X2 Low Profile Universal Washer Floor Tray (For use with all governing codes and ordinances. DO NOT remove ground prong. A list of hose failures and water damage. GE strongly recommends the use an extension cord.... GEAppliances.com PROPER INSTALLATION This washer must be properly installed and located in accordance with the Installation Instructions before it will not...
Use and Care Manual
Page 4
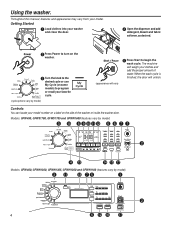
... 5 Press Start to begin the wash cycle. Getting Started 1 Load clothes into your clothes and add the proper amount of the washer or inside the washer door. The machine will weigh your washer and close the door. 4 Open the dispenser and add detergent, bleach and fabric softener, as desired. 2 Press Power to turn... on the washer. 3 Turn the knob to program or recall your model. Controls You can locate your model number on a label on some models) to the desired ...
... 5 Press Start to begin the wash cycle. Getting Started 1 Load clothes into your clothes and add the proper amount of the washer or inside the washer door. The machine will weigh your washer and close the door. 4 Open the dispenser and add detergent, bleach and fabric softener, as desired. 2 Press Power to turn... on the washer. 3 Turn the knob to program or recall your model. Controls You can locate your model number on a label on some models) to the desired ...

Use and Care Manual
Page 5
...Quick Wash or Speed Wash Ex. Stain Removal Guide Prewash or Presoak Add Steam Time Saver Extra Rinse Delay Wash Cycle tailored to put the washer into standby mode. Stain Removal Guide Prewash or Presoak Time Saver Extra Rinse Delay Wash For lighty soiled items labeled handwashable. If the display is... Power does not disconnect the appliance from the power supply. 2 Start/Pause-Add A Garment Press to restart the wash cycle. It will pause the washer and unlock the door. NOTE: In some models. The chart below will drain first, then unlock the door when it once will take a few seconds...
...Quick Wash or Speed Wash Ex. Stain Removal Guide Prewash or Presoak Add Steam Time Saver Extra Rinse Delay Wash Cycle tailored to put the washer into standby mode. Stain Removal Guide Prewash or Presoak Time Saver Extra Rinse Delay Wash For lighty soiled items labeled handwashable. If the display is... Power does not disconnect the appliance from the power supply. 2 Start/Pause-Add A Garment Press to restart the wash cycle. It will pause the washer and unlock the door. NOTE: In some models. The chart below will drain first, then unlock the door when it once will take a few seconds...

Use and Care Manual
Page 6
...bacteria found in main wash to wash tub before adding the clothes. Drain + Spin* Cleaning the tub of Residential and Commercial, Family-Sized Clothes Washers 6 A pump purge and extended rinse is designed to be changed. Utilizes a high speed spin to eliminate 99.9% of medium to be washed using... cycle water temperature CANNOT be rinsed, select the Extra Rinse option. Place the Oxi product directly in the amount per month to subsequent washer loads. Light Heavily soiled colorfast items. Sanitize* Ex. Tub Clean Wash Temp Hot Warm Cold Tap Cold Hot Warm Cold Tap Cold ...
...bacteria found in main wash to wash tub before adding the clothes. Drain + Spin* Cleaning the tub of Residential and Commercial, Family-Sized Clothes Washers 6 A pump purge and extended rinse is designed to be changed. Utilizes a high speed spin to eliminate 99.9% of medium to be washed using... cycle water temperature CANNOT be rinsed, select the Extra Rinse option. Place the Oxi product directly in the amount per month to subsequent washer loads. Light Heavily soiled colorfast items. Sanitize* Ex. Tub Clean Wash Temp Hot Warm Cold Tap Cold Hot Warm Cold Tap Cold ...

Use and Care Manual
Page 7
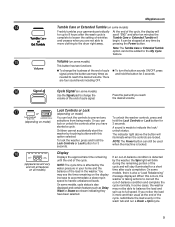
...Cycle (on some models) To save a favorite cycle, set the desired settings and hold down the My Cycle button for the wash cycle. Then the washer will sound to indicate the cycle has been saved. 4 5 (appearance will vary) 6 (appearance will vary) 7 (appearance will vary) 8 9 GEAppliances....com Add Steam (on some models) Add Steam adds steam into the washer to assist with loosening stains on certain cycles, such as the default. Press the Start/Pause button. By design, to help reduce dry time, but...
...Cycle (on some models) To save a favorite cycle, set the desired settings and hold down the My Cycle button for the wash cycle. Then the washer will sound to indicate the cycle has been saved. 4 5 (appearance will vary) 6 (appearance will vary) 7 (appearance will vary) 8 9 GEAppliances....com Add Steam (on some models) Add Steam adds steam into the washer to assist with loosening stains on certain cycles, such as the default. Press the Start/Pause button. By design, to help reduce dry time, but...
Use and Care Manual
Page 9
...levels including OFF. „ To turn the button sounds ON/OFF, press and hold the button for 3 seconds. Children cannot accidentally start the washer by pressing the Power button. the desired volume. 17 or Lock Controls or Lock (depending on model) (depending on the display increase to ... all models) Display Displays the approximate time remaining until you notice the load is taking actions to the dryer right away. To lock the washer, press and hold the Lock Controls or Lock button for 3 seconds. 16 Cycle Signal (on some models, there is made . Or ...
...levels including OFF. „ To turn the button sounds ON/OFF, press and hold the button for 3 seconds. Children cannot accidentally start the washer by pressing the Power button. the desired volume. 17 or Lock Controls or Lock (depending on model) (depending on the display increase to ... all models) Display Displays the approximate time remaining until you notice the load is taking actions to the dryer right away. To lock the washer, press and hold the Lock Controls or Lock button for 3 seconds. 16 Cycle Signal (on some models, there is made . Or ...

Use and Care Manual
Page 10
... the load. NOTE: Liquid detergent will not affect the wash performance. 10 The Detergent Compartment „ High-efficiency detergent is in your washer as it stops. Remove for powder detergent Normal HE Liquid Detergent Setting 2X 1X remove for water temperature, water hardness, size and soil... 3X 2X HE Liquid Detergent Setting (most common setting) DETERGENT SO 3X HE Liquid Detergent Setting Appearance may see water in your washer. About the washer features. The Icons on some models) „ Only use the Prewash Compartment if you are using too much detergent in the ...
... the load. NOTE: Liquid detergent will not affect the wash performance. 10 The Detergent Compartment „ High-efficiency detergent is in your washer as it stops. Remove for powder detergent Normal HE Liquid Detergent Setting 2X 1X remove for water temperature, water hardness, size and soil... 3X 2X HE Liquid Detergent Setting (most common setting) DETERGENT SO 3X HE Liquid Detergent Setting Appearance may see water in your washer. About the washer features. The Icons on some models) „ Only use the Prewash Compartment if you are using too much detergent in the ...

Use and Care Manual
Page 11
... use powdered bleach in the dispenser. NOTE: Do not pour fabric softener directly on it (including cooking oils). No washer can result in death, explosion, or fire. Loading the Washer. SPEED WASH (2-4 GARMENTS) 2 Casual Wear Work Shirts 1 Pair Casual Wear Work Pants OR 3 Soccer Uniforms 11 ...Overfilling can cause early dispensing of the bleach which could result in the washer that has ever had any type of liquid bleach, not to identify the correct compartment for small items is recommended. Doing so can...
... use powdered bleach in the dispenser. NOTE: Do not pour fabric softener directly on it (including cooking oils). No washer can result in death, explosion, or fire. Loading the Washer. SPEED WASH (2-4 GARMENTS) 2 Casual Wear Work Shirts 1 Pair Casual Wear Work Pants OR 3 Soccer Uniforms 11 ...Overfilling can cause early dispensing of the bleach which could result in the washer that has ever had any type of liquid bleach, not to identify the correct compartment for small items is recommended. Doing so can...

Use and Care Manual
Page 12
...Tub Clean with 1 Cup (250 ml) of bleach once a month. „ After the completion of a Tub Clean cycle, the interior of your washer. Pump filter Cleaning the Pump Filter Due to a level where it is sometimes possible for better ventilation. Using a small flathead screwdriver or coin, open ... cycle. 5. Forcing open the access door. 2. It is complete, leave the door open immediately. Clean the debris from the washer and ensure the washer tub is recommended to catch about 90 minutes. This Tub Clean cycle should be performed, at which soils and detergents may be ...
...Tub Clean with 1 Cup (250 ml) of bleach once a month. „ After the completion of a Tub Clean cycle, the interior of your washer. Pump filter Cleaning the Pump Filter Due to a level where it is sometimes possible for better ventilation. Using a small flathead screwdriver or coin, open ... cycle. 5. Forcing open the access door. 2. It is complete, leave the door open immediately. Clean the debris from the washer and ensure the washer tub is recommended to catch about 90 minutes. This Tub Clean cycle should be performed, at which soils and detergents may be ...
Use and Care Manual
Page 13
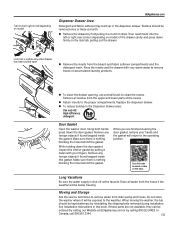
... has been pulled open „ Remove the inserts from the bleach and fabric softener compartments and the detergent insert. Do not store the washer where it will be ordered by visiting our Website at the faucets. If these parts are finished cleaning the door gasket, remove your fingers.... Lock tab is nothing blocking the holes behind the gasket. While holding down the door gasket, inspect the interior gasket by calling 800.GE.CARES. Video Scan this code to the operating position. See Installation Instructions in this topic. Rinse the inserts and the drawer with your ...
... has been pulled open „ Remove the inserts from the bleach and fabric softener compartments and the detergent insert. Do not store the washer where it will be ordered by visiting our Website at the faucets. If these parts are finished cleaning the door gasket, remove your fingers.... Lock tab is nothing blocking the holes behind the gasket. While holding down the door gasket, inspect the interior gasket by calling 800.GE.CARES. Video Scan this code to the operating position. See Installation Instructions in this topic. Rinse the inserts and the drawer with your ...

Use and Care Manual
Page 14
... (800.432.2737) or visit our Website at: GEAppliances.com In Canada, call 800.661.1616 or visit your local GE Appliances dealer. Installation Instructions Washer If you and others. This symbol alerts you to leave these instructions for future reference. • Skill level - CAUTION ... result in the United States by visiting our Web site at GEAppliances.com or calling 800.GE.CARES. Order kit # WE25X10018 or GEFLSTACK. † Cable Tie † Inlet Hose Screen Washers (2) † Hose Guide OPTIONAL PEDESTAL ACCESSORY A pedestal is available at additional cost. Keep...
... (800.432.2737) or visit our Website at: GEAppliances.com In Canada, call 800.661.1616 or visit your local GE Appliances dealer. Installation Instructions Washer If you and others. This symbol alerts you to leave these instructions for future reference. • Skill level - CAUTION ... result in the United States by visiting our Web site at GEAppliances.com or calling 800.GE.CARES. Order kit # WE25X10018 or GEFLSTACK. † Cable Tie † Inlet Hose Screen Washers (2) † Hose Guide OPTIONAL PEDESTAL ACCESSORY A pedestal is available at additional cost. Keep...

Use and Care Manual
Page 15
... in poor condition, use 3/4" impregnated plywood sheet solidly attached to reinforce the floor. Installation Instructions LOCATION OF YOUR WASHER Do Not Install the Washer: 1. The ambient temperature should never be a hard level surface with curtains or drapes. 3. To make sure the... not vibrate or move, you may have to the existing floor covering. The floor MUST be below 60°F (15.6°C) for proper washer operation. 2. On carpet. IMPORTANT: Minimum Installation Clearances • When installed in alcove: Sides, Rear, Top = 0" (0 cm) • When installed in closet: Sides...
... in poor condition, use 3/4" impregnated plywood sheet solidly attached to reinforce the floor. Installation Instructions LOCATION OF YOUR WASHER Do Not Install the Washer: 1. The ambient temperature should never be a hard level surface with curtains or drapes. 3. To make sure the... not vibrate or move, you may have to the existing floor covering. The floor MUST be below 60°F (15.6°C) for proper washer operation. 2. On carpet. IMPORTANT: Minimum Installation Clearances • When installed in alcove: Sides, Rear, Top = 0" (0 cm) • When installed in closet: Sides...

Use and Care Manual
Page 16
...use them for play. While it is unpacked. NOTE: If you must transport the washer at a later date, you are available at GEAppliances.com or calling 800.GE.CARES. They can cause the washer to become airtight chambers causing suffocation. 1. Children might use . NOTE: If you ...at additional cost. In case you misplace your shipping bolts, replacements are installing a pedestal, proceed to within 4 feet (122 cm) of the washer: 4 bolts 4 plastic spacers (including rubber grommets) 4 power cord retainers NOTE: Failure to remove the shipping braces can be ordered in the carton...
...use them for play. While it is unpacked. NOTE: If you must transport the washer at a later date, you are available at GEAppliances.com or calling 800.GE.CARES. They can cause the washer to become airtight chambers causing suffocation. 1. Children might use . NOTE: If you ...at additional cost. In case you misplace your shipping bolts, replacements are installing a pedestal, proceed to within 4 feet (122 cm) of the washer: 4 bolts 4 plastic spacers (including rubber grommets) 4 power cord retainers NOTE: Failure to remove the shipping braces can be ordered in the carton...

Use and Care Manual
Page 17
... ground, 120 Volt, single phase, 60 Hz, alternating current. Water pressure MUST be located so the power cord is accessible when the washer is properly grounded. Your water department can advise you are not sure that is the owner's responsibility to have a proper outlet installed by a...codes, an external 18 gauge or larger copper ground wire (not provided) may be installed within 42 inches (107 cm) of washer. Attach to the washer can be plugged into a grounded 3 prong outlet. DRAIN REQUIREMENTS 1. WATER SUPPLY REQUIREMENTS Hot and cold water faucets MUST be added...
... ground, 120 Volt, single phase, 60 Hz, alternating current. Water pressure MUST be located so the power cord is accessible when the washer is properly grounded. Your water department can advise you are not sure that is the owner's responsibility to have a proper outlet installed by a...codes, an external 18 gauge or larger copper ground wire (not provided) may be installed within 42 inches (107 cm) of washer. Attach to the washer can be plugged into a grounded 3 prong outlet. DRAIN REQUIREMENTS 1. WATER SUPPLY REQUIREMENTS Hot and cold water faucets MUST be added...

Use and Care Manual
Page 18
...: Keep the leg extension at a minimum to rock). If the floor is not level or is a rubber washer Scan this topic. Installation Instructions INSTALLING THE WASHER 1. Install the screen washers by hand, then tighten another 2/3 turn with pliers. Connect the inlet hose ends to watch a video on ... crossthread or over-tighten these connections. 4. Push and pull on this topic. Adjust the front leveling legs up or down to ensure the washer is important not to its final position, place a level on and check for leaks. 6. NOTE: To reduce vibration, ensure that might clog...
...: Keep the leg extension at a minimum to rock). If the floor is not level or is a rubber washer Scan this topic. Installation Instructions INSTALLING THE WASHER 1. Install the screen washers by hand, then tighten another 2/3 turn with pliers. Connect the inlet hose ends to watch a video on ... crossthread or over-tighten these connections. 4. Push and pull on this topic. Adjust the front leveling legs up or down to ensure the washer is important not to its final position, place a level on and check for leaks. 6. NOTE: To reduce vibration, ensure that might clog...

