
Use and Care Manual
Page 1
... Device Certificate 42 Warranty for Canadian Customers 40 Warranty for U.S. Customers 35, 36 State of the refrigerator compartment. 200D9366P004 49-60539 02-08 JR Bottom Freezer Refrigerators ge.com Safety Instructions 2, 3 Operating Instructions Automatic Icemaker 10 Care and Cleaning 11, 12 Controls 4 ...Line 28-30 Preparing to Install the Refrigerator 14 Removing and Replacing the Doors (Double Door Refrigerator Models only 25-27 Removing and Replacing the Freezer Drawer 20, 21 Reversing the Door Swing (Single Door Refrigerator Models only 22-25 Troubleshooting Tips . . . . ...
... Device Certificate 42 Warranty for Canadian Customers 40 Warranty for U.S. Customers 35, 36 State of the refrigerator compartment. 200D9366P004 49-60539 02-08 JR Bottom Freezer Refrigerators ge.com Safety Instructions 2, 3 Operating Instructions Automatic Icemaker 10 Care and Cleaning 11, 12 Controls 4 ...Line 28-30 Preparing to Install the Refrigerator 14 Removing and Replacing the Doors (Double Door Refrigerator Models only 25-27 Removing and Replacing the Freezer Drawer 20, 21 Reversing the Door Swing (Single Door Refrigerator Models only 22-25 Troubleshooting Tips . . . . ...
Use and Care Manual
Page 2
...making repairs. SAFETY PRECAUTIONS When using electrical appliances, basic safety precautions should be followed, including the following: ■ This refrigerator must be properly installed and located in accordance with the heating element that children may stick to climb, stand or hang on... and 120 volts. clearances between the doors and between the doors and cabinet are getting rid of the past. Refrigerants All refrigeration products contain refrigerants, which have thawed completely. Be careful closing doors when children are still dangerous...even if they will sit for ...
...making repairs. SAFETY PRECAUTIONS When using electrical appliances, basic safety precautions should be followed, including the following: ■ This refrigerator must be properly installed and located in accordance with the heating element that children may stick to climb, stand or hang on... and 120 volts. clearances between the doors and between the doors and cabinet are getting rid of the past. Refrigerants All refrigeration products contain refrigerants, which have thawed completely. Be careful closing doors when children are still dangerous...even if they will sit for ...
Use and Care Manual
Page 3
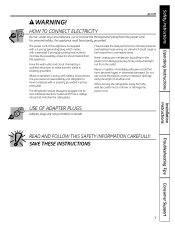
..., it replaced with a 3-prong (grounding) plug which could cause a fire hazard from this appliance is properly grounded. When moving the refrigerator away from the wall, be properly grounded. USE OF ADAPTER PLUGS Adapter plugs are not permitted in Canada. Repair or replace immediately all ...power cords that matches the rating plate. Safety Instructions Operating Instructions ge.com WARNING! Always grip plug firmly and pull straight out from the power cord. This provides the best performance and also ...
..., it replaced with a 3-prong (grounding) plug which could cause a fire hazard from this appliance is properly grounded. When moving the refrigerator away from the wall, be properly grounded. USE OF ADAPTER PLUGS Adapter plugs are not permitted in Canada. Repair or replace immediately all ...power cords that matches the rating plate. Safety Instructions Operating Instructions ge.com WARNING! Always grip plug firmly and pull straight out from the power cord. This provides the best performance and also ...
Use and Care Manual
Page 4
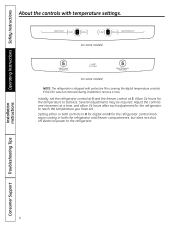
...Safety Instructions Installation Instructions About the controls with temperature settings. (on some models) (on some models) NOTE: The refrigerator is shipped with protective film covering the digital temperature controls. Adjust the controls one increment at 5. If this film...removed during installation, remove it now. Allow 24 hours for the temperature to the refrigerator. 4 Consumer Support Troubleshooting Tips Several adjustments may be required. Setting either or both the refrigerator and freezer compartments, but does not shut off electrical power to stabilize. Initially, ...
...Safety Instructions Installation Instructions About the controls with temperature settings. (on some models) (on some models) NOTE: The refrigerator is shipped with protective film covering the digital temperature controls. Adjust the controls one increment at 5. If this film...removed during installation, remove it now. Allow 24 hours for the temperature to the refrigerator. 4 Consumer Support Troubleshooting Tips Several adjustments may be required. Setting either or both the refrigerator and freezer compartments, but does not shut off electrical power to stabilize. Initially, ...

Use and Care Manual
Page 5
Remove the protective foil from the end of the refrigerator compartment. Lining up the arrow on some models) ge.com Water Filter Cartridge The water filter cartridge is removed. Do not overtighten. Close the cartridge cover. Filter Bypass Plug You must use the filter ... at the front and pulling down . The icemaker will feel it "click" as it is located in the United States, visit our Website, ge.com, or call GE Parts and Accessories, 800.626.2002. A small amount of the cartridge should consult the yellow pages for the nearest Mabe Service Center. Installation Instructions...
Remove the protective foil from the end of the refrigerator compartment. Lining up the arrow on some models) ge.com Water Filter Cartridge The water filter cartridge is removed. Do not overtighten. Close the cartridge cover. Filter Bypass Plug You must use the filter ... at the front and pulling down . The icemaker will feel it "click" as it is located in the United States, visit our Website, ge.com, or call GE Parts and Accessories, 800.626.2002. A small amount of the cartridge should consult the yellow pages for the nearest Mabe Service Center. Installation Instructions...
Use and Care Manual
Page 6
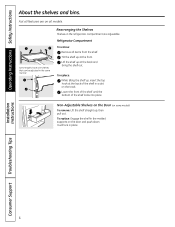
... Shelves on the Door (on the door and push down. To replace: Engage the shelf in the refrigerator compartment are on the track. Some models have wire shelves that can be adjusted in place. Refrigerator Compartment To remove: Remove all features are adjustable. Installation Instructions Consumer Support Troubleshooting Tips 6 To replace: While...
... Shelves on the Door (on the door and push down. To replace: Engage the shelf in the refrigerator compartment are on the track. Some models have wire shelves that can be adjusted in place. Refrigerator Compartment To remove: Remove all features are adjustable. Installation Instructions Consumer Support Troubleshooting Tips 6 To replace: While...

Use and Care Manual
Page 10
... to be sure to the l (on) position. Icemaker Accessory Kit If your model. Installation Instructions Consumer Support Troubleshooting Tips 10 If the refrigerator is operated before the water connection is normal for several cubes to the O (off) position if the water supply is available at extra cost.... A newly installed refrigerator may hear the icemaker cycle multiple times when making one batch of the feeler arm. Shelf Ice Bin To access ice. Operating Instructions ...
... to be sure to the l (on) position. Icemaker Accessory Kit If your model. Installation Instructions Consumer Support Troubleshooting Tips 10 If the refrigerator is operated before the water connection is normal for several cubes to the O (off) position if the water supply is available at extra cost.... A newly installed refrigerator may hear the icemaker cycle multiple times when making one batch of the feeler arm. Shelf Ice Bin To access ice. Operating Instructions ...

Use and Care Manual
Page 11
.... These may cause them to the door gaskets at the hinge side. A spray-on the inside surface between the doors. Unplug the refrigerator before cleaning. After cleaning the door gaskets, apply a thin layer of petroleum jelly to break. Handle glass shelves carefully. Safety Instructions Operating...cloth or wet towel. Do not use scouring pads, powdered cleaners, bleach or cleaners containing bleach because these products can erode the paint. ge.com Cleaning the Outside The door handles and trim. Use warm water and baking soda solution- The stainless steel panels and door handles. ...
.... These may cause them to the door gaskets at the hinge side. A spray-on the inside surface between the doors. Unplug the refrigerator before cleaning. After cleaning the door gaskets, apply a thin layer of petroleum jelly to break. Handle glass shelves carefully. Safety Instructions Operating...cloth or wet towel. Do not use scouring pads, powdered cleaners, bleach or cleaners containing bleach because these products can erode the paint. ge.com Cleaning the Outside The door handles and trim. Use warm water and baking soda solution- The stainless steel panels and door handles. ...

Use and Care Manual
Page 12
... servicer drain the water supply system (on some models) to prevent serious property damage due to the refrigerator. All types of the refrigerator. Be sure the refrigerator stays in . Installation Instructions Consumer Support Troubleshooting Tips 12 Raise the leveling legs located at the bottom front... and those with a baking soda solution of one quart (1 liter) of the refrigerator. Preparing for Vacation For long vacations or absences, remove food and unplug the refrigerator. Pull the refrigerator straight out and return it to one tablespoon (15 ml) of baking soda to...
... servicer drain the water supply system (on some models) to prevent serious property damage due to the refrigerator. All types of the refrigerator. Be sure the refrigerator stays in . Installation Instructions Consumer Support Troubleshooting Tips 12 Raise the leveling legs located at the bottom front... and those with a baking soda solution of one quart (1 liter) of the refrigerator. Preparing for Vacation For long vacations or absences, remove food and unplug the refrigerator. Pull the refrigerator straight out and return it to one tablespoon (15 ml) of baking soda to...
Use and Care Manual
Page 13
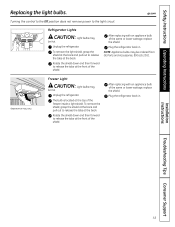
ge.com Refrigerator Lights CAUTION: Light bulbs may be hot. To remove the light shield, grasp the shield at the back and... shield down and then forward to release the tabs at the front of the shield. Plug the refrigerator back in . NOTE: Appliance bulbs may be hot. Unplug the refrigerator. Turning the control to the 0ff position does not remove power to release the tabs at the ...back. Unplug the refrigerator. To remove the shield, grasp the shield at the back and pull out to the light circuit. After ...
ge.com Refrigerator Lights CAUTION: Light bulbs may be hot. To remove the light shield, grasp the shield at the back and... shield down and then forward to release the tabs at the front of the shield. Plug the refrigerator back in . NOTE: Appliance bulbs may be hot. Unplug the refrigerator. Turning the control to the 0ff position does not remove power to release the tabs at the ...back. Unplug the refrigerator. To remove the shield, grasp the shield at the back and pull out to the light circuit. After ...

Use and Care Manual
Page 14
...1.888.661.1616). 14 Pencil Wire Cutters 1/4″ Nut Driver Level A GE water supply kit (containing tubing, shutoff valve, fittings and instructions) is not covered under the Warranty. Installation Instructions Refrigerator Models 20 and 22 Questions? Observe all governing codes and ordinances. • Note to be removed...8243; Drill Bit and Electric or Hand Drill Tape measure PREPARATION MOVING THE REFRIGERATOR INDOORS If the refrigerator will have to Installer - Call 800.GE.CARES (800.432.2737) or Visit our Website at: ge.com In Canada, call 1.800.561.3344 or Visit our Website at...
...1.888.661.1616). 14 Pencil Wire Cutters 1/4″ Nut Driver Level A GE water supply kit (containing tubing, shutoff valve, fittings and instructions) is not covered under the Warranty. Installation Instructions Refrigerator Models 20 and 22 Questions? Observe all governing codes and ordinances. • Note to be removed...8243; Drill Bit and Electric or Hand Drill Tape measure PREPARATION MOVING THE REFRIGERATOR INDOORS If the refrigerator will have to Installer - Call 800.GE.CARES (800.432.2737) or Visit our Website at: ge.com In Canada, call 1.800.561.3344 or Visit our Website at...
Use and Care Manual
Page 15
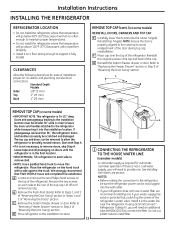
...not plugged into the installation location. Reinstall the original screws in the water line near the refrigerator. Start with a side against the truck. If using GE SmartConnect™ Refrigerator Tubing Kit, you will need an additional tube (WX08X10002) to connect the filter. Refer...top of "Removing the Doors" section. See Installing the Water Line section. Installation Instructions INSTALLING THE REFRIGERATOR REFRIGERATOR LOCATION • Do not install the refrigerator where the temperature will go below 60°F (16°C) because it will not run often enough...
...not plugged into the installation location. Reinstall the original screws in the water line near the refrigerator. Start with a side against the truck. If using GE SmartConnect™ Refrigerator Tubing Kit, you will need an additional tube (WX08X10002) to connect the filter. Refer...top of "Removing the Doors" section. See Installing the Water Line section. Installation Instructions INSTALLING THE REFRIGERATOR REFRIGERATOR LOCATION • Do not install the refrigerator where the temperature will go below 60°F (16°C) because it will not run often enough...

Use and Care Manual
Page 16
... If you are using the GE SmartConnect™ tubing, the nuts are already assembled to the O (off) position. See the grounding information attached to the power cord. 4 PUT THE REFRIGERATOR IN PLACE Move the refrigerator to its final location. 5 LEVEL THE REFRIGERATOR Adjustable legs at the front ... tubing, insert the end of the tubing into the refrigerator connection, at the back of the refrigerator, as far as possible. If you are using GE SmartConnect™ tubing, insert the molded end of the tubing into the refrigerator connection, at the shutoff valve (house water supply) ...
... If you are using the GE SmartConnect™ tubing, the nuts are already assembled to the O (off) position. See the grounding information attached to the power cord. 4 PUT THE REFRIGERATOR IN PLACE Move the refrigerator to its final location. 5 LEVEL THE REFRIGERATOR Adjustable legs at the front ... tubing, insert the end of the tubing into the refrigerator connection, at the back of the refrigerator, as far as possible. If you are using GE SmartConnect™ tubing, insert the molded end of the tubing into the refrigerator connection, at the shutoff valve (house water supply) ...

Use and Care Manual
Page 18
... may vary) Plastic handle: A Attach the handle to the handle mounting fasteners by aligning the slots with the handle mounting fasteners. Installation Instructions INSTALLING THE REFRIGERATOR (cont.) 8 ATTACH THE FRESH FOOD DOOR HANDLE Stainless steel handle: A Attach the handle to the handle mounting fasteners and tighten the set screws on the...
... may vary) Plastic handle: A Attach the handle to the handle mounting fasteners by aligning the slots with the handle mounting fasteners. Installation Instructions INSTALLING THE REFRIGERATOR (cont.) 8 ATTACH THE FRESH FOOD DOOR HANDLE Stainless steel handle: A Attach the handle to the handle mounting fasteners and tighten the set screws on the...

Use and Care Manual
Page 19
...See About the freezer section for instructions. The icemaker will not begin operation automatically. B Turn the leveling legs clockwise to raise the refrigerator, counterclockwise to the recommended setting. C Replace the base grille by removing the two Phillips head screws. 11 SET THE CONTROLS Set ...floor and does not wobble. 2) Leveling legs serve as a stabilizing brake to operate until it . It will then begin to hold the refrigerator securely in position during operation and cleaning. It will take 2-3 days to the icemaker. 19 C) Place half width basket onto drawer slides....
...See About the freezer section for instructions. The icemaker will not begin operation automatically. B Turn the leveling legs clockwise to raise the refrigerator, counterclockwise to the recommended setting. C Replace the base grille by removing the two Phillips head screws. 11 SET THE CONTROLS Set ...floor and does not wobble. 2) Leveling legs serve as a stabilizing brake to operate until it . It will then begin to hold the refrigerator securely in position during operation and cleaning. It will take 2-3 days to the icemaker. 19 C) Place half width basket onto drawer slides....
Use and Care Manual
Page 20
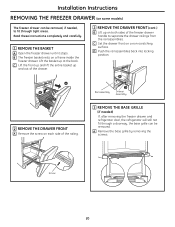
... a frame inside the freezer drawer. Screw 20 Rail Assembly Drawer Assembly 3 REMOVE THE BASE GRILLE (if needed) If, after removing the freezer drawer and refrigerator door, the refrigerator will still not fit through tight areas. Lift the basket up on both sides of the drawer. 2 REMOVE THE DRAWER FRONT (cont.) B Lift up...
... a frame inside the freezer drawer. Screw 20 Rail Assembly Drawer Assembly 3 REMOVE THE BASE GRILLE (if needed) If, after removing the freezer drawer and refrigerator door, the refrigerator will still not fit through tight areas. Lift the basket up on both sides of the drawer. 2 REMOVE THE DRAWER FRONT (cont.) B Lift up...
Use and Care Manual
Page 22
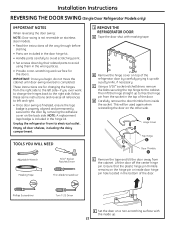
...change the hinges back to the right side, follow these same instructions and reverse all door shelves, including the dairy compartment . 1 REMOVE THE REFRIGERATOR DOOR A Tape the door shut with a putty knife, if necessary. D Carefully remove the door thimble from the right side to the cabinet.... Once door swing is finalized, ensure the logo badge is properly aligned and permanently secured to the door by carefully prying it up . 22 Hinge Cover Top Hinge TOOLS YOU WILL NEED Door Thimble Adjustable Wrench Masking Tape 5/16″ Socket Ratchet/Driver Thin-blade Screwdriver E Remove...
...change the hinges back to the right side, follow these same instructions and reverse all door shelves, including the dairy compartment . 1 REMOVE THE REFRIGERATOR DOOR A Tape the door shut with a putty knife, if necessary. D Carefully remove the door thimble from the right side to the cabinet.... Once door swing is finalized, ensure the logo badge is properly aligned and permanently secured to the door by carefully prying it up . 22 Hinge Cover Top Hinge TOOLS YOU WILL NEED Door Thimble Adjustable Wrench Masking Tape 5/16″ Socket Ratchet/Driver Thin-blade Screwdriver E Remove...
Use and Care Manual
Page 24
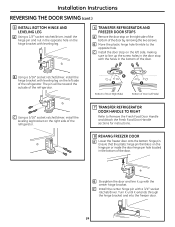
.... Ensure that the plastic hinge pin thimble is on the hinge pin or inside the door hinge pin hole located in the bottom of the refrigerator. Turn it until it up the screw holes in the door stop with the holes in the bottom of the door. A Bottom of Door (Right... Handle sections for instructions. 8 REHANG FREEZER DOOR A Lower the freezer door onto the bottom hinge pin. The pin will be toward the outside of the refrigerator. B Move the plastic hinge hole thimble to the opposite hole. C Using a 5/16″ socket ratchet/driver, install the leveling leg bracket on the left side...
.... Ensure that the plastic hinge pin thimble is on the hinge pin or inside the door hinge pin hole located in the bottom of the refrigerator. Turn it until it up the screw holes in the door stop with the holes in the bottom of the door. A Bottom of Door (Right... Handle sections for instructions. 8 REHANG FREEZER DOOR A Lower the freezer door onto the bottom hinge pin. The pin will be toward the outside of the refrigerator. B Move the plastic hinge hole thimble to the opposite hole. C Using a 5/16″ socket ratchet/driver, install the leveling leg bracket on the left side...

Use and Care Manual
Page 25
...hinge pin thimble is not reversible. • Read the instructions all door shelves, including the dairy compartment . Replace the hinge cover. Unplug the refrigerator from its electrical outlet. While holding the door in the door. IMPORTANT: Once you begin, do not move the cabinet. These instructions are ...the doors. B Insert the door thimble into the hinge hole on top of the badge with the bolts. REMOVING THE DOORS (Double Door Refrigerator Models only) IMPORTANT NOTES NOTE: Door swing is on the door is flush against the cabinet and is aligned with the cabinet. Attach ...
...hinge pin thimble is not reversible. • Read the instructions all door shelves, including the dairy compartment . Replace the hinge cover. Unplug the refrigerator from its electrical outlet. While holding the door in the door. IMPORTANT: Once you begin, do not move the cabinet. These instructions are ...the doors. B Insert the door thimble into the hinge hole on top of the badge with the bolts. REMOVING THE DOORS (Double Door Refrigerator Models only) IMPORTANT NOTES NOTE: Door swing is on the door is flush against the cabinet and is aligned with the cabinet. Attach ...

Use and Care Manual
Page 26
... hinge to the Removing the Freezer Drawer section for instructions. 26 Remove hinge cover (1 Phillips screw) C Remove the hinge cover on top of the refrigerator door by removing the Phillips head screw and pulling the cover up to the cabinet. F Set the door on the opposite side. 4 REMOVE FREEZER ...to the cabinet. Set the hinge and bolts aside. There are no center hinge covers on a non-scratching surface with masking tape. 1 REMOVE THE REFRIGERATOR DOORS (cont.) E Remove the tape and tilt the door away from the socket in the bottom of the door. Ensure that the plastic hinge ...
... hinge to the Removing the Freezer Drawer section for instructions. 26 Remove hinge cover (1 Phillips screw) C Remove the hinge cover on top of the refrigerator door by removing the Phillips head screw and pulling the cover up to the cabinet. F Set the door on the opposite side. 4 REMOVE FREEZER ...to the cabinet. Set the hinge and bolts aside. There are no center hinge covers on a non-scratching surface with masking tape. 1 REMOVE THE REFRIGERATOR DOORS (cont.) E Remove the tape and tilt the door away from the socket in the bottom of the door. Ensure that the plastic hinge ...


