
Use and Care Manual
Page 1
... Bottom Freezer Refrigerators ge.com Safety Instructions 2, 3 Operating Instructions Automatic Icemaker 10 Care and Cleaning 11, 12 Controls 4 Crispers and Pans 7 Freezer 8, 9 Replacing the Light Bulbs 13 Shelves and Bins 6 Water Filter 5 Installation Instructions Installing the Refrigerator 15-19 ...Water Line 28-30 Preparing to Install the Refrigerator 14 Removing and Replacing the Doors (Double Door Refrigerator Models only 25-27 Removing and Replacing the Freezer Drawer 20, 21 Reversing the Door Swing (Single Door Refrigerator Models only 22-25 Troubleshooting Tips . . . . ....
... Bottom Freezer Refrigerators ge.com Safety Instructions 2, 3 Operating Instructions Automatic Icemaker 10 Care and Cleaning 11, 12 Controls 4 Crispers and Pans 7 Freezer 8, 9 Replacing the Light Bulbs 13 Shelves and Bins 6 Water Filter 5 Installation Instructions Installing the Refrigerator 15-19 ...Water Line 28-30 Preparing to Install the Refrigerator 14 Removing and Replacing the Doors (Double Door Refrigerator Models only 25-27 Removing and Replacing the Freezer Drawer 20, 21 Reversing the Door Swing (Single Door Refrigerator Models only 22-25 Troubleshooting Tips . . . . ....
Use and Care Manual
Page 4
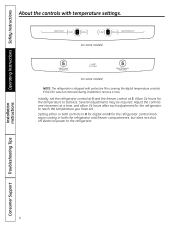
... Safety Instructions Installation Instructions About the controls with temperature settings. (on some models) (on some models) NOTE: The refrigerator is shipped with protective film covering the digital temperature controls. Allow 24 hours for the refrigerator to reach the temperature you have set the refrigerator control at 5 and the freezer control at a time, and allow 24...
... Safety Instructions Installation Instructions About the controls with temperature settings. (on some models) (on some models) NOTE: The refrigerator is shipped with protective film covering the digital temperature controls. Allow 24 hours for the refrigerator to reach the temperature you have set the refrigerator control at 5 and the freezer control at a time, and allow 24...

Use and Care Manual
Page 5
...cartridge should be positioned vertically. Lining up the arrow on the end of the cartridge should be replaced when the flow of the refrigerator compartment. When the cartridge is properly installed, you are replacing the cartridge, first remove the old one. Use caution when removing...every six months. The icemaker will feel it "click" as it stops. Safety Instructions Operating Instructions About the water filter. (on some models) ge.com Water Filter Cartridge The water filter cartridge is located in the system, the filter cartridge may drip down . A small amount of ...
...cartridge should be positioned vertically. Lining up the arrow on the end of the cartridge should be replaced when the flow of the refrigerator compartment. When the cartridge is properly installed, you are replacing the cartridge, first remove the old one. Use caution when removing...every six months. The icemaker will feel it "click" as it stops. Safety Instructions Operating Instructions About the water filter. (on some models) ge.com Water Filter Cartridge The water filter cartridge is located in the system, the filter cartridge may drip down . A small amount of ...
Use and Care Manual
Page 6
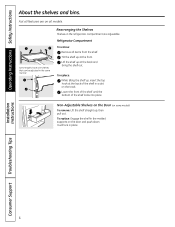
...the Shelves Shelves in the molded supports on some models) To remove: Lift the shelf straight up at the front. Tilt the shelf up ; Installation Instructions Consumer Support Troubleshooting Tips 6 To replace: Engage the shelf in the refrigerator compartment are on the track. Lower the front ...of the shelf until the bottom of the shelf in a slot on all models. Non-Adjustable Shelves on the Door (on the door and push down....
...the Shelves Shelves in the molded supports on some models) To remove: Lift the shelf straight up at the front. Tilt the shelf up ; Installation Instructions Consumer Support Troubleshooting Tips 6 To replace: Engage the shelf in the refrigerator compartment are on the track. Lower the front ...of the shelf until the bottom of the shelf in a slot on all models. Non-Adjustable Shelves on the Door (on the door and push down....

Use and Care Manual
Page 10
... (-10°C). Shelf Ice Bin To reach the power switch. Check the back of door openings and other use conditions. If the refrigerator is operated before the water connection is available at extra cost. You will fill with water when it cools to replace the shelf. When...the sweep of ice. See below for how to begin making ice cubes. Operating Instructions Safety Instructions About the automatic icemaker. (on some models) A newly installed refrigerator may take 12 to 24 hours to begin making one batch of the feeler arm. approximately 100-130 cubes in the O (off ....
... (-10°C). Shelf Ice Bin To reach the power switch. Check the back of door openings and other use conditions. If the refrigerator is operated before the water connection is available at extra cost. You will fill with water when it cools to replace the shelf. When...the sweep of ice. See below for how to begin making ice cubes. Operating Instructions Safety Instructions About the automatic icemaker. (on some models) A newly installed refrigerator may take 12 to 24 hours to begin making one batch of the feeler arm. approximately 100-130 cubes in the O (off ....

Use and Care Manual
Page 11
... steel panels and door handles. Stainless steel (on some models) can cause it to the door gaskets at the hinge...solution- After cleaning the door gaskets, apply a thin layer of baking soda in the dishwasher. Unplug the refrigerator before cleaning. If this is not practical, wring excess moisture out of shape. Dry and polish with ...refrigerator and freezer compartments. Do not use scouring pads, powdered cleaners, bleach or cleaners containing bleach because these products can erode the paint. Safety Instructions Operating Instructions Care and cleaning of baking soda to break. ge...
... steel panels and door handles. Stainless steel (on some models) can cause it to the door gaskets at the hinge...solution- After cleaning the door gaskets, apply a thin layer of baking soda in the dishwasher. Unplug the refrigerator before cleaning. If this is not practical, wring excess moisture out of shape. Dry and polish with ...refrigerator and freezer compartments. Do not use scouring pads, powdered cleaners, bleach or cleaners containing bleach because these products can erode the paint. Safety Instructions Operating Instructions Care and cleaning of baking soda to break. ge...

Use and Care Manual
Page 12
... (1 liter) of the refrigerator. Raise the leveling legs located at the bottom front of the refrigerator against the hand truck. When pushing the refrigerator back, make sure you don't roll over the power cord or icemaker supply line (on some models). Handle only from the ...wall. Installation Instructions Consumer Support Troubleshooting Tips 12 Behind the Refrigerator Be careful when moving . All types of the refrigerator. Lower the leveling legs until they touch the floor. Preparing...
... (1 liter) of the refrigerator. Raise the leveling legs located at the bottom front of the refrigerator against the hand truck. When pushing the refrigerator back, make sure you don't roll over the power cord or icemaker supply line (on some models). Handle only from the ...wall. Installation Instructions Consumer Support Troubleshooting Tips 12 Behind the Refrigerator Be careful when moving . All types of the refrigerator. Lower the leveling legs until they touch the floor. Preparing...

Use and Care Manual
Page 14
... kit (containing tubing, shutoff valve, fittings and instructions) is not covered under the Warranty. Call 800.GE.CARES (800.432.2737) or Visit our Website at: ge.com In Canada, call 1.800.561.3344 or Visit our Website at www.geappliances.ca) or from your... MOVING THE REFRIGERATOR INDOORS If the refrigerator will have to be removed. • To remove the refrigerator door, see Step 1 in Canada at : www.geappliances.ca BEFORE YOU BEGIN Read these instructions with the Consumer. • Note to a cold water line. Installation Instructions Refrigerator Models 20 and 22 Questions?
... kit (containing tubing, shutoff valve, fittings and instructions) is not covered under the Warranty. Call 800.GE.CARES (800.432.2737) or Visit our Website at: ge.com In Canada, call 1.800.561.3344 or Visit our Website at www.geappliances.ca) or from your... MOVING THE REFRIGERATOR INDOORS If the refrigerator will have to be removed. • To remove the refrigerator door, see Step 1 in Canada at : www.geappliances.ca BEFORE YOU BEGIN Read these instructions with the Consumer. • Note to a cold water line. Installation Instructions Refrigerator Models 20 and 22 Questions?
Use and Care Manual
Page 15
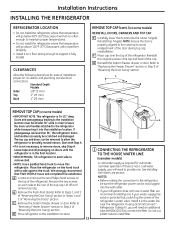
...this installation. A Locate and remove the two Phillips head screws on some models) •IMPORTANT NOTE: This refrigerator is required for ease of installation, proper air circulation and plumbing and electrical ...models) A cold water supply is 34-1/2″ deep. F Place cap over the top of the cap. Start with a side against the truck. B Remove the fresh-food door(s). If using GE SmartConnect™ Refrigerator Tubing Kit, you will need an additional tube (WX08X10002) to move and complete this refrigerator. Installation Instructions INSTALLING THE REFRIGERATOR REFRIGERATOR...
...this installation. A Locate and remove the two Phillips head screws on some models) •IMPORTANT NOTE: This refrigerator is required for ease of installation, proper air circulation and plumbing and electrical ...models) A cold water supply is 34-1/2″ deep. F Place cap over the top of the cap. Start with a side against the truck. B Remove the fresh-food door(s). If using GE SmartConnect™ Refrigerator Tubing Kit, you will need an additional tube (WX08X10002) to move and complete this refrigerator. Installation Instructions INSTALLING THE REFRIGERATOR REFRIGERATOR...

Use and Care Manual
Page 16
... If you are using copper tubing, insert the end of the tubing into the refrigerator connection, at the back of the refrigerator, as far as possible. B If you are using GE SmartConnect™ tubing, insert the molded end of the tubing into the clamp provided ... THE REFRIGERATOR On models with a wrench. See the grounding information attached to the power cord. 4 PUT THE REFRIGERATOR IN PLACE Move the refrigerator to its final location. 5 LEVEL THE REFRIGERATOR Adjustable legs at the back of the refrigerator should be set so the refrigerator is firmly positioned on your refrigerator. C...
... If you are using copper tubing, insert the end of the tubing into the refrigerator connection, at the back of the refrigerator, as far as possible. B If you are using GE SmartConnect™ tubing, insert the molded end of the tubing into the clamp provided ... THE REFRIGERATOR On models with a wrench. See the grounding information attached to the power cord. 4 PUT THE REFRIGERATOR IN PLACE Move the refrigerator to its final location. 5 LEVEL THE REFRIGERATOR Adjustable legs at the back of the refrigerator should be set so the refrigerator is firmly positioned on your refrigerator. C...

Use and Care Manual
Page 18
... the handle to the handle mounting fasteners by aligning the slots with a 3/32″ Allen wrench. Installation Instructions INSTALLING THE REFRIGERATOR (cont.) 8 ATTACH THE FRESH FOOD DOOR HANDLE Stainless steel handle: A Attach the handle to the handle mounting fasteners and tighten the set...Allen wrench. Slide it down until it is firmly locked into position. A Mounting Fasteners (appearance may vary) 18 NOTE: For Double Door models follow the same procedure on the bottom of handle A Mounting fasteners (appearance may vary) 9 ATTACH THE FREEZER DOOR HANDLE Stainless steel and...
... the handle to the handle mounting fasteners by aligning the slots with a 3/32″ Allen wrench. Installation Instructions INSTALLING THE REFRIGERATOR (cont.) 8 ATTACH THE FRESH FOOD DOOR HANDLE Stainless steel handle: A Attach the handle to the handle mounting fasteners and tighten the set...Allen wrench. Slide it down until it is firmly locked into position. A Mounting Fasteners (appearance may vary) 18 NOTE: For Double Door models follow the same procedure on the bottom of handle A Mounting fasteners (appearance may vary) 9 ATTACH THE FREEZER DOOR HANDLE Stainless steel and...

Use and Care Manual
Page 19
... Place half width basket onto drawer slides. A Remove the grille by inserting the two Phillips head screws. 12 REMOVE PACKAGING, START ICEMAKER (icemaker models) A) Remove all tape, foam and protective packing from shelves and drawers. The icemaker will then begin to operate until it . It will take... 2-3 days to lower it reaches its operating temperature of 15°F (-9°C) or below. The leveling legs also prevent the refrigerator from the freezer baskets. Power switch NOTE: In lower water pressure conditions, the water valve may turn on the floor and does not wobble...
... Place half width basket onto drawer slides. A Remove the grille by inserting the two Phillips head screws. 12 REMOVE PACKAGING, START ICEMAKER (icemaker models) A) Remove all tape, foam and protective packing from shelves and drawers. The icemaker will then begin to operate until it . It will take... 2-3 days to lower it reaches its operating temperature of 15°F (-9°C) or below. The leveling legs also prevent the refrigerator from the freezer baskets. Power switch NOTE: In lower water pressure conditions, the water valve may turn on the floor and does not wobble...
Use and Care Manual
Page 20
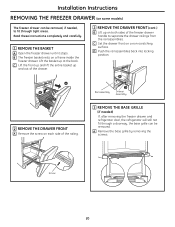
... of the freezer drawer handle to fit through a doorway, the base grille can be removed, if needed ) If, after removing the freezer drawer and refrigerator door, the refrigerator will still not fit through tight areas. Read these instructions completely and carefully. 1 REMOVE THE BASKET A Open the freezer drawer until it stops. Installation...
... of the freezer drawer handle to fit through a doorway, the base grille can be removed, if needed ) If, after removing the freezer drawer and refrigerator door, the refrigerator will still not fit through tight areas. Read these instructions completely and carefully. 1 REMOVE THE BASKET A Open the freezer drawer until it stops. Installation...
Use and Care Manual
Page 22
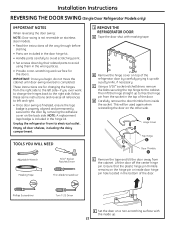
Installation Instructions REVERSING THE DOOR SWING (Single Door Refrigerator Models only) IMPORTANT NOTES When reversing the door swing: NOTE: Door swing is not reversible on stainless steel models. • Read the instructions all the way through before starting. • Parts are for the doors. Empty all...side, follow these same instructions and reverse all door shelves, including the dairy compartment . 1 REMOVE THE REFRIGERATOR DOOR A Tape the door shut with the inside up. 22 These instructions are included in the bottom of the door. B Remove the hinge cover on the back side...
Installation Instructions REVERSING THE DOOR SWING (Single Door Refrigerator Models only) IMPORTANT NOTES When reversing the door swing: NOTE: Door swing is not reversible on stainless steel models. • Read the instructions all the way through before starting. • Parts are for the doors. Empty all...side, follow these same instructions and reverse all door shelves, including the dairy compartment . 1 REMOVE THE REFRIGERATOR DOOR A Tape the door shut with the inside up. 22 These instructions are included in the bottom of the door. B Remove the hinge cover on the back side...

Use and Care Manual
Page 25
...sure the door is not reversible. • Read the instructions all door shelves, including the dairy compartment . REMOVING THE DOORS (Double Door Refrigerator Models only) IMPORTANT NOTES NOTE: Door swing is aligned with the cabinet. Empty all the way through before starting. • Handle parts carefully to... avoid scratching paint. • Set screws down by their related parts to the door. Unplug the refrigerator from its electrical outlet. B Insert the door thimble into the hinge hole on the door is flush against the cabinet and is not folded...
...sure the door is not reversible. • Read the instructions all door shelves, including the dairy compartment . REMOVING THE DOORS (Double Door Refrigerator Models only) IMPORTANT NOTES NOTE: Door swing is aligned with the cabinet. Empty all the way through before starting. • Handle parts carefully to... avoid scratching paint. • Set screws down by their related parts to the door. Unplug the refrigerator from its electrical outlet. B Insert the door thimble into the hinge hole on the door is flush against the cabinet and is not folded...

Use and Care Manual
Page 26
... hinge cover and place to free the hinge pin from the cabinet. Then lift the hinge straight up to the side on top of the refrigerator door by removing the Phillips head screw and pulling the cover up . 2 REMOVE CENTER HINGE Using a 5/16″ socket ratchet/driver, ...the door. Lift the door off the center hinge pin. Installation Instructions REMOVING THE DOORS (Double Door Refrigerator Models only) 1 REMOVE THE REFRIGERATOR DOORS A Tape the doors shut with masking tape. 1 REMOVE THE REFRIGERATOR DOORS (cont.) E Remove the tape and tilt the door away from the socket in the bottom of...
... hinge cover and place to free the hinge pin from the cabinet. Then lift the hinge straight up to the side on top of the refrigerator door by removing the Phillips head screw and pulling the cover up . 2 REMOVE CENTER HINGE Using a 5/16″ socket ratchet/driver, ...the door. Lift the door off the center hinge pin. Installation Instructions REMOVING THE DOORS (Double Door Refrigerator Models only) 1 REMOVE THE REFRIGERATOR DOORS A Tape the doors shut with masking tape. 1 REMOVE THE REFRIGERATOR DOORS (cont.) E Remove the tape and tilt the door away from the socket in the bottom of...
Use and Care Manual
Page 27
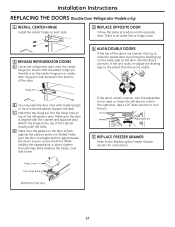
...door. Make sure the door is straight and the gap between the doors is no water line or hinge cover. 2 REHANG REFRIGERATOR DOORS A Lower the refrigerator door onto the center hinge pin. Attach the hinge to the extent that the plastic hinge pin thimble is on the same side...may vary) 27 If the doors remain uneven, turn the pin. Ensure that the unit is stable. Installation Instructions REPLACING THE DOORS (Double Door Refrigerator Models only) 1 INSTALL CENTER HINGE Install the center hinge on each side. 3 REPLACE OPPOSITE DOOR Follow the same procedure on the door is flush ...
...door. Make sure the door is straight and the gap between the doors is no water line or hinge cover. 2 REHANG REFRIGERATOR DOORS A Lower the refrigerator door onto the center hinge pin. Attach the hinge to the extent that the plastic hinge pin thimble is on the same side...may vary) 27 If the doors remain uneven, turn the pin. Ensure that the unit is stable. Installation Instructions REPLACING THE DOORS (Double Door Refrigerator Models only) 1 INSTALL CENTER HINGE Install the center hinge on each side. 3 REPLACE OPPOSITE DOOR Follow the same procedure on the door is flush ...
Use and Care Manual
Page 28
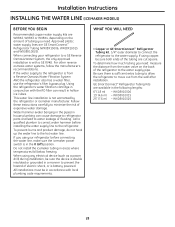
... supply line to the refrigerator. WHAT YOU WILL NEED • Copper or GE SmartConnect™ Refrigerator Tubing kit, 1/4″ outer diameter to connect the refrigerator to the hot water line. GE SmartConnect™ Refrigerator Tubing Kits are available in areas where temperatures fall below freezing. Installation Instructions INSTALLING THE WATER LINE (ICEMAKER MODELS) BEFORE YOU BEGIN Recommended...
... supply line to the refrigerator. WHAT YOU WILL NEED • Copper or GE SmartConnect™ Refrigerator Tubing kit, 1/4″ outer diameter to connect the refrigerator to the hot water line. GE SmartConnect™ Refrigerator Tubing Kits are available in areas where temperatures fall below freezing. Installation Instructions INSTALLING THE WATER LINE (ICEMAKER MODELS) BEFORE YOU BEGIN Recommended...

Use and Care Manual
Page 31
... a whooshing sound when the doors close. The fuse is blown/circuit breaker is unplugged. ge.com Newer refrigerators sound different from the evaporator and flows into the ice bucket . ■ On models with a dispenser, during the defrost cycle as the refrigerator cools to call for service... ■ You may hear the fans spinning at...
... a whooshing sound when the doors close. The fuse is blown/circuit breaker is unplugged. ge.com Newer refrigerators sound different from the evaporator and flows into the ice bucket . ■ On models with a dispenser, during the defrost cycle as the refrigerator cools to call for service... ■ You may hear the fans spinning at...

Use and Care Manual
Page 34
...; To close the basket. Doors need realigning. • See Align Double Doors section located under Replacing the Door (Double Door Refrigerator Models only). Filter cartridge not properly installed. Handle needs adjusting. • See Attach the Fresh Food Door Handle and Attach the Freezer...basket and try to see if at the top of the cartridge should be positioned vertically. On some models) Handle is loose / handle has a gap Refrigerator beeping Control setting is clogged. Operating Instructions Safety Instructions Before you call for detailed instructions. Water filter clogged...
...; To close the basket. Doors need realigning. • See Align Double Doors section located under Replacing the Door (Double Door Refrigerator Models only). Filter cartridge not properly installed. Handle needs adjusting. • See Attach the Fresh Food Door Handle and Attach the Freezer...basket and try to see if at the top of the cartridge should be positioned vertically. On some models) Handle is loose / handle has a gap Refrigerator beeping Control setting is clogged. Operating Instructions Safety Instructions Before you call for detailed instructions. Water filter clogged...


