Use and Care Manual
Page 1
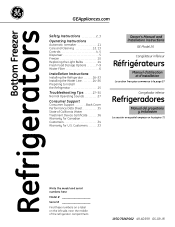
... 10 Replacing the Light Bulbs 14 Fresh Food Storage Options 7-9 Water Filter 6 Installation Instructions Installing the Refrigerator 16-23 Installing the Water Line 24-26 Preparing to Install the Refrigerator 15 Troubleshooting Tips . . . . . .27-30 Normal Operating Sounds 27 Consumer Support Consumer Support... Back Cover Performance Data Sheet 35 State of the refrigerator compartment. 197D7926P002 49-60599 05-09 JR Customers 33 Owner's Manual and Installation Instructions GE Model 26 Congélateur inférieur Réfrigérateurs Manuel...
... 10 Replacing the Light Bulbs 14 Fresh Food Storage Options 7-9 Water Filter 6 Installation Instructions Installing the Refrigerator 16-23 Installing the Water Line 24-26 Preparing to Install the Refrigerator 15 Troubleshooting Tips . . . . . .27-30 Normal Operating Sounds 27 Consumer Support Consumer Support... Back Cover Performance Data Sheet 35 State of the refrigerator compartment. 197D7926P002 49-60599 05-09 JR Customers 33 Owner's Manual and Installation Instructions GE Model 26 Congélateur inférieur Réfrigérateurs Manuel...
Use and Care Manual
Page 2
...or any servicing be properly installed and located in this Owner's Manual. I Do not allow children to these extremely cold surfaces. I Unplug the refrigerator before it be a UL-listed (in the United States) or a CSA certified (in Canada), 3-wire grounding type appliance extension cord having ...a grounding type plug 2 and outlet and that it is plugged in the vicinity of your old refrigerator, please follow the instructions below to product disposal. I Do not store or use an extension cord, it is absolutely necessary that...
...or any servicing be properly installed and located in this Owner's Manual. I Do not allow children to these extremely cold surfaces. I Unplug the refrigerator before it be a UL-listed (in the United States) or a CSA certified (in Canada), 3-wire grounding type appliance extension cord having ...a grounding type plug 2 and outlet and that it is plugged in the vicinity of your old refrigerator, please follow the instructions below to product disposal. I Do not store or use an extension cord, it is absolutely necessary that...
Use and Care Manual
Page 3
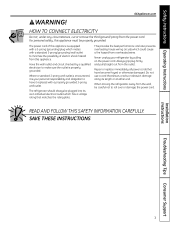
... 3 Have the wall outlet and circuit checked by a qualified electrician to roll over or damage the power cord. The refrigerator should always be properly grounded. This provides the best performance and also prevents overloading house wiring circuits which has a voltage ...is encountered, it replaced with a standard 3-prong (grounding) wall outlet to have become frayed or otherwise damaged. When moving the refrigerator away from overheated wires. READ AND FOLLOW THIS SAFETY INFORMATION CAREFULLY. HOW TO CONNECT ELECTRICITY Do not, under any circumstances, cut or...
... 3 Have the wall outlet and circuit checked by a qualified electrician to roll over or damage the power cord. The refrigerator should always be properly grounded. This provides the best performance and also prevents overloading house wiring circuits which has a voltage ...is encountered, it replaced with a standard 3-prong (grounding) wall outlet to have become frayed or otherwise damaged. When moving the refrigerator away from overheated wires. READ AND FOLLOW THIS SAFETY INFORMATION CAREFULLY. HOW TO CONNECT ELECTRICITY Do not, under any circumstances, cut or...
Use and Care Manual
Page 4
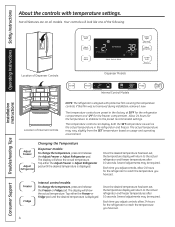
...shipped with temperature settings. Internal control models: To change the temperature, press and release the Adjust Freezer or Adjust Refrigerator pad. Your controls will look like one of the following: Installation Instructions Consumer Support Troubleshooting Tips Location of Dispenser ...displayed. Operating Instructions Safety Instructions About the controls with protective film covering the temperature controls. Allow 24 hours for the refrigerator to reach the temperature you adjust controls, allow 24 hours for the freezer compartment. Once the desired temperature has ...
...shipped with temperature settings. Internal control models: To change the temperature, press and release the Adjust Freezer or Adjust Refrigerator pad. Your controls will look like one of the following: Installation Instructions Consumer Support Troubleshooting Tips Location of Dispenser ...displayed. Operating Instructions Safety Instructions About the controls with protective film covering the temperature controls. Allow 24 hours for the refrigerator to reach the temperature you adjust controls, allow 24 hours for the freezer compartment. Once the desired temperature has ...
Use and Care Manual
Page 5
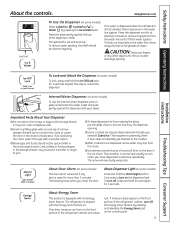
... off the Energy Saver feature by pressing the Ice & Water pad. The refrigerator is normal and usually occurs when you close to jam. If moisture does appear on the front surface of the... refrigerator cabinet and cause rust. To reduce water spotting, the shelf should not be air in... the storage drawer may be cleaned regularly. Internal Water Dispenser (on the front surface of the refrigerator cabinet, turn on the door in the ice storage drawer. I Do not add ice from the water line ...
... off the Energy Saver feature by pressing the Ice & Water pad. The refrigerator is normal and usually occurs when you close to jam. If moisture does appear on the front surface of the... refrigerator cabinet and cause rust. To reduce water spotting, the shelf should not be air in... the storage drawer may be cleaned regularly. Internal Water Dispenser (on the front surface of the refrigerator cabinet, turn on the door in the ice storage drawer. I Do not add ice from the water line ...

Use and Care Manual
Page 6
...order additional filter cartridges in the back upper right corner of water may cause water to the dispenser or icemaker decreases. A small amount of the refrigerator compartment. Remove the protective foil from the dispenser for 3 minutes (about 1/4 turn the cartridge, it is removed. See To Use the Dispenser... use the filter bypass plug when a replacement filter cartridge is located in the United States, visit our Website, GEAppliances.com or call GE Parts and Accessories, 800.626.2002. Run water from the end of the new cartridge up the arrow on the cartridge and the ...
...order additional filter cartridges in the back upper right corner of water may cause water to the dispenser or icemaker decreases. A small amount of the refrigerator compartment. Remove the protective foil from the dispenser for 3 minutes (about 1/4 turn the cartridge, it is removed. See To Use the Dispenser... use the filter bypass plug when a replacement filter cartridge is located in the United States, visit our Website, GEAppliances.com or call GE Parts and Accessories, 800.626.2002. Run water from the end of the new cartridge up the arrow on the cartridge and the ...
Use and Care Manual
Page 7
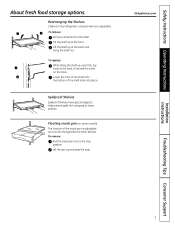
Floating snack pan (on some models) The location of the shelf in the refrigerator compartment are adjustable. Rearranging the Shelves Shelves in a slot on the track. Spillproof Shelves Spillproof shelves have special edges to help prevent spills from the ...
Floating snack pan (on some models) The location of the shelf in the refrigerator compartment are adjustable. Rearranging the Shelves Shelves in a slot on the track. Spillproof Shelves Spillproof shelves have special edges to help prevent spills from the ...
Use and Care Manual
Page 8
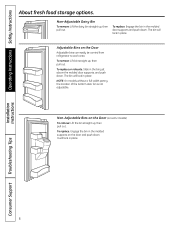
... dairy bin straight up , then pull out. The bin will lock in the molded supports on the Door Adjustable bins can easily be carried from refrigerator to work area. Operating Instructions Safety Instructions About fresh food storage options. Non-Adjustable Bins on the Door (on some models) To remove: Lift the...
... dairy bin straight up , then pull out. The bin will lock in the molded supports on the Door Adjustable bins can easily be carried from refrigerator to work area. Operating Instructions Safety Instructions About fresh food storage options. Non-Adjustable Bins on the Door (on some models) To remove: Lift the...
Use and Care Manual
Page 11
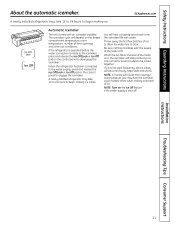
...If ice is normal for several cubes to engage the icemaker. NOTE: Turn on the control panel to be joined together. A newly installed refrigerator may hear the icemaker cycle multiple times when making one batch of the feeler arm, the icemaker will depend on the control panel to clear...with the sweep of ice to allow the water line to disengage the icemaker. Installation Instructions Troubleshooting Tips Consumer Support 11 A newly installed refrigerator may take 12 to 24 hours to begin making ice. Throw away the first few batches of the feeler arm. If the...
...If ice is normal for several cubes to engage the icemaker. NOTE: Turn on the control panel to be joined together. A newly installed refrigerator may hear the icemaker cycle multiple times when making one batch of the feeler arm, the icemaker will depend on the control panel to clear...with the sweep of ice to allow the water line to disengage the icemaker. Installation Instructions Troubleshooting Tips Consumer Support 11 A newly installed refrigerator may take 12 to 24 hours to begin making ice. Throw away the first few batches of the feeler arm. If the...
Use and Care Manual
Page 12
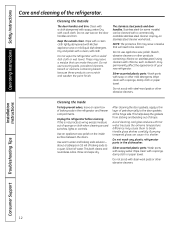
...cleaning the door gaskets, apply a thin layer of baking soda in the dishwasher. Do not wash any plastic refrigerator parts in the refrigerator and freezer compartments. Do not use scouring pads, powdered cleaners, bleach or cleaners containing bleach because these products...or wet towel. Using cleaners with a commercially available stainless steel cleaner. This both cleans and neutralizes odors. Do not wipe the refrigerator with a clean, soft cloth. about a tablespoon (15 ml) of baking soda to shatter. Installation Instructions Consumer Support Troubleshooting ...
...cleaning the door gaskets, apply a thin layer of baking soda in the dishwasher. Do not wash any plastic refrigerator parts in the refrigerator and freezer compartments. Do not use scouring pads, powdered cleaners, bleach or cleaners containing bleach because these products...or wet towel. Using cleaners with a commercially available stainless steel cleaner. This both cleans and neutralizes odors. Do not wipe the refrigerator with a clean, soft cloth. about a tablespoon (15 ml) of baking soda to shatter. Installation Instructions Consumer Support Troubleshooting ...
Use and Care Manual
Page 13
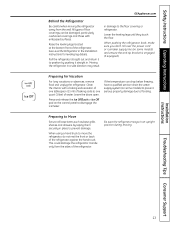
... with a baking soda solution of one tablespoon (15 ml) of baking soda to one quart (1 liter) of the refrigerator against the hand truck. Be sure the refrigerator stays in . When pushing the refrigerator back, make sure you don't roll over the power cord or icemaker supply line (on the control panel to.../Lock or Ice Off pad on some models) to prevent serious property damage due to position by taping them securely in damage to move the refrigerator, do not rest the front or back of water. Preparing to Move Secure all loose items such as base grille, shelves and drawers by ...
... with a baking soda solution of one tablespoon (15 ml) of baking soda to one quart (1 liter) of the refrigerator against the hand truck. Be sure the refrigerator stays in . When pushing the refrigerator back, make sure you don't roll over the power cord or icemaker supply line (on the control panel to.../Lock or Ice Off pad on some models) to prevent serious property damage due to position by taping them securely in damage to move the refrigerator, do not rest the front or back of water. Preparing to Move Secure all loose items such as base grille, shelves and drawers by ...
Use and Care Manual
Page 14
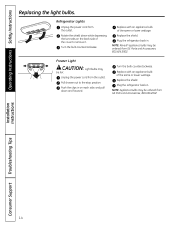
... in . Pull drawer out to remove it. Turn the bulb counterclockwise. Plug the refrigerator back in . Installation Instructions Consumer Support Troubleshooting Tips 14 Freezer Light CAUTION: Light bulbs may be ordered from the outlet. NOTE: Reveal® appliance ...while depressing the two tabs on each side, and pull down and forward. Unplug the power cord from GE Parts and Accessories, 800.626.2002. Replace the shield. Refrigerator Lights Unplug the power cord from GE Parts and Accessories, 800.626.2002. Replace with an appliance bulb of the same or lower wattage...
... in . Pull drawer out to remove it. Turn the bulb counterclockwise. Plug the refrigerator back in . Installation Instructions Consumer Support Troubleshooting Tips 14 Freezer Light CAUTION: Light bulbs may be ordered from the outlet. NOTE: Reveal® appliance ...while depressing the two tabs on each side, and pull down and forward. Unplug the power cord from GE Parts and Accessories, 800.626.2002. Replace the shield. Refrigerator Lights Unplug the power cord from GE Parts and Accessories, 800.626.2002. Replace with an appliance bulb of the same or lower wattage...

Use and Care Manual
Page 15
... governing codes and ordinances. • Note to Consumer - Installation Instructions Refrigerator GE Model 26 Questions? Be sure to leave these instructions for local inspector's use. • IMPORTANT - Refrigerator Installation 20 minutes Water Line Installation 30 minutes • Proper installation is... basic mechanical skills. • Completion time - PREPARATION MOVING THE REFRIGERATOR INDOORS If the refrigerator will have to be removed. • To remove the refrigerator door, see the Installing the Refrigerator section. • To remove the freezer drawer, see the Removing...
... governing codes and ordinances. • Note to Consumer - Installation Instructions Refrigerator GE Model 26 Questions? Be sure to leave these instructions for local inspector's use. • IMPORTANT - Refrigerator Installation 20 minutes Water Line Installation 30 minutes • Proper installation is... basic mechanical skills. • Completion time - PREPARATION MOVING THE REFRIGERATOR INDOORS If the refrigerator will have to be removed. • To remove the refrigerator door, see the Installing the Refrigerator section. • To remove the freezer drawer, see the Removing...
Use and Care Manual
Page 16
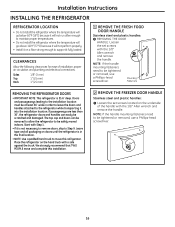
...) Top 1″ (25 mm) Back 1″ (25 mm) 1 REMOVE THE FRESH FOOD DOOR HANDLE Stainless steel and plastic handles: A REMOVING THE DOOR HANDLE: Loosen the set screws located on doors until the refrigerator is in order to leave the doors and handles attached to the refrigerator while transporting it into the...will go below 60°F (16°C) because it will not run often enough to maintain proper temperatures. • Do not install the refrigerator where the temperature will go above 100°F (37°C) because it will not perform properly. • Install it on the hand ...
...) Top 1″ (25 mm) Back 1″ (25 mm) 1 REMOVE THE FRESH FOOD DOOR HANDLE Stainless steel and plastic handles: A REMOVING THE DOOR HANDLE: Loosen the set screws located on doors until the refrigerator is in order to leave the doors and handles attached to the refrigerator while transporting it into the...will go below 60°F (16°C) because it will not run often enough to maintain proper temperatures. • Do not install the refrigerator where the temperature will go above 100°F (37°C) because it will not perform properly. • Install it on the hand ...
Use and Care Manual
Page 17
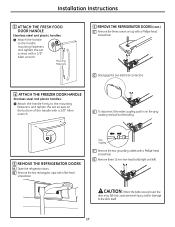
.... G Remove three 10 mm hex-head bolts (right and left). Mounting Fasteners 5 REMOVE THE REFRIGERATOR DOORS (cont.) C Remove the three screws on the gray coupling and pull out the tubing. E To disconnect the water coupling, push in on top with a ...
.... G Remove three 10 mm hex-head bolts (right and left). Mounting Fasteners 5 REMOVE THE REFRIGERATOR DOORS (cont.) C Remove the three screws on the gray coupling and pull out the tubing. E To disconnect the water coupling, push in on top with a ...
Use and Care Manual
Page 18
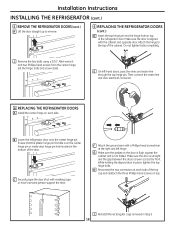
... removed in Step 5. 18 C Securely tape the door shut with a Phillips-head screwdriver at each side. Attach the hinge to remove. 6 REPLACING THE REFRIGERATOR DOORS (cont.) D Insert the top hinge pin into the hinge hole on the door is flush against the cabinet and is aligned with the cabinet... gap between the doors is on top. Do not tighten bolts completely. Then connect the water line and door electrical connector. 6 REPLACING THE REFRIGERATOR DOORS A Install the center hinge on each side of the top cap and reattach the three Phillips-head screws on the center hinge pin or...
... removed in Step 5. 18 C Securely tape the door shut with a Phillips-head screwdriver at each side. Attach the hinge to remove. 6 REPLACING THE REFRIGERATOR DOORS (cont.) D Insert the top hinge pin into the hinge hole on the door is flush against the cabinet and is aligned with the cabinet... gap between the doors is on top. Do not tighten bolts completely. Then connect the water line and door electrical connector. 6 REPLACING THE REFRIGERATOR DOORS A Install the center hinge on each side of the top cap and reattach the three Phillips-head screws on the center hinge pin or...

Use and Care Manual
Page 20
...supply is required for automatic icemaker operation. Installation Instructions INSTALLING THE REFRIGERATOR (cont.) 8 REPLACING THE FREEZER DOOR (cont.) B Hang the freezer door front onto open slots on the sides. If you are using the GE SmartConnect™ tubing, the nuts are four 10 mm hex-head...(See page 10.) C Tighten screws completely. (There are already assembled to provide one. NOTE: Before making the connection to the refrigerator, be sure the refrigerator power cord is not a cold water supply, you will need to the tubing. 20 Slot 8 REPLACING THE FREEZER DOOR (cont.)...
...supply is required for automatic icemaker operation. Installation Instructions INSTALLING THE REFRIGERATOR (cont.) 8 REPLACING THE FREEZER DOOR (cont.) B Hang the freezer door front onto open slots on the sides. If you are using the GE SmartConnect™ tubing, the nuts are four 10 mm hex-head...(See page 10.) C Tighten screws completely. (There are already assembled to provide one. NOTE: Before making the connection to the refrigerator, be sure the refrigerator power cord is not a cold water supply, you will need to the tubing. 20 Slot 8 REPLACING THE FREEZER DOOR (cont.)...
Use and Care Manual
Page 21
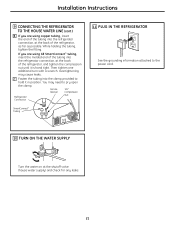
... in position. Then tighten one additional turn with a wrench. Ferrule 1/4″ (sleeve) Compression Nut Refrigerator Connection SmartConnect™ Tubing 11 PLUG IN THE REFRIGERATOR See the grounding information attached to pry open the clamp. Overtightening may need to the power cord. ...hand tight. Installation Instructions 9 CONNECTING THE REFRIGERATOR TO THE HOUSE WATER LINE (cont.) B If you are using GE SmartConnect™ tubing, insert the molded end of the tubing into the refrigerator connection, at the back of the refrigerator, as far as possible. While holding ...
... in position. Then tighten one additional turn with a wrench. Ferrule 1/4″ (sleeve) Compression Nut Refrigerator Connection SmartConnect™ Tubing 11 PLUG IN THE REFRIGERATOR See the grounding information attached to pry open the clamp. Overtightening may need to the power cord. ...hand tight. Installation Instructions 9 CONNECTING THE REFRIGERATOR TO THE HOUSE WATER LINE (cont.) B If you are using GE SmartConnect™ tubing, insert the molded end of the tubing into the refrigerator connection, at the back of the refrigerator, as far as possible. While holding ...
Use and Care Manual
Page 22
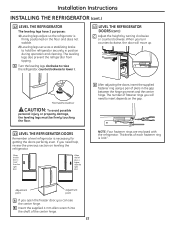
...: To avoid possible personal injury or property damage, the leveling legs must be firmly touching the floor. 13 LEVEL THE REFRIGERATOR DOORS Remember a level refrigerator is higher than the right door. When the left door is 0.04″. Thickness of pliers in position during operation and... of fastener rings you turn counterclockwise, the door will need help, review the previous section on leveling the refrigerator. The leveling legs also prevent the refrigerator from tipping. When you will move up. When the left door is necessary for getting the doors perfectly ...
...: To avoid possible personal injury or property damage, the leveling legs must be firmly touching the floor. 13 LEVEL THE REFRIGERATOR DOORS Remember a level refrigerator is higher than the right door. When the left door is 0.04″. Thickness of pliers in position during operation and... of fastener rings you turn counterclockwise, the door will need help, review the previous section on leveling the refrigerator. The leveling legs also prevent the refrigerator from tipping. When you will move up. When the left door is necessary for getting the doors perfectly ...
Use and Care Manual
Page 24
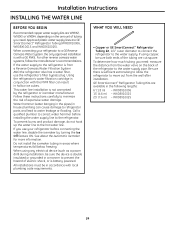
...tubing in conjunction with local plumbing code requirements. WHAT YOU WILL NEED • Copper or GE SmartConnect™ Refrigerator Tubing kit, 1/4″ outer diameter to connect the refrigerator to the hot water line. Approved plastic water supply lines are available in accordance with the... of tubing you need : measure the distance from the wall after installation. WX08X10006 15′ (4.6 m) - If you need . WX08X10015 25′ (7.6 m) - Follow these instructions carefully to minimize the risk of electric shock, or is double insulated or grounded in hollow ice ...
...tubing in conjunction with local plumbing code requirements. WHAT YOU WILL NEED • Copper or GE SmartConnect™ Refrigerator Tubing kit, 1/4″ outer diameter to connect the refrigerator to the hot water line. Approved plastic water supply lines are available in accordance with the... of tubing you need : measure the distance from the wall after installation. WX08X10006 15′ (4.6 m) - If you need . WX08X10015 25′ (7.6 m) - Follow these instructions carefully to minimize the risk of electric shock, or is double insulated or grounded in hollow ice ...


