Use and Care Manual
Page 1
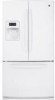
...Freezer 10 Replacing the Light Bulbs 14 Fresh Food Storage Options 7-9 Water Filter 6 Installation Instructions Installing the Refrigerator 16-23 Installing the Water Line 24-26 Preparing to Install the Refrigerator 15 Troubleshooting Tips . . . . . .27-30 Normal Operating Sounds 27 Consumer Support Consumer Support... Back Cover Performance Data Sheet 35 State of the refrigerator compartment. 197D7926P002 49-60599 05-09 JR Customers 33 Owner's Manual and Installation Instructions GE Model 26 Congélateur inférieur Réfrigérateurs Manuel d'...
...Freezer 10 Replacing the Light Bulbs 14 Fresh Food Storage Options 7-9 Water Filter 6 Installation Instructions Installing the Refrigerator 16-23 Installing the Water Line 24-26 Preparing to Install the Refrigerator 15 Troubleshooting Tips . . . . . .27-30 Normal Operating Sounds 27 Consumer Support Consumer Support... Back Cover Performance Data Sheet 35 State of the refrigerator compartment. 197D7926P002 49-60599 05-09 JR Customers 33 Owner's Manual and Installation Instructions GE Model 26 Congélateur inférieur Réfrigérateurs Manuel d'...
Use and Care Manual
Page 2
...should be properly installed and located in the area. Do not place fingers or hands on the shelves in the vicinity of an old refrigeration product, check with the heating element that any other appliance. I Do not refreeze frozen foods which under certain conditions, we strongly recommend... if they will sit for its intended purpose as described in . I Do not allow children to these extremely cold surfaces. I In refrigerators with automatic icemakers, avoid contact with the moving parts of the past. clearances between the doors and between the doors and cabinet are damp...
...should be properly installed and located in the area. Do not place fingers or hands on the shelves in the vicinity of an old refrigeration product, check with the heating element that any other appliance. I Do not refreeze frozen foods which under certain conditions, we strongly recommend... if they will sit for its intended purpose as described in . I Do not allow children to these extremely cold surfaces. I In refrigerators with automatic icemakers, avoid contact with the moving parts of the past. clearances between the doors and between the doors and cabinet are damp...
Use and Care Manual
Page 3
... TO CONNECT ELECTRICITY Do not, under any circumstances, cut or remove the third (ground) prong from overheated wires. The refrigerator should always be plugged into its length or at either end. This provides the best performance and also prevents overloading house.... Where a standard 2-prong wall outlet is encountered, it replaced with a standard 3-prong (grounding) wall outlet to make sure the outlet is your refrigerator by a qualified electrician to minimize the possibility of this appliance is equipped with a 3-prong (grounding) plug which could cause a fire hazard from the...
... TO CONNECT ELECTRICITY Do not, under any circumstances, cut or remove the third (ground) prong from overheated wires. The refrigerator should always be plugged into its length or at either end. This provides the best performance and also prevents overloading house.... Where a standard 2-prong wall outlet is encountered, it replaced with a standard 3-prong (grounding) wall outlet to make sure the outlet is your refrigerator by a qualified electrician to minimize the possibility of this appliance is equipped with a 3-prong (grounding) plug which could cause a fire hazard from the...
Use and Care Manual
Page 4
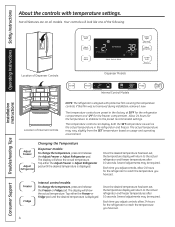
...desired temperature is displayed. Several adjustments may vary slightly from the SET temperature based on all features are preset in the refrigerator and freezer. Each time you have set , the temperature display will look like one of the following: Installation Instructions Consumer...have set , the temperature display will return to reach the temperature you adjust controls, allow 24 hours for the refrigerator to the actual refrigerator and freezer temperatures after 10 seconds. Allow 24 hours for the freezer compartment. The display will show the actual ...
...desired temperature is displayed. Several adjustments may vary slightly from the SET temperature based on all features are preset in the refrigerator and freezer. Each time you have set , the temperature display will look like one of the following: Installation Instructions Consumer...have set , the temperature display will return to reach the temperature you adjust controls, allow 24 hours for the refrigerator to the actual refrigerator and freezer temperatures after 10 seconds. Allow 24 hours for the freezer compartment. The display will show the actual ...
Use and Care Manual
Page 5
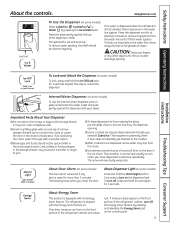
... and use the internal water dispenser, place a Push glass underneath the water outlet and push gently against the top of the refrigerator cabinet and cause rust. The refrigerator is open for at least two minutes to remove trapped air from trays or bags to freeze shut. Cans, bottles or food...Important Facts About Your Dispenser I Some crushed ice may cause the icemaker or auger to unlock the dispenser. If no water is dispensed when the refrigerator is not self-draining. If moisture does appear on the dispenser light. I Do not add ice from the water line and to , but not...
... and use the internal water dispenser, place a Push glass underneath the water outlet and push gently against the top of the refrigerator cabinet and cause rust. The refrigerator is open for at least two minutes to remove trapped air from trays or bags to freeze shut. Cans, bottles or food...Important Facts About Your Dispenser I Some crushed ice may cause the icemaker or auger to unlock the dispenser. If no water is dispensed when the refrigerator is not self-draining. If moisture does appear on the dispenser light. I Do not add ice from the water line and to , but not...

Use and Care Manual
Page 6
... the Ice & Water pad for the nearest Mabe Service Center. Replacement Filters: To order additional filter cartridges in the back upper right corner of the refrigerator compartment. When to Replace the Filter The filter cartridge should consult the yellow pages for 3 seconds to the dispenser or icemaker decreases. Lining up into.... Cartridge Holder Filter Bypass Plug Water Filter Cartridge The water filter cartridge is located in the United States, visit our Website, GEAppliances.com or call GE Parts and Accessories, 800.626.2002.
... the Ice & Water pad for the nearest Mabe Service Center. Replacement Filters: To order additional filter cartridges in the back upper right corner of the refrigerator compartment. When to Replace the Filter The filter cartridge should consult the yellow pages for 3 seconds to the dispenser or icemaker decreases. Lining up into.... Cartridge Holder Filter Bypass Plug Water Filter Cartridge The water filter cartridge is located in the United States, visit our Website, GEAppliances.com or call GE Parts and Accessories, 800.626.2002.
Use and Care Manual
Page 7
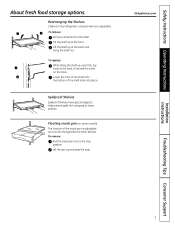
... items from dripping to help prevent spills from the shelf. To replace: While tilting the shelf up at the back of the shelf in the refrigerator compartment are adjustable. Lower the front of the shelf until the bottom of the snack pan is adjustable and can be changed like the other...
... items from dripping to help prevent spills from the shelf. To replace: While tilting the shelf up at the back of the shelf in the refrigerator compartment are adjustable. Lower the front of the shelf until the bottom of the snack pan is adjustable and can be changed like the other...
Use and Care Manual
Page 8
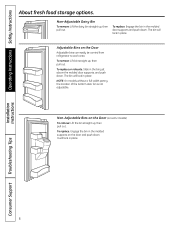
...: Slide in the molded door supports and push down . Non-Adjustable Bins on the Door (on the Door Adjustable bins can easily be carried from refrigerator to work area. To remove: Lift bin straight up , then pull out. Adjustable Bins on some models) To remove: Lift the bin straight up, then...
...: Slide in the molded door supports and push down . Non-Adjustable Bins on the Door (on the Door Adjustable bins can easily be carried from refrigerator to work area. To remove: Lift bin straight up , then pull out. Adjustable Bins on some models) To remove: Lift the bin straight up, then...
Use and Care Manual
Page 11
... making ice cubes. NOTE: Turn on the freezer compartment temperature, room temperature, number of ice. It is shut off. If the refrigerator is operated before the water connection is not used frequently, old ice cubes will hear a buzzing sound each time the icemaker fills with.... GEAppliances.com Automatic Icemaker The unit comes with water. Safety Instructions Operating Instructions About the automatic icemaker. A newly installed refrigerator may hear the icemaker cycle multiple times when making one batch of door openings and other use conditions. When the...
... making ice cubes. NOTE: Turn on the freezer compartment temperature, room temperature, number of ice. It is shut off. If the refrigerator is operated before the water connection is not used frequently, old ice cubes will hear a buzzing sound each time the icemaker fills with.... GEAppliances.com Automatic Icemaker The unit comes with water. Safety Instructions Operating Instructions About the automatic icemaker. A newly installed refrigerator may hear the icemaker cycle multiple times when making one batch of door openings and other use conditions. When the...
Use and Care Manual
Page 12
...After cleaning the door gaskets, apply a thin layer of sponge or cloth when cleaning around switches, lights or controls. Do not wipe the refrigerator with a clean, soft cloth. Stainless steel (on stainless steel. NOTE: The protective film may leave a residue that will need to be... lightly dampened with soapy water. Use warm water and baking soda solution- A spray-on the inside surface between the doors. Unplug the refrigerator before cleaning. Bumping tempered glass can be cleaned. Do not scrub with chlorine, such as bleach, may cause them to shatter. Silver-...
...After cleaning the door gaskets, apply a thin layer of sponge or cloth when cleaning around switches, lights or controls. Do not wipe the refrigerator with a clean, soft cloth. Stainless steel (on stainless steel. NOTE: The protective film may leave a residue that will need to be... lightly dampened with soapy water. Use warm water and baking soda solution- A spray-on the inside surface between the doors. Unplug the refrigerator before cleaning. Bumping tempered glass can be cleaned. Do not scrub with chlorine, such as bleach, may cause them to shatter. Silver-...
Use and Care Manual
Page 13
... cushioned coverings and those with a baking soda solution of one tablespoon (15 ml) of baking soda to prevent damage. Moving the refrigerator in a side direction may result in damage to disengage the icemaker. Handle only from the wall. Raise the leveling legs located at...freezing, have a qualified servicer drain the water supply system (on the control panel to the floor covering or refrigerator. See Level the Refrigerator in . Pull the refrigerator straight out and return it straight in the Installation Instructions for Vacation For long vacations or absences, remove food ...
... cushioned coverings and those with a baking soda solution of one tablespoon (15 ml) of baking soda to prevent damage. Moving the refrigerator in a side direction may result in damage to disengage the icemaker. Handle only from the wall. Raise the leveling legs located at...freezing, have a qualified servicer drain the water supply system (on the control panel to the floor covering or refrigerator. See Level the Refrigerator in . Pull the refrigerator straight out and return it straight in the Installation Instructions for Vacation For long vacations or absences, remove food ...
Use and Care Manual
Page 14
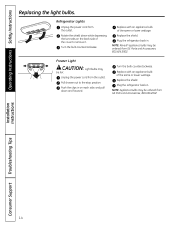
Replace the shield. Plug the refrigerator back in . Installation Instructions Consumer Support Troubleshooting Tips 14 Rotate the shield down and forward. Freezer Light CAUTION: Light bulbs may be ordered from the ....2002. Replace with an appliance bulb of the cover to the stop position. NOTE: Appliance bulbs may be hot. Plug the refrigerator back in . Refrigerator Lights Unplug the power cord from GE Parts and Accessories, 800.626.2002. NOTE: Reveal® appliance bulbs may be ordered from the outlet. Push the clips in...
Replace the shield. Plug the refrigerator back in . Installation Instructions Consumer Support Troubleshooting Tips 14 Rotate the shield down and forward. Freezer Light CAUTION: Light bulbs may be ordered from the ....2002. Replace with an appliance bulb of the cover to the stop position. NOTE: Appliance bulbs may be hot. Plug the refrigerator back in . Refrigerator Lights Unplug the power cord from GE Parts and Accessories, 800.626.2002. NOTE: Reveal® appliance bulbs may be ordered from the outlet. Push the clips in...

Use and Care Manual
Page 15
... - Save these instructions completely and carefully. • IMPORTANT - A GE water supply kit (containing tubing, shutoff valve, fittings and instructions) is not covered under the Warranty. Refrigerator Installation 20 minutes Water Line Installation 30 minutes • Proper installation is... 15 Installation Instructions Refrigerator GE Model 26 Questions? WATER SUPPLY TO THE ICEMAKER AND DISPENSER If the refrigerator has an icemaker, it will not fit through a doorway, the refrigerator doors and freezer drawer can be connected to Installer - Call 800.GE.CARES (800.432...
... - Save these instructions completely and carefully. • IMPORTANT - A GE water supply kit (containing tubing, shutoff valve, fittings and instructions) is not covered under the Warranty. Refrigerator Installation 20 minutes Water Line Installation 30 minutes • Proper installation is... 15 Installation Instructions Refrigerator GE Model 26 Questions? WATER SUPPLY TO THE ICEMAKER AND DISPENSER If the refrigerator has an icemaker, it will not fit through a doorway, the refrigerator doors and freezer drawer can be connected to Installer - Call 800.GE.CARES (800.432...
Use and Care Manual
Page 16
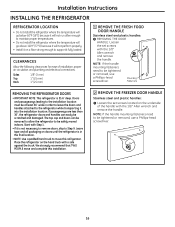
...screwdriver. Leave tape and all packaging on the underside of installation, proper air circulation and plumbing and electrical connections. Place the refrigerator on a floor strong enough to support it fully loaded. A 16 CLEARANCES Allow the following clearances for ease of the handle ...cap and doors can easily be tightened or removed, use a Phillips-head screwdriver. Installation Instructions INSTALLING THE REFRIGERATOR REFRIGERATOR LOCATION • Do not install the refrigerator where the temperature will go below 60°F (16°C) because it will not run often enough to...
...screwdriver. Leave tape and all packaging on the underside of installation, proper air circulation and plumbing and electrical connections. Place the refrigerator on a floor strong enough to support it fully loaded. A 16 CLEARANCES Allow the following clearances for ease of the handle ...cap and doors can easily be tightened or removed, use a Phillips-head screwdriver. Installation Instructions INSTALLING THE REFRIGERATOR REFRIGERATOR LOCATION • Do not install the refrigerator where the temperature will go below 60°F (16°C) because it will not run often enough to...
Use and Care Manual
Page 17
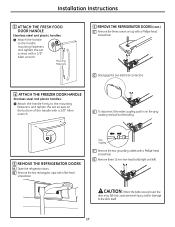
G Remove three 10 mm hex-head bolts (right and left). A 5 REMOVE THE REFRIGERATOR DOORS A Open the refrigerator doors. CAUTION: When the bolts are removed, the door may fall and cause personal injury and/or damage to the mounting fasteners and ...tighten the set screws with a Phillips-head screwdriver. B Remove the two rectangular caps with a Phillips-head screwdriver. Mounting Fasteners 5 REMOVE THE REFRIGERATOR DOORS (cont.) C Remove the three screws on top with a flat-head screwdriver. E To disconnect the water coupling, push in on the gray coupling and...
G Remove three 10 mm hex-head bolts (right and left). A 5 REMOVE THE REFRIGERATOR DOORS A Open the refrigerator doors. CAUTION: When the bolts are removed, the door may fall and cause personal injury and/or damage to the mounting fasteners and ...tighten the set screws with a Phillips-head screwdriver. B Remove the two rectangular caps with a Phillips-head screwdriver. Mounting Fasteners 5 REMOVE THE REFRIGERATOR DOORS (cont.) C Remove the three screws on top with a flat-head screwdriver. E To disconnect the water coupling, push in on the gray coupling and...
Use and Care Manual
Page 18
... screws from the center hinge. F Attach the ground wire with a Phillips-head screwdriver at each side. Attach the hinge to remove. 6 REPLACING THE REFRIGERATOR DOORS (cont.) D Insert the top hinge pin into the hinge hole on top of the cabinet. G Make sure the gasket on the door is...I Reinstall the rectangular caps removed in place, tighten the top hinge bolts. Then connect the water line and door electrical connector. 6 REPLACING THE REFRIGERATOR DOORS A Install the center hinge on each side of the door. Make sure the door is straight and the gap between the doors is aligned...
... screws from the center hinge. F Attach the ground wire with a Phillips-head screwdriver at each side. Attach the hinge to remove. 6 REPLACING THE REFRIGERATOR DOORS (cont.) D Insert the top hinge pin into the hinge hole on top of the cabinet. G Make sure the gasket on the door is...I Reinstall the rectangular caps removed in place, tighten the top hinge bolts. Then connect the water line and door electrical connector. 6 REPLACING THE REFRIGERATOR DOORS A Install the center hinge on each side of the door. Make sure the door is straight and the gap between the doors is aligned...

Use and Care Manual
Page 20
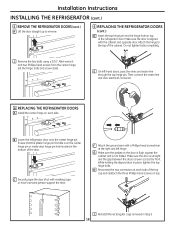
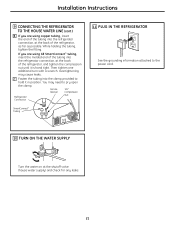
... cord is not plugged into the frame. 9 CONNECTING THE REFRIGERATOR TO THE HOUSE WATER LINE A cold water supply is not a cold water supply, you are using the GE SmartConnect™ tubing, the nuts are four 10 mm hex-head bolts.) REPLACE THE FREEZER BASKET Replace the freezer ...basket by lowering it into the wall outlet. Installation Instructions INSTALLING THE REFRIGERATOR (cont.) 8 REPLACING THE FREEZER DOOR (cont.) B ...
... cord is not plugged into the frame. 9 CONNECTING THE REFRIGERATOR TO THE HOUSE WATER LINE A cold water supply is not a cold water supply, you are using the GE SmartConnect™ tubing, the nuts are four 10 mm hex-head bolts.) REPLACE THE FREEZER BASKET Replace the freezer ...basket by lowering it into the wall outlet. Installation Instructions INSTALLING THE REFRIGERATOR (cont.) 8 REPLACING THE FREEZER DOOR (cont.) B ...
Use and Care Manual
Page 21
... the tubing, tighten the fitting. You may cause leaks. C Fasten the tubing into the refrigerator connection, at the back of the refrigerator, as far as possible. Installation Instructions 9 CONNECTING THE REFRIGERATOR TO THE HOUSE WATER LINE (cont.) B If you are using GE SmartConnect™ tubing, insert the molded end of the tubing into the...
... the tubing, tighten the fitting. You may cause leaks. C Fasten the tubing into the refrigerator connection, at the back of the refrigerator, as far as possible. Installation Instructions 9 CONNECTING THE REFRIGERATOR TO THE HOUSE WATER LINE (cont.) B If you are using GE SmartConnect™ tubing, insert the molded end of the tubing into the...
Use and Care Manual
Page 22
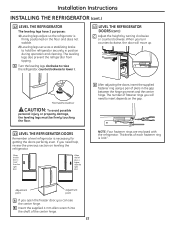
... each fastener ring is higher than the right door. A Turn the leveling legs clockwise to raise the refrigerator, counterclockwise to insert depends on leveling the refrigerator. Flat-Head Screwdriver CAUTION: To avoid possible personal injury or property damage, the leveling legs must be ...firmly touching the floor. 13 LEVEL THE REFRIGERATOR DOORS Remember a level refrigerator is necessary for getting the doors perfectly even. D After adjusting the doors, insert the supplied fastener ring using a pair...
... each fastener ring is higher than the right door. A Turn the leveling legs clockwise to raise the refrigerator, counterclockwise to insert depends on leveling the refrigerator. Flat-Head Screwdriver CAUTION: To avoid possible personal injury or property damage, the leveling legs must be ...firmly touching the floor. 13 LEVEL THE REFRIGERATOR DOORS Remember a level refrigerator is necessary for getting the doors perfectly even. D After adjusting the doors, insert the supplied fastener ring using a pair...
Use and Care Manual
Page 24
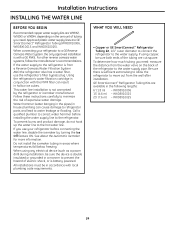
...: measure the distance from the water valve on the amount of tubing you use the refrigerator's filter bypass plug. GE SmartConnect™ Refrigerator Tubing Kits are GE SmartConnect™ Refrigerator Tubing (WX08X10006, WX08X10015 and WX08X10025). Water hammer (water banging in the pipes) in ...sure both ends of the tubing are cut square. WHAT YOU WILL NEED • Copper or GE SmartConnect™ Refrigerator Tubing kit, 1/4″ outer diameter to connect the refrigerator to water leakage or flooding. This water line installation is battery powered. To determine how much...
...: measure the distance from the water valve on the amount of tubing you use the refrigerator's filter bypass plug. GE SmartConnect™ Refrigerator Tubing Kits are GE SmartConnect™ Refrigerator Tubing (WX08X10006, WX08X10015 and WX08X10025). Water hammer (water banging in the pipes) in ...sure both ends of the tubing are cut square. WHAT YOU WILL NEED • Copper or GE SmartConnect™ Refrigerator Tubing kit, 1/4″ outer diameter to connect the refrigerator to water leakage or flooding. This water line installation is battery powered. To determine how much...


