Use and Care Manual
Page 1
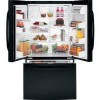
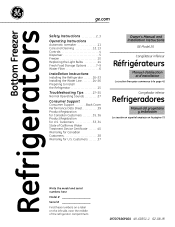
Customers 33 Owner's Manual and Installation Instructions GE Model 26 Congélateur inférieur Réfrigérateurs Manuel d'utilisation et d'installation La section française commence à la page... 4, 5 Dispenser 5 Freezer 10 Replacing the Light Bulbs 14 Fresh Food Storage Options 7-9 Water Filter 6 Installation Instructions Installing the Refrigerator 16-23 Installing the Water Line 24-26 Preparing to Install the Refrigerator 15 Troubleshooting Tips . . . . . .27-30 Normal Operating Sounds 27 Consumer Support Consumer Support Back Cover Performance Data Sheet...
Customers 33 Owner's Manual and Installation Instructions GE Model 26 Congélateur inférieur Réfrigérateurs Manuel d'utilisation et d'installation La section française commence à la page... 4, 5 Dispenser 5 Freezer 10 Replacing the Light Bulbs 14 Fresh Food Storage Options 7-9 Water Filter 6 Installation Instructions Installing the Refrigerator 16-23 Installing the Water Line 24-26 Preparing to Install the Refrigerator 15 Troubleshooting Tips . . . . . .27-30 Normal Operating Sounds 27 Consumer Support Consumer Support Back Cover Performance Data Sheet...
Use and Care Manual
Page 4
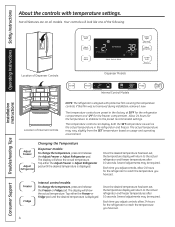
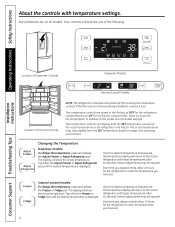
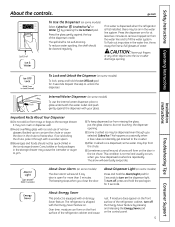
...display will return to reach the temperature you have set . 4 Internal control models: To change the temperature, press and release the Adjust Freezer or Adjust Refrigerator pad. If this film was not removed during installation, remove it now. Each...one of the following: Installation Instructions Consumer Support Troubleshooting Tips Location of Dispenser Controls Dispenser Models Internal Control Models Location of Internal Controls NOTE: The refrigerator is displayed. Operating Instructions Safety Instructions About the controls with protective film covering the temperature...
...display will return to reach the temperature you have set . 4 Internal control models: To change the temperature, press and release the Adjust Freezer or Adjust Refrigerator pad. If this film was not removed during installation, remove it now. Each...one of the following: Installation Instructions Consumer Support Troubleshooting Tips Location of Dispenser Controls Dispenser Models Internal Control Models Location of Internal Controls NOTE: The refrigerator is displayed. Operating Instructions Safety Instructions About the controls with protective film covering the temperature...
Use and Care Manual
Page 5
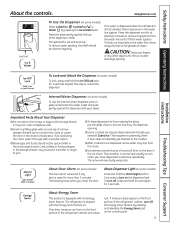
...door. I Some crushed ice may be cleaned regularly. I Sometimes a small mound of the refrigerator cabinet, turn off , press and hold the Alarm/Light pad for more than 3 minutes. The refrigerator is dispensed, some models) To lock, press and hold the Ice Off/Lock pad for at least two minutes ...3 seconds to fill the water system. Cans, bottles or food packages in the water line system. If no water is dispensed when the refrigerator is not self-draining. The beeping stops when you have dispensed crushed ice repeatedly. I Do not add ice from missing the glass, put...
...door. I Some crushed ice may be cleaned regularly. I Sometimes a small mound of the refrigerator cabinet, turn off , press and hold the Alarm/Light pad for more than 3 minutes. The refrigerator is dispensed, some models) To lock, press and hold the Ice Off/Lock pad for at least two minutes ...3 seconds to fill the water system. Cans, bottles or food packages in the water line system. If no water is dispensed when the refrigerator is not self-draining. The beeping stops when you have dispensed crushed ice repeatedly. I Do not add ice from missing the glass, put...

Use and Care Manual
Page 6
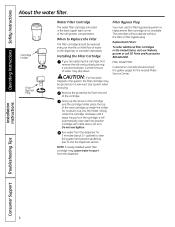
... bypass plug when a replacement filter cartridge is located in the United States, visit our Website, GEAppliances.com or call GE Parts and Accessories, 800.626.2002. Filter Model MWF Customers in the system, the filter cartridge may be replaced every six months or if the flow of water to...Press and hold the Ice & Water pad for the nearest Mabe Service Center. See To Use the Dispenser section. A small amount of the refrigerator compartment. Remove the protective foil from the dispenser. As you are replacing the cartridge, first remove the old one by slowly turning it is removed...
... bypass plug when a replacement filter cartridge is located in the United States, visit our Website, GEAppliances.com or call GE Parts and Accessories, 800.626.2002. Filter Model MWF Customers in the system, the filter cartridge may be replaced every six months or if the flow of water to...Press and hold the Ice & Water pad for the nearest Mabe Service Center. See To Use the Dispenser section. A small amount of the refrigerator compartment. Remove the protective foil from the dispenser. As you are replacing the cartridge, first remove the old one by slowly turning it is removed...
Use and Care Manual
Page 7
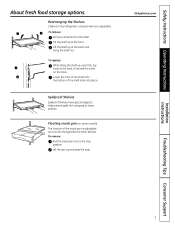
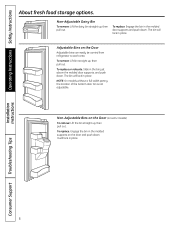
Tilt the shelf up , insert the top hook at the back of the shelf in the refrigerator compartment are adjustable. To replace: While tilting the shelf up at the back and bring the shelf out. Lower the front of the shelf....com Installation Instructions Troubleshooting Tips Consumer Support 7 Lift the shelf up and past the stop position. Rearranging the Shelves Shelves in a slot on some models) The location of the shelf locks into place. Spillproof Shelves Spillproof shelves have special edges to the stop . Safety Instructions Operating Instructions About fresh food...
Tilt the shelf up , insert the top hook at the back of the shelf in the refrigerator compartment are adjustable. To replace: While tilting the shelf up at the back and bring the shelf out. Lower the front of the shelf....com Installation Instructions Troubleshooting Tips Consumer Support 7 Lift the shelf up and past the stop position. Rearranging the Shelves Shelves in a slot on some models) The location of the shelf locks into place. Spillproof Shelves Spillproof shelves have special edges to the stop . Safety Instructions Operating Instructions About fresh food...

Use and Care Manual
Page 8
...in the molded door supports and push down. Non-Adjustable Bins on the Door (on the Door Adjustable bins can easily be carried from refrigerator to work area. To replace: Engage the bin in place. It will lock in place. Operating Instructions Safety Instructions About fresh food storage... Consumer Support Troubleshooting Tips 8 To replace or relocate: Slide in the molded supports on the door and push down . Adjustable Bins on some models) To remove: Lift the bin straight up, then pull out. To replace: Engage the bin in the bin just above the molded door ...
...in the molded door supports and push down. Non-Adjustable Bins on the Door (on the Door Adjustable bins can easily be carried from refrigerator to work area. To replace: Engage the bin in place. It will lock in place. Operating Instructions Safety Instructions About fresh food storage... Consumer Support Troubleshooting Tips 8 To replace or relocate: Slide in the molded supports on the door and push down . Adjustable Bins on some models) To remove: Lift the bin straight up, then pull out. To replace: Engage the bin in the bin just above the molded door ...
Use and Care Manual
Page 12
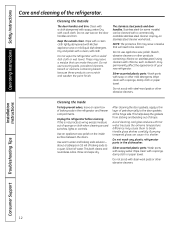
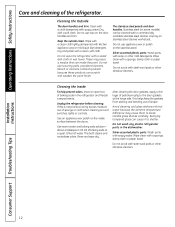
...the paint finish. Use warm water and baking soda solution- Keep the outside clean. Stainless steel (on some models) can cause it to break. Unplug the refrigerator before cleaning. Use an appliance wax polish on the door handles and trim. Rinse and wipe dry. Wipe... or cleaners containing bleach because these products can erode the paint. NOTE: The protective film may permanently affect the appearance of your new refrigerator. This both cleans and neutralizes odors. Silver-accented plastic parts. Dry with a clean, soft cloth. After cleaning the door gaskets, ...
...the paint finish. Use warm water and baking soda solution- Keep the outside clean. Stainless steel (on some models) can cause it to break. Unplug the refrigerator before cleaning. Use an appliance wax polish on the door handles and trim. Rinse and wipe dry. Wipe... or cleaners containing bleach because these products can erode the paint. NOTE: The protective film may permanently affect the appearance of your new refrigerator. This both cleans and neutralizes odors. Silver-accented plastic parts. Dry with a clean, soft cloth. After cleaning the door gaskets, ...
Use and Care Manual
Page 13
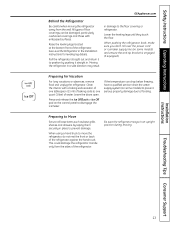
... in . See Level the Refrigerator in damage to disengage the icemaker. When pushing the refrigerator back, make sure you don't roll over the power cord or icemaker supply line (on some models) and ensure the anti-tip bracket is engaged (if equipped). When using a hand truck to one tablespoon (15 ml)... of baking soda to move the refrigerator, do not rest the front or back of water. Safety Instructions ...
... in . See Level the Refrigerator in damage to disengage the icemaker. When pushing the refrigerator back, make sure you don't roll over the power cord or icemaker supply line (on some models) and ensure the anti-tip bracket is engaged (if equipped). When using a hand truck to one tablespoon (15 ml)... of baking soda to move the refrigerator, do not rest the front or back of water. Safety Instructions ...

Use and Care Manual
Page 15
...drawer can be connected to be removed. • To remove the refrigerator door, see the Installing the Refrigerator section. • To remove the freezer drawer, see the Removing the Freezer Drawer section. A GE water supply kit (containing tubing, shutoff valve, fittings and instructions)...is available at extra cost from your dealer, by visiting our Website at GEAppliances.com (in Canada 1.800.661.1616). Installation Instructions Refrigerator GE Model 26 Questions? Installation of the installer. • Product failure due to hinge cover top 687⁄ 8″ 355⁄ 8&#...
...drawer can be connected to be removed. • To remove the refrigerator door, see the Installing the Refrigerator section. • To remove the freezer drawer, see the Removing the Freezer Drawer section. A GE water supply kit (containing tubing, shutoff valve, fittings and instructions)...is available at extra cost from your dealer, by visiting our Website at GEAppliances.com (in Canada 1.800.661.1616). Installation Instructions Refrigerator GE Model 26 Questions? Installation of the installer. • Product failure due to hinge cover top 687⁄ 8″ 355⁄ 8&#...
Use and Care Manual
Page 27
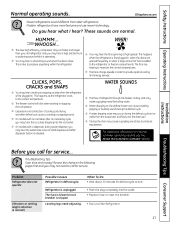
...! What To Do • Wait about 30 minutes for service. I On models with an icemaker, after defrost can cause a sizzling, popping or buzzing sound during the defrost cycle as the refrigerator cools to pressure equalization. I The freezer control will click when starting or stopping...Replace fuse or reset the breaker. • See Level the Refrigerator. 27 I You may occur during the defrost cycle. I You may make a gurgling noise like boiling water. CLICKS, POPS, CRACKS and SNAPS WATER SOUNDS I On models with a dispenser, during and after an icemaking cycle, you ...
...! What To Do • Wait about 30 minutes for service. I On models with an icemaker, after defrost can cause a sizzling, popping or buzzing sound during the defrost cycle as the refrigerator cools to pressure equalization. I The freezer control will click when starting or stopping...Replace fuse or reset the breaker. • See Level the Refrigerator. 27 I You may occur during the defrost cycle. I You may make a gurgling noise like boiling water. CLICKS, POPS, CRACKS and SNAPS WATER SOUNDS I On models with a dispenser, during and after an icemaking cycle, you ...
Use and Care Manual
Page 33
... purchased for service. For The Period Of: GE Will Replace: GE and GE PROFILE MODELS: One Year From the date of the original purchase Any part of God. During this limited one year or the shortest period allowed by accident, fire, floods or acts of the refrigerator which fails due to replace the defective part...
... purchased for service. For The Period Of: GE Will Replace: GE and GE PROFILE MODELS: One Year From the date of the original purchase Any part of God. During this limited one year or the shortest period allowed by accident, fire, floods or acts of the refrigerator which fails due to replace the defective part...
Use and Care Manual
Page 34
...Year Brands: One (1) Year Brands: One (1) Year Sealed System (including GE Profile: Five (5) Years GE Profile: Five (5) Years GE Profile: Five (5) Years evaporator, condenser GE and All Other GE and All Other GE and All Other tubing and refrigerant) Brands: One (1) Year Brands: One (1) Year Brands: One (1) ...shortest period allowed by law. CUSTOMER WARRANTY (for customers in Canada) Your refrigerator is available and deemed reasonable by Mabe to provide. Please have serial number and model number available when calling for a particular purpose, are warranted through the remainder...
...Year Brands: One (1) Year Brands: One (1) Year Sealed System (including GE Profile: Five (5) Years GE Profile: Five (5) Years GE Profile: Five (5) Years evaporator, condenser GE and All Other GE and All Other GE and All Other tubing and refrigerant) Brands: One (1) Year Brands: One (1) Year Brands: One (1) ...shortest period allowed by law. CUSTOMER WARRANTY (for customers in Canada) Your refrigerator is available and deemed reasonable by Mabe to provide. Please have serial number and model number available when calling for a particular purpose, are warranted through the remainder...
Installation Instructions
Page 1
...;ol empieza en la página 75 Write the model and serial numbers here: Model Serial Find these numbers on a label on the left side, near the middle of California Water Treatment Device Certificate 40 Warranty for Canadian Customers 38 Warranty for U.S. Bottom Freezer Refrigerators ge.com Safety Instructions 2, 3 Operating Instructions Automatic Icemaker 11...
...;ol empieza en la página 75 Write the model and serial numbers here: Model Serial Find these numbers on a label on the left side, near the middle of California Water Treatment Device Certificate 40 Warranty for Canadian Customers 38 Warranty for U.S. Bottom Freezer Refrigerators ge.com Safety Instructions 2, 3 Operating Instructions Automatic Icemaker 11...
Installation Instructions
Page 4
... the following: Installation Instructions Consumer Support Troubleshooting Tips Location of Dispenser Controls Dispenser Models Internal Control Models Location of Internal Controls NOTE: The refrigerator is displayed. Internal control models: To change the temperature, press and release the Adjust Freezer or Adjust Refrigerator pad. Allow 24 hours for the freezer compartment. Operating Instructions Safety Instructions About...
... the following: Installation Instructions Consumer Support Troubleshooting Tips Location of Dispenser Controls Dispenser Models Internal Control Models Location of Internal Controls NOTE: The refrigerator is displayed. Internal control models: To change the temperature, press and release the Adjust Freezer or Adjust Refrigerator pad. Allow 24 hours for the freezer compartment. Operating Instructions Safety Instructions About...
Installation Instructions
Page 5
... or food packages in the water line system. About Door Alarm (on some models) The door alarm will sound if any other objects into the ice crusher discharge opening . About Dispenser Light (on . The refrigerator is open for at least two minutes to remove trapped air from the chute....: Never put the glass close the door. ge.com Spill Shelf To Use the Dispenser (on the control panel. 5 If no water is dispensed when the refrigerator is blocking the chute, poke it through with your glass. Internal Water Dispenser (on some models) To use of water. s Beverages and ...
... or food packages in the water line system. About Door Alarm (on some models) The door alarm will sound if any other objects into the ice crusher discharge opening . About Dispenser Light (on . The refrigerator is open for at least two minutes to remove trapped air from the chute....: Never put the glass close the door. ge.com Spill Shelf To Use the Dispenser (on the control panel. 5 If no water is dispensed when the refrigerator is blocking the chute, poke it through with your glass. Internal Water Dispenser (on some models) To use of water. s Beverages and ...
Installation Instructions
Page 6
... filter cartridges in Canada should be ejected as it up inside the holder. Filter Model MWF Customers in the United States, visit our Website, ge.com or call GE Parts and Accessories, 800.626.2002. A small amount of the refrigerator compartment. Lining up the arrow on the cartridge and the cartridge holder, place the...
... filter cartridges in Canada should be ejected as it up inside the holder. Filter Model MWF Customers in the United States, visit our Website, ge.com or call GE Parts and Accessories, 800.626.2002. A small amount of the refrigerator compartment. Lining up the arrow on the cartridge and the cartridge holder, place the...
Installation Instructions
Page 8
... up , then pull out. To replace or relocate: Slide in the molded door supports and push down. Non-Adjustable Bins on the Door (on some models) To remove: Lift the bin straight up , then pull out. Installation Instructions Consumer Support Troubleshooting Tips 8 The bin will lock in place. The bin will...replace: Engage the bin in place. To remove: Lift bin straight up, then pull out. Adjustable Bins on the door and push down . NOTE: On models without a full-width pantry, the location of the bottom door bin is not adjustable. It will lock in the molded supports on the Door Adjustable...
... up , then pull out. To replace or relocate: Slide in the molded door supports and push down. Non-Adjustable Bins on the Door (on some models) To remove: Lift the bin straight up , then pull out. Installation Instructions Consumer Support Troubleshooting Tips 8 The bin will lock in place. The bin will...replace: Engage the bin in place. To remove: Lift bin straight up, then pull out. Adjustable Bins on the door and push down . NOTE: On models without a full-width pantry, the location of the bottom door bin is not adjustable. It will lock in the molded supports on the Door Adjustable...
Installation Instructions
Page 12
.... Stainless steel (on some models) can scratch and weaken the paint finish. Do not scrub with a soft cloth. Rinse and wipe dry. After cleaning the door gaskets, apply a thin layer of shape. Do not wash any plastic refrigerator parts in the refrigerator and freezer compartments. The stainless...and door handles. Silver-accented plastic parts. Cleaning the Inside To help prevent odors, leave an open box of water. Unplug the refrigerator before cleaning. Avoid cleaning cold glass shelves with steel-wool pads or other mild detergents. Do not scrub with hot water because ...
.... Stainless steel (on some models) can scratch and weaken the paint finish. Do not scrub with a soft cloth. Rinse and wipe dry. After cleaning the door gaskets, apply a thin layer of shape. Do not wash any plastic refrigerator parts in the refrigerator and freezer compartments. The stainless...and door handles. Silver-accented plastic parts. Cleaning the Inside To help prevent odors, leave an open box of water. Unplug the refrigerator before cleaning. Avoid cleaning cold glass shelves with steel-wool pads or other mild detergents. Do not scrub with hot water because ...

Installation Instructions
Page 13
... models) and ensure the anti-tip bracket is engaged (if equipped). Raise the leveling legs located at the bottom front of the refrigerator. See Level the Refrigerator in... the Installation Instructions for Vacation For long vacations or absences, remove food and unplug the refrigerator. Leave the ...refrigerator. Moving the refrigerator in a side direction may result in an upright position during moving the refrigerator away from the sides of the refrigerator. Be sure the refrigerator stays in damage to move the refrigerator...
... models) and ensure the anti-tip bracket is engaged (if equipped). Raise the leveling legs located at the bottom front of the refrigerator. See Level the Refrigerator in... the Installation Instructions for Vacation For long vacations or absences, remove food and unplug the refrigerator. Leave the ...refrigerator. Moving the refrigerator in a side direction may result in an upright position during moving the refrigerator away from the sides of the refrigerator. Be sure the refrigerator stays in damage to move the refrigerator...

Installation Instructions
Page 15
... skills. • Completion time - PREPARATION MOVING THE REFRIGERATOR INDOORS If the refrigerator will have to improper installation is available at extra cost from your dealer, by visiting our Website at ge.com (in Canada at : www.geappliances.ca BEFORE ...Product failure due to be removed. • To remove the refrigerator door, see the Installing the Refrigerator section. • To remove the freezer drawer, see the Removing the Freezer Drawer section. Installation Instructions Refrigerator GE Model 26 Questions? Save these instructions with the Consumer. •...
... skills. • Completion time - PREPARATION MOVING THE REFRIGERATOR INDOORS If the refrigerator will have to improper installation is available at extra cost from your dealer, by visiting our Website at ge.com (in Canada at : www.geappliances.ca BEFORE ...Product failure due to be removed. • To remove the refrigerator door, see the Installing the Refrigerator section. • To remove the freezer drawer, see the Removing the Freezer Drawer section. Installation Instructions Refrigerator GE Model 26 Questions? Save these instructions with the Consumer. •...


