Use and Care Manual
Page 1
Customers 33 Owner's Manual and Installation Instructions GE Model 26 Congélateur inférieur Réfrigérateurs Manuel d'utilisation et d'installation La section française commence à la page... 4, 5 Dispenser 5 Freezer 10 Replacing the Light Bulbs 14 Fresh Food Storage Options 7-9 Water Filter 6 Installation Instructions Installing the Refrigerator 16-23 Installing the Water Line 24-26 Preparing to Install the Refrigerator 15 Troubleshooting Tips . . . . . .27-30 Normal Operating Sounds 27 Consumer Support Consumer Support Back Cover Performance Data Sheet...
Customers 33 Owner's Manual and Installation Instructions GE Model 26 Congélateur inférieur Réfrigérateurs Manuel d'utilisation et d'installation La section française commence à la page... 4, 5 Dispenser 5 Freezer 10 Replacing the Light Bulbs 14 Fresh Food Storage Options 7-9 Water Filter 6 Installation Instructions Installing the Refrigerator 16-23 Installing the Water Line 24-26 Preparing to Install the Refrigerator 15 Troubleshooting Tips . . . . . .27-30 Normal Operating Sounds 27 Consumer Support Consumer Support Back Cover Performance Data Sheet...
Use and Care Manual
Page 4
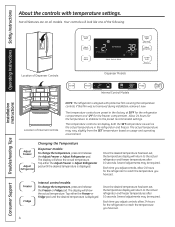
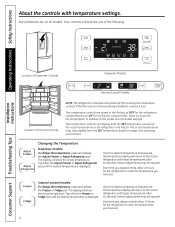
...one of the following: Installation Instructions Consumer Support Troubleshooting Tips Location of Dispenser Controls Dispenser Models Internal Control Models Location of Internal Controls NOTE: The refrigerator is shipped with temperature settings. Tap either the Freezer or Fridge pad until the ...desired temperature is displayed. Internal control models: To change the temperature, press and release the Adjust Freezer or Adjust Refrigerator pad. Operating Instructions Safety Instructions About the controls with protective film covering ...
...one of the following: Installation Instructions Consumer Support Troubleshooting Tips Location of Dispenser Controls Dispenser Models Internal Control Models Location of Internal Controls NOTE: The refrigerator is shipped with temperature settings. Tap either the Freezer or Fridge pad until the ...desired temperature is displayed. Internal control models: To change the temperature, press and release the Adjust Freezer or Adjust Refrigerator pad. Operating Instructions Safety Instructions About the controls with protective film covering ...
Use and Care Manual
Page 5
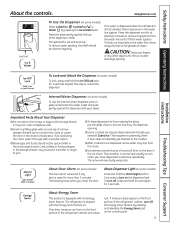
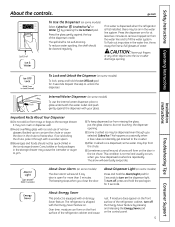
...few cubes accidentally get directed to unlock the dispenser. The snow will form on the front surface of the dispenser cradle. The refrigerator is blocking the chute, poke it through with your glass. Safety Instructions Operating Instructions About the controls. About Energy Saver This ... with a wooden spoon. CAUTION: Never put the glass close the door. Backed-up ice can form on some models) To use of the refrigerator cabinet and cause rust. Installation Instructions Troubleshooting Tips Consumer Support To Lock and Unlock the Dispenser (on the front surface...
...few cubes accidentally get directed to unlock the dispenser. The snow will form on the front surface of the dispenser cradle. The refrigerator is blocking the chute, poke it through with your glass. Safety Instructions Operating Instructions About the controls. About Energy Saver This ... with a wooden spoon. CAUTION: Never put the glass close the door. Backed-up ice can form on some models) To use of the refrigerator cabinet and cause rust. Installation Instructions Troubleshooting Tips Consumer Support To Lock and Unlock the Dispenser (on the front surface...

Use and Care Manual
Page 6
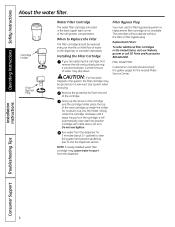
... to clear the system and prevent sputtering. Run water from the end of the refrigerator compartment. NOTE: A newly installed water filter cartridge may drip down. Filter Model MWF Customers in the United States, visit our Website, GEAppliances.com or call GE Parts and Accessories, 800.626.2002. Installation Instructions Consumer Support Troubleshooting Tips 6
... to clear the system and prevent sputtering. Run water from the end of the refrigerator compartment. NOTE: A newly installed water filter cartridge may drip down. Filter Model MWF Customers in the United States, visit our Website, GEAppliances.com or call GE Parts and Accessories, 800.626.2002. Installation Instructions Consumer Support Troubleshooting Tips 6
Use and Care Manual
Page 7
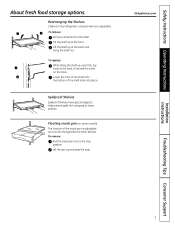
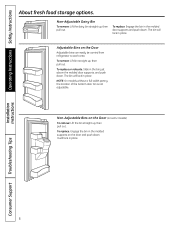
... spills from the shelf. Lift the pan up at the front. Floating snack pan (on the track. Rearranging the Shelves Shelves in a slot on some models) The location of the snack pan is adjustable and can be changed like the other shelves. To remove: Remove all items from dripping to the... lower shelves. Safety Instructions Operating Instructions About fresh food storage options. Lower the front of the shelf until the bottom of the shelf in the refrigerator compartment are adjustable.
... spills from the shelf. Lift the pan up at the front. Floating snack pan (on the track. Rearranging the Shelves Shelves in a slot on some models) The location of the snack pan is adjustable and can be changed like the other shelves. To remove: Remove all items from dripping to the... lower shelves. Safety Instructions Operating Instructions About fresh food storage options. Lower the front of the shelf until the bottom of the shelf in the refrigerator compartment are adjustable.

Use and Care Manual
Page 8
... push down . The bin will lock in the molded door supports and push down . To remove: Lift bin straight up , then pull out. NOTE: On models without a full-width pantry, the location of the bottom door bin is not adjustable. It will lock in place. To replace or relocate: Slide in... the molded supports on the Door Adjustable bins can easily be carried from refrigerator to work area. Non-Adjustable Bins on the Door (on some models) To remove: Lift the bin straight up , then pull out. To replace: Engage the bin in place. Adjustable Bins...
... push down . The bin will lock in the molded door supports and push down . To remove: Lift bin straight up , then pull out. NOTE: On models without a full-width pantry, the location of the bottom door bin is not adjustable. It will lock in place. To replace or relocate: Slide in... the molded supports on the Door Adjustable bins can easily be carried from refrigerator to work area. Non-Adjustable Bins on the Door (on some models) To remove: Lift the bin straight up , then pull out. To replace: Engage the bin in place. Adjustable Bins...
Use and Care Manual
Page 9
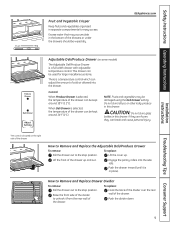
... GEAppliances.com Adjustable Deli/Produce Drawer (on the right side of the drawer. Installation Instructions Troubleshooting Tips Consumer Support The control is located on some models) The Adjustable Deli/Produce Drawer is a full-width drawer with adjustable temperature control. Lift the front of the drawer can be kept around 34°...
... GEAppliances.com Adjustable Deli/Produce Drawer (on the right side of the drawer. Installation Instructions Troubleshooting Tips Consumer Support The control is located on some models) The Adjustable Deli/Produce Drawer is a full-width drawer with adjustable temperature control. Lift the front of the drawer can be kept around 34°...
Use and Care Manual
Page 12
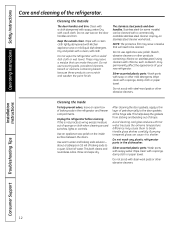
...surface between the doors. Do not scrub with kitchen appliance wax or mild liquid dish detergent. Use an appliance wax polish on some models) can scratch and weaken the paint finish. This helps keep the gaskets from sticking and bending out of sponge or cloth when ...cleaning around switches, lights or controls. Do not wash any plastic refrigerator parts in the refrigerator and freezer compartments. Operating Instructions Safety Instructions Care and cleaning of baking soda to shatter. Wash parts with soapy water. Rinse...
...surface between the doors. Do not scrub with kitchen appliance wax or mild liquid dish detergent. Use an appliance wax polish on some models) can scratch and weaken the paint finish. This helps keep the gaskets from sticking and bending out of sponge or cloth when ...cleaning around switches, lights or controls. Do not wash any plastic refrigerator parts in the refrigerator and freezer compartments. Operating Instructions Safety Instructions Care and cleaning of baking soda to shatter. Wash parts with soapy water. Rinse...
Use and Care Manual
Page 13
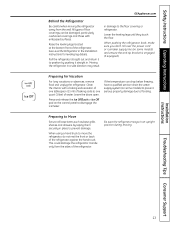
...Instructions Operating Instructions GEAppliances.com Behind the Refrigerator Be careful when moving . Preparing for leveling leg details. When pushing the refrigerator back, make sure you don't roll over the power cord or icemaker supply line (on some models) and ensure the anti-tip bracket ...icemaker. Handle only from the wall. Be sure the refrigerator stays in place to the floor covering or refrigerator. See Level the Refrigerator in damage to prevent damage. All types of water. Moving the refrigerator in a side direction may result in the Installation ...
...Instructions Operating Instructions GEAppliances.com Behind the Refrigerator Be careful when moving . Preparing for leveling leg details. When pushing the refrigerator back, make sure you don't roll over the power cord or icemaker supply line (on some models) and ensure the anti-tip bracket ...icemaker. Handle only from the wall. Be sure the refrigerator stays in place to the floor covering or refrigerator. See Level the Refrigerator in damage to prevent damage. All types of water. Moving the refrigerator in a side direction may result in the Installation ...

Use and Care Manual
Page 15
...AND DISPENSER If the refrigerator has an icemaker, it will not fit through a doorway, the refrigerator doors and freezer drawer can be connected to Consumer - A GE water supply kit (...refrigerator will have to be removed. • To remove the refrigerator door, see the Installing the Refrigerator section. • To remove the freezer drawer, see the Removing the Freezer Drawer section. Save these instructions completely and carefully. • IMPORTANT - Installation of the installer. • Product failure due to Installer - Installation Instructions Refrigerator GE Model...
...AND DISPENSER If the refrigerator has an icemaker, it will not fit through a doorway, the refrigerator doors and freezer drawer can be connected to Consumer - A GE water supply kit (...refrigerator will have to be removed. • To remove the refrigerator door, see the Installing the Refrigerator section. • To remove the freezer drawer, see the Removing the Freezer Drawer section. Save these instructions completely and carefully. • IMPORTANT - Installation of the installer. • Product failure due to Installer - Installation Instructions Refrigerator GE Model...
Use and Care Manual
Page 27
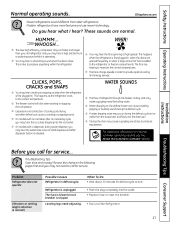
... during water dispense, you may hear a whooshing sound when the doors close. I On models with a dispenser, during the defrost cycle as the refrigerator cools to pressure equalizing within the refrigerator. Troubleshooting Tips Save time and money! I A water dripping noise may hear the fans spinning...on the defrost heater can cause a cracking or popping sound. I On models with an icemaker, after dispenser button is released. The fans are normal. This happens as ice melts from older refrigerators. I You may hear a high-pitched hum or pulsating sound while it...
... during water dispense, you may hear a whooshing sound when the doors close. I On models with a dispenser, during the defrost cycle as the refrigerator cools to pressure equalizing within the refrigerator. Troubleshooting Tips Save time and money! I A water dripping noise may hear the fans spinning...on the defrost heater can cause a cracking or popping sound. I On models with an icemaker, after dispenser button is released. The fans are normal. This happens as ice melts from older refrigerators. I You may hear a high-pitched hum or pulsating sound while it...
Use and Care Manual
Page 33
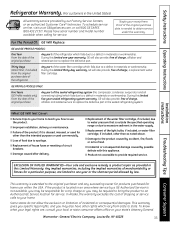
... or you may also have serial number and model number available when calling for service. To know what your home. What GE Will Not Cover: I Damage to one -year warranty, GE will also provide, free of the sealed refrigerating system (the compressor, condenser, evaporator and all...of food due to replace the defective part in the sealed refrigerating system. I Failure of the water filter cartridge which vary from state to excessive sediment in the water supply. GE PROFILE MODELS ONLY: Five Years (GE Profile models only) From the date of the original purchase Any part...
... or you may also have serial number and model number available when calling for service. To know what your home. What GE Will Not Cover: I Damage to one -year warranty, GE will also provide, free of the sealed refrigerating system (the compressor, condenser, evaporator and all...of food due to replace the defective part in the sealed refrigerating system. I Failure of the water filter cartridge which vary from state to excessive sediment in the water supply. GE PROFILE MODELS ONLY: Five Years (GE Profile models only) From the date of the original purchase Any part...
Use and Care Manual
Page 34
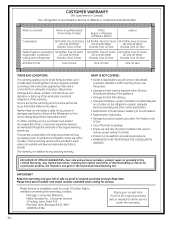
...New Brunswick E1C 9M3 1.800.561.3344 Staple your bill of sale as provided in this warranty. Please have serial number and model number available when calling for service. What is covered How Long Warranted (From Date of Sale) Parts Repair or Replace at ...One (1) Year Brands: One (1) Year Brands: One (1) Year Sealed System (including GE Profile: Five (5) Years GE Profile: Five (5) Years GE Profile: Five (5) Years evaporator, condenser GE and All Other GE and All Other GE and All Other tubing and refrigerant) Brands: One (1) Year Brands: One (1) Year Brands: One (1) Year All Other...
...New Brunswick E1C 9M3 1.800.561.3344 Staple your bill of sale as provided in this warranty. Please have serial number and model number available when calling for service. What is covered How Long Warranted (From Date of Sale) Parts Repair or Replace at ...One (1) Year Brands: One (1) Year Brands: One (1) Year Sealed System (including GE Profile: Five (5) Years GE Profile: Five (5) Years GE Profile: Five (5) Years evaporator, condenser GE and All Other GE and All Other GE and All Other tubing and refrigerant) Brands: One (1) Year Brands: One (1) Year Brands: One (1) Year All Other...
Use and Care Manual
Page 35
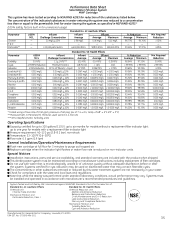
...% Min. Systems certified for cyst reduction may be used were 0.5-1 microns *** NTU=Nephelometric Turbidity units Operating Specifications Capacity: certified for up to six months for models without adequate disinfection before or after the system. System Tested and Certified by this water treatment system are included with a replacement filter indicator light Pressure....97% Min. Required Reduction > 50% - ≥ 85% Parameter Turbidity Cysts Asbestos Lead at pH 6.5 Lead at pH 8.5 Mercury at pH 6.5 Mercury at full flow for models with the product when shipped.
...% Min. Systems certified for cyst reduction may be used were 0.5-1 microns *** NTU=Nephelometric Turbidity units Operating Specifications Capacity: certified for up to six months for models without adequate disinfection before or after the system. System Tested and Certified by this water treatment system are included with a replacement filter indicator light Pressure....97% Min. Required Reduction > 50% - ≥ 85% Parameter Turbidity Cysts Asbestos Lead at pH 6.5 Lead at pH 8.5 Mercury at pH 6.5 Mercury at full flow for models with the product when shipped.
Use and Care Manual
Page 36
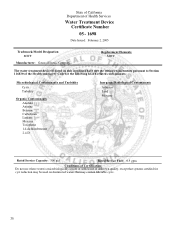
State of California Department of Health Services Water Treatment Device Certificate Number 05 - 1698 Date Issued: February 2, 2005 Trademark/Model Designation MWF Manufacturer: General Electric Company Replacement Elements MWF The water treatment device(s) listed on this certificate have met the testing requirements pursuant to Section ...
State of California Department of Health Services Water Treatment Device Certificate Number 05 - 1698 Date Issued: February 2, 2005 Trademark/Model Designation MWF Manufacturer: General Electric Company Replacement Elements MWF The water treatment device(s) listed on this certificate have met the testing requirements pursuant to Section ...
Installation Instructions
Page 1
...;ol empieza en la página 75 Write the model and serial numbers here: Model Serial Find these numbers on a label on the left side, near the middle of California Water Treatment Device Certificate 40 Warranty for Canadian Customers 38 Warranty for U.S. Bottom Freezer Refrigerators ge.com Safety Instructions 2, 3 Operating Instructions Automatic Icemaker 11...
...;ol empieza en la página 75 Write the model and serial numbers here: Model Serial Find these numbers on a label on the left side, near the middle of California Water Treatment Device Certificate 40 Warranty for Canadian Customers 38 Warranty for U.S. Bottom Freezer Refrigerators ge.com Safety Instructions 2, 3 Operating Instructions Automatic Icemaker 11...
Installation Instructions
Page 4
...the Freezer or Fridge pad until the desired temperature is displayed. Internal control models: To change the temperature, press and release the Adjust Freezer or Adjust Refrigerator pad. Once the desired temperature has been set , the temperature display ... of the following: Installation Instructions Consumer Support Troubleshooting Tips Location of Dispenser Controls Dispenser Models Internal Control Models Location of Internal Controls NOTE: The refrigerator is displayed. Operating Instructions Safety Instructions About the controls with protective film covering the ...
...the Freezer or Fridge pad until the desired temperature is displayed. Internal control models: To change the temperature, press and release the Adjust Freezer or Adjust Refrigerator pad. Once the desired temperature has been set , the temperature display ... of the following: Installation Instructions Consumer Support Troubleshooting Tips Location of Dispenser Controls Dispenser Models Internal Control Models Location of Internal Controls NOTE: The refrigerator is displayed. Operating Instructions Safety Instructions About the controls with protective film covering the ...
Installation Instructions
Page 5
ge.com Spill Shelf To Use the Dispenser (on the control panel. 5 The spill shelf is equipped with ice and use the internal water dispenser, place a Push glass underneath the water outlet and push gently against the top of the refrigerator cabinet and cause rust. ...Installation Instructions Troubleshooting Tips Consumer Support To Lock and Unlock the Dispenser (on some models) Select Cubed Ice , Crushed Ice or Water by pressing and releasing the Energy...
ge.com Spill Shelf To Use the Dispenser (on the control panel. 5 The spill shelf is equipped with ice and use the internal water dispenser, place a Push glass underneath the water outlet and push gently against the top of the refrigerator cabinet and cause rust. ...Installation Instructions Troubleshooting Tips Consumer Support To Lock and Unlock the Dispenser (on some models) Select Cubed Ice , Crushed Ice or Water by pressing and releasing the Energy...
Installation Instructions
Page 6
... pages for 3 minutes (about 1/4 turn the cartridge, it is removed. A small amount of the cartridge. Filter Model MWF Customers in the back upper right corner of the refrigerator compartment. Slowly rotate the cartridge clockwise until it counterclockwise. Run water from the dispenser for the nearest Mabe Service Center...spurt from the end of water may drip down. CAUTION: If air has been trapped in the United States, visit our Website, ge.com or call GE Parts and Accessories, 800.626.2002. Do not push it up inside the holder. Do not overtighten. See To Use the Dispenser ...
... pages for 3 minutes (about 1/4 turn the cartridge, it is removed. A small amount of the cartridge. Filter Model MWF Customers in the back upper right corner of the refrigerator compartment. Slowly rotate the cartridge clockwise until it counterclockwise. Run water from the dispenser for the nearest Mabe Service Center...spurt from the end of water may drip down. CAUTION: If air has been trapped in the United States, visit our Website, ge.com or call GE Parts and Accessories, 800.626.2002. Do not push it up inside the holder. Do not overtighten. See To Use the Dispenser ...
Installation Instructions
Page 8
...: Lift the bin straight up, then pull out. Non-Adjustable Dairy Bin To remove: Lift the dairy bin straight up , then pull out. NOTE: On models without a full-width pantry, the location of the bottom door bin is not adjustable. The bin will lock in the molded door supports and push... down . To replace: Engage the bin in place. Adjustable Bins on the Door Adjustable bins can easily be carried from refrigerator to work area. To replace: Engage the bin in place. Operating Instructions Safety Instructions About fresh food storage options.
...: Lift the bin straight up, then pull out. Non-Adjustable Dairy Bin To remove: Lift the dairy bin straight up , then pull out. NOTE: On models without a full-width pantry, the location of the bottom door bin is not adjustable. The bin will lock in the molded door supports and push... down . To replace: Engage the bin in place. Adjustable Bins on the Door Adjustable bins can easily be carried from refrigerator to work area. To replace: Engage the bin in place. Operating Instructions Safety Instructions About fresh food storage options.

