
Installation Instructions
Page 1
...Start Guide 5 Using the Dryer 9 Features 10 Care and Cleaning 11 Installation Instructions Before You Begin 12- 14 Connecting the Inlet Hoses 15 Connecting a Gas Dryer 16-19 Connecting an Electric Dryer 20-22 Exhausting the Dryer 23-29 Final Setup 30... Reversing the Door Swing 31-34 Stacking the Washer and Dryer 36-38 Owner's Manual & Installation Instructions... Serial They are on the label on the front of the dryer behind the door. 49-90470 02-13...
...Start Guide 5 Using the Dryer 9 Features 10 Care and Cleaning 11 Installation Instructions Before You Begin 12- 14 Connecting the Inlet Hoses 15 Connecting a Gas Dryer 16-19 Connecting an Electric Dryer 20-22 Exhausting the Dryer 23-29 Final Setup 30... Reversing the Door Swing 31-34 Stacking the Washer and Dryer 36-38 Owner's Manual & Installation Instructions... Serial They are on the label on the front of the dryer behind the door. 49-90470 02-13...
Installation Instructions
Page 2
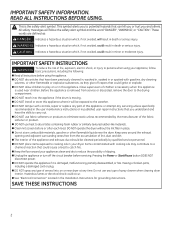
...SAFETY INFORMATION. CAUTION Indicates a hazardous situation which , if not avoided, could result in death or serious injury. Keep area around your dryer. Hazardous fumes or electrical shock could cause a load to catch fire. „ Keep the floor around the exhaust opening and adjacent ...containing foam rubber or similarly textured rubber-like materials. „ Clean lint screen before or after each load. This is used near dryer at any time. Before the appliance is damaged, malfunctioning, partially disassembled, or has missing or broken parts, including a damaged cord ...
...SAFETY INFORMATION. CAUTION Indicates a hazardous situation which , if not avoided, could result in death or serious injury. Keep area around your dryer. Hazardous fumes or electrical shock could cause a load to catch fire. „ Keep the floor around the exhaust opening and adjacent ...containing foam rubber or similarly textured rubber-like materials. „ Clean lint screen before or after each load. This is used near dryer at any time. Before the appliance is damaged, malfunctioning, partially disassembled, or has missing or broken parts, including a damaged cord ...

Installation Instructions
Page 3
... California to cause cancer, birth defects or other reproductive harm and requires businesses to warn of this manual must be minimized by properly venting the dryer to prevent damage, personal injury, or death. - SAVE THESE INSTRUCTIONS 3 DO NOT store or use any phone in your building. • Clear the room, .... - Exposure to these substances can cause low-level exposure to light any appliance. • DO NOT touch any electrical switch; GEAppliances.com ADDITIONAL GAS DRYER WARNINGS WARNING For your safety, the information in this or any other appliance. -
... California to cause cancer, birth defects or other reproductive harm and requires businesses to warn of this manual must be minimized by properly venting the dryer to prevent damage, personal injury, or death. - SAVE THESE INSTRUCTIONS 3 DO NOT store or use any phone in your building. • Clear the room, .... - Exposure to these substances can cause low-level exposure to light any appliance. • DO NOT touch any electrical switch; GEAppliances.com ADDITIONAL GAS DRYER WARNINGS WARNING For your safety, the information in this or any other appliance. -
Installation Instructions
Page 4
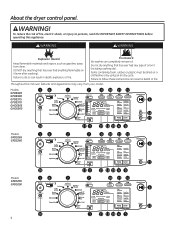
... any type of fire, electric shock, or injury to persons, read the IMPORTANT SAFETY INSTRUCTIONS before operating this manual, features and appearance may vary from dryer. Fire Hazard No washer can result in death or fire. Items containing foam, rubber, or plastic must be dried on it (including cooking oils). WARNING... 2 7 9 10 11 12 GFDS265 GFDS260 6 15 16 17 3 13 18 19 4 5 Models: 18 2 7 10 11 12 GFDS255 GFDS250 6 16 4 15 3 13 18 19 4 5 About the dryer control panel.
... any type of fire, electric shock, or injury to persons, read the IMPORTANT SAFETY INSTRUCTIONS before operating this manual, features and appearance may vary from dryer. Fire Hazard No washer can result in death or fire. Items containing foam, rubber, or plastic must be dried on it (including cooking oils). WARNING... 2 7 9 10 11 12 GFDS265 GFDS260 6 15 16 17 3 13 18 19 4 5 Models: 18 2 7 10 11 12 GFDS255 GFDS250 6 16 4 15 3 13 18 19 4 5 About the dryer control panel.

Installation Instructions
Page 5
... Care or Perma Press: For wrinkle-free and permanent press items. Delicates For lingerie and special-care fabrics. Use to mix towels and sheets in dryer for each cycle. Use to Time Dry. 2. Select the Temp. 4. For large coats, bed spreads, mattress covers, sleeping bags, blankets, comforters,...the length and tumble speed of bacteria by pressing the Add Time button. The chart below will reset the counter to turn the dryer off. Sanitize Reduces certain types of the drying process. Steam Dewrinkle Full Loads Ideal for active sports exercise and some items damp,...
... Care or Perma Press: For wrinkle-free and permanent press items. Delicates For lingerie and special-care fabrics. Use to mix towels and sheets in dryer for each cycle. Use to Time Dry. 2. Select the Temp. 4. For large coats, bed spreads, mattress covers, sleeping bags, blankets, comforters,...the length and tumble speed of bacteria by pressing the Add Time button. The chart below will reset the counter to turn the dryer off. Sanitize Reduces certain types of the drying process. Steam Dewrinkle Full Loads Ideal for active sports exercise and some items damp,...

Installation Instructions
Page 6
...Dry Temp You can be set while a cycle is in your Cottons, Normal, Active Wear, Delicates, clothes reaches your selected dry level, the dryer Speed Dry, Bulky, Towels/Sheets, Sanitize will stop. High For regular to fit your needs. 3. Medium For synthetics, blends and items labeled Permanent... custom settings can change your favorite combination of fabrics. and Steam Dewrinkle cycles. A beep will sound and the button will pause the dryer. To recall your drying cycle. 2. To change the temperature of NOTE: Sensor dry Level only works with Air Fluff, in which items...
...Dry Temp You can be set while a cycle is in your Cottons, Normal, Active Wear, Delicates, clothes reaches your selected dry level, the dryer Speed Dry, Bulky, Towels/Sheets, Sanitize will stop. High For regular to fit your needs. 3. Medium For synthetics, blends and items labeled Permanent... custom settings can change your favorite combination of fabrics. and Steam Dewrinkle cycles. A beep will sound and the button will pause the dryer. To recall your drying cycle. 2. To change the temperature of NOTE: Sensor dry Level only works with Air Fluff, in which items...

Installation Instructions
Page 7
...every five minutes as bed and bath mixed loads, where sheets, towels and pillow cases are laundered together, benefit from this option is opened , the dryer will show minutes of your dry cycle and any options. NOTE: If the door is selected. 13 Delay Dry Use to 5 garments. If the ...been pressed again. 3. The extended tumble time does not get added to the cycle time on the display. 12 Damp Alert This option causes the dryer to hang dry. Delay Dry, the countdown time will only beep when this capability. You can reduce the need reduces wrinkles on some items. wish...
...every five minutes as bed and bath mixed loads, where sheets, towels and pillow cases are laundered together, benefit from this option is opened , the dryer will show minutes of your dry cycle and any options. NOTE: If the door is selected. 13 Delay Dry Use to 5 garments. If the ...been pressed again. 3. The extended tumble time does not get added to the cycle time on the display. 12 Damp Alert This option causes the dryer to hang dry. Delay Dry, the countdown time will only beep when this capability. You can reduce the need reduces wrinkles on some items. wish...

Installation Instructions
Page 8
... until the Start/Pause button is pressed. To lock the dryer, press and hold selections from Good (1 light) to indicate the lock/unlock status. means the dryer is dryer. Press the button again to prevent any To unlock the dryer controls, press and hold the Lock Control button for 3 ...continue to sound every minute for 3 seconds. They are locked. At that the cycle is made . Even though you will continue until the dryer senses a low level of moisture in the display. the Power button has been pressed), the "Clean Filter" message will still be cleaned ...
... until the Start/Pause button is pressed. To lock the dryer, press and hold selections from Good (1 light) to indicate the lock/unlock status. means the dryer is dryer. Press the button again to prevent any To unlock the dryer controls, press and hold the Lock Control button for 3 ...continue to sound every minute for 3 seconds. They are locked. At that the cycle is made . Even though you will continue until the dryer senses a low level of moisture in the display. the Power button has been pressed), the "Clean Filter" message will still be cleaned ...

Installation Instructions
Page 9
... Do not tumble dry (used in accordance with the manufacturer's instructions. Using the dryer. Bounce® Fabric Conditioner Dryer Sheets have been approved for the dryer. Do not overload. Fabric Care Labels Below are sorted properly for use in this dryer when used with socks or other small items. Do not add fabric softener...
... Do not tumble dry (used in accordance with the manufacturer's instructions. Using the dryer. Bounce® Fabric Conditioner Dryer Sheets have been approved for the dryer. Do not overload. Fabric Care Labels Below are sorted properly for use in this dryer when used with socks or other small items. Do not add fabric softener...

Installation Instructions
Page 10
.... To install the drying rack, extend the drying rack into the dryer drum. Rest the front two legs on the front angled ledge and then rest the rear two legs on front angled ledge 10 Dry with ...the Time Dry cycles. Rest rear legs on rear angled ledge Drying Rack (on some models) A handy drying rack may result in the dryer, that are not placed on the drying rack and block such items as washable sweaters. Rest front legs on the rear angled edge. NOTES: „...
.... To install the drying rack, extend the drying rack into the dryer drum. Rest the front two legs on the front angled ledge and then rest the rear two legs on front angled ledge 10 Dry with ...the Time Dry cycles. Rest rear legs on rear angled ledge Drying Rack (on some models) A handy drying rack may result in the dryer, that are not placed on the drying rack and block such items as washable sweaters. Rest front legs on the rear angled edge. NOTES: „...
Installation Instructions
Page 11
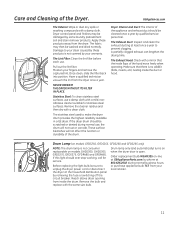
... Dryer ...dryer power cord or disconnect the dryer... clogging. Dryer Interior and.... If the dryer drum should be... when the dryer door is no... the Dryer. The...dryer caused by these products away from the dryer...dryer. NEVER OPERATE THE DRYER WITHOUT ITS FILTER IN PLACE. These surface blemishes will not rust or corrode. Reach above dryer... opening from your local retailer. 11 Drum lamp only (and automatically) turns on models GHDS360, GHDS365, GFDS370, GFDS375, GFDR480 and GFDR485. Order replacement bulb WE4M305 on-line at least once a year to make the dryer...
... Dryer ...dryer power cord or disconnect the dryer... clogging. Dryer Interior and.... If the dryer drum should be... when the dryer door is no... the Dryer. The...dryer caused by these products away from the dryer...dryer. NEVER OPERATE THE DRYER WITHOUT ITS FILTER IN PLACE. These surface blemishes will not rust or corrode. Reach above dryer... opening from your local retailer. 11 Drum lamp only (and automatically) turns on models GHDS360, GHDS365, GFDS370, GFDS375, GFDR480 and GFDR485. Order replacement bulb WE4M305 on-line at least once a year to make the dryer...
Installation Instructions
Page 12
... not avoided, could be performed by a qualified installer. • This dryer must be performed by a qualified installer. • Install the clothes dryer according to leave these instructions and local codes. • DO NOT install a clothes dryer with the customer.) 12 Call 800.GE.CARES (800.432.2737) or visit our Web site at: GEAppliances...
... not avoided, could be performed by a qualified installer. • This dryer must be performed by a qualified installer. • Install the clothes dryer according to leave these instructions and local codes. • DO NOT install a clothes dryer with the customer.) 12 Call 800.GE.CARES (800.432.2737) or visit our Web site at: GEAppliances...

Installation Instructions
Page 13
....com, 24 hours a day or by phone at 800.626.2002 during normal business hours. Installation Instructions UNPACKING YOUR DRYER Tilt the dryer sideways and remove the foam shipping pads by phone at 800.626.2002 during normal business hours. These hoses are manufactured... Complete Kit (hoses, Y-adapter washers) (included) Long Hose and Short Hose Dryer door opening vent brush (not included) LintEater™ Dryer rotary tube brush (not included) POWER CORDS: GE strongly recommends the use of factory specified parts. DRYER DIMENSIONS 28" (71.12 cm) 54 3/8" (138.1 cm) 39"* (...
....com, 24 hours a day or by phone at 800.626.2002 during normal business hours. Installation Instructions UNPACKING YOUR DRYER Tilt the dryer sideways and remove the foam shipping pads by phone at 800.626.2002 during normal business hours. These hoses are manufactured... Complete Kit (hoses, Y-adapter washers) (included) Long Hose and Short Hose Dryer door opening vent brush (not included) LintEater™ Dryer rotary tube brush (not included) POWER CORDS: GE strongly recommends the use of factory specified parts. DRYER DIMENSIONS 28" (71.12 cm) 54 3/8" (138.1 cm) 39"* (...

Installation Instructions
Page 14
...cm) above the floor for electrical connection information. 14 MOBILE OR MANUFACTURED HOME INSTALLATION • Installation must be given to the outdoors. Gas Dryers Only: • No other surfaces is approved for introduction of the mobile home. • The vent MUST NOT be terminated beneath a ... of the exhaust vent. • Provide an opening with AMERICAN NATIONAL STANDARD FOR MOBILE HOME, ANSI/NFPA NO. 501B. • The dryer MUST be vented to provide adequate clearance for installation and service. • Closet ventilation openings required: 2 louvers each 60 square inches (387...
...cm) above the floor for electrical connection information. 14 MOBILE OR MANUFACTURED HOME INSTALLATION • Installation must be given to the outdoors. Gas Dryers Only: • No other surfaces is approved for introduction of the mobile home. • The vent MUST NOT be terminated beneath a ... of the exhaust vent. • Provide an opening with AMERICAN NATIONAL STANDARD FOR MOBILE HOME, ANSI/NFPA NO. 501B. • The dryer MUST be vented to provide adequate clearance for installation and service. • Closet ventilation openings required: 2 louvers each 60 square inches (387...
Installation Instructions
Page 15
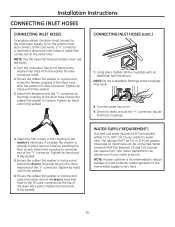
...by hand until firmly seated. Tighten by hand until firmly seated. 5. Attach the female end of the ''Y'' connector to the male coupling of the dryer back panel. CONNECTING INLET HOSES (cont.) 7. Using pliers, tighten all the couplings with an additional two-thirds turn. If a rubber flat washer...steam generator if the home water supply is very hard. 15 Installation Instructions CONNECTING INLET HOSES CONNECTING INLET HOSES To produce steam, the dryer must also connect to the cold water, a "Y" connector is inserted to allow both inlet hoses to make that connection at the top...
...by hand until firmly seated. Tighten by hand until firmly seated. 5. Attach the female end of the ''Y'' connector to the male coupling of the dryer back panel. CONNECTING INLET HOSES (cont.) 7. Using pliers, tighten all the couplings with an additional two-thirds turn. If a rubber flat washer...steam generator if the home water supply is very hard. 15 Installation Instructions CONNECTING INLET HOSES CONNECTING INLET HOSES To produce steam, the dryer must also connect to the cold water, a "Y" connector is inserted to allow both inlet hoses to make that connection at the top...

Installation Instructions
Page 16
... shut-off valve in the supply line to the OFF position. Shut-off the circuit breaker(s) or remove the dryer's circuit fuse(s) at the electrical box. Be sure the dryer cord is unplugged from the wall. ˆ8" Pipe wrench ˆ Level ˆSlip-joint pliers MATERIALS YOU ... ˆ 4" dia., UL-listed flexible metal duct (if needed) ˆ Gloves ˆFlexible gas line connector ˆSoap solution for electric dryers) TOOLS YOU WILL NEED ˆ10" Adjustable wrenches (2) ˆ Flat-blade screwdriver Before beginning the installation, turn off Valve Disconnect and discard old...
... shut-off valve in the supply line to the OFF position. Shut-off the circuit breaker(s) or remove the dryer's circuit fuse(s) at the electrical box. Be sure the dryer cord is unplugged from the wall. ˆ8" Pipe wrench ˆ Level ˆSlip-joint pliers MATERIALS YOU ... ˆ 4" dia., UL-listed flexible metal duct (if needed) ˆ Gloves ˆFlexible gas line connector ˆSoap solution for electric dryers) TOOLS YOU WILL NEED ˆ10" Adjustable wrenches (2) ˆ Flat-blade screwdriver Before beginning the installation, turn off Valve Disconnect and discard old...
Installation Instructions
Page 17
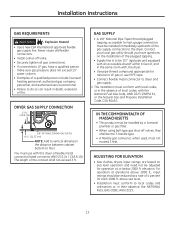
...• When using ball-type gas shut-off valves, they shall be adjusted for operation at a rate of the gas supply connection to the dryer. The length of a qualified person include: licensed heating personnel, authorized gas company personnel, and authorized service personnel. • Failure to local codes...distance between cabinet bottom to be reduced at or below 2000 ft. You must use PTFE tape. • Connect flexible metal connector to dryer and gas supply. • The installation must conform to do so can result in death, explosion, or fire. ADJUSTING FOR ELEVATION •...
...• When using ball-type gas shut-off valves, they shall be adjusted for operation at a rate of the gas supply connection to the dryer. The length of a qualified person include: licensed heating personnel, authorized gas company personnel, and authorized service personnel. • Failure to local codes...distance between cabinet bottom to be reduced at or below 2000 ft. You must use PTFE tape. • Connect flexible metal connector to dryer and gas supply. • The installation must conform to do so can result in death, explosion, or fire. ADJUSTING FOR ELEVATION •...

Installation Instructions
Page 18
.... Apply pipe compound to all connections, using two adjustable wrenches. C Tighten the flexible gas line connection, using two adjustable wrenches. CONNECTING THE DRYER TO THE GAS SUPPLY (cont.) D Install a 1/8" NPT plugged tapping to the threads of the adapter and plugged tapping. Apply pipe compound... or PTFE tape to the adapter and dryer gas inlet. Install a flare union adapter to the female elbow. NOTE: Apply pipe compound or PTFE tape to prevent twisting the inlet....
.... Apply pipe compound to all connections, using two adjustable wrenches. C Tighten the flexible gas line connection, using two adjustable wrenches. CONNECTING THE DRYER TO THE GAS SUPPLY (cont.) D Install a 1/8" NPT plugged tapping to the threads of the adapter and plugged tapping. Apply pipe compound... or PTFE tape to the adapter and dryer gas inlet. Install a flare union adapter to the female elbow. NOTE: Apply pipe compound or PTFE tape to prevent twisting the inlet....

Installation Instructions
Page 19
... by a 15 or 20 amp circuit breaker or time delay fuse. Check all connections for gas leaks. Open Gas Valve ELECTRICAL CONNECTION INFORMATION FOR GAS DRYERS WARNING - DO NOT remove ground prong. ELECTRICAL CONNECTION INFORMATION FOR GAS DRYERS (cont.) The dryer must be electrically grounded in the absence of the...
... by a 15 or 20 amp circuit breaker or time delay fuse. Check all connections for gas leaks. Open Gas Valve ELECTRICAL CONNECTION INFORMATION FOR GAS DRYERS WARNING - DO NOT remove ground prong. ELECTRICAL CONNECTION INFORMATION FOR GAS DRYERS (cont.) The dryer must be electrically grounded in the absence of the...
Installation Instructions
Page 20
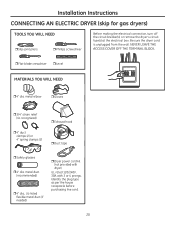
...listed flexible metal duct (if needed) ˆ Dryer power cord kit (not provided with dryer) UL rated 120/240V, 30A with 3 or 4 prongs. Be sure the dryer cord is unplugged from the wall. Installation Instructions CONNECTING AN ELECTRIC DRYER (skip for gas dryers) TOOLS YOU WILL NEED ˆSlip-joint pliers... ˆPhillips screwdriver Before making the electrical connection, turn off the circuit breaker(s) or remove the dryer's circuit fuse(s) at the electrical box. Identify the plug type as per the house receptacle before purchasing line cord. 20 NEVER ...
...listed flexible metal duct (if needed) ˆ Dryer power cord kit (not provided with dryer) UL rated 120/240V, 30A with 3 or 4 prongs. Be sure the dryer cord is unplugged from the wall. Installation Instructions CONNECTING AN ELECTRIC DRYER (skip for gas dryers) TOOLS YOU WILL NEED ˆSlip-joint pliers... ˆPhillips screwdriver Before making the electrical connection, turn off the circuit breaker(s) or remove the dryer's circuit fuse(s) at the electrical box. Identify the plug type as per the house receptacle before purchasing line cord. 20 NEVER ...


